Wednesday, March 7th, 2012

Shoot right at night – Tip #5 – Capture movement

When you’re capturing shots with a slow shutter speed of a half a second or more, look out for things that are moving in an interesting way to capture them.

The tail lights of cars moving away from you look great when they are caught as parallel strips of red light.

You can get a similar effect with cars and other traffic which moves perpendicular to you – in this case you will catch both the light from headlights and tail lights as they move across your path.


Helen Bradley

Friday, March 2nd, 2012

Shoot right at night – Tip #4 – Capture silhouettes

At night, if you’re using what light there is, you need capitalize on it. One option is to look for silhouettes where you capture a subject in front of a light source.

In this image shot in New York after dark on a wet night I used the lights of the oncoming traffic to backlight this woman as she walked down the road trying to hail a cab.

Because she was moving fast I was walking behind her at a similar pace so there was no chance to stop or use a slow speed so this image had the ISO set high to capture what light I had.

Helen Bradley

Tuesday, February 28th, 2012

Shoot right at night – Tip #3 – Set a high ISO

While a flash is handy for taking snapshots of friends, it’s useless when the subject is more than about 10-15 feet away as this is the range of a typical flash. It also makes it impossible to shoot candid images.

So, the best solution to shooting at night is to turn the flash off – before you head out, make sure you know how to disable the camera’s flash so it doesn’t fire.

If your camera lets you do so, set the ISO equivalent to use for capturing the shot, increase this at night to 1600 or more. In the shot above the ISO was 6400, the image is grainy but a flash would have disturbed the couple and that would have spoiled the candid moment.

The shots will be more grainy – like film, shots taken at higher ISO levels are more grainy even when shot digitally. However, grain is not a ‘bad thing’ and night time images can look particularly interesting when the film grain is obvious.

Helen Bradley

Friday, February 24th, 2012

Shoot right at night – Tip #2 – Find the interest

At night what can look very uninteresting during the day can take on an entirely different look.

A single light on a wall or a neon sign can make an interesting shot and, when it is raining you’ve got a double bonus of night lights and reflections in the wet surfaces.


Helen Bradley

Monday, February 20th, 2012

Shoot right at night – Tip #1 – Get the light

When the sun goes down, a world of different lights opens up and it’s a great time to pull out your camera for some stunning photos. However, before you go out to shoot at night, there are some things to think about that will help you take great shots even when the lighting isn’t ideal.

Today we’re starting a new tip series – shooting right at night and here’s the first tip:

Make light or capture what little there is

At night, there’s obviously less light than there is during the day. So, to get good shots you either have to replace the missing light with a flash, or open up the aperture so more light gets in and slow the shutter speed so the camera gets enough light to register the image. You can also up the ISO – in the next few tips we’ll look at each of these options in more detail and find some great topics for shooting at night.


Helen Bradley

Wednesday, February 15th, 2012

Capture a great Panorama


There’s something very compelling about panoramic images. They’re much wider than regular photos and, instead of showing the small portion of a scene that is in front of the camera lens, they show much more.

Some panoramas show a semi circle around a point and others wrap around a full 360 degrees showing everything there is to see. Panoramas have been popular with photographers since the early days of photography. Then, as now, they were created using a series of side by side images put together to form a single seamless image.

Today’s digital cameras and photo editing software let you create panoramas quite easily. Even simple cameras like prepaid phone cameras and point-and-shoot cameras are advanced enough to have a panorama setting. There are, however, some tips and tricks for taking the photos that will help ensure you get a great panorama and I’ve thrown in my best solution for when things go wrong!

Use a tripod

When you take photos for your panorama make sure you stand in one position to take all the shots. It is easiest if you fix the camera to a tripod and test to ensure it will swing around smoothly to capture the images that you want to take. If you don’t have a tripod, practice standing in one position and rotating your body to capture the images.

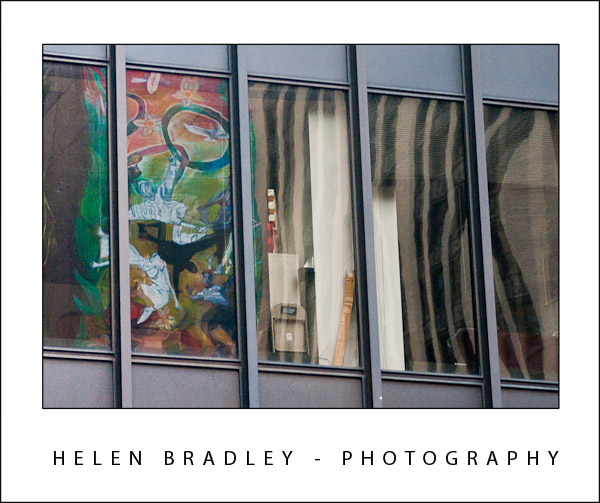
This painted sign on the building above was too large to capture in one shot but it works well as a panorama.

Overlap the images

When taking the individual shots for a panorama, make sure that the photos overlap each other by around 25 percent. This means that the objects that appear on the far right of one photograph should appear on the far left of the next photograph in the sequence.

If your camera has a panorama feature you can use this to help configure the overlap for the images. Your photo editing software uses the overlapping areas as a key for aligning and matching the images so it’s important that you have enough of an overlap for the software to do its work. On the flip side, avoid having too much overlap as that’s not desirable either.

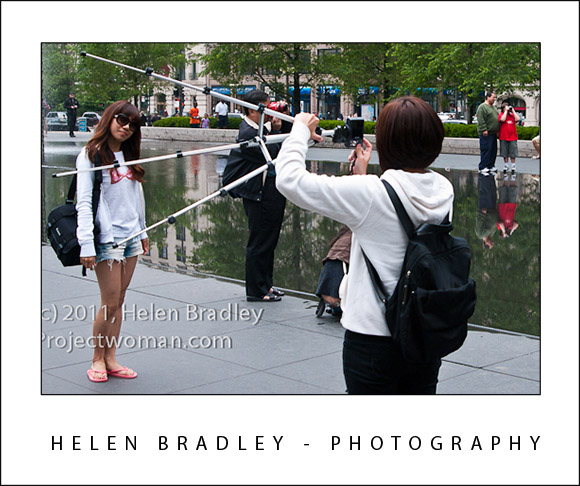
Try to photograph scenes that don’t change rather than subjects that are moving as it’s much harder to match up your images if people are moving around in them such as in this image:

I had to put a lot of work into tidying up this image – with so much action it was far from an ideal topic for a panorama but the results were worth it.

Fix your settings

When capturing photos for a panorama make sure that you do not alter your camera settings, such as the zoom, between shots as this will mess up your images and they won’t be easy to match.

If you’re using a digital SLR camera, keep the exposure the same between shots too. Using Aperture priority mode is a good choice.

There are some classic occasions when a panorama is an obvious solution and I dream of one day spending an afternoon at Lord’s capturing that wonderful cricket ground as a panoramic image. Other shots that work well as panoramas include scenery and landscapes. However panoramas aren’t limited to major spectacles and you can capture a series of two or more images of anything from a sign to a streetscape and assemble it into a panorama.

I’ve shot panoramas of signs, cityscapes, the mounting yard at a racecourse and I’ve done one of my street so one day I will be able to look back and see then what I see now, as I stand on my front porch.

If you’d like to learn more about creating Panoramas, check out this post on Creating Panoramas with a twist. It’s a great way to save an imperfectly shot panorama.

http://www.projectwoman.com/2009/04/photoshop-panorama-with-twist.html

Helen Bradley

Monday, June 13th, 2011

A tripod that works with you!


I want one of these tripods. No more bending down to look through the viewfinder because it never winds high enough. No more adjusting the camera to change from shooting landscape to portrait.

This tripod works with  you. It does just what you want it to when you want it. It’s on my list for Santa this year, for sure.

P.S. What the heck was this girl thinking? I never once saw the tripod touch the ground. It really was very funny to watch. Here she does another portrait orientation shot with it – notice how she’s rotated the camera to get the tripod in a more accommodating position.

Helen Bradley

Sunday, June 12th, 2011

Have Patience – it will be rewarded – guaranteed!

Something I’ve been thinking about lately is patience. The secret to this image isn’t the place although it was pretty cool or the weather – a hundred feet above the buildings are surrounded with grey fog. It isn’t my camera – it’s good but not great or my skills, anyone on Aperture priority sitting where I was would have got the same shot. No! the secret of this one is patience.

I spent about an hour shooting kids playing in 1 inch of water at this fountain. Waiting. Watching. Hoping for something to happen. I found a good location, got comfortable, and waited. I got a lot of good shots but when this kid opened the umbrella I knew I was onto something. I pressed the shutter and kept going – I didn’t stop when I thought I had the shot I just kept shooting. When I got home, the shots I thought were great were good.  This was the winner,this was the shot that keeps me going out every day… looking for magic.

Next time you’re out shooting – be patient. Find a good spot and wait until magic happens for you.

Helen Bradley

Saturday, June 11th, 2011

When is the art yours and when is it not?


I’m not talking copyright here but rather, when is a photo about your vision and when it is just recording someone else’s. I think that when you take a photo of something someone else created it’s probably more about the recording process than that the result is truly art. Take this image below – it’s a piece of building art that I photographed but really, beyond placing myself in position to capture the image I didn’t contribute any of my vision to the result.

However, the image at the top of this post is something else indeed. Here the same piece of art appears but it looks very different. I had to find this image – it was a reflection in the windows of a building across the street. Here I made a creative choice about what I captured and what I left out, where the reflection appeared and how the result would look. I contributed my artist’s vision to the photograph.

Ask yourself next time you’re out photographing – are you recording someone else’s work or creating your own?

Helen Bradley

Tuesday, February 22nd, 2011

Photography – why you should use a polarizer

Polarizer.jpg

Using a polarizing filter on your camera’s lens ensures crisp blue skies and saturated colours even as here, when shooting into the sun.

You may have already noticed that you can encounter problems you’re capturing photos in very bright sunlight. On the beach, for example, you may find your camera exposes for the lighter areas leaving the remainder of your photograph underexposed and very dark.

In bright sunlight you can benefit from using a Polarizing Filter over the lens of your camera. These filters are obtainable for most DSLR cameras and simply screw onto the lens.

For a point and shoot camera you’ll need to determine if it can take a polarizing filter either on a bracket that screws into the camera’s tripod mount or, in some cases using a special adaptor called a tele converter that screws over the lens and that has a screw mount for the filter.

Image showing a polarizing filter for a dslr and one for a point and shoot which uses a tele converter to mount it

How to buy

When purchasing a polarizing filter for a digital camera you will generally want to purchase a circular polarizer. The other option is a linear polarizer – however circular polarizers are typically recommended for cameras that meter through the lens (TTL) which is what a digital SLR does.

When using your polarizing filter notice it has a marker on it that you can use as a reference point for adjusting it. Look through the viewfinder and turn the filter slowly. As you do this you will notice that the preview will change.

At some point of the rotation it may have no effect at all and at other points it will have an increasingly strong effect. Turn it until you get the effect you are looking for which is good rich color and no washed out skies. When you find the sweet spot go ahead and capture your photo.

A polarizing filter will give you better colour saturation and brighter, bluer skies. It’s also a good filter for photographing things under water from above the water surface such as a tropical reef or seaweed because it cuts out the sun’s reflection on the water surface allowing you to capture the underwater detail.

This blue sky would have been washed out if the photo had not been captured using a Polarizing filter:

An image shot using a polarizing filter to ensure rich blue skies

Helen Bradley

Page 4 of 512345