Friday, July 18th, 2008

Quick and dirty color cast removal

I love quick and dirty solutions and this one is just that. Got an image with a color cast that needs removing? Here’s a Photoshop solution worth looking at:

Open the image, choose Image > Adjustments > Color Match and click Neutralize. It’s a fix that neutralizes the image and, if it’s too much of a fix, drag the Fade slider to the right to get a balance between the original and the fixed version.

Simple huh?

Helen Bradley

Friday, July 11th, 2008

I killed my blogs..


Sometimes I really hate things I do. About a week ago I had high ideals about fixing my articles page and adding mini images to it. I slaved away in FrontPage for an hour or two and I had everything sorted out. I also added a new tutorial on creating planets, mini worlds – amazing circles – whatever you like to call them in Photoshop. Then I did something stupid. I uploaded it all but without really thinking about what I was doing. All I can assume is that I told FrontPage to synch the on and offline sites – result – it clobbered my blog – deleted everything including all my images.

Yikes. First thing I knew my Ad stats were down. I blamed Google for a day then went to see if the blog was live. Well that was a big No! Both of them totally gone. Luckily Blogger retains the text – what I lost was all the images. It has taken me a week to get this blog back up, the other one isn’t half done yet. I am seriously bummed.. what a big waste of time that was. But my articles page looks good [insert wry grin here]!

From here on in – I back up my blog images before I mess with the site. And, long term, I’m thinking about moving from FrontPage to Dreamweaver.. but first – Hey!- I have a blog to fix.

So, in the meantime, this lovely boat was high and dry in a creek near Brighton in the UK. Love the colours and the setting – this is one of my favourite images from the UK and it will be appearing in my new book next year.

Helen Bradley

Tuesday, April 15th, 2008

Hong Kong Trams

One of the most wonderful things about Hong Kong is its cultural and social diversity. Along side this tram is a person on a push bike – with a basket full of things they are pedalling around town. It’s a sight you see a lot, high rise buildings, wealthy people contrasted with push bikes and mountains of laundry hanging off the sides of buildings. Gotta love this place, I certainly did.

This image needed more contrast and a bit of tweaking on the colour side to highlight its delicious pastels. My contrast fix of choice is now, officially Curves in Photoshop. But these aren’t your dad’s curves or your mums! They are curves on steroids – select the channels R,G and B and adjust each of them to get the best contrast in the image, just don’t look at colour – look at contrast. Then, when you’re done, you did apply your fix on an Adjustment layer didn’t you? Set the Adjustment Layer blend mode to Luminosity. Notice how the wonky colours disappear and your image’s contrast is adjusted perfectly? Luminosity blend mode applies the change to the image’s luminosity (lights and darks on a grey scale) and keeps it away from messing with colour – Like I said, not your mum and dad’s curves.. these are for real Photoshoppers!

Helen Bradley

Thursday, March 27th, 2008

Photoshop on the web – Yes, you heard right!

Ok, so it’s not the entire Photoshop program but it is edit to go Photoshop style and you can find it here – it’s called Photoshop Express and it’s the Beta release we’ve all been waiting for.

You register on the site then wait to get your email confirmed. Then login and upload your photos. There are heaps of great tools for adjusting your images. Of course, no layers or adjustment layers or any of the advanced stuff and you can whistle “Dixie” if you dream in LAB. However, these limitations aside there are plenty of good tools to use. These include Crop & Rotate, AutoCorrect as well as Fill Light, Sharpening and Soft Focus and even fun effects like Distort, Tint and Sketch.

The interface is dead easy to use – most options involve pointing and clicking at a display showing the effect applied at different levels, just like a linear version of the Photoshop Variations tool.

It’s well worth checking out and seeing that it’s so new, you get to snag a good URL for your gallery. But forget getting http://helenbradley.photoshop.com since I just grabbed that!

Helen Bradley

Friday, March 21st, 2008

Fixing with Luminosity masks

Luminosity (Luminance) masks are an interesting tool. Consider the situation where you need to apply a fix to an image but the lighter portions of the image are ok, it’s the darks that aren’t – or vice versa.

Start by duplicating the image layer and apply the fix to the top layer. Concentrate on the portion of the image that needs fixing, ignore the disaster that’s happening in the areas that don’t need fixing.

When you have the fix in place, it’s time for the fun stuff. Locate a channel which has the detail you want for your mask. You need a channel that is dark where you want the fix to be less and light where you want it more (or vice versa, as you can invert the mask). When you have your channel, Control + Click on the channel (Command + Click on the Mac) to load it as a mask. Now go back to the image and add a mask to the layer – it is automatically created as a luminosity mask based on the channel you used. So, your new mask is white where the channel is light and dark where the channel is dark. Of course, if you need it in reverse, add your mask, select it and press Control + I to invert it. Where the mask is lighter, the fix is more strongly applied and where the mask is darker, the fix is least strongly applied.

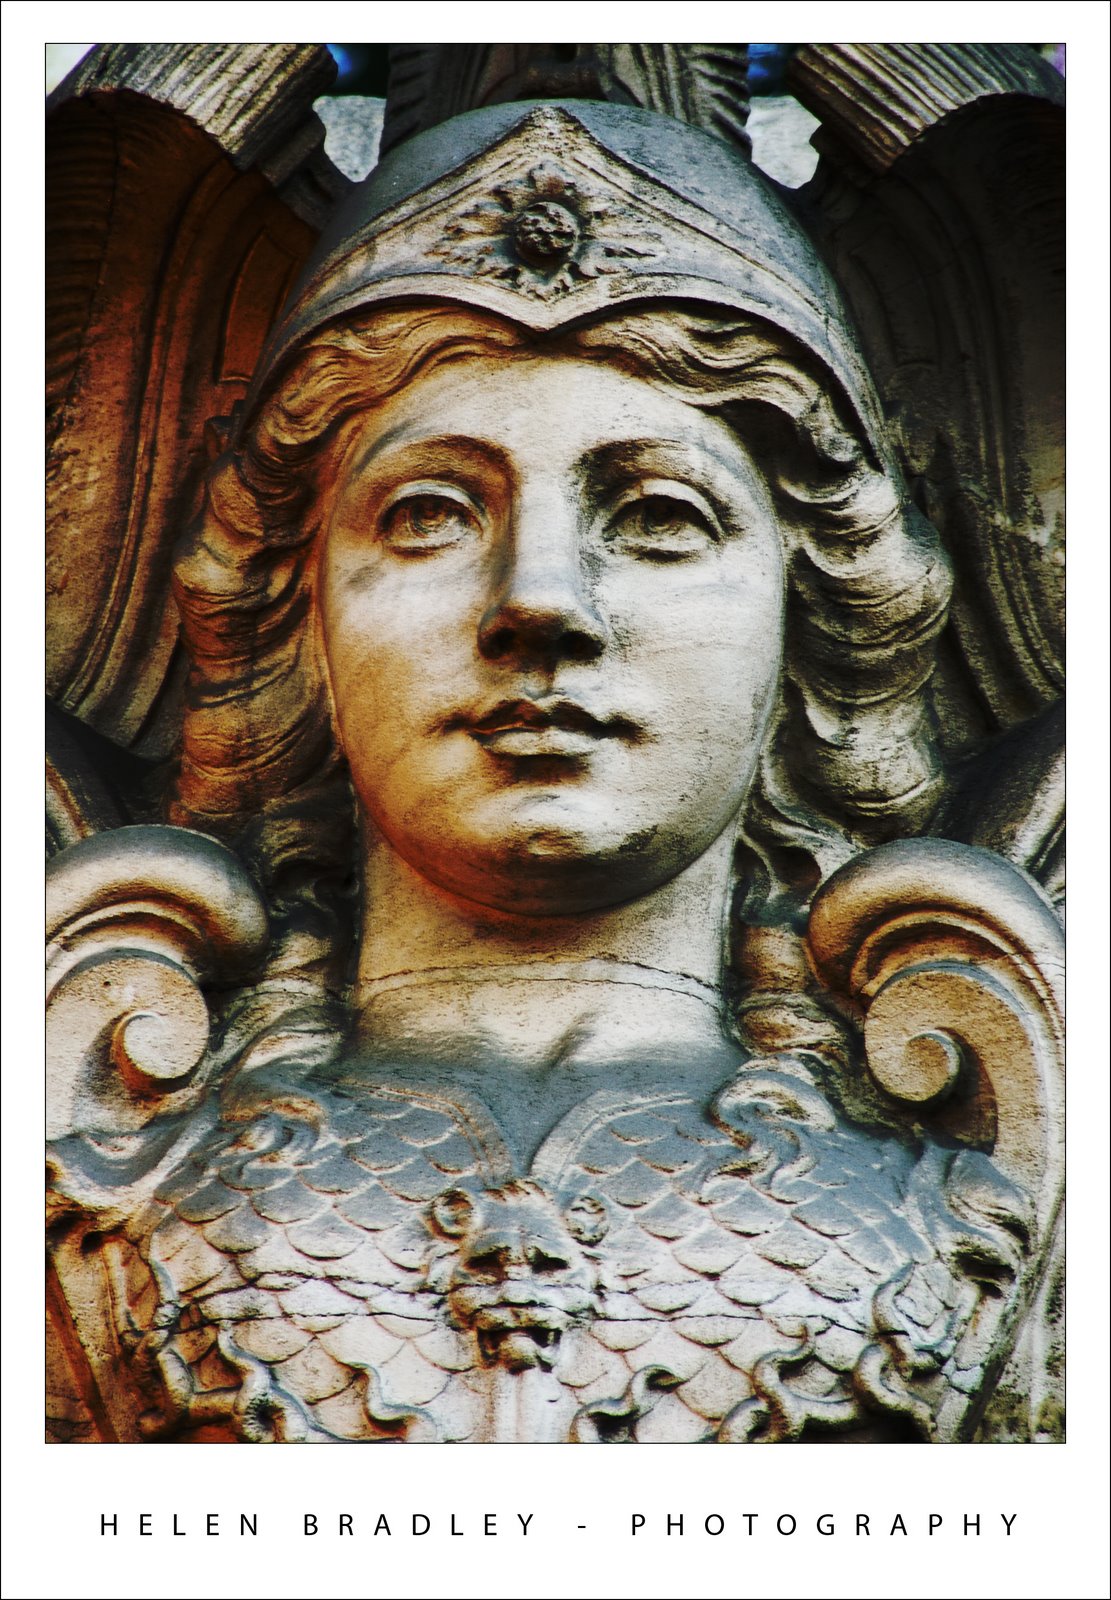
In the image above, shot in Harajuku, Tokyo on New Year’s Day, I’ve used a Luminosity mask based on the image’s own red channel to add some extra contrast and colour to the wonderful hat. I duplicated the image layer and applied a simple Overlay blend mode to that layer. Then I added the Luminosity mask to force the fix into the areas lightest in the red channel – ie where the reds in the image are located and less so in areas which weren’t red. (If this sounds wrong to you, remember that in RGB mode, the red channel is lightest where red is located and darker where it isn’t, ditto the green channel – it’s lighter where the green is and darker where it isn’t, etc..)

There’s also a handy shortcut you can use to make your masks if you know which channel to use. Use Control + Alt + 1 for the Red channel in a RGB image, Control + Alt + 2 for the Green and Control + Alt + 3 for the Blue. In LAB, the same shortcuts will get you the L, a and b channels respectively.

Helen Bradley

Tuesday, February 19th, 2008

Color and activity

It’s hard to find a single phrase to define Hong Kong. You can be horrified by the pollution or captivated by its industry. You can long for the days of British rule or you can wonder at its cultural contrasts – a snippet of UK and a bucket load of eastern magic.

These narrow streets along Hong Kong Island were my favourite places. The trams are so beautiful, decked out as they are in advertising, each of them so different from the next and the street signs, brilliant and light by night, duller by day, an eclectic mix of Chinese characters and signs so familiar such as Lee jeans.

This image didn’t need much work. I just brought the colours out to lighten and brighten the signs then added a very subtle edge effect. This darkened vignette effect isn’t noticeable unless you look for it but it edges the photo, subtly keeping your eye in the middle where the action is by creating a slightly darker border around it.

To create a vignette frame effect, finish editing the photo and then add a new empty layer to the top of the Layer stack. Make a selection using the Rectangular marquee tool around the inside edge of the image. Invert the selection so you have just the edge selected and fill with a dark gray or a dark brown. Then deselect the selection and apply a really big blur to it – the Gaussian blur filter is the best choice here – you don’t want to see any edge left.

Now, adjust down the opacity of this top layer so that it blends with the image below. You want to be just able to see the effect darkening the edge of the photo when you look for it but not if you don’t – if that makes sense!

Helen Bradley

Friday, November 9th, 2007

Rooftops in the rain – Brighton

When I was in Brighton we had one beautiful summer like Sunday when everyone was walking along the beach and it was all so gorgeous and then, next day, it rained cats and dogs.

Here’s a photo I took from my hotel room window across the roofs of Brighton the day it rained. I don’t think the windows of the Queens Hotel had been washed since good ol’ Queen Vic gave her name to the hotel so they were pretty interesting to shoot through and, of course, they only opened 6in from the bottom so shooting through the gap was impossible.

The original was flat and lifeless as one might expect. A Levels adjustment is a great starting point for a photo like this. Simply choose Layers, New Adjustment Layer and then choose Levels. Drag the little triangle sliders in from the left and the right till they are just under the places where the chart data begins and ends. This darkens the darks and lightens the lights and instantly boosts the tonal range in the image and gives it more contrast and life. The middle slider handles the midtones so you can drag it to the right or left as required for your image.

For the rest of this image I worked hard to get the colour and detail back. The cream buildings in the background were treated independently of everything else as they just kept getting lost in every solution I tried. Masks are great for this, fix one part of the image with adjustment layers, then hide the adjustment layer and work with another one focusing on the other part of the image. Then, use the mask on each adjustment layer to paint in or remove the fix from areas of the image. When I want most of the fix I just paint in black over the areas that I don’t want the fix to be applied to. When I only want little bits affected by the mask, I fill the mask with black (white reveals, black conceals), then paint with a low opacity, soft white brush to bring back the fix in the small areas that it is needed.

I also used the Selected Color adjustment on this image, I’ll talk more about it in a future blog post.

Helen Bradley

Thursday, November 1st, 2007

Brighton Pier No. 3

I fell in love with Brighton and Brighton Pier. The day I had to photograph it the rain nearly put an end to my photoshoot. However, I managed to get some great images. This is of the pier looking back to Brighton, the only real colour is in the life preservers and I love that you can see some of the Brighton buildings through the water pouring down the window. The repeated elements really work in this image.

The photo needed a bit of a levels adjustment, I use this to punch the contrast up a bit more than I get from the camera. The crop makes the image look so much more interesting than the size that it came out of the camera.

Helen Bradley

Friday, October 26th, 2007

Boats on the Seine

I went on a lot of boat rides in my 10 days in London and Paris. My dad was a sailor and a love of water flows in my blood alongside the bits and bytes. This photo is from one of the trips in Paris, the horror ride in the boat on the Seine (see below for more details).

This image nearly defeated me. It is a big crop – what is left is under a quarter of the original image. It wasn’t particularly in focus and the color was awful – for this read dirty grey – the boats had the sun hitting their sides so the color is washed out.

I did some fancy work with Curves to get the color out of the image. I over adjusted the colours very harshly and then blended a couple of versions of the image back into itself. The result is pretty good and I think the image has some charm and that’s why it’s here.

It really was a beautiful afternoon in Paris.

Helen Bradley

Friday, October 26th, 2007

The beauty of Paris

I just adored Paris. I recognised my love of the city as I flicked through the photos I had taken there – at least some of them – there are thousands.

This is one of them. The sculpture itself isn’t notable, it’s just a small piece from above a doorway in some Parisienne backstreet. Yet it’s part of what is magic about Paris – there is so much there – more than you could take in in a lifetime.

This picture underwent a simple Levels adjustment to bring up some of the contrast and then a huge Curves attack to bring some colour into it. I totally abused the Curves dialog and the image gave up its magic. I actually blame Dan Margulis for this. Yesterday I watched one of his Man from Mars videos and I just couldn’t resit applying the technique to this image and it gave wonderful results. Thanks Dan!

You can find Dan’s video at Peachpit (along with some of my own Photoshop articles and videos). It’s a huge download – around 90Mb but, believe me, it’s worth every bit of it. Don’t blame me if you fall in love with the Curves adjustment as a result of watching it. Then, when you’re done, treat yourself to one of his LAB colour videos – it’s almost better than chocolate! And, add to your Christmas wish list his wonderful book Photoshop LAB Color: The Canyon Conundrum and Other Adventures in the Most Powerful Colorspace.

Helen Bradley

Page 22 of 23« First101920212223