Wednesday, February 19th, 2014

Photoshop – Color Threshold Art Effect

Adjust Color and Contrast to make your Image Pop

by Helen Bradley

The threshold filter in Photoshop lets you turn an image into a black and white image where pixels are either black or white. It is a great tool when combined with some color for creating artistic effects with your photos.

The only issue with this filter is that you have no fine control over how the conversion takes place. This video solves the problem by showing you how to work with the image to give better results with the conversion.

Here you will learn how to use the threshold filter to adjust the image to make a black and white and how to pick out areas of the image to adjust them separately so you retain the details in it.

You will use masks and adjustment layers to lighten and darken those areas of the image that you wan to keep and highlight.

You will also learn how to create a reusable noise layer to give the final image a more grainy look.

You will also learn why using a fill layer makes better sense than filling a layer with color.

In all, this video is jammed full of handy Photoshop tips as well as showing you how to create a great color effect.

Helen Bradley

Helen Bradley

Friday, April 27th, 2012

Edit images on the iPad with PhotoPower

Download: PhotoPower on the iPad – 2.99

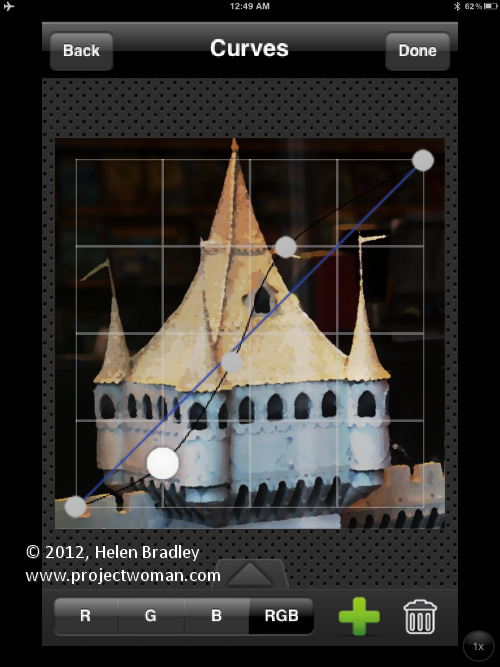
This is an iPhone app that runs on the iPad. It totally rocks and it’s an example of what a photo fixing app should do. It is simple to use but extraordinarily powerful it even includes a curves tool!

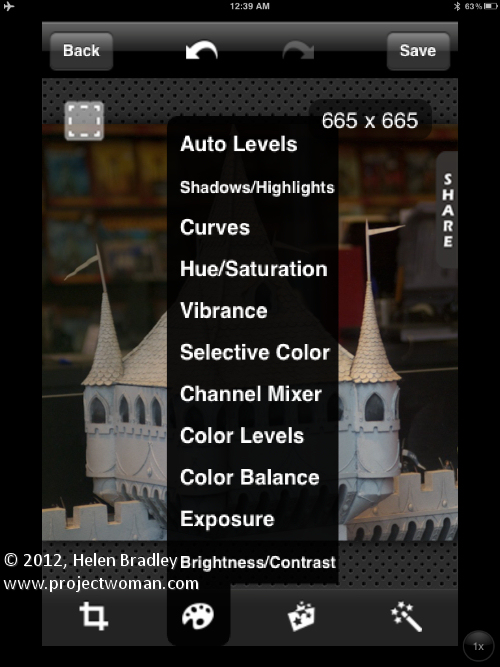
Open an image, crop  it and then adjust it. There are tools from Exposure to Vibrance and in many tools you can adjust the separate color channels or the composite channel.

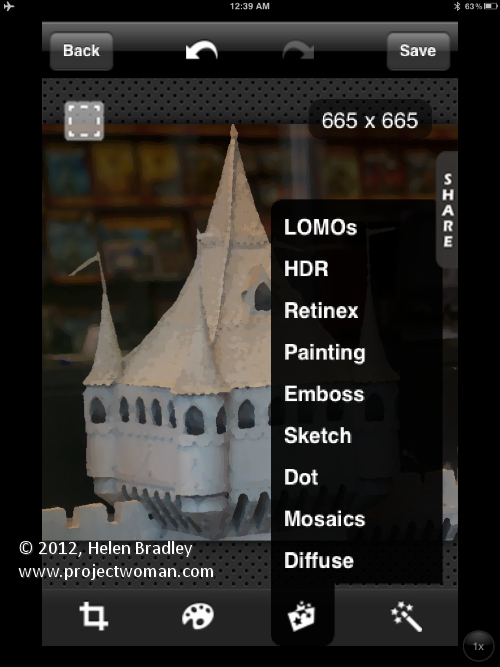
Tap any of the Adjustments, Effects or Filters and you’ll see a long list of options to choose from. This is a seriously awesome program with heaps of cool features. It’s a pity it isn’t available for the iPad at full screen size but that gripe aside it is well worth looking at as a tool for adjusting your images.

Helen Bradley

Tuesday, January 25th, 2011

Color an object to match an exact color in Photoshop

Completed image color matched to a selected=

Finished project: a garage door color matched to a selected Pantone color. Image (c) Sarej, sxc.hu.

One issue that a lot of people face is matching color in Photoshop. You may have a Pantone color that you want to match to or some other color and you want an image to be colored this way.

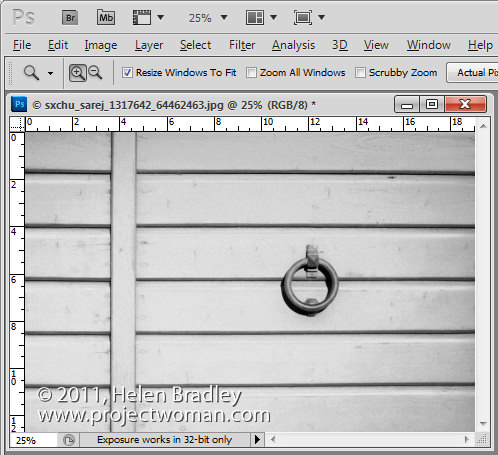
The solution is to start with a Grayscale version of the image, so desaturate the image to start with and make sure it is light enough to take your color – so if you want to use a light color brighten it to suit.Image of desaturated image ready to apply color to it

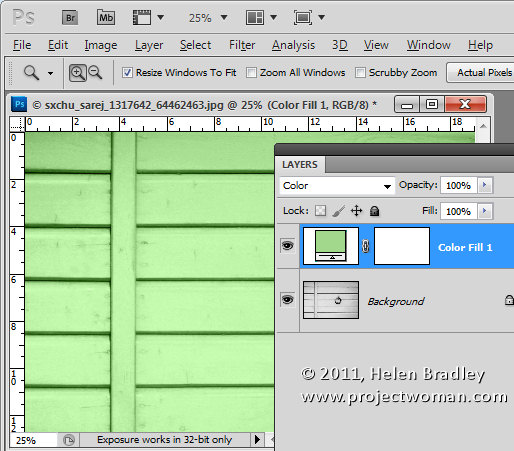
Now add a new fill color layer to the image by choosing Layer > New Fill Layer > Solid Color and click Ok.

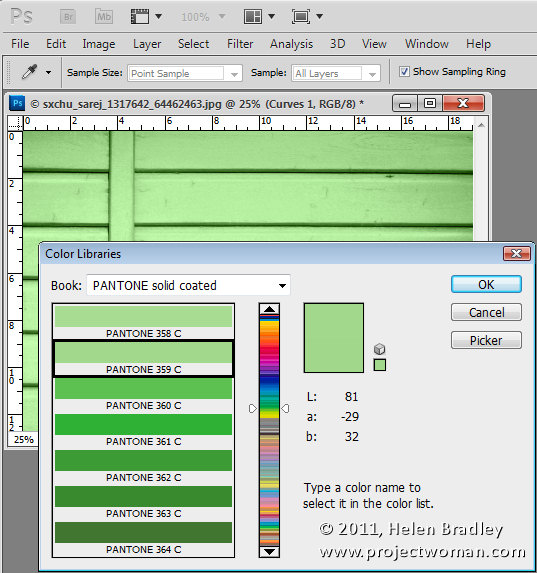
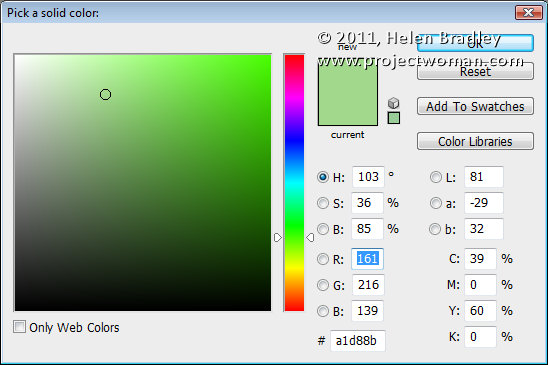
Set the solid color to the RGB or CMYK values of the color that you want to match. Set the Blend Mode for the layer to Color.

Color blended layer showing initial recoloring of subject to match a pantone color

I chose Pantone 359C which has RGB values of 161, 216 & 139.

Right now you’ll have a reasonable match for the color but not as good a one as you can get.

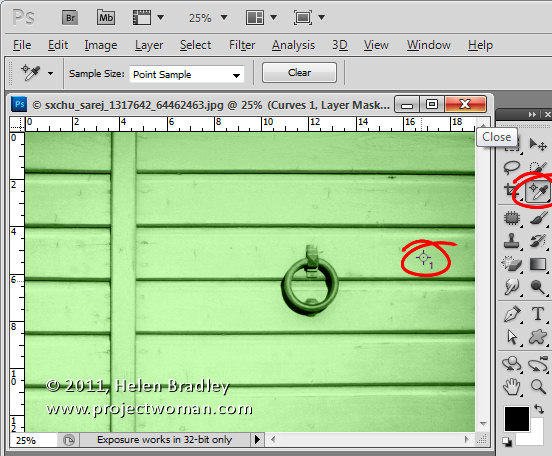
To improve it, select the Color Sampler Tool, which sits under the Eyedropper tool in the tool palette, and click in an area of the image that you want to be that particular color.

Because the grayscale values will vary, you need to identify a place in the image that you want the color to be exactly your chosen color. Around it, the other tones in the image will vary as they should – some will be lighter and some will be darker. Click on that point to add a color sample point.

Image showing color sample point in place we want to exactly match the Pantone color

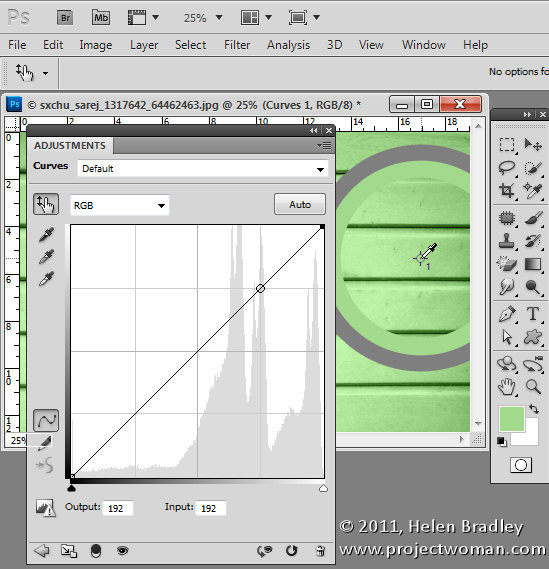
Now add a curves adjustment layer by choosing Layer > New Adjustment Layer > Curves. Click Ok to create the curve adjustment. If you’re using Photoshop CS3 or earlier, Ctrl + Shift + Click (Command + SHift + Click on the Mac) on the color sample point to mark this point on the curve in the Red, Green and Blue channels.

If you’re using CS4 or later, the functionality of the curves dialog has changed. In this case, you should use the On Image Adjustment tool, which is the tool in the top left corner of the curves dialog, which has a hand on it. Click this, then Ctrl + Shift + Click (Command + Shift + Click on the Mac) on the sample point to add the marker to the Red, Green and Blue channels.

Image showing marking color sample point on the RGB curves

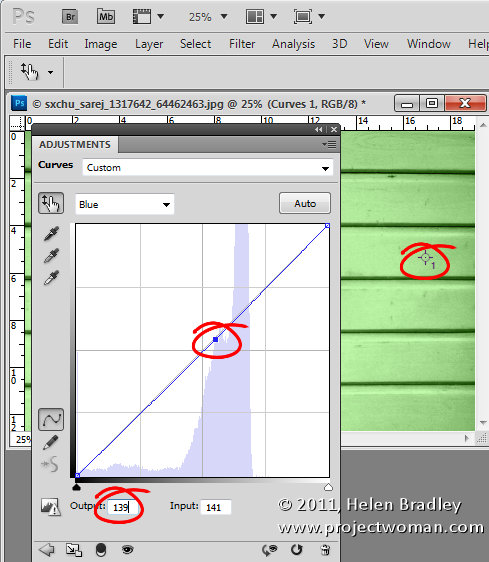
Now select the Red channel, click on the marker you just added and adjust the Output value to the Red value of the RGB color number that you want to match. Repeat this for the Green and the Blue channels. Then close the dialog. In my case I’ve set the Red output value for this selected point to 161, the Green to 216 and the Blue to 139 to match the Pantone color values. If you are trying to match a CMYK value then you’d do the same thing but for the Cyan, Magenta, Yellow and Black channels.

Image showing curves dialog and adjusting the Red green and blue curves to match the RGB values of the chosen Pantone or CMYK color

To remove the Color Sample Point, select the color sample tool and hold Alt as you hover over the sample point. It turns into an icon like a pair of scissors which you then click to remove the sample point.

You will end up with an image where, at your designated point, the color is exactly as you wanted it to be.

Thanks to blog reader Lesley Clarke for posing the question.

Helen Bradley

Thursday, March 5th, 2009

Photoshop: Color that packs a punch


I like to see lovely saturated color in my photos but sometimes the color I capture just doesn’t do justice to the subject and it isn’t what I remember the scene looked like. Boosting the color can turn a lackluster image into one that totally rocks. So, if you find that the color in your photos is lacking, here’s what I do to make it better. The process is ridiculously simple, it requires no selections to be made, and it can be recorded as a simple action. It’s my kind of fix – quick, easy and very powerful.

A word about LAB
The fix uses the LAB color space. This is not an often used color space and it isn’t available in most other programs so you won’t be able to mimic this effect in, for example, Photoshop Elements. However, LAB has been around in Photoshop for years.

In the RGB color space you work with the red, green and blue channels and in CMYK you work with cyan, magenta, yellow and black channels. In LAB you have three channels; L, a and b. The L channel is the lightness channel and, if you adjust it you adjust only the lightness in the image and you don’t change any of the color in the image. This sets Lab apart from RGB and CMYK as color and lightness are separate in LAB where they aren’t in the other modes.

In Lab the two color channels are a and b. The a channel contains color information for the green and magenta in the image. The b channel manages the blue and yellow colors in the image. If you were to look at these channels they would look very light because they contain only color information and no lightness data.

By separating lightness from color as LAB does you can make adjustments that would be difficult or time consuming to do in any other color space. However, that said, I think this fix works best on animals, landscapes and streetscapes – but not on close ups of people. On people it tends to destroy the natural skin tones.

How to fix in Lab
To see this LAB fix at work pick an image that has color in it but which you think could use a color boost.
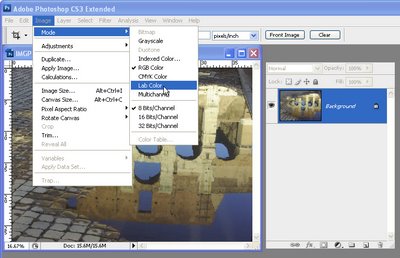
Step 1
With the flattened image open in Photoshop, choose Image > Mode > LAB Color. If you’re working on a flattened image you won’t see anything except LAB/8 appearing in the title bar of the image.
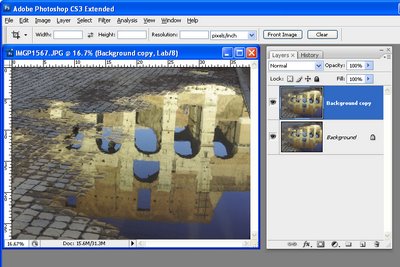
Step 2
Duplicate the background layer of the image by right clicking it and choose Duplicate Layer. You’ll make your adjustments on this duplicate of the background layer so that you can blend them into the background layer later on.
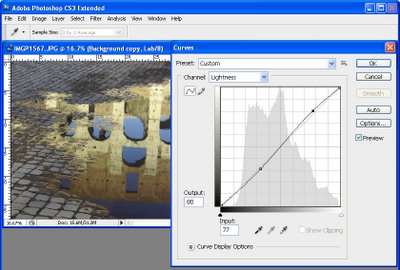
Step 3
Choose Image > Adjustments > Curves to apply the curves adjustment to the duplicate background layer. Don’t use an adjustment layer as you’ll only have to flatten it on returning to RGB anyway.

In the curves dialog, the L channel is visible on the screen. This channel that contains only lightness and darkness values so that you can drag on the curve to adjust this if desired.
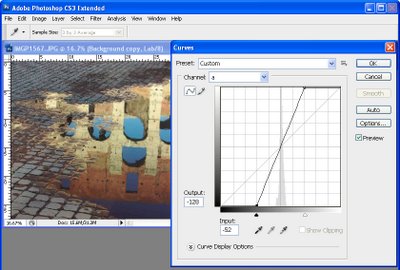
Step 4
Select the a channel – this is the magenta/green channel. In a standard Photoshop setup green is on the left and magenta is on the right. Drag the bottom edge of the curve inwards 2-3 squares. Then drag the top edge of the curve inwards the same number of squares. It doesn’t matter how many squares you drag but you must drag the same number on either end so the curve line crosses the middle of the grid – this stops you from inadvertently inducing a color cast into the image.
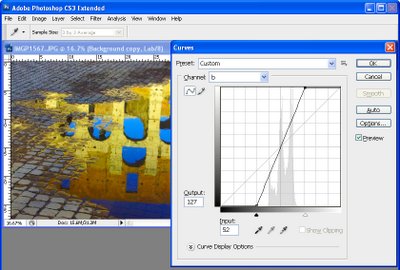
Step 5
When you’ve adjusted the a curve, repeat the process with the b curve. At this point the image is probably looking very scary indeed. However, you need to make the adjustment strong enough that you get too much color rather than too little at this stage. Click Ok to apply the curve to the top image layer.
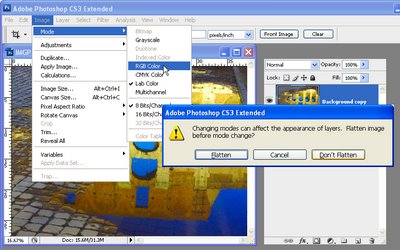
Step 6
To return to RGB mode choose Image > Mode > RGB Color. When prompted, select the Don’t Flatten option. This is critical because you want both layers intact back in RGB mode.
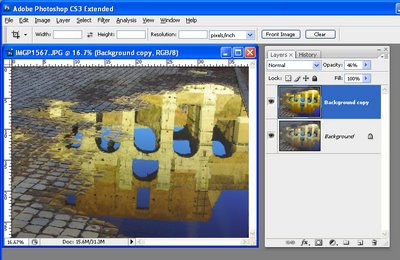
Step 7
Now drag the Opacity slider for the top layer back to 0 so you see the original image and slowly walk the slider back up until you get the amount of color you want in your image. When you’re done, save the result.

Once you’ve done this a couple of times, you’ll appreciate how much of a boost in color you can get and how fast you can do it. Record the fix as an action and you can do it in one click and then just adjust the opacity to suit.

In some cases altering the blend mode of the top layer can yield pleasing results. The blend modes in the Overlay, Soft Light, Hard Light, Vivid Light, Linear Light and Pin Light grouping in the Blend Mode list give the best results. You can also duplicate the top layer and apply different blend modes to each copy to bring out different areas of the image.

So, if you want to produce eye-wateringly beautiful color in your photos, chances are that a Lab color fix like this is just what you need.

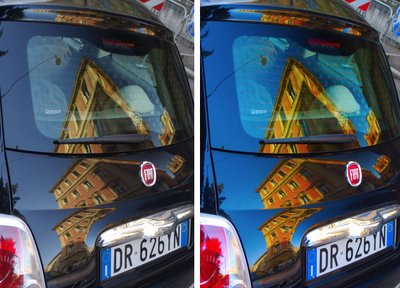
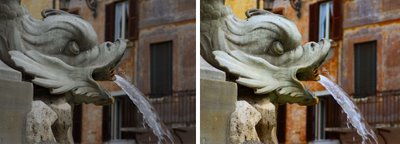
The images below show the original image on the left and the LAB color fix applied to it in the image on the right. No adjustments other than working LAB and blending the resulting layers have been used on the right hand versions.
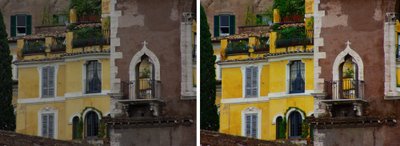
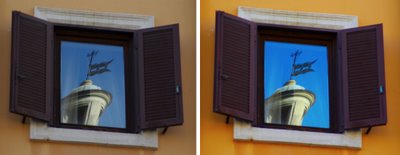

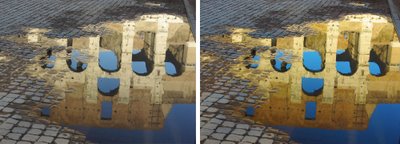
Post Script: To learn more about LAB color mode and the fixes that you can perform using it, look no further than Dan Margulis’ book— Photoshop LAB Color: The Canyon Conundrum and Other Adventures in the Most Powerful Colorspace – it’s practically the definitive book on Lab by the master of Lab himself.

I contibute to the Post Production blog at Digital Photography School and this post first appeared there.

Helen Bradley

Wednesday, February 25th, 2009

Photoshop: Fixing photos shot from airplanes

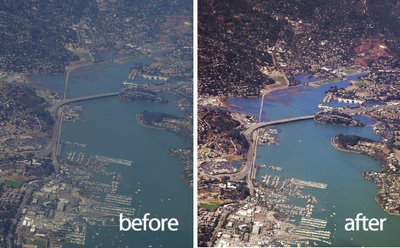
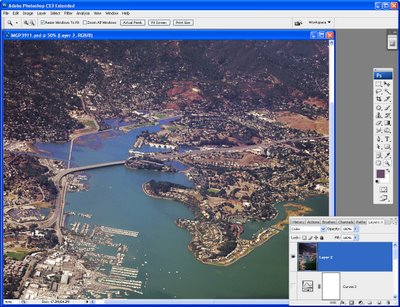
One of the cool things about getting a window seat in an airplane is that you get a unique opportunity to photograph things from a high vantage point. On the flipside, when you get them home you often find photos taken from the air look washed out and the colour is poor. Luckily there is not much that Photoshop can’t recover provided the photographs are in focus. So if you scored a window seat lately and if you have images that fix, I’ll show you the Photoshop tools you need to fix them.

Understand the problems
Most airplane photos look washed out and they don’t have the richness of colour that you might expect them to have. The first step in fixing them is to boost the tonal range in the image using a levels adjustment – a by product of this is that the colour gets a boost.

Step 1
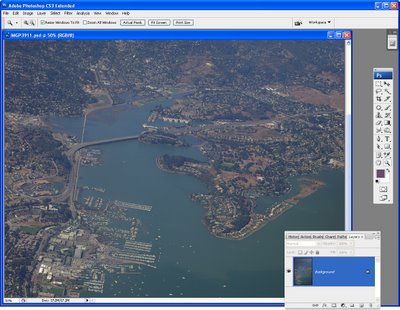
Start by making a duplicate of the background layer so that you’re working on a copy in case you need to refer to it later on. To do this, right click the background layer in the layers palette and choose Duplicate Layer.

Step 2
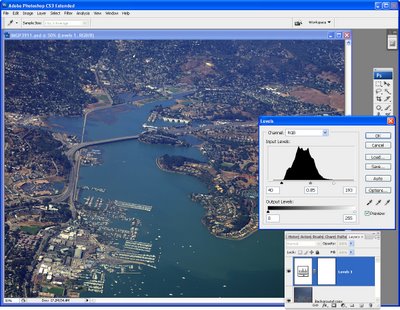
Select the background layer and choose Layer > New Adjustment Layer > Levels and click Ok. The Levels histogram tells you a lot about the state of your image. In most cases you’ll lack white whites and black blacks and most of the image content will be around the middle of the image. Drag the right and left sliders below the chart so that there are below the points where the chart data begins. This should give the image an immediate boost in contrast and some boost in colour too. Adjust the midtone slider if desired to fix the midtones in the image and click Ok to confirm your settings.

Step 3
Colour fixes: Often the image will contain too much blue and you can adjust this using a Curves adjustment. Choose Layer > New Adjustment Layer > Curves and click Ok to display the curves dialog. Click the Channel list and choose the Red channel. Drag up on the middle of the Red channel line to add some red to the image. Repeat with the Green channel adjusting it as required – drag down on the middle to remove green and up to add it. Finish with the Blue channel.

If you’re unsure which way to go with the adjustment, give the line a good pull in one direction or the other to see what happens, back off the adjustment to get something less intense. Different places on the curve line will give you different effects so experiment either side of the midline. Click Ok when you are done.

Step 4
Fixing uneven contrast: Photographs shot from high up are generally display better tonality in the areas closer to you and poor tonality in areas farther away. To fix this add another layer by choosing Layer > New Layer and click Ok. Fill this layer with a gradient by selecting the Gradient tool and select the Black to White gradient. Choose the Linear option and drag the gradient to fill the layer. You want black at the top of the layer and white at the bottom – if you get it wrong, drag in another direction till you get it right. Don’t worry that your photo has disappeared in the process!

From the Blend modes dropdown list choose Color Burn. This will darken the image considerably particularly in the areas where the black colour appears. Adjust the layer Opacity in the layer palette until you get an acceptable result.

Step 5
Final touches: To finish the colour fixing, boost the saturation using Layer > New Adjustment Layer > Hue/Saturation and increase the Saturation a little. If the image needs a little lightening and if you’re using Photoshop CS3 or CS4, use a Brightness/Contrast adjustment layer. If you’re using Photoshop CS2 or earlier, use a Curves adjustment and this time drag the composite RGB curve upwards to lighten the image. The Brightness/Contrast tool in earlier versions of Photoshop is to be avoided at all costs as it damages good pixels in the image – the new tool that first appeared in Photoshop CS3 is much different and much better.

step 6
Sharpening: The final step is to apply some sharpening to the image. To do this, you need a single image layer so press Ctrl + Alt + Shift + E to create a composite layer. Select this layer and use Filter > Sharpen > Unsharp Mask to sharpen the image. Set the Radius to between 0.5 and 1 and set the threshold to under 10. Adjust the Amount until you get a good sharpening of the image.

Helen Bradley

Wednesday, December 10th, 2008

Curves + Luminosity = Better Tones.


In the last blog entry I mentioned some cool things you can find in the Curves dialog that help you adjust the tonal range of your image. Today I’m going to show you how to wreck the color in an image in the name of improving tonal range.

The Curves dialog has four channel options – you can work on the RGB composite channel (the default), or you can work on the separate R, G or B channels. Problem is that although adjusting the R, G or B channels independently can help you improve the tonal range of the image – it can also totally mess with the color. For this reason, few users bother working with the individual channels. Makes good sense? No!

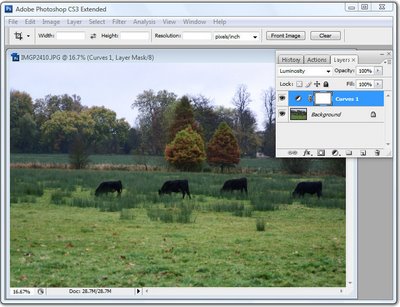
You see working with individual channels is a good fix. If the Red or Green channel lack contrast you can hype it up using a curves adjustment. You’ll mess up the color but, if you’re using an Adjustment Layer, you can simply change the blend mode of the adjustment layer to Luminosity and immediately the messed up color disappears and the adjustment is limited to luminosity only. Instant fix.

So, next time you need to apply a Curves adjustment, check the channels in the Channels palette. If you see a channel that lacks contrast – adjust it to add contrast to it. Then set the blend mode of the adjustment layer to Luminosity to remove the color problems you just created.

Helen Bradley
Sunday, December 7th, 2008

Where on the Curve are you?

The Curve dialog in Photoshop hides some surprise features that aren’t immediately apparent at first glance. In Photoshop CS3 and later, one surprise is that you now have the adjusters under the chart that you’re used to using in the Levels dialog inside Curves. So it’s easy to perform a Levels adjustment in Curves – the reverse isn’t true – Levels can’t do a Curves adjustment. So I don’t use Levels for increasing tonal range in my images anymore – Curves does everything I need.

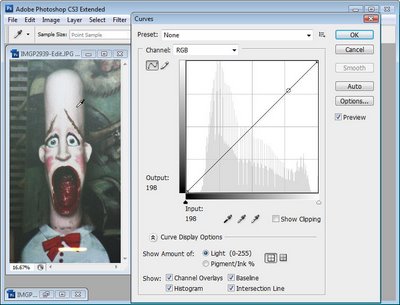
Second tool is the sampler. If you want to add contrast in a particular area of an image it helps if you can find that area on the curve. Simple. Just move across and hold the left mouse button as you wave your mouse pointer over the area of your image to sample. When you do this, you’ll see a marker move along the curve showing you where those pixels are in the curve. This is the area you want to steepen – the steeper the curve, the more contrast in that area. So pull the curve above the area you want to affect upwards and pull the curve below that area downwards to steepen the curve and you’ll get more contrast in that area of the image.

To add markers to the curve – Control + Click (Command + Click on the Mac) on a point in the image and you will add a marker on the curve indicating exactly where those pixels are to be found. You can use the marker to anchor the curve so it doesn’t move when you pull the curve above or below it or drag on the marker to change the shape of the curve at that point.

Helen Bradley
Saturday, April 19th, 2008

French Quarter

I have never been to New Orleans, so this is a first. The mighty Mississippi has to be seen to be believed, it’s huge. I haven’t seen a river like that before – ever. You can hardly see from one side to the other and the river dwarfs the paddlesteamers and the container ships that plow their way up and down.

We spent a morning in the French Quarter, dubbed the “sliver by the river” and the “isle of denial” by locals as it remains less touched by the ravages of Katrina than other areas. We ate beignets at Cafe du Monde which is the quintessential New Orleans experience. Beignets are wonderful doughnut like square pastries piled high with powdered sugar which ends up everywhere – over your face, over the table and everywhere in between. Topped off with Cafe au lait, it’s not to be missed.

Fresh from California, where signage is in English and Spanish, here it is English, French and Spanish and it’s the deep south so it’s hot, marshy and humid but so very compelling in it’s own way.

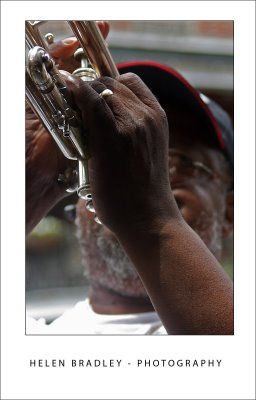
This guy was playing the trumpet raising money to rebuild his church. He was very funny and, to my delight, only too happy to let me capture some photos which I’ve promised to send him with an invitation for him to use them on his next album cover… who knows?

I had to work to get the exposure right, shooting from a covered area into a bright street was challenging and he was wearing that wonderful cap which added to the problems of lighting him without using a distracting fill flash. I had to use Curves to enhance the darks as the +2 exposure compensation muddied the blacks and blew out the highlights. The Photoshop Shadow/Highlight tool brought back enough detail in the highlights to give the images the richness I wanted to see.

Helen Bradley
Friday, October 26th, 2007

Boats on the Seine

I went on a lot of boat rides in my 10 days in London and Paris. My dad was a sailor and a love of water flows in my blood alongside the bits and bytes. This photo is from one of the trips in Paris, the horror ride in the boat on the Seine (see below for more details).

This image nearly defeated me. It is a big crop – what is left is under a quarter of the original image. It wasn’t particularly in focus and the color was awful – for this read dirty grey – the boats had the sun hitting their sides so the color is washed out.

I did some fancy work with Curves to get the color out of the image. I over adjusted the colours very harshly and then blended a couple of versions of the image back into itself. The result is pretty good and I think the image has some charm and that’s why it’s here.

It really was a beautiful afternoon in Paris.

Helen Bradley
Friday, October 26th, 2007

The beauty of Paris

I just adored Paris. I recognised my love of the city as I flicked through the photos I had taken there – at least some of them – there are thousands.

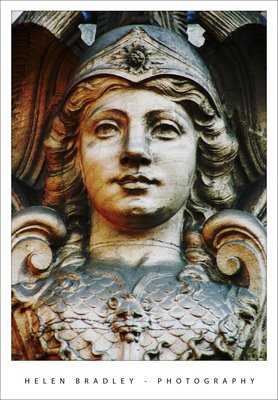
This is one of them. The sculpture itself isn’t notable, it’s just a small piece from above a doorway in some Parisienne backstreet. Yet it’s part of what is magic about Paris – there is so much there – more than you could take in in a lifetime.

This picture underwent a simple Levels adjustment to bring up some of the contrast and then a huge Curves attack to bring some colour into it. I totally abused the Curves dialog and the image gave up its magic. I actually blame Dan Margulis for this. Yesterday I watched one of his Man from Mars videos and I just couldn’t resit applying the technique to this image and it gave wonderful results. Thanks Dan!

You can find Dan’s video at Peachpit (along with some of my own Photoshop articles and videos). It’s a huge download – around 90Mb but, believe me, it’s worth every bit of it. Don’t blame me if you fall in love with the Curves adjustment as a result of watching it. Then, when you’re done, treat yourself to one of his LAB colour videos – it’s almost better than chocolate! And, add to your Christmas wish list his wonderful book Photoshop LAB Color: The Canyon Conundrum and Other Adventures in the Most Powerful Colorspace.

Helen Bradley
Page 1 of 212