The threshold filter in Photoshop lets you turn an image into a black and white image where pixels are either black or white. It is a great tool when combined with some color for creating artistic effects with your photos.
The only issue with this filter is that you have no fine control over how the conversion takes place. This video solves the problem by showing you how to work with the image to give better results with the conversion.
Here you will learn how to use the threshold filter to adjust the image to make a black and white and how to pick out areas of the image to adjust them separately so you retain the details in it.
You will use masks and adjustment layers to lighten and darken those areas of the image that you wan to keep and highlight.
You will also learn how to create a reusable noise layer to give the final image a more grainy look.
You will also learn why using a fill layer makes better sense than filling a layer with color.
In all, this video is jammed full of handy Photoshop tips as well as showing you how to create a great color effect.
Learn to create a monochrome stamp effect from a photo in Photoshop. Includes using filters such as Posterize, black and white, threshold and the Photocopy and Stamp filter to adjust the image to get the effect. Also see how Dodge and Burn can help you fine tune the effect.
Transcript:
Hello, I’m Helen Bradley. Welcome to this video tutorial. In this tutorial I’m going to show you how you can convert an image so that it looks like a stamped monochromatic image.
Before we get started on this tutorial this is the effect that we’re looking for. I have an original bird image here and what we’re going to do is to firstly get rid of the background around the bird. And then we’re going to convert it to black and white. We’ll posterize it and then we’ll apply a filter to it. And finally we’re going to apply the Threshold Adjustment. And we’re going to end up with this sort of stamped monochromatic effect from an original photograph. So let’s just hide that and let’s get started on the image that we’re working with. And I have a duplicate image sitting here.
Now I’ve already gone ahead and made the mask for this image so that we’re not wasting a lot of time cutting out the bird. But essentially what I would use is the Quick Select tool to just select over the bird. And then I made a duplicate of the background layer by just dragging it onto the New Layer icon and then just clicked this Layer Mask icon and that adds a layer mask to the image. So there’s the bit that we had selected. Then obviously I would make a much better selection and this would give me my isolated bird here.
So the next thing that we’re going to do is to convert this to black and white. So I’m going to click on the topmost layer and we’re going to do this using an adjustment layer. The reason for this is that it can then be redone later on if we don’t like the effect. So I’m going Layer, New Adjustment Layer, Black and White and click Ok, and here is the black and white adjustment.
Now what I’m looking for here is that we’re going to make this into a pure black and white only image later on so I want plenty of detail here. So I’m just going to walk these sliders in either direction to see where they go. And I want some edge detail because that’s going to define the birds so I probably want to bring the blue channels and the purple channels over towards the black. And let’s just see where the red gets us. I want to definitely see the bird’s eye so I want that to be different to the colors surrounding the bird. So I’m just looking for a reasonably good black and white conversion at this point, and I’ll just close that down.
Next we’re going to use Layer, New Adjustment Layer, Posterize. And what the posterize adjustment does is it flattens the image to a certain number of colors. They’re called levels but here we’ve got four levels of lightness and darkness. So if we had a color image we’d have four colors. And we can wind this up to a sort of surrealistic amount or we can take it back to a less realistic, more stylized amount. And that’s exactly what we want here.
But you’ll see that every time you change this it has different affects around the edge. So the difference between 5 and 7 and perhaps 6 and 5 is really quite significant. So I’m looking for a number of levels that gives me a good result. I’m worried about the eye disappearing here. Three is not enough. Four is a whole lot better. I really quite like that four so I’m just going to let that be what we’re using here. At this point if we were not getting the exact result that we like we could go back and dodge and burn on this layer. So we could grab the Dodge or Burn tools here to darken and lighten the image by clicking on these, taking the highlights, just make the brush a little bit smaller and perhaps brush around the edges here to darken it up which will ensure that later on we’re going to get some dark edges around the edge of our bird. So if that’s of concern to you selecting a tool such as Dodge or Burn will allow you to lighten and darken the areas around this bird that you want to have lighter or darker.
So for example if we really wanted to see this eye we could lighten the areas around the eye. So you can craft that to an extent using the Dodge and Burn tools here. So I’m just going to burn in a little bit around the top of the leg and the sides of the leg here, and perhaps just under the belly. So once we’ve done that I’m going to come up to the topmost layer and I’m going to make a flattened version of the image so far. And I do that by holding Ctrl and Alt and Shift and E, that’s Command, Option, Shift E on the Mac. And this gives us a flattened version of this that we can now apply a filter to.
I could use smart filters but the filter is just going to be fine for this. So I’m going to choose Filter and then Filter Gallery but before I do this I’m making sure I’ve got black and white as my foreground and background colors because the filter set that we’re using relies on black and white for the color. So if you don’t have black and white selected as the color it’s not going to be a black and white effect that you’re going to end up with. So I’m just going to drag this back in. And I used the Photocopy earlier, and I found that that was a really good result for me.
But you could also try the Stamp and see if in the light and dark balance you can get what you want with the Stamp. We’re going to get pretty much the Stamp effect by just using the Photocopy. But I’ve got a way of getting rid of these sort of almost blurry sort of gradient detail in the bird’s back. So I’m going to ignore that for now and just go for a good sort of stamped effect. I’m looking at the blacks and the whites in this image because that’s essentially what I’m going to get at the end of this. So I’m going to say that that’s good and click Ok.
And the final tool that we need to make these areas disappear is a Threshold Adjustment. And again, I’ll do this using an adjustment layer with Layer, New Adjustment layer and then Threshold. Now Threshold is an unusual sort of filter. What it does is it turns everything either pure black or pure white. There is no in between. And this selector here tells Photoshop at which point we want the colors to go to white or to black. So if we wind this back down a little bit we’re going to get rid of some of these areas in here and they’re become darker or lighter according to how we have this selected.
So I’m just going to go around about that midpoint because we do have this as an adjustment layer which means that if we make changes to this layer they will affect the adjustment layer. So I’m just going back to the Dodge tool here and just see if I can get rid of the very obvious sort of circling effect here, so I’ll just make that a little less obvious that that was something that got left behind with the Photocopy filter. Let’s just bring the exposure right up. And there’s our finished bird there. And we can do whatever we like with it.
You may want to save it out so that you could use it perhaps with a background color or something like that. But there’s this sort of stamped monochromatic effect created in Photoshop. And it’s done very easily by first just isolating the object and then converting it to black and white in a way that gives you the contrast that you want, posterize it to flatten it to some levels of color or levels of tonal range, create a brand new layer from that and apply a Photocopy or Stamp filter to it and then finally finish off with the Threshold Adjustment.
I’m Helen Bradley. Thank you for joining me for this video tutorial. If you liked the tutorial please Like it and comment on it and share it with your friends. Look out for more videos on my YouTube channel and visit projectwoman.com for more tutorials on Photoshop, Photoshop Elements, GIMP, Lightroom, Illustrator and a whole lot more.
You can learn a lot about black and white photography using your favourite photo editing program as most have tools for converting from colour to black and white.
Avoid the adjustments that do the work for you such as by choosing Image > Mode > Grayscale as you won’t be able to make any creative changes to the image.
Instead, in Photoshop Elements, choose Enhance > Convert to Black and White and experiment with the sliders and options. There are different options down the left of the screen to select from and you can then adjust the red, green and blue sliders to fine tune the result.
In Photoshop, choose Layers > New Adjustment Layer > Black & White and adjust the sliders for the colors – this lets you control how the colours are converted to either black or white. In this way you can separate colors like Green and Red for example making them significantly different to what they would look if you do a regular conversion.
In Lightroom and in Adobe Camera Raw you can convert to black and white and then adjust the color sliders to create a good looking black and white image.
Traditionally, when shooting with black and white film, photographers use filters to enhance the colours in the image.
Using red, yellow or orange filters when shooting landscapes or shots where the sky has interesting detail can help darken the blues in the sky giving them more punch than they would otherwise have.
You can purchase coloured filters that screw onto the lens of a digital SLR or which can be placed over the lens of a point-and-shoot camera using an adaptor ring.
The images captured with these filters will show different conversion of colours to black and white than you would see if you were to shoot in regular black and white without the filter.
The image at the top shows two different renderings of a single image the first with a red filter and the second with a blue filter.
The same rules for composing an image in colour apply when you are shooting in black and white. Make sure the subject of the photo is placed in an interesting position in the shot, make sure the camera is square to the horizon and that the subject is in focus.
When you are photographing in black and white pay attention to how the colours are converted.
Some colour pairs like green and red which contrast so strongly in colour photos convert to the same shade of grey in a black and white image. Depending on what you are shooting this can be an advantage or a disadvantage.
In the image above the solid black of the nuns’ habits ensures that the image will be a strong one and placing the subjects off center makes the image more dynamic.
If you are unsure how the image will convert, check the camera’s viewfinder or on a digital SLR take a reference shot and look at the result in the LCD screen to evaluate the composition and to check that what you are seeing in the scene will render well in black and white.
When the light is lacklustre because the weather is overcast it is often a bad time to shoot in colour because the colours are bleak and uninteresting.
These are times when black and white works particularly well because, by removing the colour problems, you can focus on the interesting things in the scene.
If the scene is monochromatic anyway and even flat but shooting it in black and white you can reinforce the desolation and age of the scene.
However, that’s not to say that a sunny day or sunrise and sunset is not also a good time to capture photos in black and white – when the sunlight is strong, the contrast between areas of light and shadow become very obvious and black and white is a wonderful way to capture this.
Black and white is particularly attractive for use in portraits photography. You can use it when your subject is dressed in or surrounded by colours that are not complimentary to them or which are distracting to the eye.
By shooting in black and white, you remove the impact of the clashing colours allowing the subject to become the focus of the image and not their clothes or, worse still, the background.
Bathed in soft light, babies captured in black and white look wonderful and the impact of jaundiced skin or blemishes is reduced.
For subjects that have facial details that can handle harsh light, try capturing your portraits with strong side lighting such as sunlight pouring in through a window. The dramatic contrast between light on one side of the face and shadow on the other can bring a portrait to life.
This type of setup is best used for a subject who has very strong facial features such as older subjects with lots of wrinkles or for subjects who live life hard as it reinforces their personalities and lifestyle.
Children’s and baby’s portraits captured in black and white do away with distracting colours and blemishes and allow you to focus on the child.
When you remove the colour from an image, you are left without one of the key elements that attracts the eye to an image – the differing colours in it.
However, colour is also distracting so removing colour removes a distractive element allowing the eye to focus on other elements in the image.
This image isn’t a good one to shoot in black and white as most of the interest in it is colour:
As photographer it’s your job to find other elements of interest to capture.
Look for different shapes, textures, tones and contrast in the scene that will be visually interesting and make these your subject matter.
For example, one element that works particularly well in black and white is repetition.
When you capture a series of repetitious elements such as trees, fence posts, light poles; then by removing the colour, you’ll be able to focus the viewer’s eyes on the repeated elements.
Artistically black and white photos take a lot of beating. There is something about a good black and white image that invokes a level of appreciation that many colour images can never achieve.
In days of film, shooting in black and white meant that you had to commit to an entire roll of film for your black and white photos. Today you have a lot more choices and black and white is only a setting away in your camera.
However, shooting in black and white is a little different to shooting in colour so here is what you need to know:
Camera settings for black and white shooting
The first thing to do is to work out how your digital camera captures in black and white.
Most cameras have a setting that allows you to switch to monochrome or black and white capture.
You’ll need to be familiar with how to switch the camera into this mode, how to identify from its display that you are in this mode and how to return to full colour mode when you’re done.
When you capture in JPEG using a point and shoot camera or a digital SLR, your camera will discard all the colour information before saving the image. You can’t go from monochrome to colour later on.
However, if you shoot with a digital SLR and capture the image using Camera RAW you can generally configure your camera to capture monochrome images but, behind the scenes, the camera will still capture all the RAW data it would capture if you were shooting in colour and this will be available later when you process the RAW image.
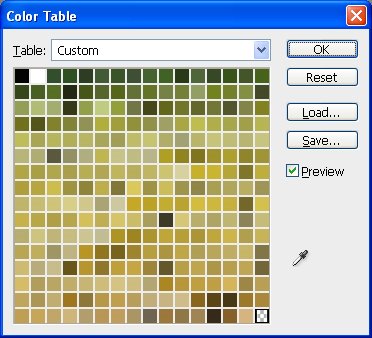
I like to look at what users type into Google when they land on my blog. Today, someone wanted to create a monochromatic swatch from a monochromatic image. I don’t have explicit instructions for this, so I thought it a good concept to consider.
To do this, first convert your image to monochrome by choosing Image > Mode > Greyscale and click to Discard the color. If the image doesn’t show the variety of greys you want, use a Levels adjustment to alter the tonal range in your image.
Now choose Image > Mode > Indexed color and then Image > Mode > Color Table. Here is your custom swatch sourced from your image. Simply click Save to save the color table.
Now, you don’t have to make a monochrome swatch. Say you need some lush greens for a project. Grab an image that shows the greens you like. Choose Image > Mode > Indexed Color and, for now, select the defaults and click Ok. Now choose Image > Mode > Color Table and you have a color table created from your image with your lovely greens and you can save them to use any time. If you get too many other colors in the swatch, crop the image to just the green area before making the conversion. Save the Color Table but don’t save the image and you’ll find no photos have been harmed in the process of creating your own custom color swatch.
To add the color table as a swatch, display the Swatches palette (Window, Swatches) click the menu and choose Load Swatches. From the Files of type list choose Color Table (*.act) and then browse to find your saved file and open it.