Wednesday, November 10th, 2010

Hyper-focal distance and DOF

I’ve been playing around this week with my new Pentax K-7 shooting a range of images to use to illustrate Depth of Field for an article I’m writing. I’ve also been drawing pictures to illustrate Hyper-focal distance – I love my job!

As I was trawling the web I found the DOF Master website which calculates all things hyper-focal and DOF.

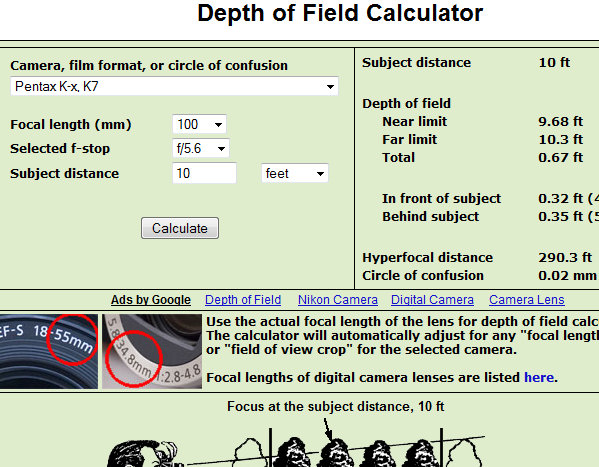
There you can calculate the depth of field required for various situations – simply select your camera and the focal length of the lens that you are using. So, for example, if you have a 28 – 200 lens and are planning to shoot at 100 mm, then select 100 mm for the focal length. Select the f stop that you intend to shoot at at for that focal distance. Then select the distance between you and the subject and click Calculate.

So, for example, for my Pentax K7, shooting at 100 mm with f/5.6 at a subject 10 feet away, the depth of field is approximately .67 feet and the hyper-focal distance would be 290 feet.

If you’re using a fixed focal length lens, then there is also an online depth of field table available on that site. Select the focal length of your lens and the camera that you are using and click Calculate – you’ll get a printable table showing the near and far range of the depth of field at a given distance and aperture, as well as the hyper-focal distance. How cool is that?

Helen Bradley

Thursday, October 28th, 2010

Word 2010: Add your signature as a clipart image


Quite often, I need to sign a Word document and convert it to a PDF or fax it. It’s easier to do everything on the computer rather than printing it, signing and then scanning it all over again.

The solution is to scan your signature and convert it into an image that you can use inside Word. To give you access to your signature image in Word, first save it as a GIF, JPG or BMP file and then from the Microsoft Office Group in your All Programs menu, select the Microsoft Office 2010 Tools > Microsoft Clip Organizer.

Choose File > Add Clips to Organizer > On My Own and browse to the folder that contains the images of your signature. I have a simple Helen signature and one for Helen Bradley. You can also do the same with your company logos and other elements that you’re likely to want to use repeatedly in Word.

Select the images and click Add. They’ll be added automatically to your clip organizer. Hold your mouse over the first image, click the dropdown arrow to its right and choose Edit Keywords.

Now in the Keyword box type a keyword that describes the image. Add one keyword, click the word Add and then add additional keywords. If there are keywords in the list that you don’t want to use, select them and press Delete. Click Apply to apply the selected keywords to the image and then click Next to do the same thing for the next image in the sequence.

I add my name and the word Signature as keywords to my signature files so they are easy to find.

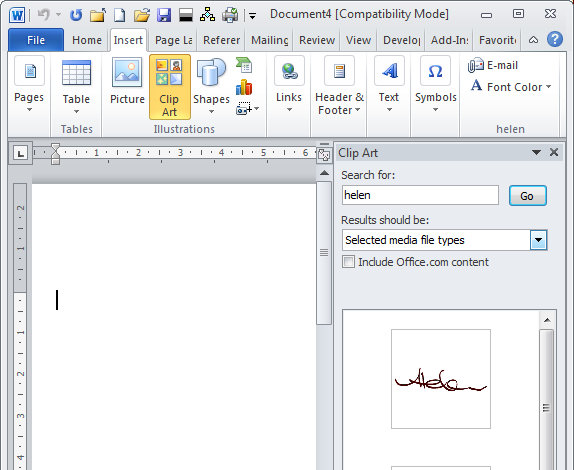
Now you can close the Clip Organizer and whenever you need the image inside Word, choose Insert > Clipart, make sure that the file types are set to Illustrations if you saved the images as Gif files or set to Photographs if you saved them as JPGs or Tiffs. Type your search text which in my case is Helen and press Go.

Microsoft Word locates the signature image and you can then drag and drop it into your document. The images are permanently in the Clip Organizer so they’ll be there next time you launch Word or any Office program that can access it.

Helen Bradley

Monday, October 25th, 2010

Quick and easy PDF to Word


While these days it’s easy enough to get data from programs like Excel and Word into a PDF file, sometimes it’s just a little bit difficult to get it back out again.

Often all I need is a picture from a PDF file that I can drop into a Word document add a signature or some text, and then re-bundle it as a PDF and distribute.

Not everyone sets up PDF files so that they can be edited and in most cases I’ll need to do the editing myself – so for that I use Word as I can drop in a signature or a text box really easily.

The problem then becomes how do you get the data out of the PDF and into Word. Luckily the Adobe Acrobat Reader has a tool for this built in.

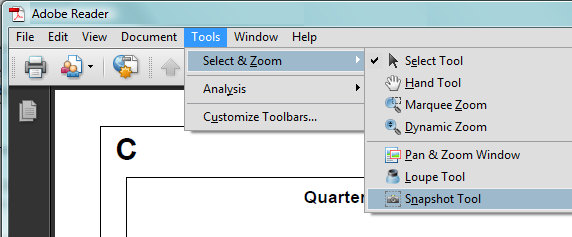
From the menu select Tools > Select & Zoom > Snapshot Tool. Now position yourself in the file where you want to grab the data from and drag over the area to capture.

A picture of the area is captured to the Windows clipboard which you can now paste into another program such as a Word document. It’s not the world’s prettiest solution but it is quick and easy and that works for me.

Helen Bradley

Saturday, October 23rd, 2010

Kangaroo Island slideshow

I just recently got  back from the very wonderful Kangaroo Island off  the coast of South Australia. Here is slideshow of images from the Island. No Kangaroos, sorry.. but some great scenery none the less. Click here to view it!

Helen Bradley

Wednesday, October 20th, 2010

Create a Root Folder in Lightroom

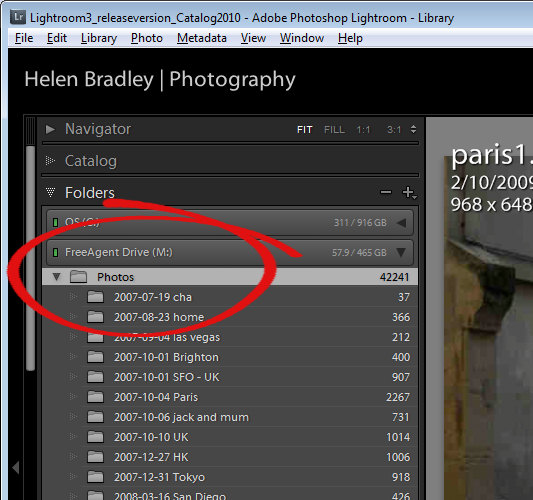
If you store your photo collection on an external drive and switch between two or more computers, you can run into trouble when the Lightroom catalog does not recognize the current drive letter assigned to your portable drive. In this case, you may find that all of the folders in your Lightroom collection are “missing” requiring you to individually locate each folder in turn on the disk so that Lightroom can find the images.

If you have a large number of folders in Lightroom this can take a lot of time to fix and it’s a major nuisance. The solution is to create a folder in which all the other folders on your removable drive are located. Then add this folder to Lightroom so that it becomes your root folder. Then if the folders are ever reported as being missing you can quickly locate this root folder and Lightroom will automatically find all the other missing folders that are contained within this one.

To create a root folder, first make sure that you locate all the folders of images in your Lightroom catalog in a single folder on your external drive. Then make sure that there is, at the very least, one image in your root folder – if needed, simply copy an image there so you can continue.

Now return to Lightroom and import the root folder into Lightroom. You need at least one image in the root folder because Lightroom requires there to be at least one image in a folder before it will import it and its contents into Lightroom.

Once you’ve imported your root folder and its single image you can remove the image from Lightroom and from the disk if desired. Once the root folder appears in the Lightroom catalog it will stay there even if it doesn’t contain any images.

Now, in future, if you move your external drive to another computer and if it is not recognized by your Lightroom catalog, select the root folder in Lightroom and locate it on the disk. All the other folders below this in the hierarchy will then be automatically found.

Helen Bradley

Friday, October 15th, 2010

Drives not recognized in Vista


Having just purchased two brand new backup USB drives, unboxed them and plugged them into my computer, imagine my horror when neither appeared as drives in Windows Explorer, effectively rendering them useless. They were recognized easily by an older XP machine proving that it wasn’t the fault of the drives but it was a Vista issue. Drives these days are typically plug and play devices so they should install and run automatically without needing to be set up.

Running Control Panel > System > Device Manager and selecting disk drives from the list showed the drives in the list, so Vista knew the drives were there. It just wasn’t giving me access to them.

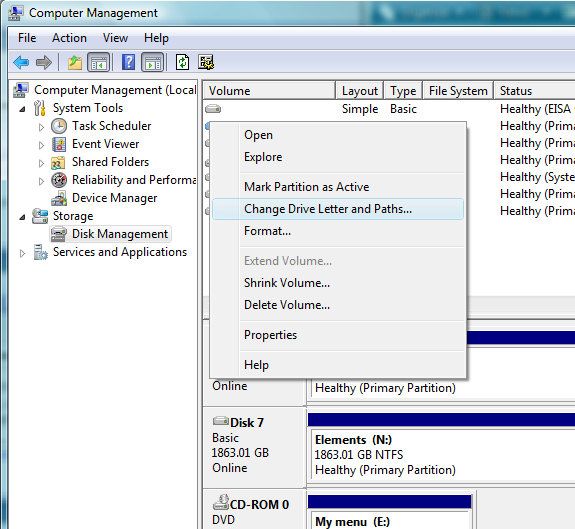
The problem was that neither drive had been allocated a drive letter so they weren’t showing up as being accessible. To fix this you have to do the work yourself. Start by selecting Control Panel > Administrative Tools > Computer Management – if necessary, you’ll need administrator access to run this.

When the Computer Management Console opens, from the Storage Options group, select Disk Management and wait as the computer loads information about your disks.

Somewhere in that list will be the drive or drives that you are looking for. Select any volume in the list at the top of the dialog that has no drive letter associated with it and then check the disk specifications below until you locate the drive you want access to.

You should note that there are possibly partitions on your hard drive that also do not have drive letters for varying reasons – don’t touch these – you’re here looking for external hard drives without drive letters.

When you locate the drive in question, right click the entry in the top portion of the dialog and choose Change Drive Letter and Paths. Click Add and then from the Assign The Following Drive Letter dropdown list, select a drive letter that is not currently in use to assign that drive to and click Ok.

When you do, the volume should now appear in the list with some sort of drive name in front of it and the appropriate drive letter. If you now restart My Computer or Windows Explorer the drive will appear ready for use.

Helen Bradley

Thursday, September 23rd, 2010

Handling MOD MOI movies

I hate it when camera manufacturers don’t use standard formats for their movie files.

My camera uses the MOD/MOI format which practically no player known to man (or woman) can play. It shouldn’t really be a problem as MOD is really just MPG in disguise and you should be able to rename the MOD file to read MPG and it should play – but you’ll encounter problems if you capture in 16:9 aspect ratio. Go figure!

Before you sling the camcorder into the trash and vow never to buy from that manufacturer again, read on. On second thoughts you should vow never to buy from a manufacturer that cares so little for their customers that they use impossible to read formats – after all you’re shooting movies – chances are you’ll want to do something with them – like watch them or perhaps I’m expecting too much?

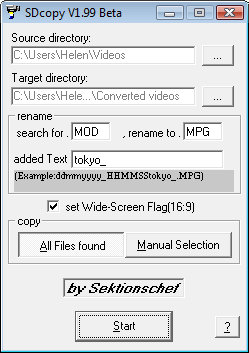
So, the solution is to download this little SDCOPY.EXE utility which comes bundled in a zip file that just needs to be extracted and then run.

It is simplicity itself, you tell it where your MOD files are and where you want the converted files to go (I recommend a second/separate folder) and if the widescreen 16:9 flag needs to be set and press Start and in a few minutes you have viewable converted MPG files.

So, thanks but no thanks Canon. I won’t be buying a new camcorder from you and thanks to Sektionschef for creating and continuing to support this handy utility.

Helen Bradley

Thursday, September 16th, 2010

Borrowing PowerPoint Image Designs

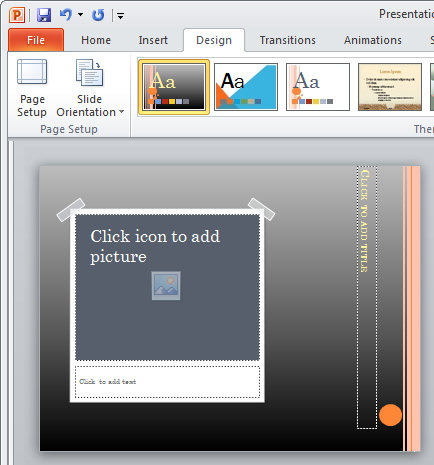
This stickytape image border comes from the Solstice Theme and here I’ve added it as a new layout in my Oriel Theme.

I saw a recent post on a blog which referred to one of my earlier posts about creating torn edge image effects in PowerPoint 2007. You can see my original post here: http://www.projectwoman.com/2007/03/powerpoint-2007-torn-photo-edges.html.

Someone who responded to the post asked if there was a way of using the photo edges from a theme but not the theme itself. Their problem was they loved the edges but because their organization had a custom theme that was always used, the person wasn’t allowed to change it. The question got me thinking about a solution and here it is!

To use an image design from a PowerPoint theme first create a new file by choosing File > New > Blank Presentation and then choose the New Slide > Picture with Caption Layout – this is the layout typically used to apply fancy styles to images.

Click on the image locator and add an image to the slide – it doesn’t matter what image you add – you just need something so you can see how the image design looks.

Now go to the Design tab and arrow over each of the Themes in turn to see what the image layout looks like. For example, Solstice has a sticky tape edge to the image, Pushpin adds the image with a pushpin background and Opulent has a layered frame look. Flow has a bent corner on the image, Couture has an interesting beveled edge and Summer has a series of illustrative dots around the image. You may find other interesting designs in other Themes such as those that you download from Office Online.

Select the Theme that has the look you want to borrow.

Now choose View > Slide Master and locate the Picture with Caption Layout. Drag over the elements that create the look that you want such as the Pushpin and frame, the sticky tape frame or the circles. Make sure to include the image placeholder. Right click the selected elements and choose Copy.

Now open a file that uses your corporate Theme – or the Theme you prefer to use. Choose View > Slide Master and locate the Picture with Caption Layout slide layout. Right click it and choose Duplicate layout.

Click the image placeholder on this duplicate layout and delete it. Right click on the layout and choose Paste to paste the elements that you copied from the other layout. Move the design elements into a new position, if desired.

You can now adjust the text and title boxes on the layout so that they don’t encroach over the elements that you’ve just added to the design.

When you’re done, click Close Master View.

To save the Theme with the new Layout, from the Design tab open the Themes dropdown palette and choose Save Current Theme and save it.

In future you can use this Theme for your slideshows and to use the layout you created select it from the Layout list where it appears with all the other layouts from the original theme.

Helen Bradley

Tuesday, September 7th, 2010

Visual Basic 2008 Express – select a textbox contents

When you hand control back to a textbox in Visual Basic it’s useful if you also select the textbox contents so a user can just start typing over the current contents. Here’s how to do this – place the code in the Textbox_gotfocus event handler:

TextBox.SelectionStart = 0
TextBox.SelectionLength = Len(TextBox.Text)

How easy is that?

Helen Bradley

Friday, September 3rd, 2010

Run out of canvas using Photoshop’s Pen tool?

I’m sure this has happened to you – you’re zooming along drawing a path around an object using the Photoshop pen tool and all of a sudden you’re running out of room – the image is off the screen. The solution is simple, press and hold the Spacebar and the cursor turns into the Hand tool so you can move the canvas around to get the next bit of the image in view. Let go the Spacebar and you’re back to working on your path.

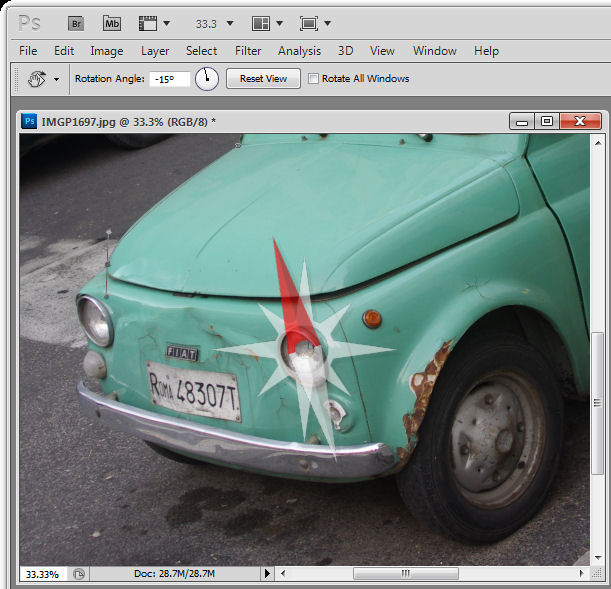
And, while you’re there – wanna rotate the canvas so you can draw your path more easily? Easy! Press and hold R (R for rotate) then drag the canvas to rotate it.

Helen Bradley