Tuesday, March 3rd, 2009

Protect part of a Word document


You know when it happens. You’re developing a template or document for someone to work on and you know that they will clobber part of it when you least expect it. So, you want to protect this from happening and make sure your document never gets destroyed.

Problem is how to do it?

Solution? Read on..

Ok.. so, Word has a document protection feature you can use but it only protects the whole document. But, it can be tweaked to protect only part – but we have to set it up to work this way. So, you have to add section breaks around the area to protect. Pretty easy to do. Click just above where the protection is to start and choose Insert > Break > Continuous – this adds a continuous section break in at this point and, because it’s continuous there isn’t really any indication it’s there.

Move to just beyond the area to protect and repeat to add another continuous section break. If you just want to protect the beginning or end of your document you only need one section break.

So far, so good. Now for the protection bit. Choose Tools > Protect Document and in the Editing Restrictions area, click the checkbox and from the list choose Filling in Forms. Now click Select Sections and check the sections to protect (ie leave the ones you want to be able to edit unchecked).

Then click Yes, Start Enforcing Protection and, if desired, add a password.

Now users are locked out of the protected area of the document and they can’t change it.

In Word 2007 it works just the same. Find the section breaks in Page Layout > Breaks > Continuous and the protection tool in Review > Protect Document > Restrict Formatting and Editing.

Neat huh?

Helen Bradley

Wednesday, February 25th, 2009

Photoshop: Fixing photos shot from airplanes

One of the cool things about getting a window seat in an airplane is that you get a unique opportunity to photograph things from a high vantage point. On the flipside, when you get them home you often find photos taken from the air look washed out and the colour is poor. Luckily there is not much that Photoshop can’t recover provided the photographs are in focus. So if you scored a window seat lately and if you have images that fix, I’ll show you the Photoshop tools you need to fix them.

Understand the problems
Most airplane photos look washed out and they don’t have the richness of colour that you might expect them to have. The first step in fixing them is to boost the tonal range in the image using a levels adjustment – a by product of this is that the colour gets a boost.

Step 1
Start by making a duplicate of the background layer so that you’re working on a copy in case you need to refer to it later on. To do this, right click the background layer in the layers palette and choose Duplicate Layer.

Step 2
Select the background layer and choose Layer > New Adjustment Layer > Levels and click Ok. The Levels histogram tells you a lot about the state of your image. In most cases you’ll lack white whites and black blacks and most of the image content will be around the middle of the image. Drag the right and left sliders below the chart so that there are below the points where the chart data begins. This should give the image an immediate boost in contrast and some boost in colour too. Adjust the midtone slider if desired to fix the midtones in the image and click Ok to confirm your settings.

Step 3
Colour fixes: Often the image will contain too much blue and you can adjust this using a Curves adjustment. Choose Layer > New Adjustment Layer > Curves and click Ok to display the curves dialog. Click the Channel list and choose the Red channel. Drag up on the middle of the Red channel line to add some red to the image. Repeat with the Green channel adjusting it as required – drag down on the middle to remove green and up to add it. Finish with the Blue channel.

If you’re unsure which way to go with the adjustment, give the line a good pull in one direction or the other to see what happens, back off the adjustment to get something less intense. Different places on the curve line will give you different effects so experiment either side of the midline. Click Ok when you are done.

Step 4
Fixing uneven contrast: Photographs shot from high up are generally display better tonality in the areas closer to you and poor tonality in areas farther away. To fix this add another layer by choosing Layer > New Layer and click Ok. Fill this layer with a gradient by selecting the Gradient tool and select the Black to White gradient. Choose the Linear option and drag the gradient to fill the layer. You want black at the top of the layer and white at the bottom – if you get it wrong, drag in another direction till you get it right. Don’t worry that your photo has disappeared in the process!

From the Blend modes dropdown list choose Color Burn. This will darken the image considerably particularly in the areas where the black colour appears. Adjust the layer Opacity in the layer palette until you get an acceptable result.

Step 5
Final touches: To finish the colour fixing, boost the saturation using Layer > New Adjustment Layer > Hue/Saturation and increase the Saturation a little. If the image needs a little lightening and if you’re using Photoshop CS3 or CS4, use a Brightness/Contrast adjustment layer. If you’re using Photoshop CS2 or earlier, use a Curves adjustment and this time drag the composite RGB curve upwards to lighten the image. The Brightness/Contrast tool in earlier versions of Photoshop is to be avoided at all costs as it damages good pixels in the image – the new tool that first appeared in Photoshop CS3 is much different and much better.

step 6
Sharpening: The final step is to apply some sharpening to the image. To do this, you need a single image layer so press Ctrl + Alt + Shift + E to create a composite layer. Select this layer and use Filter > Sharpen > Unsharp Mask to sharpen the image. Set the Radius to between 0.5 and 1 and set the threshold to under 10. Adjust the Amount until you get a good sharpening of the image.

Helen Bradley

Wednesday, February 25th, 2009

Update to Photoshop CS4

Adobe has advised that it has released an update to Photoshop CS4. The Photoshop 11.0.1 update addresses key issues reported by customers that may impact performance. The update also includes the ability to correctly recognize 3D textures edited by plug-ins; improved quality of Auto-Blend Layers (Stack Images); and fixes for issues that can be caused by corrupt fonts or when pasting formatted text.

The Photoshop 11.0.1 update is available as a free download for existing Photoshop CS4 customers at http://www.adobe.com/downloads/updates/ or through the Adobe updater via the application itself.

Helen Bradley

Tuesday, February 24th, 2009

Copy a worksheet – Excel 2007


I work with monthly worksheets and they develop over the month in such a way that I want the starting point for the next month to be where this month stops. So, I need to copy this month’s worksheet to make next month’s.

In Excel this is simple. Right click the tab at the foot of the worksheet and choose Move or Copy sheet. Make sure you click the Create a Copy checkbox so you make a copy or you’re toast – you’ll lose your original.

Now choose the position in the current workbook to make the copy or choose another or new workbook. Click OK and the copy is made.

I then strip out all of last month’s variable data and start over for this month… but I always make sure I made a copy before I do this, you never can be too sure.

Helen Bradley

Sunday, February 22nd, 2009

Excel 2007: quick format your data


I earlier versions of Excel there were some pretty horrid autoformats you could use to quickly format your tables. These are gone from Excel 2007 – thankfully!

Instead, Excel 2007 offers sophisticated formatting options, but they can be applied only if you’re prepared to convert your range to a table. However, this isn’t always a desirable outcome but luckily there is a work around.

Start by selecting your data and click Home tab > Format as Table and select a table format. You will notice that Excel applies an AutoFilter to your data which is typically the most obvious part of the conversion that you don’t want. Other things come with this table format too – if you have data alongside the table – but not part of it – and you delete a row from a table or insert a row into a table, the data alongside remains in place.

So, if you want to retain the nice formatting but not the table behaviour, click in the table and choose Table Tools > Design tab and click the Convert to Range option and click Yes when prompted to convert the table to a normal range. The range will go back to behaving like a typical Excel range and the formatting will be retained.

Helen Bradley

Sunday, February 22nd, 2009

Show Off! Frame your photos in Photoshop

When you’re displaying your photos on a blog or a website you’ll want them to look as good as they would if you had them framed on the wall. Here is a Photoshop technique for adding a frame, complete with your name and photo details, to a photo.

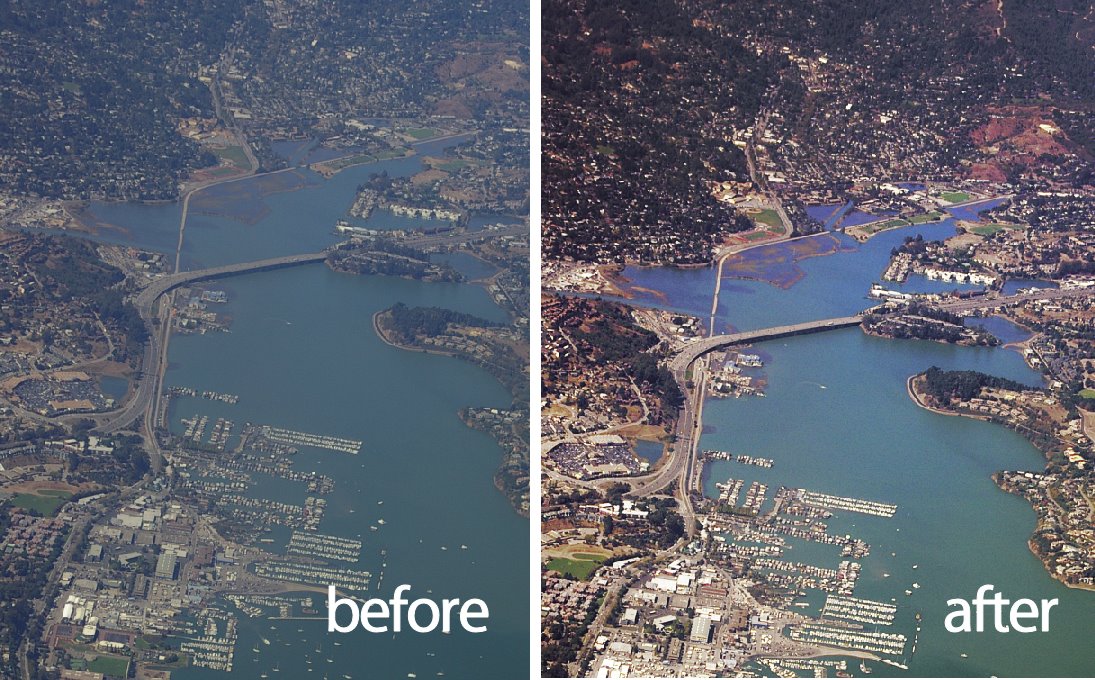
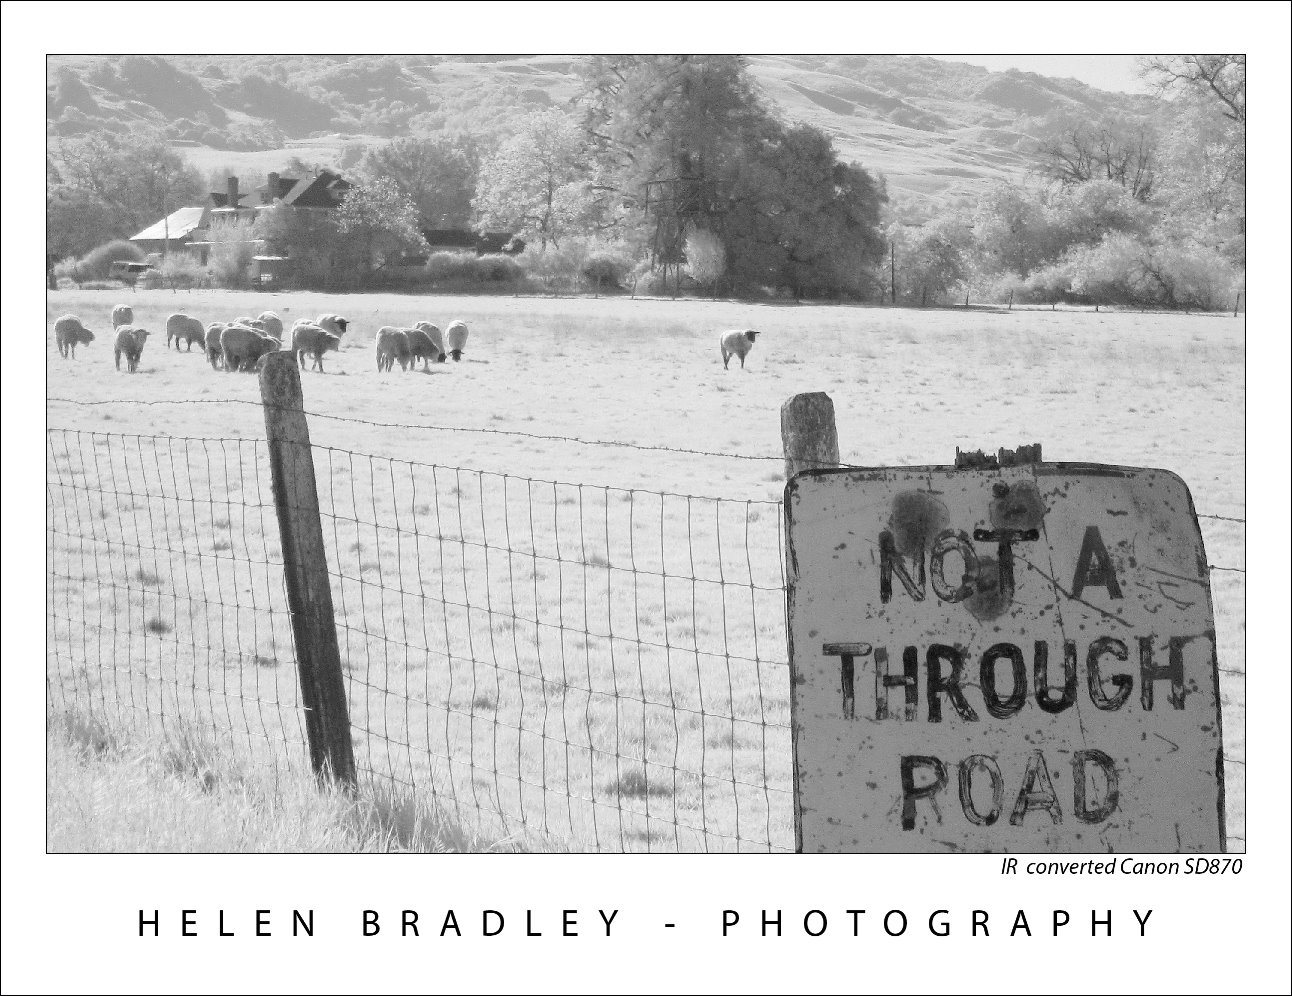
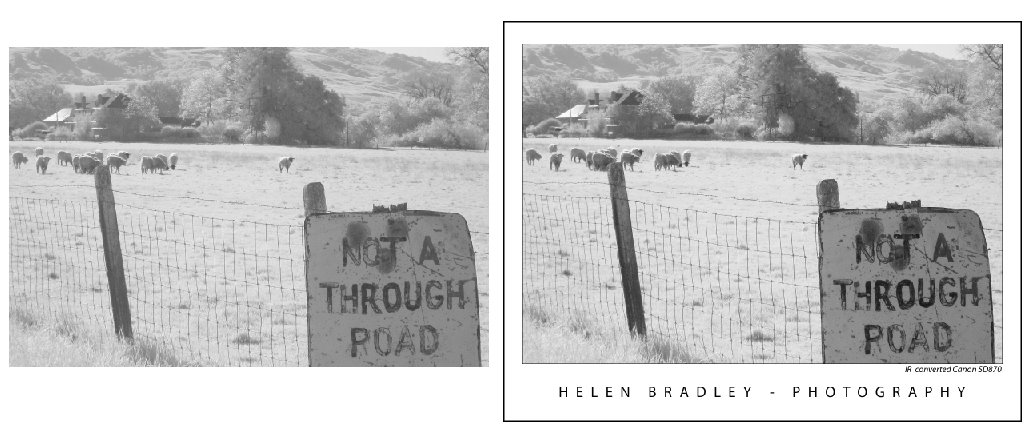
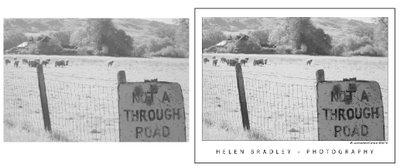
To see what we are aiming for, compare the two images below. The photo on the left is unadorned and the one on the right has been framed using the process outlined in this step by step. This frame gives the photograph a very smart and professional look.

Here’s how to achieve this:


Step 1
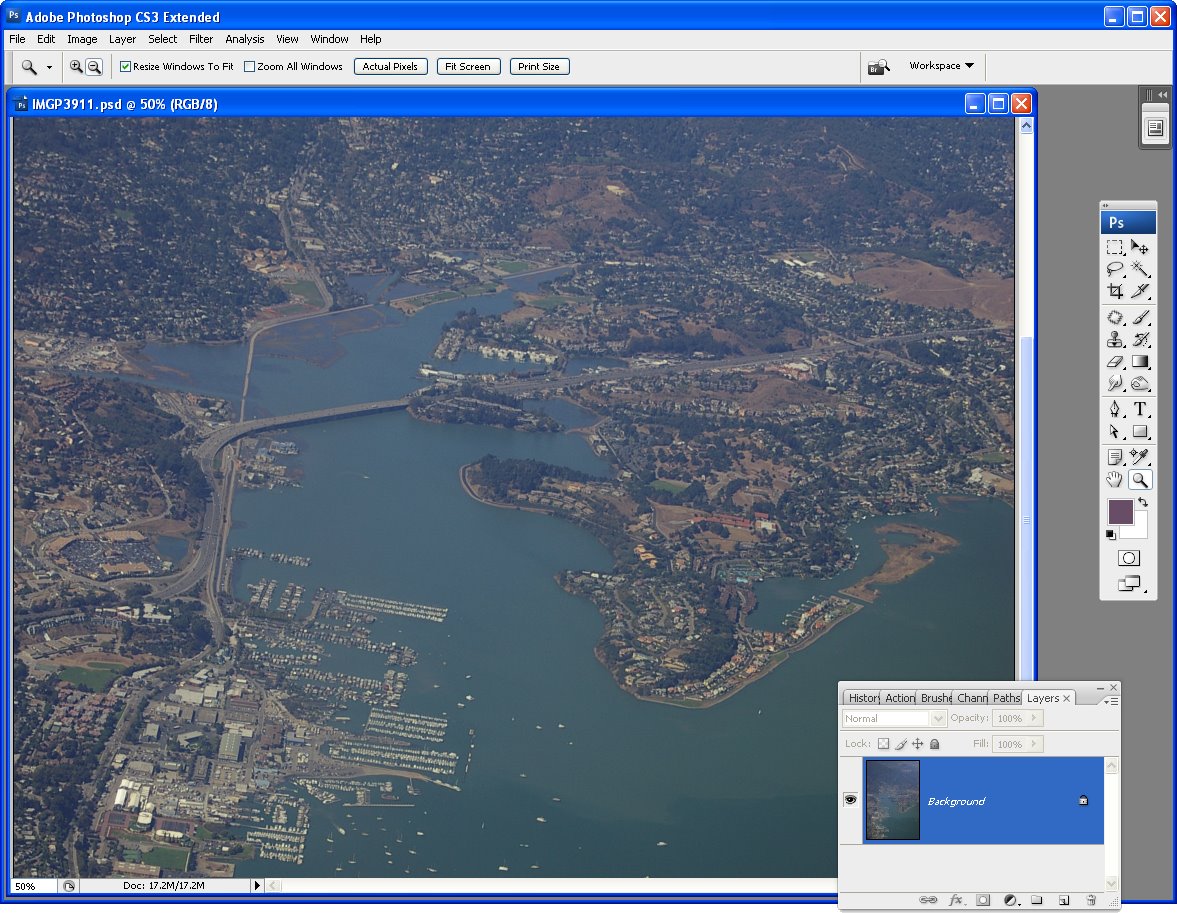
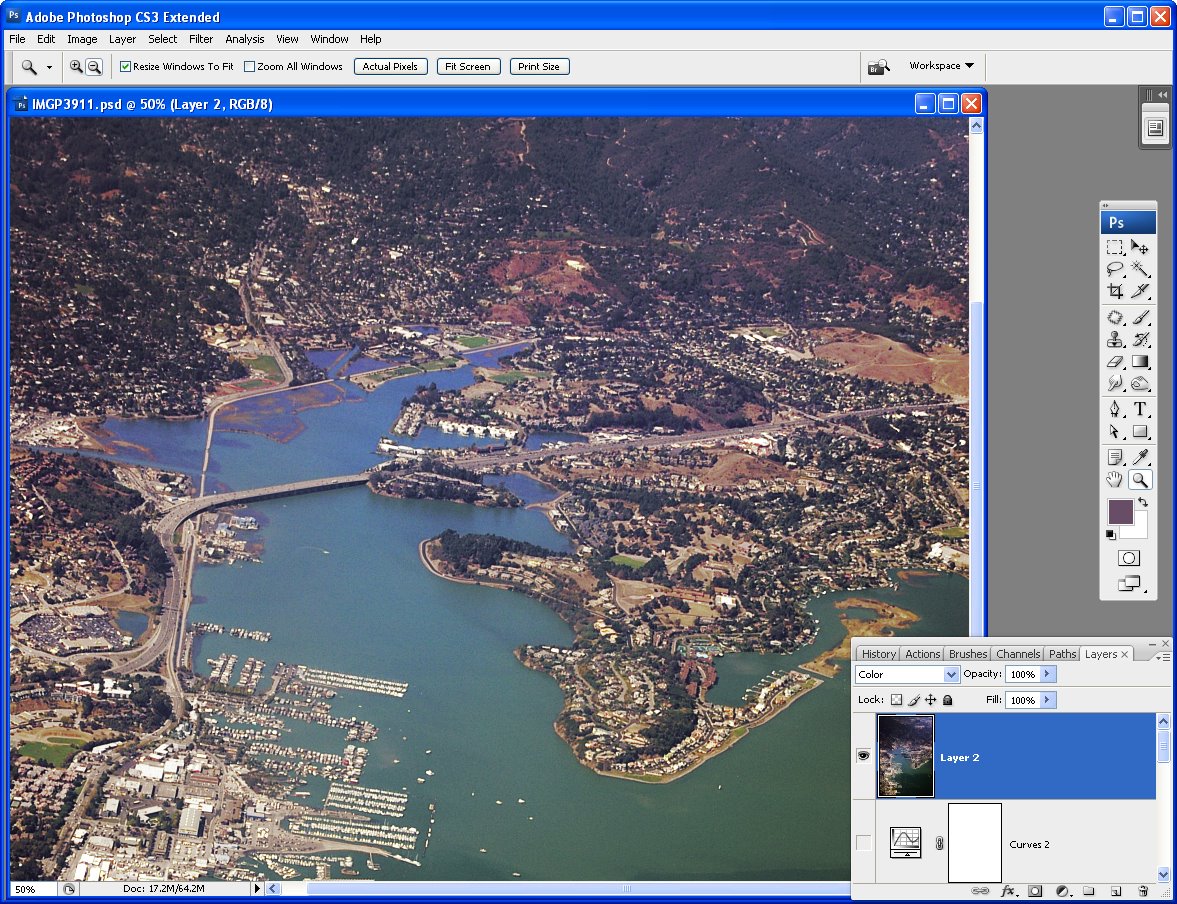
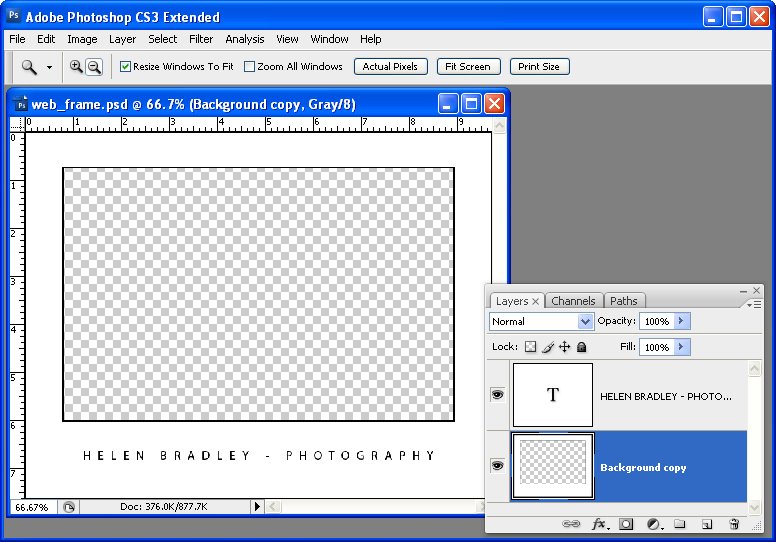
Once you have finished editing your photograph in Photoshop, click the topmost layer of the image and press Ctrl + Alt + Shift + E (Command + Option + Shift + E on the Mac), to create a new layer containing a merged version of the image.

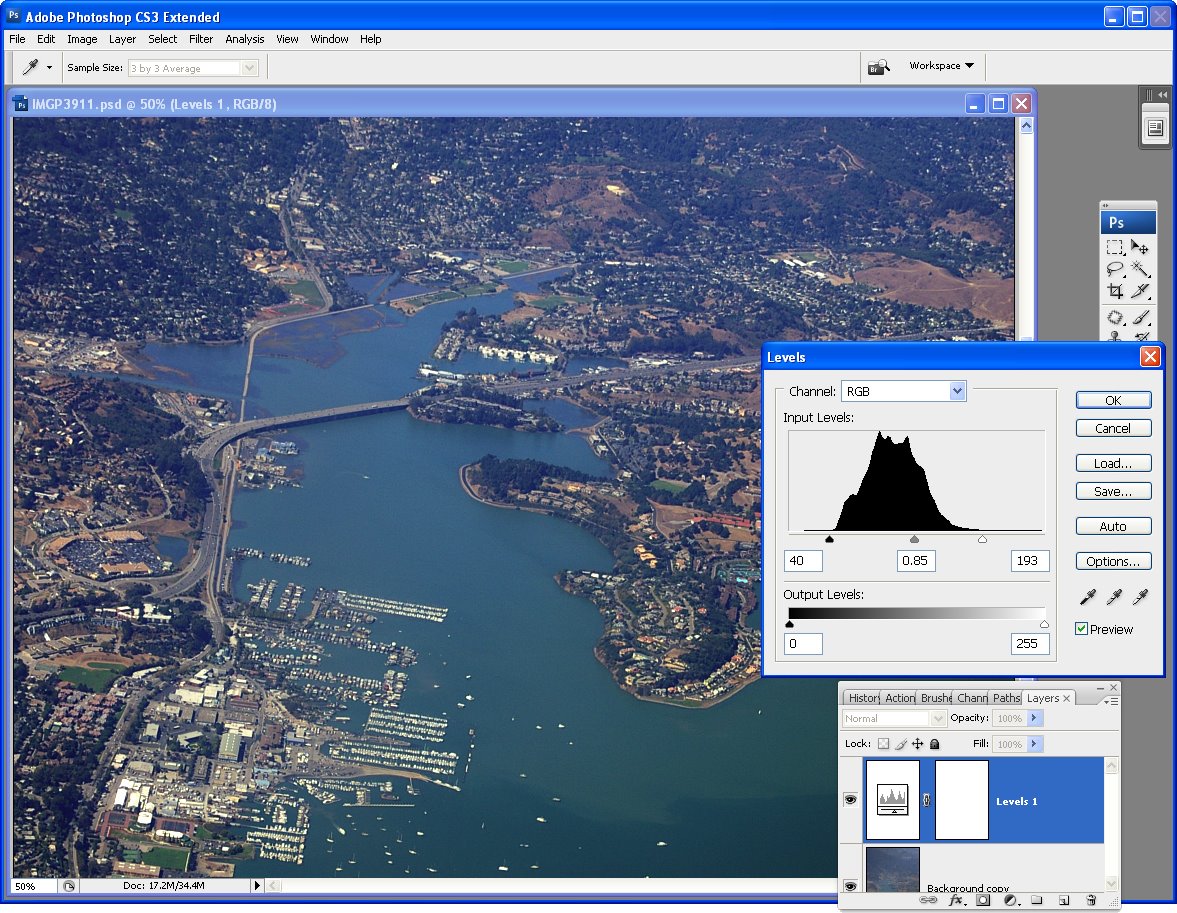
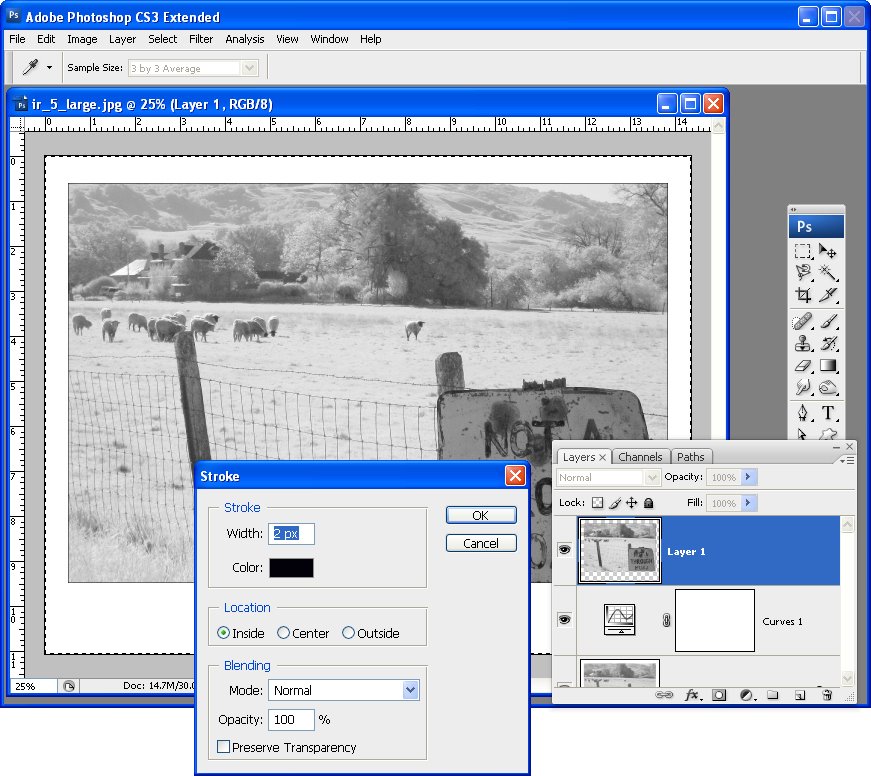
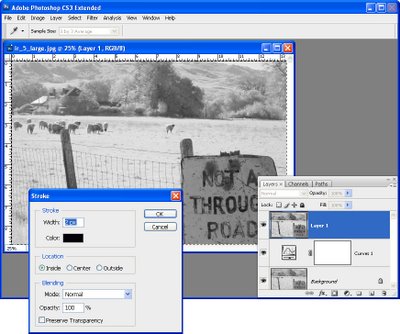
Click this new top layer and choose Select > All and then Edit > Stroke. Set the Width to 2 pixels, the Color to black and select Inside and click OK. This adds a keyline around the image and makes sure that any white areas in the photograph do not bleed into the frame. Adjust the stroke width to match your image size – larger images can handle a wider stroke whereas small images may need only a 1 pixel stroke. Choose Select > Deselect or press Control + D (Command + D on the Mac).


Step 2
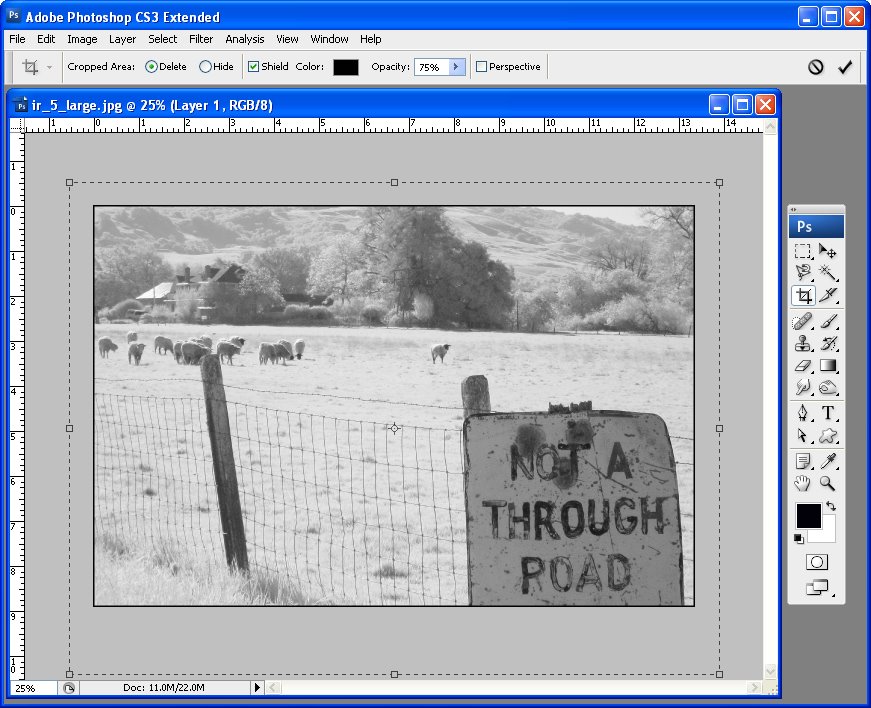
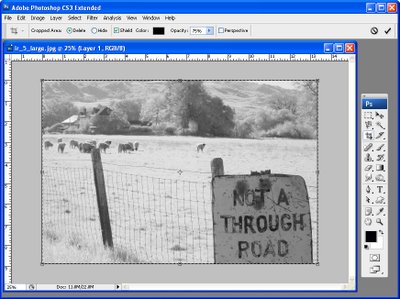
Enlarge the Photoshop image window by dragging on one corner. You want to see some of the gray edge around the photo. Set the background color to the desired frame color. Click the Crop tool, select the entire photo and let go the mouse button.


Step 3
Hold the Alt key (Option on the Mac) and drag on the left or right side of the crop marquee outwards into the gray area of the image. What you’re doing is marking the amount of space that you want for a frame around the left and right areas of the image.

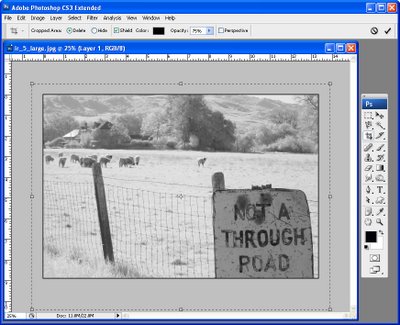
Repeat using the Alt key (Option on the Mac), on the top or bottom border to create a matching amount of space above and below the image. Now, without holding down any other keys, drag the bottom border downwards to create a larger space at the bottom of the image.

Double click on the crop selection and this extra area you have marked out will be added to your photograph. If your image had a background layer the color is added to the background. If your background layer had been previously converted to a regular layer, the extra area will be transparent. If the area is transparent, add a new layer by choosing Layer > New > Layer and fill it with white or your chosen frame color by choosing Edit > Fill and choose the color to use from the Use list. Drag this layer underneath your topmost photo layer.


Step 4
Select the topmost layer, choose Select > All and then Edit > Stroke and add another 2 pixel black stroke on the Inside of the selection. Choose Select > Deselect or press Control + D (Command + D on the Mac).


Step 5
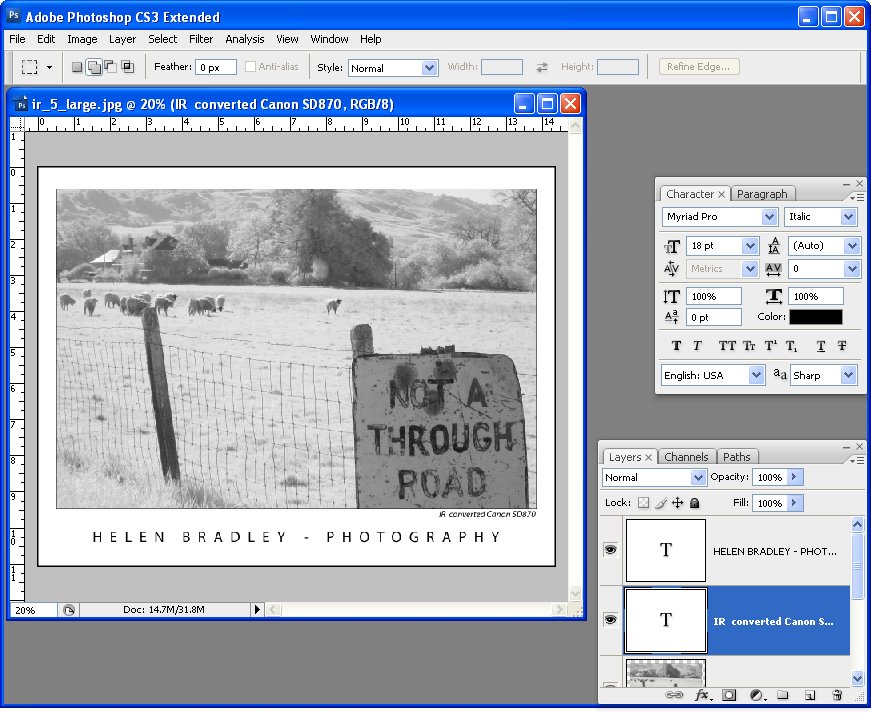
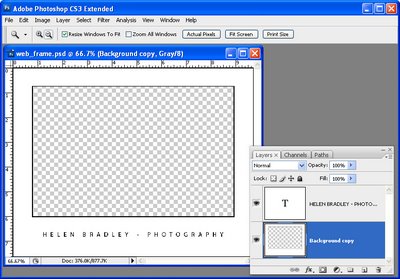
Click the Horizontal Type tool and select a relatively plain font such as Myriad Pro, black color and type your name below the photo. For example, I use “Helen Bradley – Photography”. To widen the spacing between the font characters so they fit better across the screen, select the text and press Alt + Right Arrow (Option + Right Arrow on the Mac). To center the text below the image, select the text and the image layer and choose Layer > Align > Horizontal Centers.

If desired, add the photo title and date captured on the right hand side underneath the photograph in the same font face but a smaller font size. This time, don’t stretch the characters apart and use an Italic font if desired. Align the last character in the title with the edge of the image.

Step 6
You’re now ready to save a version of this image as a JPEG file for web display.

Tip
Choose a ‘frame’ color that works for your images, you can use an off white color rather than white or reverse the colors and use white keylines and type, and a black frame. Whatever choice you make, it will ensure your photos are readily identifiable if you consistently use the same design for all your images.


Tip
If you are preparing a series of images to display on the web, you can create a frame shape with the keylines and type already in place on the frame layer and with a cutout area for the photograph to appear in. Save the frame image as a PSD or layered TIFF file ready for use. Open the frame and your finished photo. Flatten your photo image to a new layer using Control + Alt + Shift + E (Command + Option + Shift + E on the Mac) and drag this new layer underneath the “hole” that you have cut out of the frame image and size the image to suit. Save the framed version and repeat as required. When you have a lot of images to process and if you’re prepared to loose a little of the image edges for the sake of speeding up your workflow, you will find that adding an image to a frame is quicker than creating the frame for each image separately.

I blog for the online Digital Photography School and this post first appeared here Digital-photography-school.com.

Helen Bradley

Monday, February 16th, 2009

Excel: Open multiple workbooks


If you’re like me, you will open Excel in the morning and then open a series of workbooks that you work on each day. You can save time in finding and loading these files by creating an Excel Workspace.

To do this, open all the workbooks you want to have opened each time you launch Excel and then save them as a Workspace file by choosing File > Save Workspace and type a name for the file. Click Save and you can then open all the workbooks at one time by opening the Workspace file. Of course, if you just want to open a single file you can open it as normal.

In Excel 2007 – find the Workspace feature by choosing View > Window > Save Workspace.

Another alternative for opening files automatically when Excel opens is to save the file to the XLStart folder – when you do this, the file is opened every time Excel launches.

Helen Bradley

Wednesday, February 4th, 2009

Photoshop: Extracting Lines from a photo


Here is a link to my latest post on the Digital Photography School blog. It is also a technique I used in my Photoshop presentation for CHA designers recently as it is a really cool way to get lines out of an image. I love step 4 – in the previous step everything goes to white. In step 4 the Gaussian blur brings out the lines like magic!

Enjoy!

Helen Bradley

Wednesday, January 14th, 2009

Custom formats in Excel


Ok, so here’s the scenario, you want to enter a value like 20Kg (or 44 lb) into an Excel cell. All goes well until you try to multiply the value. Instant disaster. Your number isn’t a number it’s a piece of text and you can’t multiply or add text. You can’t divide or minus text or find the 4th power of it either – you get the idea.. it’s basically a useless entry – pretty but useless.

SO, how do you format a cell so it displays the Kg after the number but so it still treats the entry as a number? I’m so glad you asked!

The answer is to create a custom number format. Click the cell or a range of cells and choose Format > Cells > Number tab. Select the Custom entry and type something like 00.00 “kg” in the text box and click Ok. Now, enter the numbers again as 20 or 40 etc and the kg will appear automatically after the number courtesy of the format – and the number, well it’s still a number so you can add, multiply, divide and do all sorts of other wonderful things to it as you like.

You can also add the text before a number. So, for all those lovely Canada dollars I get paid by the folk at Hub Digital Living where I write a monthly Office column, I type a Custom format like “CAN” 00.00 in my sheet where I record my payments. It’s all so easly when you know how.. and now – you do too..

Helen Bradley

Monday, January 12th, 2009

Free Photoshop Brushes

Yup, I am a certified brush junkie and I just love free downloadable Photoshop brushes. However, I’m also a designer so I need to know what I can use for my designs and what I can only use for personal projects.

So.. I created this web page with a list of my favorite brushes. You get to see pictures of the brush sets, you get some detail about the set and the all important licence information. Click any of the links or the images themselves to go direct to the web site to download the brushes you like.

It’s all too easy and, best of all, I’ll be updating the page regularly so you’ll always find something new in the list and I’ll be adding links to my own custom brush sets so you can download them too.

If you have a favorite brush set you think I should include in the list, send me an email to helen(at)helenbradley.com, tell me about the set and give me the download link. If I like it, I’ll add it to the list and credit you for finding it.

You can also get regular updates on my favorite brushes by following me on Twitter. I post a new set nearly every other day.

Helen Bradley