

Wednesday, June 13th, 2007
Quick Question – what is 2 + 3 x 4?
Answer: 14
Surprised? Did you think it was 20? It’s not. Try it in Excel if you need proof. Type =2+3*4 and the answer is
Excel calculates according to an order of precedence which isn’t necessarily left to right. In this calculation it performs multiplication first and then the addition, hence the answer: 3 times 4 is 12 add 2 is 14.
To learn more about it, look up Order of Precedence in Excel Help.
In the meantime, the short explanation is that it performs things in brackets first, then percents, exponents (as in squared and cubed), multiplication and division, then addition and subtraction. If you have two of the same such as an addition and a subtraction they’re done left to right. So, to force the calculation to perform your way, put things in brackets when you want them done first.
In our case, to get an answer of 20, write the formula =(2+3)*4
Labels: Excel tip, Order of Precedence
Wednesday, June 13th, 2007
Changing Excel 2007 Default template location
Q: Where do you go to change the default locations for templates in Excel 2007?
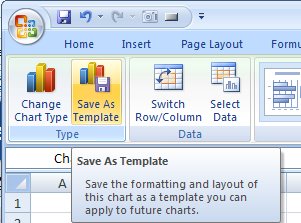
Luckily I already know the answer to this question because my bet is that it’s going to take your hours to work out how to do it. You see, there’s no way in Excel to change the default location for where its templates are stored, in particular as one of my blog readers found to his chagrin, the default location for saving chart templates.
Perhaps I’ll start this story again, this time at the beginning. In a recent blog entry I showed you how to save a chart template. The process is this: create your chart in Excel 2007 and then from the Design tab which appears only when you have the chart selected, click the Save As Template button in the Type group and save your file in your default templates folder which should be c:\Documents and Settings\username\application data\Microsoft\templates. The file should have the .crtx extension.
Close your Excel worksheet, close Excel, open Excel again, create the data for a new chart, select the data and choose Insert, Other Charts, All Chart types, Templates and your chart template should appear in the list. So far so good.
Problem is that not everyone’s installation of Excel 2007 looks to this default location for either saving chart templates or finding them when you need to use them. In particular you may confront this problem if you’re on a network. So the question then becomes where are your chart templates supposed to be saved to? Answer – who knows? You see, there’s no setting in Excel to say where to put them, so you have no clue where Excel is looking for them, so you can’t put them there because where is “there”?
So, we’re now at the point where we know there’s no setting in Excel for specifying the default location for templates. If we could set this, we could save our template there and Excel could find it… simple to understand, but problematic to achieve.
The solution that I found and which works is to make the change in Word 2007 – not exactly the first place you’d look huh? If you visit this link: www.kbalertz.com/kb_924460.aspx you’ll see buried in the KnowledgeBase article quoted there, information on how the template locations in Office 2007 programs are managed.
There are some registry entries that you can change but the simpler solution is to change the location in which your templates are stored using the Word settings. When you use Word 2007 to change the location where your Word templates are stored you also change the location where all Office 2007 templates are stored. So Word’s settings control every other program which is sort of handy to know because you could spend all day looking in Excel for a place to change the Excel template location.
So here’s the short information on how to change Excel’s default template locations: —
Start Word 2007, click the Office button and choose Word Options, Advanced and locate the General group. Click File Locations, User Templates, Modify and in the modify location dialog change the setting in the folder name list or the look in list to point to the folder where your templates will be saved.
For ease of access and backup I suggest that you put it where they were supposed to be put in the first place which is Documents and Settings\username\Application Data\Microsoft\templates but theoretically you could put them anywhere.
This changes the setting in the Windows registry so that all templates are now saved to this location.
The KnowledgeBase article makes essential reading for anybody trying to manage Microsoft Office applications particularly in a network situation.
Labels: defautl template location, Excel 2007, Word 2007
Saturday, June 9th, 2007
Outlook 2007 – what time is that in London?
I’m one of those people who suck bad at calculating time. I miss interviews in Sydney, I call New York at 5pm my time wondering why they aren’t still at work, and ask me the time in London and I can only guess at it – even though I talk to UK folk each week.
Thank you Outlook 2007! Now I can act smart on international times, provided no one knows my secret!
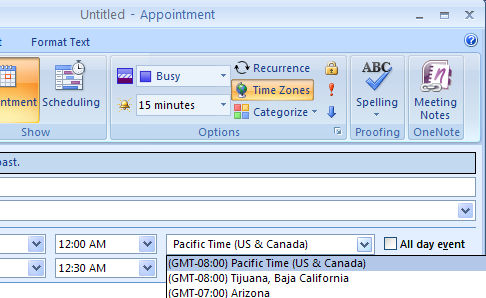
To set a cross timezone appointment in Outlook open the New Appointment dialog, select the Time Zone icon and, from the list, choose the second timezone – for me that might be 3pm in London. Outlook creates the appointment in my calendar in my time zone so I get the reminder when I need to call or be on hand for the meeting. It’s all way too easy… no more missed interviews.
Labels: Outlook 2007, time zones
Friday, June 8th, 2007
What’s your fancy? It’s Oriel for me…

The new PowerPoint 2007 is just wonderful! It really makes the task of creating a presentation easy and fun. Pity you can’t say that for the task of sitting through most of them!
If you don’t like the Office Theme which is the default, you can easily make any theme your own. Open the Theme gallery on the Design tab and right click the theme of your choice, choose Save As Default Theme and every time you start PowerPoint that’s what you’ll see. Neat huh?
Labels: defaults, PowerPoint 2007, theme
Thursday, June 7th, 2007
Love the theme, hate the background image?
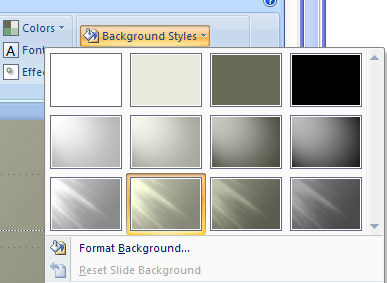
Yum, PowerPoint’s new themes. They’re fun, colorful and a far cry from the drab and boring ones we’ve lived with for so long. So, what happens when you love everything about a Theme except its background?
Well, since I’m waxing lyrical about PowerPoint you can probably guess I’m about to let you in on a trick for fixing the background problem in your PowerPoint 2007 theme love affair? Click the Background Styles option in the Design tab and there is an entire selection of different backgrounds all coordinated with the theme. If you change your color scheme the background’s colors change too – sweet!
Labels: background, PowerPoint 2007, themes
Wednesday, June 6th, 2007
Blog from Word 2007
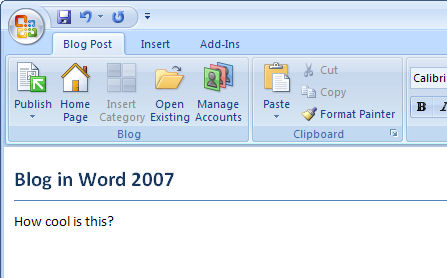
One of the coolest features in Word 2007 is the ability to blog from Word.
To do this, click the Office Button and choose New, New Blog Post. Click the Register Now button and choose your blogging tool, it’s Blogger for me. Enter the details of your account and choose the picture option to use for uploading images. If you have multiple blogs running from the one account, choose the blog to use with Word. It’s very simple then to create posts and upload them without having to
crank up your browser.
Labels: Blog in Word 2007
Monday, June 4th, 2007
Word Toolbars your way
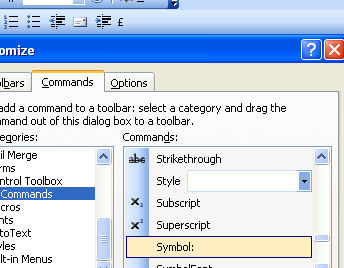
I use the £ and ¢ symbols a lot but they’re not on my keyboard. However they’re on my toolbar, thanks to the ability to customize Word’s toolbars.
Right click Word’s toolbar and choose Customize and then the Commands tab. Click the All Commands option in the Commands list and locate and click the Symbol: entry. Drag and drop it onto a toolbar and, when the symbol dialog appears, click the symbol to attach to the button and click Ok.
The toolbar button displays the font name and the symbol number. To make it look prettier, right click the button and type a different name for it. If the symbol can be typed using the keyboard by pressing the Alt key and typing out the numbers then do this. Alternately, click the Edit Button Image button and draw the symbol to create your own icon.
And, if you’re curious, the £ symbol is Alt + 0163 and the ¢ symbol is Alt + 155 – so now you know.
Labels: Microsoft Word, special symbols., toolbars
Thursday, May 31st, 2007
Haven’t I said this before?

Ever get that sense of deja vu – you’ve said this before.. oh so many times? Office has never had a good tool for managing blocks of text that you use repeatedly. The is AutoText and AutoCorrect but they’re not highly visible or intuitive. In Office 2007 another tool is thrown into the mix. The jury is out on whether this is a good thing or just another option that isn’t properly thought our or implemented. Anyway, it’s worth testing out to see if it works for you. BTW the technical term for text you use over and over again is boilerplate text… not sure why, but there it is!
In Word, for example, type and select the text that you use a lot and, on the Insert tab choose the Quick Part option. You can save the text and later insert it using the same tool – it’s kinda nice that the tool shows you the full text before you insert it.
Interestingly the same feature is available in Outlook 2007 where it just might be a litte bit more use.
Labels: boilerplate text., Outlook 2007, Quick Part, Word 2007
Tuesday, May 29th, 2007
Axe the Mini toolbar
If you don’t like the new mini toolbar that appears when you right click something in an Office 2007 document, you can axe it. You can’t customize it, you can’t add or remove anything from it but you can zap it.
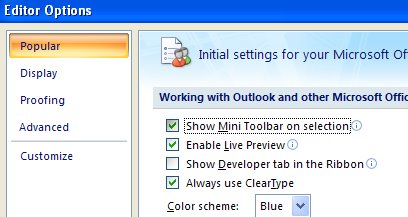
In Word 2007, PowerPoint 2007and Excel 2007 you do this by clicking the Office button and choose the Options link at the foot of the dialog. In the Popular group you will disable the Show Mini Toolbar on selection checkbox.
The steps are a little different in Outlook 2007 in Outlook, you need to open an element that uses the new Ribbon interface such as a new message window. Now click the Office button, Editor Options and disable the Show Mini Toolbar on selection checkbox.
If you want it back at any time, just reverse the process.
Labels: mini toolbar, Office 2007
Saturday, May 26th, 2007
Copying Styles in Word
If you often work on documents that need to use custom styles, you can easily copy the styles from one document to another – if you know how. Since you’re reading this, you’re about to be invited into the inner circle of knowledge.
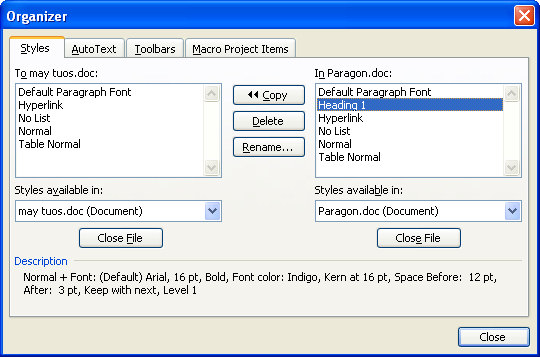
So, start with the document open into which you want to copy the styles. Choose Tools, Macro, Macros, Organizer – yep! sounds weird but it works!
Now click the Close file button on the right to close Normal.dot and then click Open File and browse to find the file to copy the styles from. If this is a regular file and not a template, you’ll have to select the correct file type from the Files of Type list. When you open your file, click the Styles tab and you can select and copy styles from one document to the other. Simple when you know how?
Labels: Copy Styles., Word 2003
Friday, May 25th, 2007
Showing the Styles pane in Word 2007
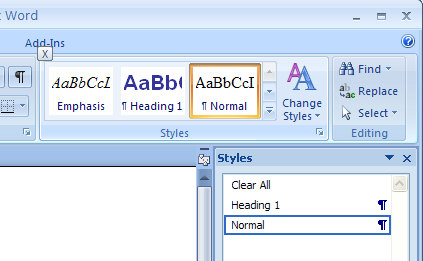
The Styles task pane in Word is a handy way of tracking what styles are applied to a paragraph and for formatting text with styles. You might be wondering if the Styles task pane is totally missing it in Word 2007. Don’t worry – it is still there, you just have to find it.
Click the Home tab and locate the Styles group. Click the indicator in the bottom right corner to open the Styles dialog – voila! just what you need. To dock it so it sits permanently on the right of the screen, double click its title bar. You can also display it by pressing Control + Alt + Shift + S.
Labels: Style Task pane, Word 2007
Wednesday, May 23rd, 2007
Quick moves in Word
As an extension to yesterday’s tip my preference for moving items around a Word document is to hold the Shift and Alt keys together and to use the Up and Down arrow keys.
This moves a paragraph up and down a document or, if you have more than one paragraph selected, it moves all of them up and down a document.
If you do this inside a table you move the table row up and down the table – neat but there’s more to come. If the table row moves past the top of a table it is broken out of the table and it becomes a table all of its own. Move some table rows from one table down into another table and they’re automatically incorporated into the second table. It’s an amazingly simple yet effective way of moving things around a Word document.
Labels: Microsoft Word, Moving paragraphs, table rows
Tuesday, May 22nd, 2007
Quick moves in Excel
My friend Theda and I were talking the other day about a project she’s working on where she has to reorder a lot of items into alphabetical order and, in some cases, an order which is not alphabetical.
While she is doing the project in Microsoft Excel there are, of course, difficulties in Excel in moving items around as Excel does not, by default, open up a row when you choose to move an item from one part of the worksheet to another – instead, Excel thinks you want to overwrite the target cells – as if!
There is, however, a way to do this which opens up the space for the new row and which closes up the space that you have just made available. To do this select an entire row or range of rows in Excel by clicking on the row number or numbers. Hold your mouse over the dark outline around the rows and hold the Shift key as you drag the rows to their new position. The empty space that you have created will be closed up and a new space will be created between the other two rows for your item.
Problem solved!
Labels: Excel 2003, Excel 2007, Moving rows