Tuesday, December 15th, 2009

Vista

Oh, I love Vista (Not!)

Ok, here’s my dilemma. I’m an administrator and I uninstall a program. It tells me during the uninstall that it has left bits and pieces behind in my Application Data folder. Ok, so I’d like to get rid of these. Problem is I can’t see the folder and when I opt to see hidden system folders, I can’t open it.

Yikes? Well not totally a problem. You see your

C:\Users\\Application Data

folder really isn’t a folder – it’s a shortcut – that’s why its icon has the bent arrow on it. It is really a shortcut to a real folder – called:

C:\Users\\AppData\Roaming

and that folder is totally accessible just by clicking on it.

So, you can clean up after programs if you know where to look!

Helen Bradley

Saturday, December 12th, 2009

Surprising Cambridge UK


I was lucky enough to spend a somewhat damp afternoon in Cambridge last month. The buildings were fantastic and the Christmas decorations were up which is always so colourful and fun.

I walked out through one of the colleges to the river Cam where I saw people punting along the river. It was just on dusk – around 4pm and it was totally picturesque.

Click here to see some of my images from that day.

Helen Bradley

Saturday, December 12th, 2009

Outlook 2007 Calendar display your way

You already know you can look at your Outlook calendar by viewing one day, one week or a month at a time.

Did you know you can also view the calendar in other ways? So, for example, if you need to see your plans for the next three Tuesdays you can do this.

Make sure the To-Do Bar is visible and switch to Day view so you are seeing only one day. Click on the first day to view in the Calendar in the To-Do bar and then Control + Click on each other day to view and it will open up in the same display.

Helen Bradley

Friday, December 11th, 2009

Five secrets of the marquee tools

There are two key marquee selection tools in Photoshop: the rectangular and elliptical marquee tools and they share a toolbar position. Here are some things you may not know about these tools.

1 Squares and circles


The rectangular and elliptical marquee tools can be used to draw perfect squares and circles. When you click and drag the marquee, hold the Shift key to constrain the shape to a circle or square.

2 A circle is a square? No thank you!


Try and draw a circle or ellipse in a fixed position on an image and you may be confused about just where the shape starts. A circle or ellipse is drawn as if it were placed inside a square or rectangle shape so you start drawing the shape from a corner of its square or rectangular container. All this makes it very hard to position a shape accurately. To make things easier you can draw your shapes from the center outwards by holding the Alt key (Option on the Mac), as you drag on the marquee tool. Add the Shift key to constrain the ellipsis to a circle.

3 Right shape, wrong place?

What do you do when you’ve drawn a perfect shape but in the wrong place on the image? Don’t let go the mouse! Instead, hold the Spacebar and you can now move the shape into the desired position. Let go the Spacebar and then let go the left mouse button fix the marquee in position.

4 Right shape, wrong rotation?


When you want to create a rotated shape such as a rectangle, square or ellipse, first create your shape using the marquee tool and ignore the rotation issue. Now let go the mouse button and choose Select > Transform Selection. The shape now shows a set of transform handles that you can use to rotate it. Hold the Ctrl key (Command on the Mac) and you can drag on a corner of the shape to distort it. Press Enter or Return to commit the transformation and remove the handles. You can now continue to work with the marquee selection.

5 Exact size selection


If you want to make a selection that is an exact size, from the Style dropdown list choose Fixed Size. Type the pixel width and height into the boxes and click on the image and a selection exactly the desired size will appear on it. Use Fixed Ratio to make a selection at a fixed ratio like 1:1 shown here.

Next time you need to make a selection on an image using the marquee tool remember that there’s a lot more to it than might meet the eye.

Helen Bradley

Thursday, December 10th, 2009

Outlook 2007 Remembers important Birthdays

If you’re one of those people who occasionally forgets important birthdays or anniversaries, then get Outlook to help you remember them.

To do this, add the person whose birthday or anniversary you need to remember as an Outlook contact in your Contacts list.

Click the Contact tab, from the Show group, click Details to display the details area of their contact data and type their birthday or anniversary in the place provided.

When you do this, these dates are automatically added to your calendar as events so you won’t forget them.

If you need to set a reminder for the event, locate the day it happens on and double click the event and choose Open Series. On the Recurring Event tab set the Reminder to whatever suits you – if you need to organize presents and restaurant bookings then set the reminder to a few days before the event.

Helen Bradley

Tuesday, December 8th, 2009

Photoshop image framing template

I love things that look good and which are simple to use and this custom framing technique is one of them. Here’s how it is done:

Step 1
Open an image to use as a template background. Here I’ve stacked two texture photos on top of each other and blended them with the Color Burn blend mode. I then added another layer with a brown blurred edge to give the design a vignette effect.

Step 2
Next create a new layer on the image and make a selection on it for the photo. Fill the selection with a solid colour. You can, if desired, add a grunge layer mask to this layer as I have done – I used a grunge edge from Graphic Authority and added a blended flower for decoration. I think the Graphics Authority grunge effects totally rock.

Step 3
Open the photo to frame with this design and drag its background layer into your template design. Rotate the image to match the rotation of the shape on the layer below and drag it on top of that shape. Choose Layer > Create Clipping Mask to mask the image to the shape below.

Once it is made, you can reuse this template by simply replacing the image layer.

Helen Bradley

Thursday, December 3rd, 2009

Get Smart with SmartArt

Oh yum! You just have to love the new SmartArt tool in Office 2007. It is part of Excel, Word and PowerPoint it will probably be most used in PowerPoint because this is where you will most need to display large scale diagrams.

SmartArt objects are great to use to illustrate processes, lists and the flow of information or product. In fact most business graphics can be created as SmartArt objects improving their look and readability.

In PowerPoint 2007, SmartArt objects can be created two ways either by converting a list or text selection into a SmartArt object or by creating the SmartArt object from scratch.

If you have an existing list or text you want to display as a SmartArt object, select the text and, from the Paragraph group on the Home tab in PowerPoint 20007, select the Convert to SmartArt Graphic button.

Select a graphic object to use for the text – you can preview what the graphic will look like by holding the mouse pointer over the graphic and see how the text will display in it on the slide underneath.

If none of the SmartArt designs listed are what you want, click the More SmartArt Graphics button to see more options. Right now, just look for a basic layout for your SmartArt graphic as the actual look of the graphic can be adjusted later on.

Edit the text
When you convert text into a SmartArt graphic you can edit the text by clicking on the SmartArt graphic, and select the double pointing arrows on the right hand border of the object to open the text dialog. Here you can type different text if desired or add additional entries each of which will become another element in the SmartArt design.

Once you have the text in place use the SmartArt Tools > Design tab on the ribbon to format the shape. The SmartArt Styles collection gives you a range of styles that you can choose from to apply to the graphic. If you find a style that you like but the color is not correct, apply the style and then click the Change Colors button and choose a different color scheme for the shape.

Create SmartArt from scratch
It is also possible to create a SmartArt graphic from scratch using the Insert tab. Click the SmartArt button and then choose a SmartArt design to use and you can then enter your text and format it to suit your needs. This is the same option you have in Excel and Word.

You can change the look of the text inside a SmartArt object by selecting the SmartArt object and, for example, change the text format to one of the WordArt styles in the WordArt styles list.

Having chosen a WordArt style you can then change the color of the style using the Text Fill options. Notice too that when you resize a SmartArt object the text inside the object automatically resizes to fit it.

Graphics in SmartArt
You will see that many SmartArt objects include containers into which you can insert graphics. To do this, click on the graphic icon in the SmartArt element and a dialog will open allowing you to select a graphic to use for that element.

Helen Bradley

Wednesday, December 2nd, 2009

Custom color swatches in Photoshop

I’ll often look at the color palette in Photoshop and find it difficult to locate a nice rich brown color, for example. A useful solution is to create a swatch of the colors I most often want to use so I can load it when I need it.

To do this you can find the colors you want in your own photos. Open an image which is largely monochromatic and which contains the colors you are interested in. For example open a bark image to get browns and a leaf image to get greens.

Step 1
Choose Image > Mode > Indexed Color and, when the Indexed Color dialog appears, from the Palette list select Local (Perceptual) Colors, set the Colors to 256, set Forced to None, set the Dither to None and click Ok.

Step 2
To save the Palette choose Image > Mode > Color Table to see the colors sampled from your image. Click Save and type a name for your color table – it will be given the .ACT extension. Save it to your \Presets\Color Swatches folder.

Step 3
In future, to use the colors from your saved swatch, choose Window > Swatches and open the palette flyout menu. Choose Load Swatches and, from the Files of Type list, choose Color Table (*.act). Select your file and click Load to load the colors as a new Swatch.

Helen Bradley

Tuesday, December 1st, 2009

Word 2007 – Add a Date Picker control

Word 2007 has a cool Date Picker control you can use to insert a date into a document.

To insert one into your document first display the Developer tab by selecting the Office button, click Word Options and from the Popular category choose the Show Developer tab in the Ribbon option.

Now click the Developer tab and, in the Controls area you’ll find entries for the Building Block Gallery and for elements such as a Date Picker and a Text Box which you can use in your documents.

Select Design Mode, click the Date Picker control to add it and then click Design Mode again to exit that mode.

The user will see a Click here to enter a date option and, when they click the content control, a dropdown date picker will appear allowing them to select a date to insert into the document.

To ensure the date is formatted in a particular way, with Design Mode enabled click the Date Picker and choose Properties from the Ribbon. From the Properties dialog select a date format to use from the list.

You can use content controls like these to create memo and fax cover sheets complete with prompts to your user as to the details required.

Helen Bradley

Tuesday, November 24th, 2009

Word 2007: Make your own Click and Type controls

Word 2007’s new Content Controls let you do some pretty snazzy things in your Word documents.

You will have worked with Word’s own controls when you add a cover page or header and footer using the Insert tab options in Word 2007. In this case you may have noticed that, if your document already has a title configured in the document properties, the title appears automatically on the cover page and in the header.

Alternatively, if it doesn’t have a title, when you double click the Title area and type one, any other object in the document that includes a title will be updated automatically. This behavior occurs because the document information is inserted using content containers which are linked to the document properties.

You can take advantage of this behavior in your own designs and you can create and use unlinked content containers to prompt for details to be inserted in your own documents.

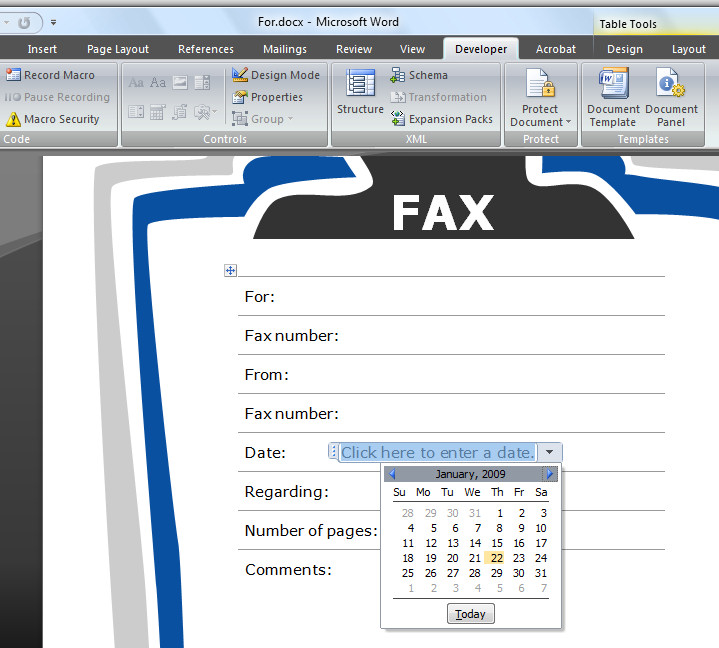
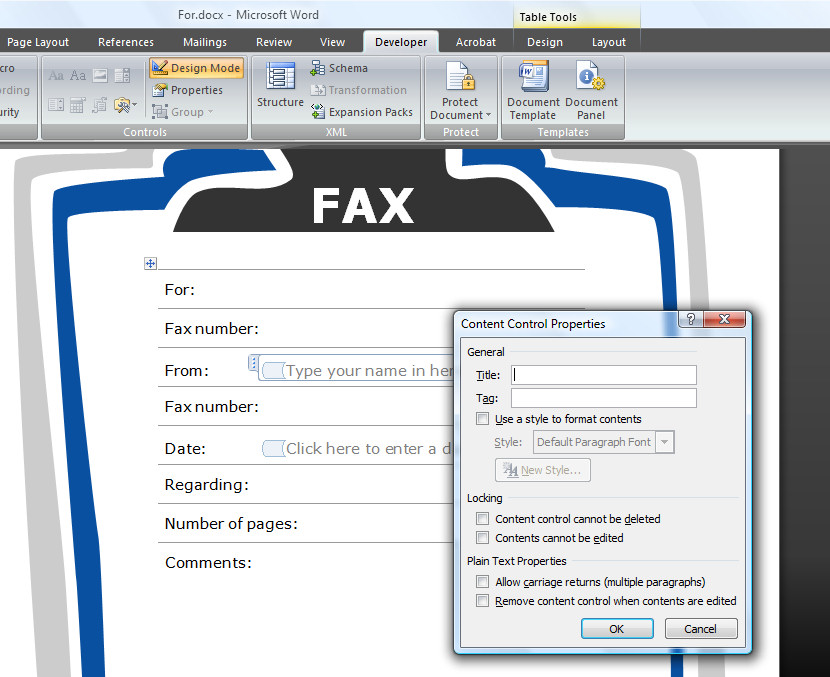
To see how content containers work you’ll need to display the Developer tab which you can do by selecting the Office button, click Word Options and from the Popular category choose the Show Developer tab in the Ribbon option.

Click the Developer tab and, in the Controls area you’ll find entries for the Building Block Gallery and for elements such as a Date Picker and a Text Box which you can use in your documents.

So, for example, to prompt a user to insert an entry from the Quick Part Gallery, click where you want the Quick Part Gallery entry to appear. Click the Developer tab and click the Design Mode button so you are in design mode.

Now click the Building Block Gallery button. This inserts a small content container with the words [Choose a building block] as the prompt. Exit Design Mode by clicking Design Mode button once again and you will see that the document contains a clickable link in this position prompting the user to choose a building block.

In practice, all the user needs to do is to click on the Choose a building block link to show the dropdown list and they can then select the building block to insert at this position in the document.

You can also provide a link that the user clicks on to type custom text. To do this, check you’re in Design Mode and select the Text button from the Controls group. Between the markers type the text describing the content to be inserted in this position.

To test this, deselect Design Mode and click the element to see it highlighted and type the text prompted for. The text you type appears in line with regular text in the document and can be formatted by right clicking on the text and apply a format to it.

Note, however, that the entire content control is formatted at the one time and individual letters and words cannot be formatted independently of the others.

Helen Bradley