Wednesday, May 9th, 2007
Ok, so Outlook 2007 is running like a dog. It’s slow and cumbersome to use. Microsoft has admitted it and pointed a finger at overlarge .PST files. One wonders why Microsoft persists in forcing hapless users to jam all their emails (plus attachments) and RSS feeds into one .PST file anyway. Heaven help the new user who plain doesn’t understand what a .PST file is anyway, much less why it affects their system performance.
Until the folks at Redmond come to their collective senses and offer us an alternative solution, your options are to work around it. Split your emails into multiple .PST files by archiving them and keep your main .PST file at a small size.
Here are Microsoft’s current series of recommendations for speeding up Outlook 2007, it’s a KnowledgeBase article, and here’s a link to an update for Outlook that promises to fix some of the speed issues: Microsoft Outlook 2007 update download site.
I just have to have the final word here… why, in 2007, should are we still bothered by this stuff?
Helen Bradley
Labels: Outlook 2007, speed, update
Categories:Uncategorized
posted by Helen Bradley @ 4:14 pmNo Comments links to this post
Tuesday, May 8th, 2007
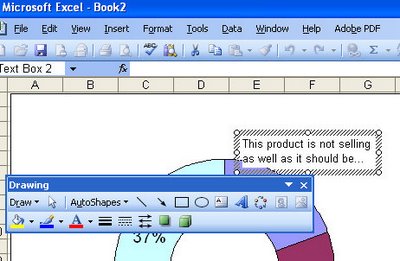
It’s easy enought to place a title or Y and X axis titles on a chart but what about a note or comment?
The secret is in the Drawing tools. Display the Drawing toolbar and click on the Text Box button. Now you can drag a text box on your chart and add text inside it. Size it, format it and you’re off.
Helen Bradley
Labels: chart, Excel 2003, text on a chart
Categories:Uncategorized
posted by Helen Bradley @ 4:52 pmNo Comments links to this post
Monday, May 7th, 2007
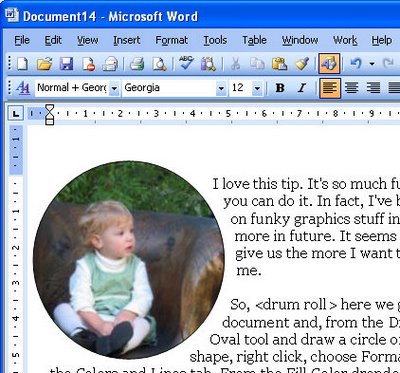
I love this tip. It’s so much fun and so unexpected that you can do it. In fact, I’ve been working a lot lately on funky graphics stuff in Word so expect to see more in future. It seems like the fewer tools they give us the more I want to make them work for me.
So, here we go. Open a Word document and, from the Drawing toolbar, click the Oval tool and draw a circle on the page. Click the shape, right click, choose Format AutoShape and click the Colors and Lines tab. From the Fill Color dropdown list choose Fill Effects then the Picture tab. Then click Select Picture and locate and open your image by clicking Insert. Click the Lock picture aspect ratio checkbox and click Ok twice. It sounds complicated but it’s really pretty easy to do and the results.. well they’re great.
Better still, you can use any shape – it doesn’t have to be a circle… any of the AutoShapes will do.
Helen Bradley
Labels: circular images, Microsoft Word, shapes
Categories:Uncategorized
posted by Helen Bradley @ 4:31 pmNo Comments links to this post
Friday, May 4th, 2007
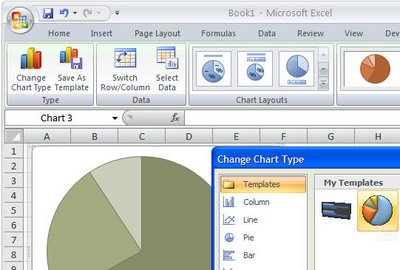
Sometimes you’ll create a chart that just looks so good you want to save the ‘look’ so you can use it again. You can do this by turning your chart into a template. This would be a technique you could use if you were creating a report and you need to use multiple charts that are all formatted in a similar way.
To save a chart as a template, first display or create the chart and select it. On the Chart Tools, Design tab, choose Save As Template in the Type group. In the Save In box check you’re using the Charts folder and type a name for your template and click Save. Later, to apply the template, to a chart you’re about to create, select your data the Insert tab, click the Other Charts button to open the list and choose All Chart Types. Choose Templates and then the template you just saved. If you already have a chart created, click the chart and click the Design tab, then Change Chart Type. Click Templates, then click the template to use from the My Templates area.
You can store lots of templates to meet any need you might have and change from one to the other as required.
Helen Bradley
Labels: chart, Excel 2007, template
Categories:Uncategorized
posted by Helen Bradley @ 4:34 pmNo Comments links to this post
Thursday, May 3rd, 2007
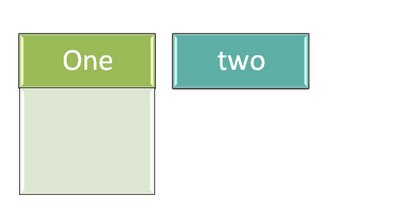
I love the new SmartArt feature in Office 2007 and I’d buy Office just to get hold of it. The images are drop dead gorgeous and they’re so easy to make and to color.
So, what’s better than great looking SmartArt? Animated SmartArt, that is. Launch PowerPoint 2007 and create a SmartArt object. Select it and then click the Animations tab. From the Animate dropdown list choose One by One and Preview the result – deliciously animated SmartArt. Of course, you can do all sorts of Animations – this is just to whet your appetite.
Fun huh?
Helen Bradley
Labels: animate, PowerPoint 2007, SmartArt
Categories:Uncategorized
posted by Helen Bradley @ 7:54 pmNo Comments links to this post
Wednesday, May 2nd, 2007
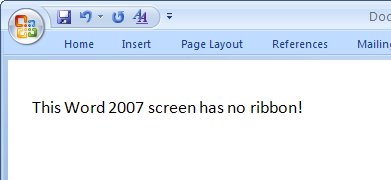
Ok, I’m on record, I love the ribbon in Word but on my laptop with its scrunched up screen (in the tradeoff between size and weight, I opt for weight!) the ribbon is sometimes too big.
Not a worry, it’s simplicity itself to hide it. Press Control + F1 and it disappears and press it again and it reappears. You can also have it disappear so it will come back with a single click on any tab name. To do this, double click a tab name and the ribbon disappears. Single click a tab name and it reappears – click again on the tab or in the document, and it disappears. Repeat until you’re tired of the magic! Double click or Control + F1 to go back to how it is.
It’s a neat party trick to play on a co-worker (no! I did not tell you to do that), and a great way to buy back some much needed screen real estate.
Helen Bradley
Labels: Hide, Office 2007, Ribbon
Categories:Uncategorized
posted by Helen Bradley @ 11:37 pmNo Comments links to this post
Tuesday, May 1st, 2007
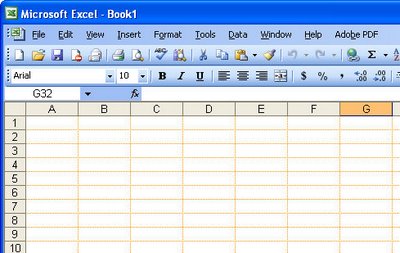
Ok, grey is my favourite colour – it’s the colour of my old school uniform. I’m an Aussie and we still wear uniforms to school! Mine was grey serge in winter and grey cotton in summer, complete with hats and gloves. I kid you not and this is seriously OT and it uses Australian spelling so I’ll get back to what I was saying.
Ok, so gray might be my favorite color but it’s probably not yours. If Excel’s gray gridlines offend your color sense, you can change them or remove them entirely. To remove them choose Tool, Options, View tab and disable the Gridlines checkbox.
To change the color of the lines, choose Tool, Options, View tab and choose an alternate color from the Gridlines color dropdown list. If you didn’t realise gridlines were little dots and not solid lines, you’re about to see that that’s exactly what they are.
Helen Bradley
Labels: Excel 2003, gridlines
Categories:Uncategorized
posted by Helen Bradley @ 2:54 pmNo Comments links to this post
Monday, April 30th, 2007
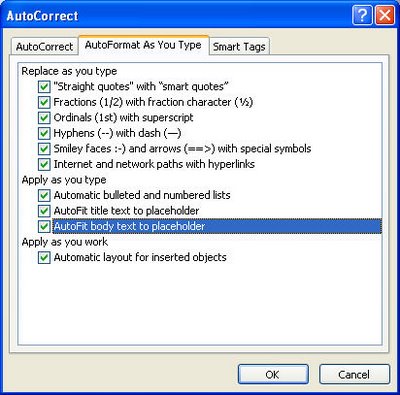
PowerPoint has a handy tool (or a very annoying one – depending on your perspective) for adjusting text on a slide.
In PowerPoint 2003 and earlier choose Tools > AutoCorrect Options > Autoformat as you Type and you will see that there is an option called Autofit body text to placeholder. Enabled this and all the text that you type on a slide is automatically sized to fit the slide – you can type gobs of text and it just keeps getting made smaller and smaller as PowerPoint shoehorns it in so it fits.
If you disable this option, you get to control the slide’s text size yourself – a rough rule of thumb is that if it goes over the edge – it’s too much text for one slide so make another one or edit your text.
Autofit is a tool you can disable or enable as you like – once you know it’s there – it’s your choice what you do with it.
Helen Bradley
Labels: Autofit, PowerPoint, slide
Categories:Uncategorized
posted by Helen Bradley @ 7:52 pmNo Comments links to this post
Friday, April 27th, 2007
Hmm – there is good and bad in everything I presume but I’m particularly bummed by the fact that a couple of the tools that I have grown to love in PowerPoint over the years have been removed from the new PowerPoint 2007. Well, perhaps love is too strong a word, but I liked them a lot and they’re gone.
Gone is the AutoContent Wizard but you can find much of its functionality in templates. There’s no broadcast feature and no macro recorder (but you can still use macros), and no title master – but there’s a new title layout which really makes better sense. All this I could live without, what I’ll miss is the Speaker Notes tool which let you record notes while making a presentation which you could save later on. Gone too is the summary slide tool which really is a big omission – summaries were a great way to create an agenda so folks knew what they’d be learning… poor choice of tools to go in my book.
Helen Bradley
Labels: missing features, PowerPoint 2007
Categories:Uncategorized
posted by Helen Bradley @ 9:53 pmNo Comments links to this post
Thursday, April 26th, 2007
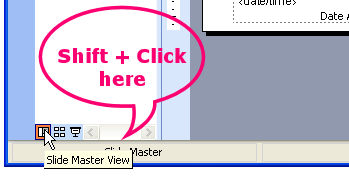
If you’re like me and you use the PowerPoint master view a lot—and you really should because it allows you to control the formatting of all the slides in your presentation from one place—you will know that there’s no quick way to open into master view.
That is unless you read this tip.
To quickly access the slide master view hold Shift and click the Slide View button in the bottom left corner of the PowerPoint screen. This automatically opens master view allowing you to work on the slide master then close it and return to your PowerPoint presentation. Simple, when you know how?
Helen Bradley
Labels: master slide, PowerPoint
Categories:Uncategorized
posted by Helen Bradley @ 4:55 pmNo Comments links to this post


