Thursday, January 19th, 2012

Winter Photography tip #5 – Play with Depth of Field

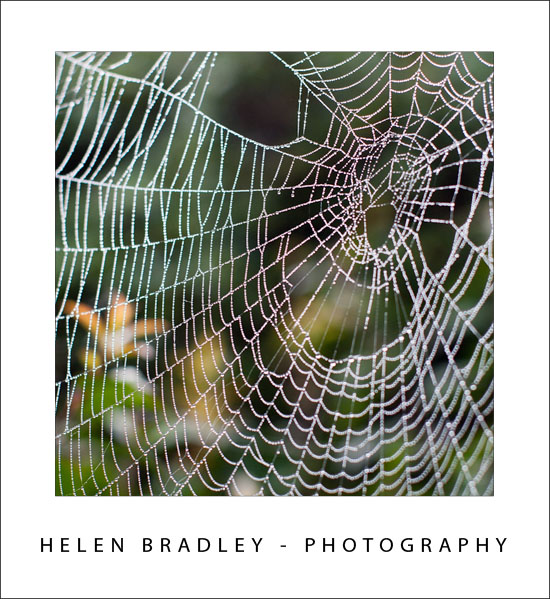
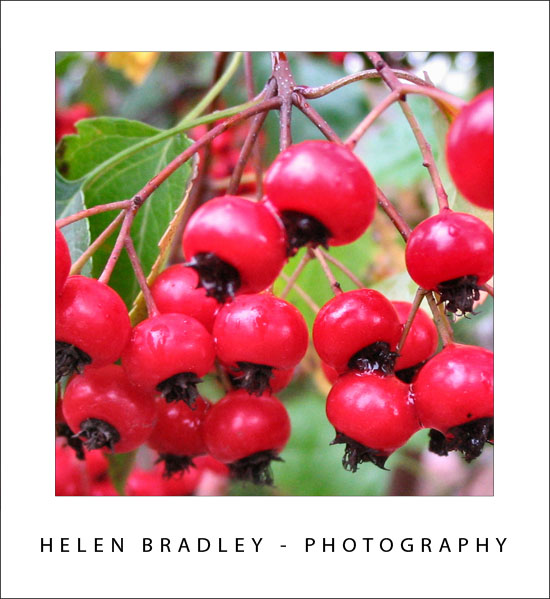
Winter is a great time to capture images taking advantage of your camera’s ability to create depth of field effects.

Get close to your subject and use an aperture setting of f2.8 or f4. When you use a wide aperture you achieve a very small depth of field so there will be a small amount of the image in focus and most of it out of focus. This is a great way to turn an otherwise humdrum subject into something a lot more interesting.

Helen Bradley

Tuesday, January 17th, 2012

5 Top Tips for Lightroom Develop Presets

Develop Presets are powerful Lightroom tools. You can use them to quick start your editing in Lightroom and to apply creative fixes to your images. You can create your own presets and you can download them from the web. Here are my top five tips for harnessing the power of Develop Presets.

1 Create Disconnected Presets

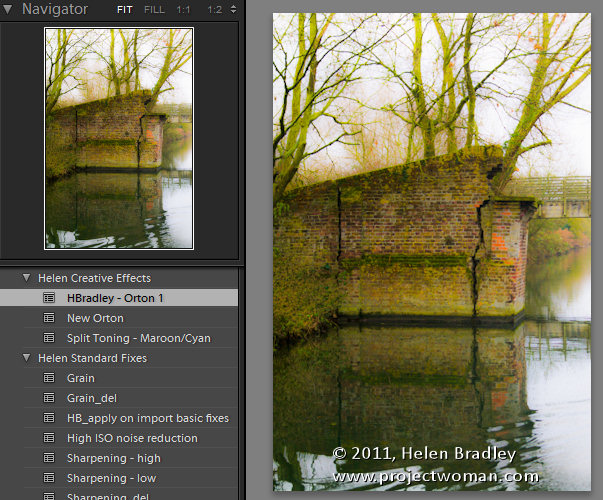
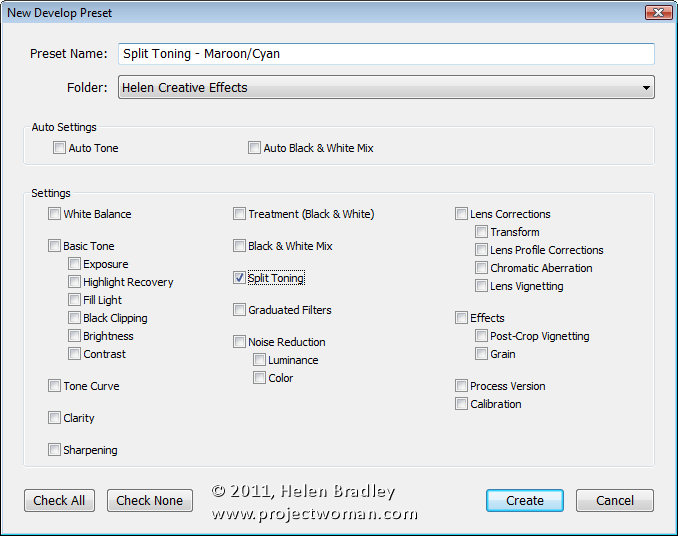
Instead of creating a preset which, for example, applies a split toning effect as well as a vignette to an image, split this into two separate presets. Then you can use the split toning effect as well as the vignette if you want to do so but you also have the ability to apply one and not the other. If both effects are applied with one preset, you’ll have some work ahead of you to undo one of the effects. In addition when they are separate presets the vignette, for example, could be used on images where you would not consider also using the split toning effect.

2 Create Undo Presets

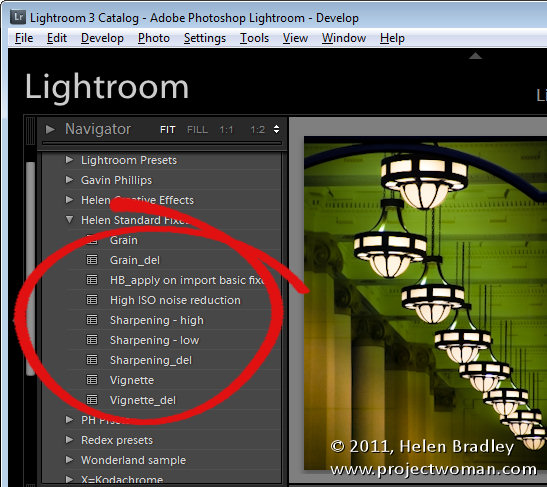
When you create a preset that adds, for example, grain or a vignette to your image, consider at the same time creating a preset that removes that effect. If you call the two presets the same name such as Grain_heavy and the delete preset Grain_heavy_del they will appear side by side in the list and it will be obvious that the second preset cancels out the effect of the first. Then, when you apply the preset and subsequently make other changes to the image you can easily remove the effect of the preset without having to wind back all the changes you’ve made.

3 Choose the Right Tools

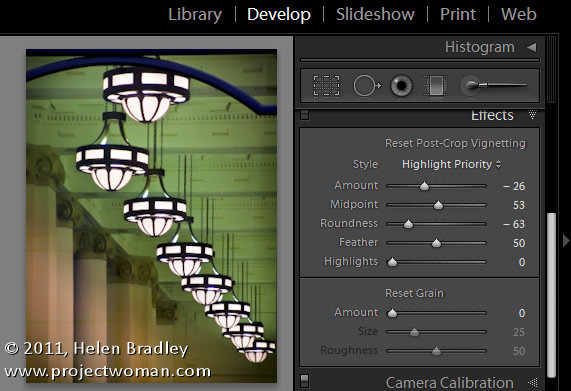
I recently downloaded a great preset which applied a cool effect as well as a vignette. Unfortunately the designer applied the vignette using the Lens Vignetting tool in the Lens Correction panel. This isn’t a post crop vignette so, while the preset worked fine on some images it failed spectacularly on images which had been cropped. When you want to add a vignette, do this using the Effects panel’s Post Crop Vignetting options so your preset will work on any image cropped or not. Testing your presets with a range of images will tell you if they have problems that using a different solution may avoid.

4 Organizing Presets

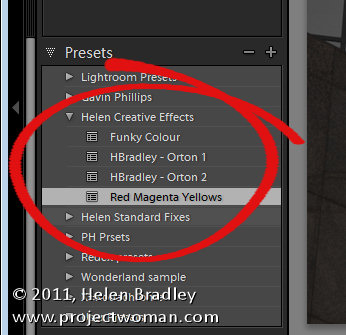
If you’re creating a lot of presets or downloading a lot of presets from the web, it will help to organize them neatly. For this purpose, I like to create separate folders for preset sets that I download from the web. This allows me to open or close a folder of presets to display all its contents or shrink the list to show just the folder title. Be aware that the folder  hierarchy for presets is very flat and you cannot create folders inside folders for example.

If you have a lot of your own presets consider grouping them in folders too – so you might have a folder of editing presets and then a second folder of more creative presets. You can drag and drop presets from one folder into another in the Develop module.

If you download or create presets and you know you will never use them, right click the preset and choose Delete to remove it from Lightroom and from your disk.

5 Apply them on Import

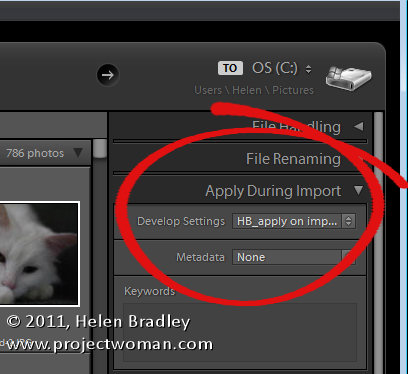
Here’s a good reason for ignoring Tip #1 (at least for now) and for creating a Develop Preset that applies all the changes you typically apply to your images. So, if you typically apply some extra Brightness, Clarity and Vibrance and some noise reduction to your images, make all these changes to an image and save them as a preset. Now, in the Import dialog’s Apply During Import panel you can choose this preset and have it applied automatically to all images as you import them.

Helen Bradley

Saturday, January 14th, 2012

Winter Photography tips #4 – Capture Reflections

When you’re looking around a scene for photographic opportunities take the time to look down as well as out and up.

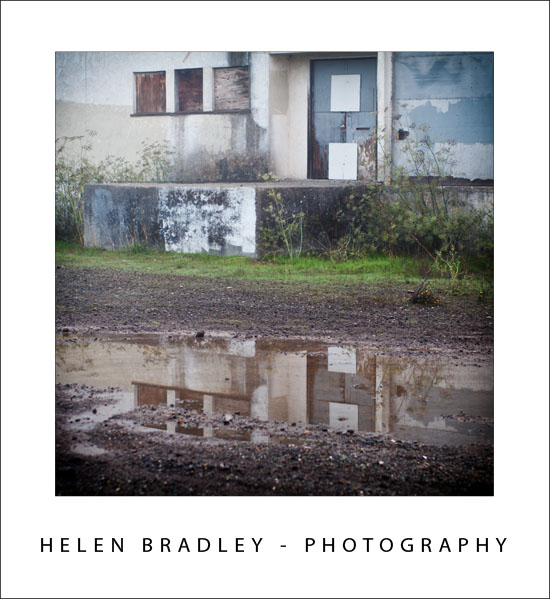
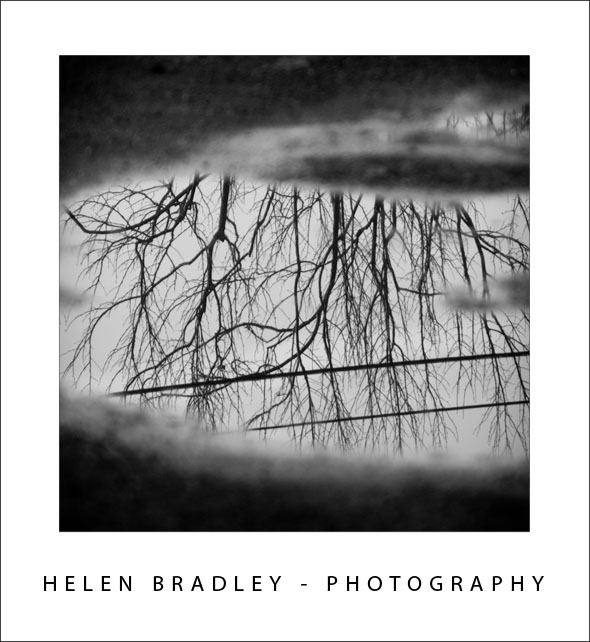
Winter brings with it not only stiller waters but also puddles created by rainfall.

On any day when rain has fallen a wealth of photographic opportunities exist at your feet. Capture a scene in a puddle to get a reflected image with artistic qualities that simply aren’t there when you take a photograph of the object itself.

Helen Bradley

Thursday, January 12th, 2012

Ten best Photoshop shortcuts

Photoshop has a huge range of shortcut keys for speeding up your day. Here are my ten best shortcut keys that I suggest you add to your Photoshop toolkit:

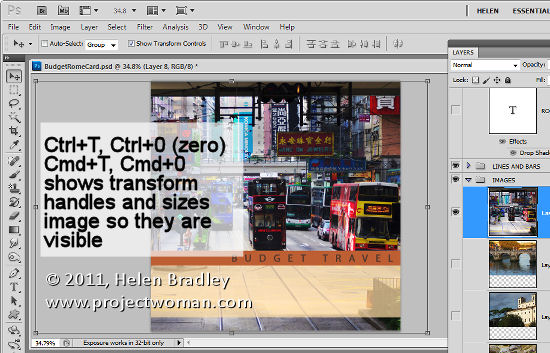
Find the sizing handles

When you paste a layer or selection into a Photoshop image – if it is larger than the current image it can be difficult to find the sizing handles.

To find them, press Ctrl + T, then Ctrl + 0 (zero) or on the Mac – Command + T, Command + 0. This selects Transform and sizes the image inside the window so you can see the sizing handles.

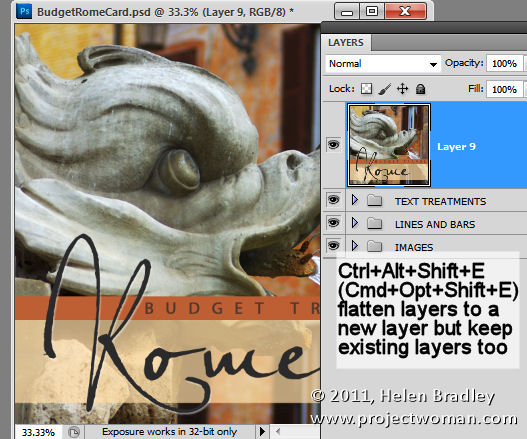
Flatten layers but keep them too

Sometimes you need, for example, to flatten the layers in an image to sharpen the result but you don’t want to get rid of the layers either. Here’s how to have your cake and eat it too (or more accurately, flatten your layers and keep them too).

Add a new empty layer to the top of the layer stack, click in it and press Ctrl + Alt + Shift + E (Command + Option + Shift +E on the Mac). This adds a flattened version of the image to the new layer but leaves the layers intact too.

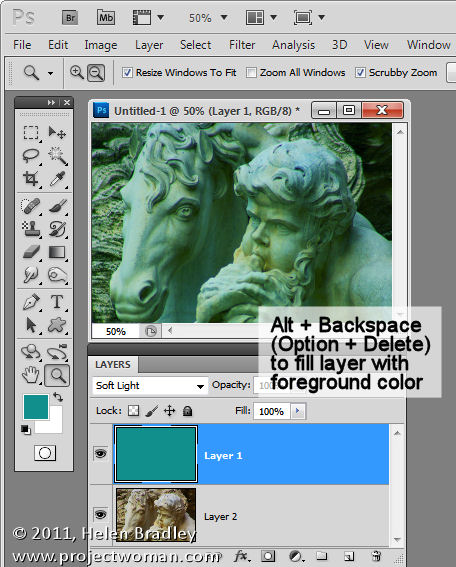
Fill a layer

To fill an empty layer with the current foreground or background color use Alt + Delete or Option + Backspace on the Mac to fill the layer with the Foreground color or Ctrl + Delete or Command + Backspace on the Mac or to fill with the Background color.

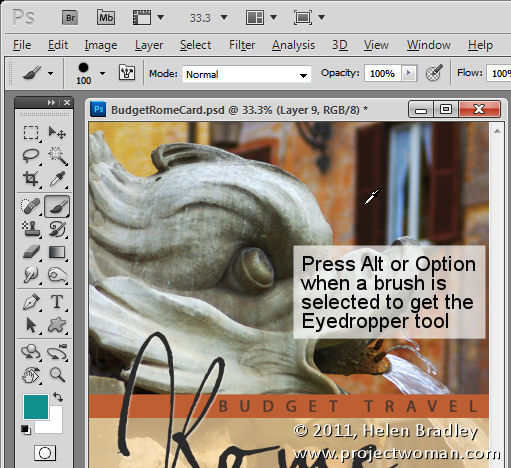
Select a color from the image

When you’re working with a Photoshop brush and you want to sample a color from the image, instead of clicking the Eyedropper tool and then the Brush tool again, you can do it with a keystroke.

Hold the Alt the key (Option on the Mac) to switch temporarily to the Eyedropper tool and click to select a new foreground color. Let go the Alt/Option key to return to the brush.

Move a selection

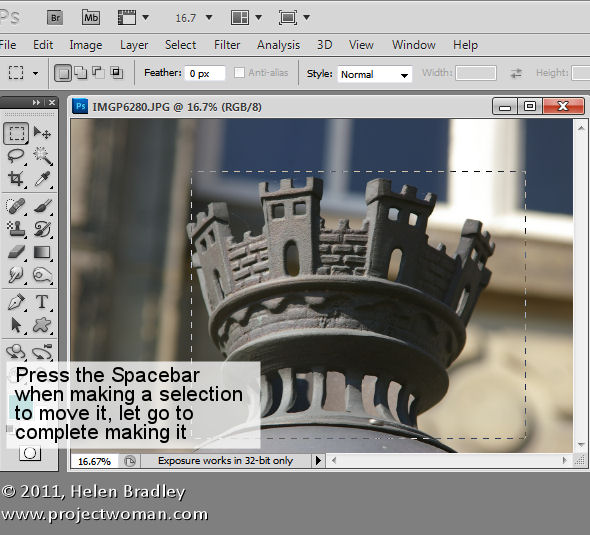
Moving a selection is notoriously cumbersome without this keystroke: to move a selection while you are still drawing it, press and hold the Spacebar. Continue to hold the it while you move the selection and let it go when the selection is in the correct place.

Adjusting brush size

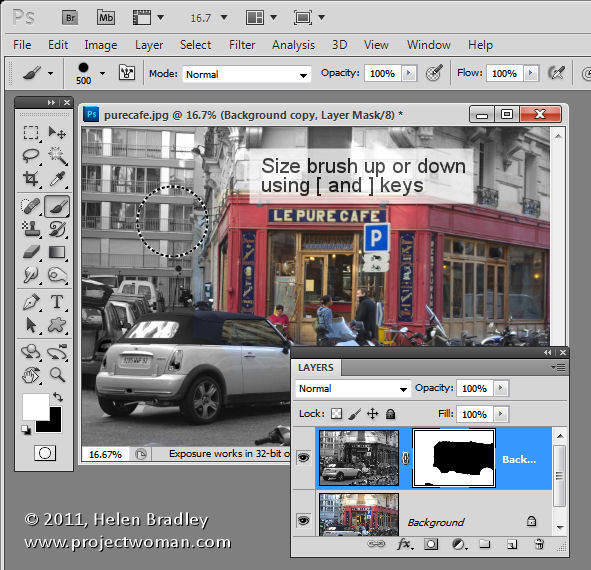
When you’re using a brush as an eraser, to paint with or in any tool that uses brushes, you can size the brush up or down using the [ and ] keys on the keyboard. In Photoshop CS5, you can hold the Alt key and the right mouse button (on the Mac use the Control + Option keys) and drag up to increase or decrease brush hardness and drag left and right to size the brush.

Scrubby sliders

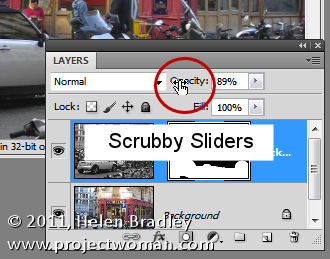
Not technically a keystroke but a “must know” tool are scrubby sliders. In Photoshop CS3, and later, most options in most dialogs that can be adjusted using a slider can also be adjusted using a scrubby slider. Scrubby sliders appear as a hand with a pointing finger icon when you hold your mouse over the slider name. Drag on the name to adjust the slider value.

Zoom and Move with dialogs open

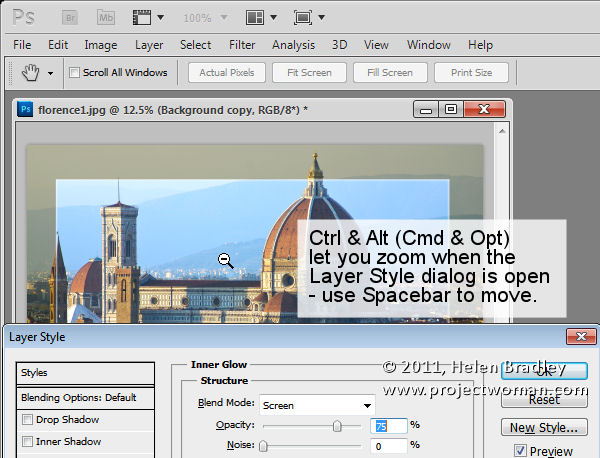
When a dialog such as the Layer Style dialog is open you can access the Zoom and Move tools by using Ctrl (Command on the Mac) to zoom in and Alt (Option on the Mac) to zoom out of the document. Use the spacebar to access the Hand tool to move the document around.

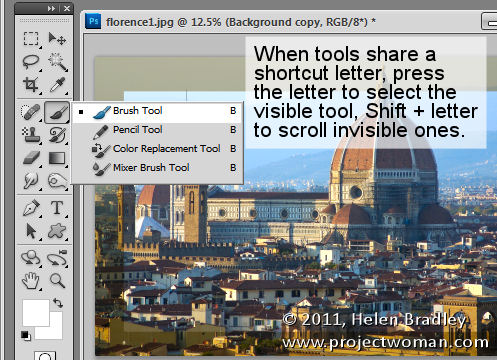
Hidden tools

Tools that share a tool palette position and a shortcut keystroke letter can be easily selected using the keystroke letter. So, for example, to access the Mixer Brush which shares a tool position with the Brush tool and if the Mixer Brush is hidden, press B to get the Brush tool. The press Shift + B until the Mixer Brush appears. In a similar way press M to get the Rectangular Marquee tool and Shift + M to get the Elliptical Marquee tool.

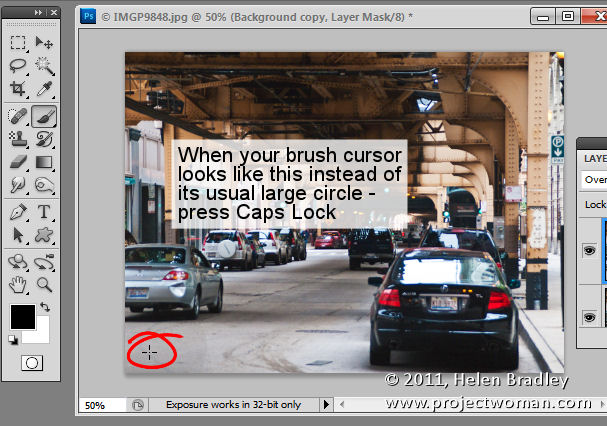
Precise and crosshair cursors

Finally, not so much a keyboard shortcut as something that can go horribly wrong –  pressing the Caps Lock key switches the Brush cursor into precise mode. This is a small crosshair cursor and hides the actual size of the brush. To return to the regular normal or standard brush tip, press the Caps Lock key again.

If I were helping a new user learn Photoshop, these are ten keystrokes I’d be teaching them. Do you agree or what keystrokes do you think are the most important to learn in Photoshop?

Helen Bradley

Tuesday, January 10th, 2012

Pattern fills for your Excel 2007 charts

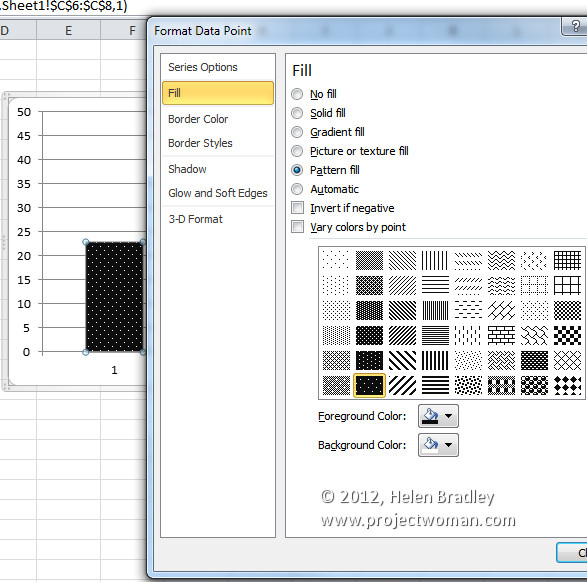
In Excel 2003 and now in Excel 2010 , there are pattern fills which you can use to fill chart bars so your charts print just great in black and white.

Unfortunately the same feature was removed from Excel 2007 – wtf? I have no clue why but it was but it has to be a very silly thing to have done.

If you are using Excel 2007 and you need to use pattern fills with a chart you are out of luck – well not really – you just need to read the rest of this tip because I can tell you how to put the fills back into Excel 2007.

To begin, download this handy add-in: http://officeblogs.net/excel/PatternUI.zip 

Update: This link is no longer live so patternui.zip is not longer available. You can find an add-in here (with instructions which achieves the same thing) courtesy of Andy Pope.

The zip file contains a single file patternUI.xlam which you need to extract and place somewhere you will find it easily and where it won’t get deleted by accident. You could make an Excel add-ins folder for it, for example.

Once you’ve done this, open Excel 2007 and choose the Office button > Excel Options > Add-ins and from the Manage dropdown list, select Excel Add-ins and click Go. This opens the old Add-ins dialog from earlier versions of Excel. Click Browse and locate the .xlam file that you just unzipped and placed somewhere safe. Select it and click Ok. Ensure that the PatternUI option appears in the Add-ins available list and that it is checked and click Ok.

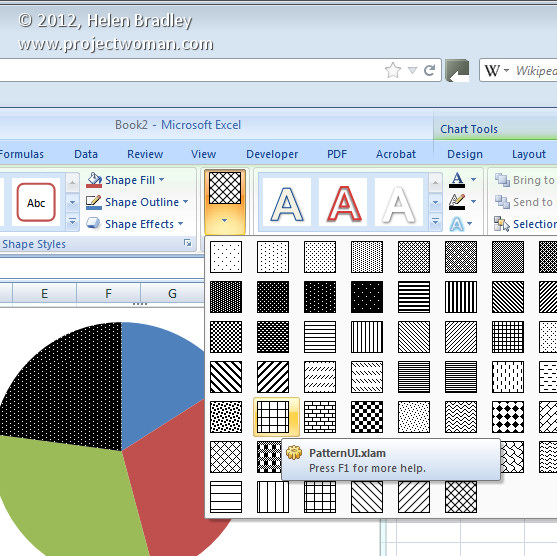
Now create an Excel chart. Once you have you chart, click on the data series to fill with a pattern – if you have a single series plotted then select just one of the columns at a time. Select the Chart Tools > Format tab and notice that you now have an option called Patterns available. Click the Patterns option and select a pattern to apply to the currently selected chart series or column. Click on each series or column in turn and apply a pattern to it. When you are done, you can print your chart as usual.

Installed add-ins are managed automatically by Excel so you will find that the add-in will still be there and accessible next time you use Excel.

If you are using Excel 2010 you don’t need this add-in as the pattern fills are back where they should have been all the time.

Helen Bradley

Tuesday, January 10th, 2012

Photoshop – 6 “must save” settings

One feature of Photoshop is its ability to store things like custom shapes, brushes and workspaces so you can use them again and again. Saving settings you use a lot in Photoshop will save you time in future when you need to repeat the process.

Here are six handy ways to speed up your work in Photoshop by saving custom settings:
 

Curves (and other) Dialog presets

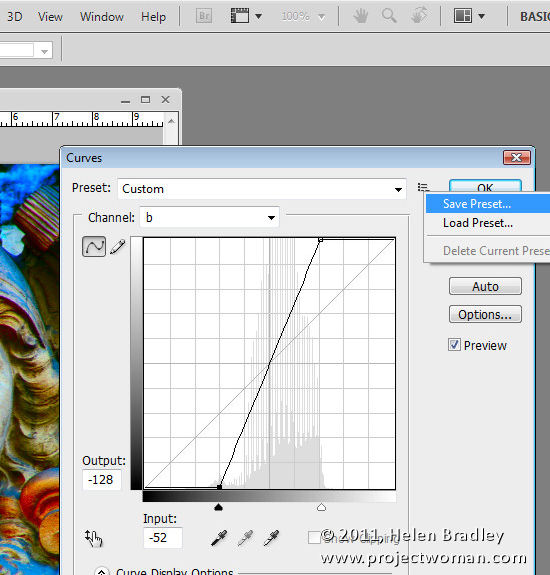
One of my favorite fixes is one involving a curves adjustment in the LAB color space which I introduced in my blog post “Turn Ho-Hum Color into WOW! with Photoshop” http://www.digital-photography-school.com/turn-ho-hum-color-into-wow-with-photoshop. The fix involves taking an image to LAB color mode and then, on a duplicate of the background layer, applying a particular Curves adjustment. Once you’ve done this once, you can speed up the process next time by saving the Curves settings as a preset. To do this, click the down-pointing arrow icon to the right of the Presets list, choose Save Preset and type a name for the preset. Next time you need to apply the same adjustment all you need to do is to select the preset from the list in the Curves dialog to save yourself the effort of creating the curves manually.

As you work in Photoshop, look out for dialogs that offer the ability for you to save your settings as presets you can use anytime in future.

Image Vignette Layer Style

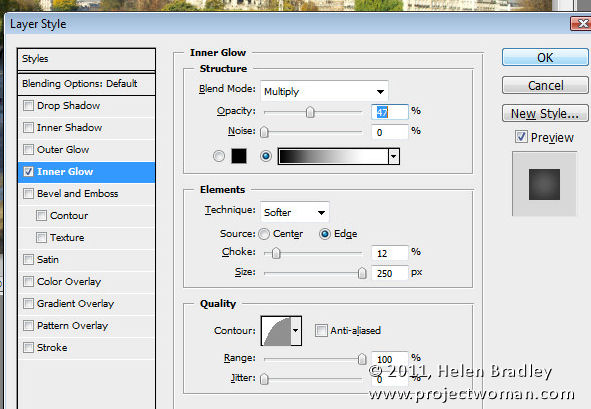
Another type of preset you can save to reuse is a layer style such as one that applies a vignette to an image. To configure this, convert the background layer of an image to a regular layer and choose Layer > Layer Style > Inner Glow. Configure an Inner Glow with settings such as Blend Mode: Multiply, Opacity: 50%, Noise: 0%, Color: Black or Dark Brown/Grey. Set the Technique to Softer, Source: Edge, Choke: 10%, Size: 250px (or to suit the image).

Click the New Style button and type a name for your style. Select both the Include Layer Effects and Include Layer Blending Options checkboxes and click Ok.

In future, you can apply this effect to an image by selecting Window > Styles to display the Styles Palette. Your new layer style will be the last one in the dialog and you can apply it to any image by clicking on it.
 

Saving the Presets themselves

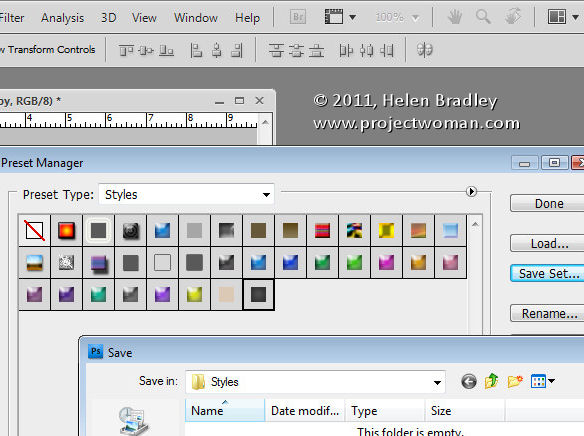
Certain Brushes, Styles, Gradients, Shapes and Tool presets need to be saved to disk or your run the risk of losing them if, for example, you reinstall Photoshop, delete your preferences file or choose Replace instead of Append when adding presets to a panel.

To save these presets to disk as files, choose Edit > Preset Manager and select the type of feature to save, such as Styles if you have created a custom style. Select the style or styles that you want to save, click Save Set and give the style set a name.

Once they’re saved as file on disk, you can load them into Photoshop at any time in future using the Preset Manager dialog or the feature’s own flyout menu.
 

Save a record of your work

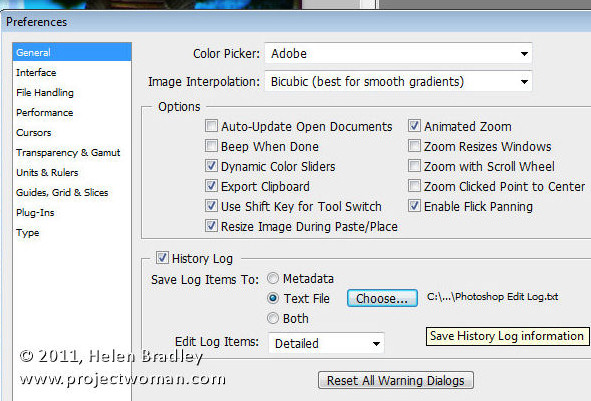
Sometimes what you want to save in Photoshop is not preferences or brushes but, instead, details of the work that you’ve been doing on your images. You can save details of the steps you have performed to individual files or to a log file by choosing Edit > Preferences > General and enable the History Log checkbox.

Select to save the Log Items to Metadata, Text File or Both. If you choose Text File, a dialog will open from which you can select the folder and text file name to save the information to. Select Sessions Only, Concise or Detailed – to learn more about these options check out this blog post: http://www.digital-photography-school.com/how-to-keep-a-log-of-your-work-in-photoshop. Click Ok and in future the work you do on all your files will be recorded and stored for you.
 

Save your Actions

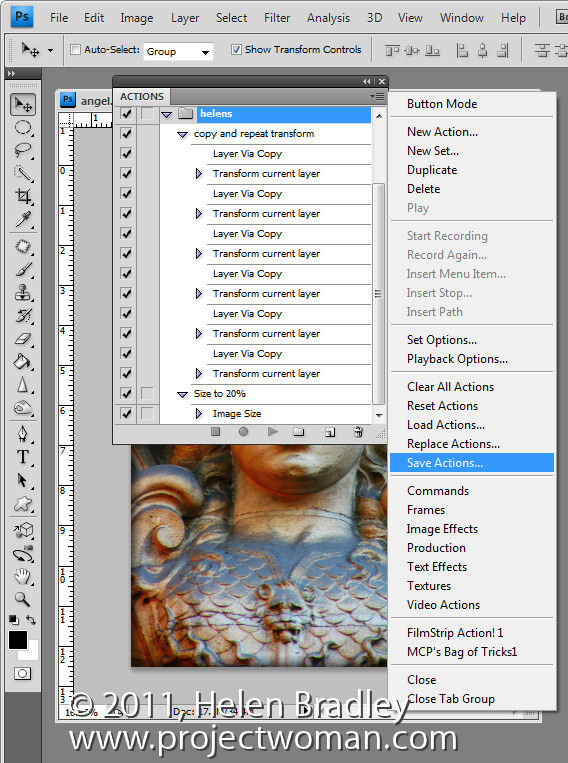
When you create Photoshop Actions to speed up the work that you do in Photoshop, like Brush and Presets, these will be lost if you lose your Photoshop settings. To make sure that these are backed up to external files so that you can recover them if they are lost, view the Actions palette, select the group of actions that you want to back up and click the flyout menu. Select Save Actions and, when the dialog appears, save your actions in a file so you can load then into Photoshop at any time.
 

Save your Workspace

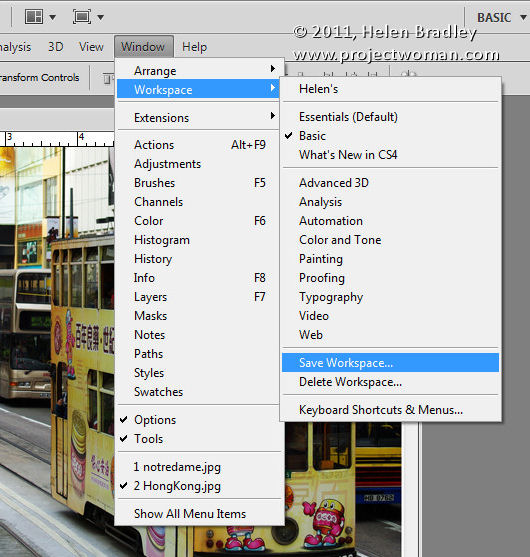
I like my Photoshop workspace to be a certain way so I use the workspace feature to store my preferred layout for the Photoshop window and Palettes. To see how to do this, arrange Photoshop the way you want it to look, including hiding any palettes you don’t want to see and showing those that you do. Choose Window > Workspace > Save Workspace (New Workspace in Photoshop 5) and give your workspace a name. Select whether to include Panel Locations, Keyboard Shortcuts and/or Menus.

In future, you can use your Photoshop workspace by choosing Window > Workspace and select your saved workspace. Unlike other preferences, workspaces are automatically saved as external files.


Helen Bradley

Tuesday, January 10th, 2012

Winter Photography Tip #3 – get in close


Often it is the small things that offer the most creative opportunities in winter photography.

Look for the little things around you such as a drop of water hanging from a leaf, or a steaming cup of cocoa.

To capture small objects use the macro setting on your camera which is indicated by a flower shape icon. Get in close to the item that you want to shoot – your camera’s manual will tell you how close your camera can focus with macro enabled.

Helen Bradley

Saturday, January 7th, 2012

Winter photography Tip #2 – Grab the Color

Any splash of colour in a winter scene will show up beautifully and can be the makings of an attractive image.

Look out for things as simple as a blue sky over a snow covered mountain or a skier’s jacket.

The colour will be the first thing that the viewer’s eye will go to in the photograph so make sure to place it in an appropriate position in the shot. Draw an imaginary tic-tack-toe board across your view finder and position the colorful item where two lines intersect to get a more vibrant photograph.

Helen Bradley

Wednesday, January 4th, 2012

Winter photography tip #1 – B&W

Most digital SLRs and point and shoot cameras can capture black and white images. Winter is a good time to experiment with this feature because of the general lack of color.

Find and enable this feature on your camera and then head out looking for suitable subjects.

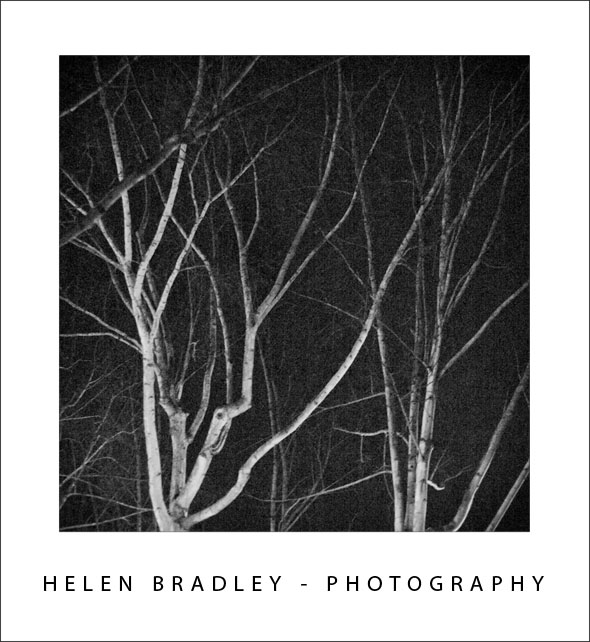
This early morning scene shows the mystery of the branches lit by a streetlight against the dark predawn sky.

Because you will not be capturing any color from your images, look for a scene that shows the contrast between light and dark elements. You may also find that foggy scenes where everything is not only by nature monochromatic but also biased towards mid tones is a great option for black and white photography.

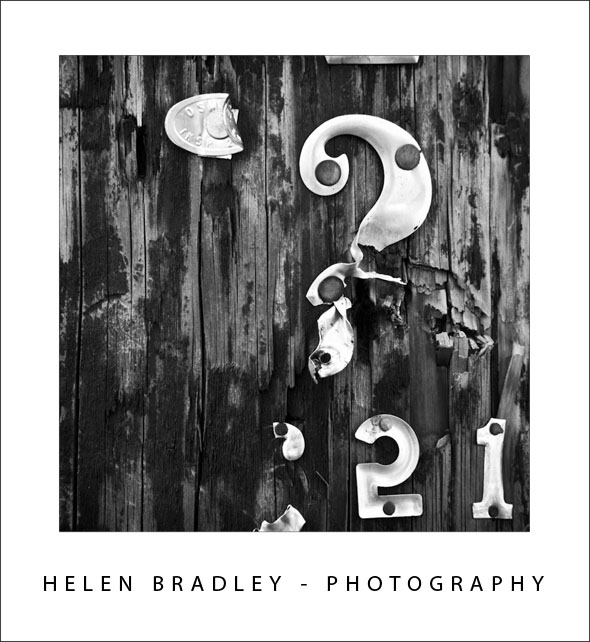
Another topic which can be rendered interestingly rendered in black and white is texture and repeating elements – the lack of color will enhance the texture and draw attention to the repeating elements.


In this image the texture and contrast between the rough wood and the metal letters is more apparent when captured in black and white.

Helen Bradley

Friday, December 30th, 2011

Lightroom – help my import dialog just shrunk!


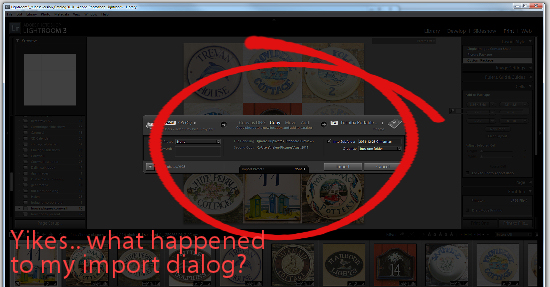
I just got a help! email from a reader who lost her import dialog. It had shrunk to a small size and none of her regular options were available. She is using Lightroom 3 and this shrinking dialog is actually a feature – it’s just she wasn’t seeing it that way – and who can blame her?

If something happens to change your screen and you don’t know how to undo it all of a sudden a feature becomes a disaster. Here is what her screen looked like:

There is a small button in the bottom left of the Import dialog shown circled here and it switches you into this mode. All you need to do to get back to where you want to be is to click on it again and the import dialog goes back to its regular size.

When you know how, it really is a feature, until then… help! my Lightroom import dialog shrunk.

Helen Bradley