 (photo by: kslyesmith via www.sxc.hu)
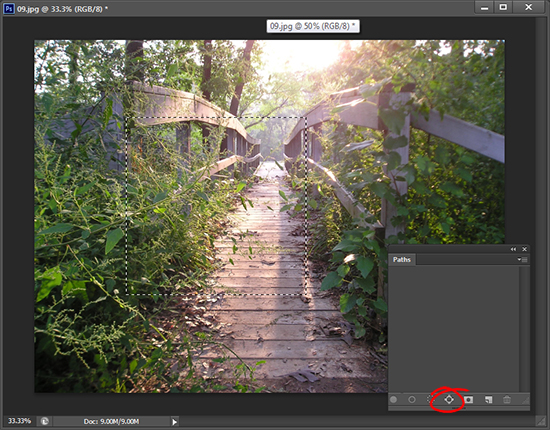
Looking to make your own paths? Start with a selection that you want to turn into a path. From the foot of the Paths palette click on the Make Work Path from Selection.
I'm Helen Bradley - I'm a photographer and Photoshop professional. In this Photoshop and Lightroom blog you will find powerful Photoshop and Lightroom tips, tricks and techniques that will help you get more out of both programs. You will also find step by step guides for working creatively with your photos in Lightroom and Photoshop and any other cool applications I know you will be interested in knowing more about.
 (photo by: kslyesmith via www.sxc.hu)
Looking to make your own paths? Start with a selection that you want to turn into a path. From the foot of the Paths palette click on the Make Work Path from Selection.
Labels: how to, path, Photoshop, selection, tip, tip of the week, trevor adobe, trevor payne
Learn the Illustrator Pen Tool to draw a folk art shaped heart. You’ll learn how to draw with the Pen tool, how to know which way to drag to make a shape and how to adjust the path when done. Also shows using the Twirl, Scallop and Crystallize tools.
Come and see all our viseo tutorials on YouTube.
The text for the video:
Hello, I’m Helen Bradley. Welcome to this video tutorial. In this tutorial I’m going to show you how you can use the Illustrator pen tool to draw a folk art heart. I’m going to focus on how to use the pen tool for people who haven’t used the pen tool very much before. And in the process we’re going to create an interesting heart shape that could be used for a lot of things including adapted for use in one of my other tutorials which shows you how to create a half drop repeating pattern. But let’s get started on the folk art heart. I’m going to show you how to use the pen tool here to make a folk art heart. So we’re going to click the pen tool to begin with and we’re going to draw the heart shape. I’m going to start with some color though because it would be really nice to see this heart as we make it. So I’m going to give it a dark pink fill and I’m going to make a darker pink for its stroke. Let’s take this pink and let’s just adjust it a little bit. I’ll double click on it and let’s make it a bit darker. And we’ll give it a bit of a weighted stroke as well, let’s say 5 points. I think this document is a letter size sheet of paper so this should be a pretty good start. So with the pen tool selected I’m going to click and drag. So my first point is going to be at the sort of bendy bit of the heart, so I’m going to click and drag. And I’m dragging up here in the direction that I want to go in, and then I’m going to let go. Now my paper on art board has taken off so I’m just holding the spacebar down to move it back into position. I haven’t lost my pen tool or my shape. I’m all ready to go and do the next bit. Now having gone up here the next point I want is about here. So look at my heart shape. I’m going down towards here. So I’m going to click here and drag in the direction I want to go in, and I’m going all the way down to the bottom pointy bit off my heart. I still haven’t let go of the mouse button. I’m not overly worried about the shape. I’d like it to sort of look heart shape, but I can fine-tune it later on. Now I’m letting go the mouse button. The next bit I need to focus on is where I want the pointy bit. And the pointy bit because it is going to be pointy, I want it to come down, point and up again, I’m just going to click. So I’m thinking about here is a good spot so one click is all I need. And now I have half my heart shape. Now I could do all sorts of things like flip this over and join it back together again, but this is a folk art heart so it’s supposed to be uneven. So the next point is going to be up here somewhere and I’m going to be drawing in this direction. So I’m going to click here and drag in the direction that I want this line to go, click, drag. You can see if I went the other way my line wouldn’t go the way I want it to, so I have to click and drag up towards the top right hand corner of this art board. And I’m just going to shape it as I go. And I think that’s a nice sort of shape. I’m going to now let go the left mouse button. And here’s the next piece of our heart shape. The last piece is the final piece, and I’m just going to click here to finish off. And there’s the end of my heart. This is a closed shape, so if I click the move tool or press V to move I can now move my heart around. And I can also adjust it with this tool, the Direct Selection or A tool. And what I do with that tool is just drag over a point on the heart that I want to adjust, and then I can pull it into a different position and I can reshape the curve. And if I want these handles to work independently of each other they will. All I need to do is hold my mouse pointer over the handle and hold the Alt or Option key so it gets that little plus symbol beside it. That means that these handles will now operate independently of each other. And sometimes that allows you to create something that you wouldn’t otherwise be able to create. Now I want as I said a sort of folk art style heart so I want a beefy side and a less beefy side. Now I’ve got the Direct Selection Tool selected but you can see that when I’m dragging on it I’m actually dragging on the path. That’s because I don’t have just this point selected. To do that I just drag over this point, and when these are hollow boxes and this is a filled one it tells me that I’m working on this point alone. And I’m going to call this good. This is now my folk art heart shade. Now because it’s a shape in Illustrator we can do some other things to it. So let’s look quickly at how we might decorate this heart using some of Illustrator’s tools. There are some fun tools in Illustrator that you can use to work on this heart a little bit to give it a more sculptured look. For example there’s the Twirl tool. Now I’m going to select the Twirl tool. My brush is pretty big. So I’m going to Alt or Option drag on it, and I’m dragging down towards the bottom left corner of the image to make the shape a little bit smaller. That’s a good sort of shape for this brush. And now I’m just going to twirl. Now I twirled a little bit too much there so that you really can’t see what I’ve done. What happens when I use the Twirl tool is that it twirls the edge of this shape. So I could create my heart with a twirled edge by just twirling this edge with this brush. Now I’m pressing Ctrl or Command Z to undo that if I don’t like the twirl. So I’ve just got my fingers over Ctrl or Command Z so I can undo a twirl if it’s not to my liking. So that’s one way that we could decorate the edges of this heart. We could also use tools such as the Scallop Tool, and scallop will allow us to scallop the edges off this heart. But I’m thinking that I don’t have nearly a big enough brush here. So I’m going to Alt or Option drag towards the top corner of this image, the top right hand corner, and see if that’s a better option for the Scallop Tool. And I can pull out the edges of the heart. Now it’s not looking particularly effective on this heart shape but for other shapes it may be of interest to you. Let’s have a look and see what the Crystallize Tool will give us. This will give us some crystallized edges. So in actual fact for this heart that may work reasonably well. Let’s just undo it and have another shot at it. I’m just going to click and drag as I click. So undo it again, click and drag and just see if that’s going to give me anything of interest. The other tool I could choose is this Wrinkle Tool, and that will wrinkle the edges as well. So we could run that around the edges of the heart if that was the effect that we were looking at. But there are some interesting tools here that having drawn your heart shape you could now come and do something a little more interesting with it. This might do for somebody who’s trying to illustrate something on say looking after someone’s heart because we’re getting almost a sort of blood pressure reading or heart pressure reading effect around the edge of the heart. So there are a whole heap of tools here that you can use. Having already created your heart with the pen tool it can now be adjusted because it is a vector object in Illustrator using all these tools.
Labels: folkart heart, Helen Bradley, how to, Illustrator, part1, pen draw, video, video tutorials
 (photo by: Amy Burton)
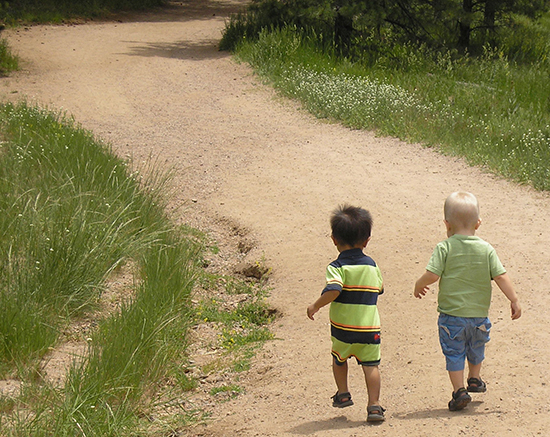
Paths can be a very helpful tool when editing and can be saved along with your image in .jpeg files. To do this create a path in the desired location on your image. Go to File > Save As choose JPEG as the file type. Name your image and save it. When you open it next the path will be accessible in the Paths palette.
Labels: jpeg., path, Photoshop, save a path, saving, tip, trevor adobe, trevor payen
Learn how to use Photoshop to prepare an image for tracing and painting in Illustrator with Live Paint. Shows how to make a selection on an image, how to use the Refine selection tools to refine a selection then how to convert the selection to a mask. See how to paint on the mask to fine tune the selection. See how to touch up the image to remove white by painting over it and then how to flatten and save the image as a jpg file to take into Illustrator.
The full text from the video:
Hello, I’m Helen Bradley. Welcome to this video tutorial. This video tutorial is part of a series and it’s involving using Live Paint in Illustrator. But we’re going to start in Photoshop because what we’re going to do in Photoshop is to isolate the image and get it all ready to take to Illustrator where we can trace it and apply live Paint to it. In a minute we’re going to take the image of this bathing box into Illustrator and recolor it using live paint. But before we do there’s a fair bit of work that we can do on this image to prepare it in Photoshop. The first thing I’m going to solve is the fact that this image is crooked so I’m going to select the Ruler tool. And from experimentation I already know that this image is going to look better if I straighten it based on the horizontal lines in the image so I’m just going to select that horizontal line and click Straighten Layer. And the image is now straightened and I can just crop it to get rid of the worst of the excess. The next thing I’m going to do is to isolate this bathing box. And to do that I’m going to start with the quick Selection tool because it’s just a very easy tool to use. I’m just going to click and draw on the image. And you can see that it’s jumped a little bit and gone in places that I didn’t want it to go and it hasn’t gone in places that I do want it to go. So I’m just going to drag over the bits that I want to expand it into. And in the places that I don’t want it to be I’m just going to hold the Alt or Option key down to turn it into an eraser so that we’re erasing that area from our selection. That’s a pretty good selection so I’m going to sit with that right now and choose Select and then Refine Edge because this allows me to refine the edge. I’ve got a few problems down this edge here and this edge here and there’s a bit of an issue where the tree line was. So I’m going to have Photoshop have a better look at this image and I’m going to choose the Refine Radius tool. At the moment I’m viewing the selection against white but I could see it as a black and white image. I could see it on black. That’s not actually helping me a lot. I could see overlay or marching ants. But I’m pretty happy with on white. I’m just not totally happy with my selection so I’m going to paint over the areas that I think Photoshop needs to have a better look at. And it needs to have a better look at there although that wasn’t a particularly good result so I’m just going to Ctrl Z to undo that fix and see if I can do a better selection. I think there’s a bit of a fix needed there and a bit of a fix needed down this edge here as well. It wasn’t a very good line so we’ll just undo it and try again. And this is particularly useful when Photoshop hasn’t done the best of selections. You can get it to fine-tune that selection and see if it can do a little better job. I’m relatively happy with that but I’m going to see if contrast will help me. And it seems to firm up that edge a little bit so I’m going to apply some contrast and I could see if radius is going to help. Virtually what I’m looking for here is a pretty good selection that I don’t have to do much with in a minute. I’m going to output to a New Layer with Layer Mask because that will give me a bit of flexibility and I’ll just click Ok. This is now a new layer in the image. It has a layer mask on it. I can zoom into any areas that need some more fixing such as this corner here. I’m going to bring in my tools, select the letter D for default colors, select a brush, I’ve got a fairly hard edge brush, make sure I’m painting onto the mask itself and just paint out any of these areas that I think need fixing. If I want to paint in white I’ll just press the letter X to bring that color back in and press X again to remove the color. And I’m just going to tidy up a couple of little bits here. I want to paint with white. I’m going to click and then Shift Click to paint a line to bring in this roof a little bit better. I’ll just zoom out again and just check around the image to make sure that everything is looking pretty good. I’m still not convinced that this image is straight but we’ll worry about that in just a second. I’m going to add a new blank layer to this image and I’ll press Ctrl Alt Shift E, that’s Option Shift Command E on the Mac, and that will give me the isolated image on its own layer. Now I can straighten it again if I think it needs a bit of straightening. I’m still convinced this is crooked so let’s see if this fixes it. We’ll just straighten this layer. That looks a little better to me. And I’m just going to apply an adjustment to this layer. I’m going to use Levels because this image is extremely dark and it will behoove us to lighten it a little bit before we head to Illustrator. So I’m just going to fix it a little bit. What I am a little concerned about here is these white areas so let’s just click Ok and let’s zoom into those white areas. And I’m going to select these with the Quick Selection Tool or with the magic Wand. Actually I’m thinking Magic Wand will be better here so let’s get the magic wand. It’s got a tolerance of 30. I’m just going to click on that area, click on this line here, this bit here, and there’s another bit over here. I need to Shift Click on those because they’re not being added automatically. Let’s just add them automatically so we don’t have to keep holding the Shift key down. Now that I’ve got those all selected I’m going to enlarge the selection a little bit because it’s a little on the small side. I’ll choose Select Modify Expand and Expand it by just 2 pixels. Now I’m going to add a new layer to this image, go and grab my paintbrush, I’m going to Alt Click on some paint that I’m going to copy and now I’m just going to paint over these areas on a brand new layer. Now this is just flat paint going in but that doesn’t matter because that’s just going to fix this area for us. And now I can select a blend mode and I’m thinking that darker color will be a good one, that we’ll only use the green when it is in fact a darker color. And I can just drag down the opacity of this layer a little bit too because it was a lighter area of the image. But I don’t want it be pure white because I just don’t want white in my image when I get to Illustrator. So Ctrl D to deselect the selection. And let’s just zoom out again. And that’s my finished image and it’s ready now to head to Illustrator to actually do something about recoloring the image. This is the image that we started off with here and this is the one that we’ve ended up with here. So I’m going to save this, choose File, Save As and I’m going to save it as a JPG image. And then we’ll come back in a next video in Illustrator and do something with this image.
Go and see all of our video tutorials on our YouTube channel
Labels: Helen Bradley, isolate an object, part1, Photoshop, Tutorial, video tip, YouTube
 (photo by: Asif Akbar)
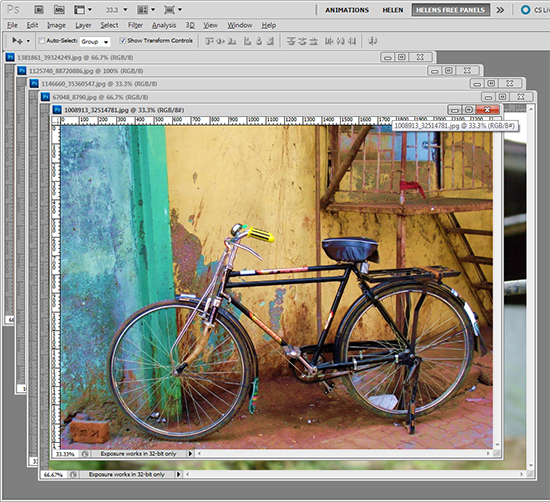
Cycle through your open images by pressing the Ctr + Tab keys on the keyboard.
Labels: cycle, documents, how to, images, photohshop, tip, trevor adobe, trevor payne, work flow
Learn how to selectively recolor a portion of an image using the Hue/Saturation adjustment layer and to do so without having to make a complex timeconsuming selection to do so.
See all our video tutorials on our YouTube channel
Labels: Helen Bradley, how to, layer adjustment, Photoshop, video tutorials, YouTube
 (photo by: Piotr Bizior)
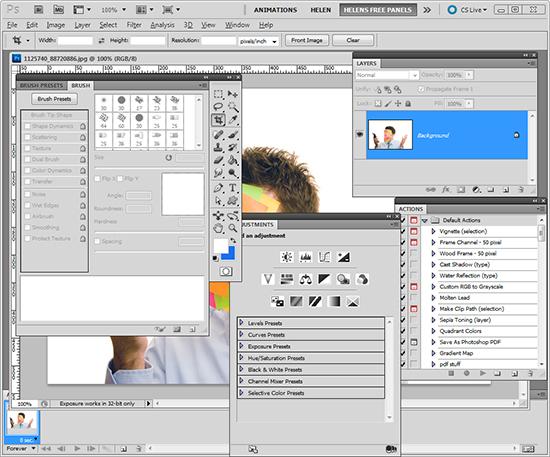
If your work space is feeling cluttered with palettes you can press the Tab key on your keyboard to hide them all or Shift + Tab to hide all but the tools palette. Want them back? Press Tab again and there they are.
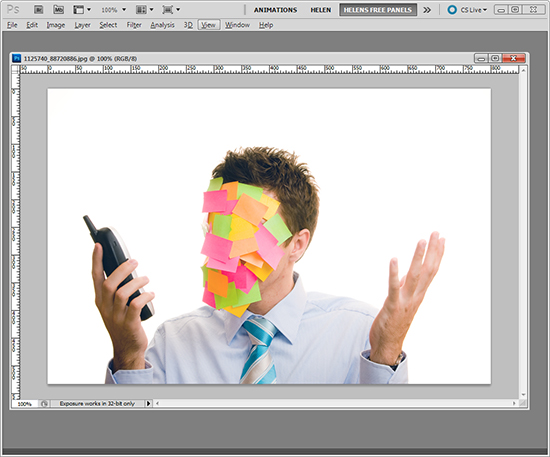 (photo by: Piotr Bizior)
Labels: palettes, Photoshop, tip, trevor adobe, trevor payne, work space clean up
How to convincingly replace a poor sky in Photoshop. You’ll need your photo and nothing else – we make the blue sky in the tutorial.
See all our video tutorials on our YouTube channel.
Labels: cs5, fix a sky, Helen Bradley, how to, Photoshop, replace, technique, video, video tutorial, YouTube
Learn how to add impact to your animal and bird images with this smart and easy Lightroom fix.
Come and see all our video tutorials on our YouTube channel.
Labels: fixing photo, Helen Bradley, how to, Lightroom, Tutorial, video tutorial, YouTube
 (Photo by: Jorge Vicente)
Change the size of your brush, eraser, or any tool that is brush based quickly by press the ] key to increase the size and the [ key to decrease the size.
Labels: brush, brush size, Photoshop, shortcut, size change, tip, trevor adobe, trevor payne
Yeah! The folks at Moo have released a Lightroom plug in that makes it easier than ever to get photos to Moo.
Visit this page and grab the zip file – click the Zip button to get it.
Unzip the contents and rename the folder moo.lrplugin
Then launch Lightroom and choose File > Plug-in Manager and grab the plug in folder. That’s all you need to do. It will be installed and ready to be used.
Just select the images to send to Moo, choose Export and select the Moo Export Plug-in from the Lightroom Presets in the Export dialog.
Labels: export, Lightroom, moo, plug-in, publishing service
Learn how to make a convincing painting from a photo in Photoshop using the Art History Brush tool.
Come and see all of our videos on our YouTube Channel
Learn to make a faux hdr (high dynamic range) effect in Lightroom 4.
Check out all our video tutorials on our Helen Bradley YouTube channel.
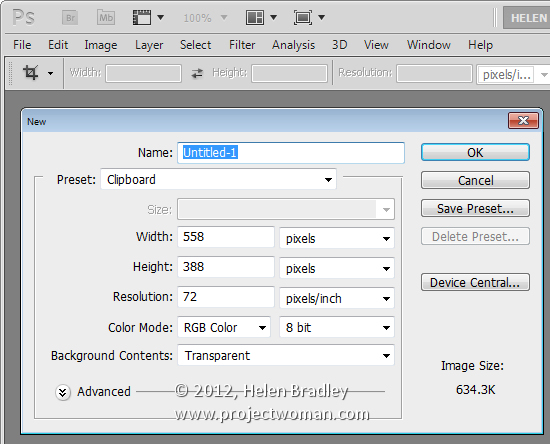
It is easy to save an image copied from the web to a Photoshop file. To do this, first copy the image to the Windows clipboard then choose File > New and press Ok.
The Photoshop file will be sized automatically to exactly the same image size as the image on the clipboard.
Now choose Edit > Paste to paste the image into position and you are ready to save it.
Labels: Clipboard, copy image, file size, helan bradley, how to, image, paste image, Photoshop, tip
 photo by: lcrumling via www.sxc.hu)
Want to quickly match a color without disrupting your work flow? Press the I key to activate the Eyedropper tool, then click on the color your trying to replicate to sample it.
Labels: color, color matching, eyedropper, Photoshop, tip, trevor adobe, trevor payne