Saturday, September 29th, 2007

Photoshop, Size two images the same size

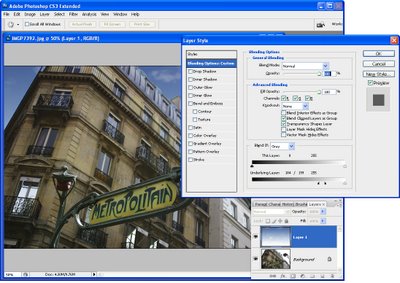
When you need to size two images to the same size in Photoshop, open both the files and select the file whose size you want to alter. Choose, Image > Image Size and then, to set the size options so they match the other image, click Window and choose the image name at the foot of the list that is the size you want to use. The Image Size dialog then changes to reflect these new dimensions.

Use this, for example, when you’re trying to adjust the size of a mask to the same size as the image you’re about to apply it to or to size two images to the same size to collage them.

Helen Bradley

Saturday, September 8th, 2007

Photoshop World hits Las Vegas

I’m spending the week in Las Vegas taking in all the best that PSW (Photoshop World to those in the know – now you’re included!) has to offer. It’s a great opportunity to take classes from the likes of Scott Kelby, Matt Kloskowski, Jim DiVitale and photographers Moose Peterson, Joe McNally and Vincent Versace.

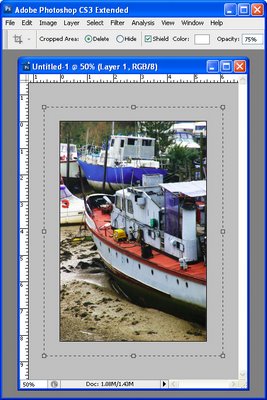
My best tip and one I’ve seen quite a few instructors embrace is the crop canvas enlargement. It works like this, you use the crop tool to enlarge the canvas – seriously.

To do it, shrink the image down using the Zoom tool then enlarge the window so you have a little image and a big window. Click the Crop tool and drag it on the image, it won’t go any larger than the image right now – don’t panic.

Let go the mouse now drag the crop marquee handles outwards. Do it on all the sides that you need to add canvas. To do it evenly all around, hold the Alt/Option key as you drag on a corner handle. Check your background color as that’s the one that will be used to fill the new area. Press Return/Enter and you’re done.

Wow… one to show your friends just how good you are – you can now use the Crop tool to make an image bigger!

Helen Bradley

Wednesday, August 15th, 2007

London bound

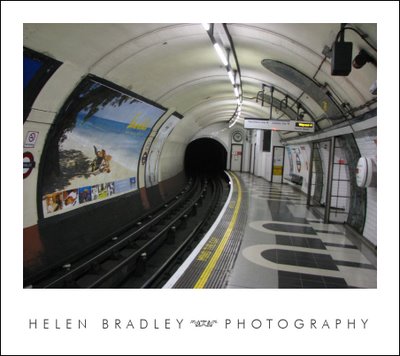
I had the chance to visit London for a weekend earlier this year. I took only a few photos to my chagrin. This is one of the tube ones. I love the Underground, it has such a wonderful feel to it, the advertising is so different to what we have here in the US and the station names are so cool.

I’m off back to London next month so I hope to capture more great shots then.

Helen Bradley

Tuesday, July 31st, 2007

Run, don’t walk to snag a copy of this.

I get to play with a lot of software all in the name of work. It’s a job ok!

This week I had a lucky encounter with a program called FaceFilter Xpress. Now you know that professional photographers touch up portraits don’t you? The fix things like zits and try and make you look as good as they can without Photoshopping Cameron Diaz face onto your head. So, when you take photos of folk you images will seldom look as good as those professionally photographed because you don’t use their fancy lighting and no one pays you $100+ an hour to make them look wonderful.

Ok.. stage is set… enter FaceFilter Xpress – it’s an instant half a dozen click solution to fixing portraits. It can put a smile on someone’s face, reduce a large chin, open eyes and generally apply fixes that will make anyone look younger and better guaranteed. It’s simple and quick enough to make a job that might take and hour in Photoshop take around 5 minutes. It’s also subtle and adjustable so you can make changes that improve but which don’t look obvious.

This program makes my top 10 tools list – it’s a must have if you photograph people and love to flatter.

Helen Bradley

Thursday, June 7th, 2007

OMG! that’s what it’s supposed to look like!

Ok, I admit it, I use a LCD screen on my second computer and I know its color sucked. Note the use of the work sucked… past tense.

I went to this Shutterbug photo day on Sunday and, as well as a really bad case of sunburn and dehydration from hanging out all day in the sun, I saw a demo of a tool called Huey Pro from Pantone. Now Pantone are some of the kings of color – so anything that has Pantone attached to it you’d think should be good.

Huey is a color callibration tool for monitors. I have NEVER BUT NEVER callibrated a monitor before except for some funky setup I found built into Windows once which I thought was a little mickey mouse, if you get my drift.

Huey is very professional, it has little suction feet that grip your monitor and it does all the work and, OMG you should see the results. I never knew that my Word File open dialog showed different colors like that. My greys are now beige, the blues are, well, blue and everything looks so crisp and beautiful. It took around 15 mintues from opening the box to having it callibrated and that included rebooting the computer. It’s so simple anyone can do it and, surprise surprise isn’t that how these things should be?

You can save your profile information and, if you leave Huey plugged in it will change your settings if the ambient light changes.

Be warned however, for the first few days you’ll be going OMG what is this? as your programs will all look like they’ve been given a color makeover.

Of course, where it counts is in the photos you take and view and it looks wonderful. I have one monitor I’ve always hated using because the color is hiddeous, it’s now gorgeous and all this from a product that retails (standard) for around $100 and $150 for the pro version.

If you’ve never callibrated a monitor, given up because it’s too hard or dream one day of having a monitor that looks great, do yourself a favor and run, don’t walk, to your nearest camera store and snag a Huey for yourself.

Helen Bradley

Sunday, May 20th, 2007

Photoshop – Replace a sky

It seems to be one of those things that people are least satisfied with – the sky in their photos. It’s all too easy to shoot a wonderful image on a sunny day, there’s not a cloud in the sky and it’s blue, blue, blue. However, when you return home the sky in the photo you took is dingy blue white – yuck, yuck, yuck. It’s disappointing and it doesn’t have to happen.

If you’re shooting with a digital SLR invest in a polarizing lens and use it! It will make your skies deliciously blue. You can also get these lenses for many point and shoot cameras, I have an adapter and a polarizer on my Canon 3S IS and it all just snaps into place.

If all else fails, take a series if good photos of just sky when it’s not so bright and keep these in a “spare skies” folder. Then, when your sky isn’t all you want it to be, like my old car, you simply search out a spare part – replacement sky for it. To use it, visit my new Photoshop skies tutorial – don’t be fooled by the title, there’s a great 6 step by step solution at the foot of the page.

Helen Bradley

Wednesday, May 16th, 2007

Vanishing Point in Photoshop CS3

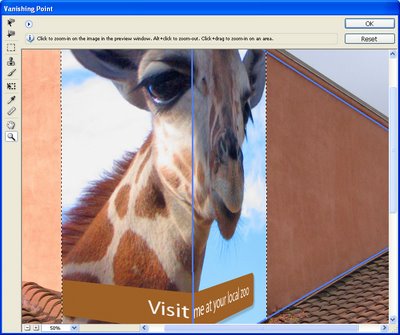
The Vanishing Point Filter in Photoshop lets you create perspective grids that you can drop an image into.

To do this, copy the image to paste into the grid into the clipboard and open or create the image to put it into. Add a new layer to this image, select it and choose Filter, Vanishing Point Filter.

Click the Create Plane Tool and click on the four corners of the grid. Move the points if necessary, you need a blue grid (if it’s yellow or red it isn’t correct and won’t work). Now, you can drag a second related plane by holding the Control key (Command on the Mac) and drag from a side to create a second pane. Don’t worry about the direction just that it’s at right angles to the existing pane. Let go the mouse. Hold the Alt key (Option on the Mac) and drag to align the pane, fine tune using the Angle value.

Now either continue to create planes or paste the image using Control + V (Command + V on the Mac). Select the Marquee tool and move it into position on the grid. Use the Transform tool to size it if desired. When you’re done, click Ok.

If you need to remove or delete the plane – for example to start over, click on it so it’s selected and press Backspace.

The Vanishing Point Filter is heaps of fun – use it to apply an image to a building, the side of a truck, or just in thin air!

Helen Bradley

Tuesday, April 10th, 2007

What color is Red?

Ok, so my blog photo is blonde but, truth to tell, I’m really a redhead right now. That is blindingly red as you can see in this photo on the marvellous Moose Peterson’s blog.

I just attended Photoshop World in Boston and went on the Photo Safari with Moose, Joe McNally and Vincent Versace. It was a fun experience and I learned lots of big things and lots of little ones too. If you ever get a chance to do a photo course with any of these guys, do it, they’re great folk and fantastic photographers.

Helen Bradley

Saturday, March 17th, 2007

Soft Focus Portrait in Photoshop

Portraits typically look much more flattering when they have a soft focus look. This is a fix that will give even a so-so portrait a lift. The colors in the image will be more muted and softer and more flattering to the subject. And, when you’re done, crop the final result very tightly to get that professional look.

Start by duplicating the background layer on the photo – choose Window, Layers to view the Layers palette, right click the background layer and choose Duplicate Layer and then Ok. Click the top layer and choose Filter, Noise, Median to smooth the image on this layer – choose a value of around 5 for the radius. Now apply a slight aging effect to this top layer by choosing Image, Adjustments, Hue/Saturation and reduce the saturation and use the Hue slider to create a slightly aged yellowing of this layer I set Saturation to -50 and Hue to -10 and click OK. Now experiment with the layer opacity of this top layer to vary the result – you want something softer than the original.

To finish, make a elliptical selection around the subject, invert the selection using Select, Inverse and add a feather using Select, Feather and add a large feather to the selection. Blur the result to soften the area around the subject and then crop the photo to size to finish.

Helen Bradley

Wednesday, March 14th, 2007

Layer Masks in Phototshop Elements

Hmm, if you’re like me you’ve looked in vain for layer masks in Photoshop Elements. Now there’s evidence for the fact that you should be able to use them. Try adding an adjustment layer – what’s that to the right of it? Yes, got it! it’s a layer mask. Ditto if you add a new fill layer. But not for regular layers – to me that just sucks.

Well it did, until I stumbled on the free download from Hidden Elements – a site dedicated to unearthing all sorts of Photoshop Elements secrets. And, in my case, when the tool simply isn’t there, they give you a way to put it there. Download and install a small program, close and reopen Photoshop Elements and on your Artwork and Effects bar is a new group of features including a one click Layer Mask.

It’s simple to install and very easy to use and, better than a workaround you have to remember how to perform from one session to the next, it’s now a clickable option.

It’s the next best thing to having the Layer Mask feature built in.

Helen Bradley

Tuesday, February 27th, 2007

Stop the action

Much of the action in the snow in winter is of the skiing and snowboarding kind. These are fast paced sports and you’ll need to be ready to capture the action so your photos are crisp and sharp and not blurry. There are two handy techniques you can employ. One is to use the sports or action mode on your camera so the shutter speed will be very short and the shot will be taken very fast – sometimes in the order of 1/250 of a second or shorter. This is so quick that the action will be effectively frozen. Another method is to follow the subject with the camera as you take the shot. Stand still and brace the camera to your body as you follow the subject’s movement. Focus and take your shot while you are still moving and continue to move after the photo has been shot. This technique will result in the subject being sharply in focus against a deliciously blurry background.

Helen Bradley

Thursday, February 15th, 2007

Use the fill flash

When you’re photographing a person in front of a snow scene on a sunny day the lightness of the snow in the background of the shot will fool the camera’s automatic sensors into exposing incorrectly for the person who is standing in front of you. In a similar manner to taking photographs on the beach in the height of summer use the camera’s fill or force flash when shooting in these circumstances. The flash will light the person in the foreground and you’ll have both the person and their background nicely exposed.

Helen Bradley

Saturday, January 27th, 2007

Fabulous frosty things

In addition to snow, winter brings with it frosty mornings even in areas of the country that are not subject to snowfall. To capture the delicate frost crystals on flowers, leaves, and even your house or car, use the macro setting on your camera. The macro setting is indicated by a small flower shape icon – it lets you focus your camera on a subject only inches from the lens. When you use the macro setting ensure that your camera zoom is not engaged – on most cameras the macro function doesn’t work correctly when the zoom is enabled.

Helen Bradley

Page 39 of 39« First1020303536373839