Monday, December 3rd, 2012

Lightroom – harness the power of your scroll wheel

In Lightroom, using the scroll wheel on your mouse has some distinct advantages over using other methods for adjusting sliders. It might take a little getting used to but when you see just what it can do you might be surprised.

Develop module and the Wheel

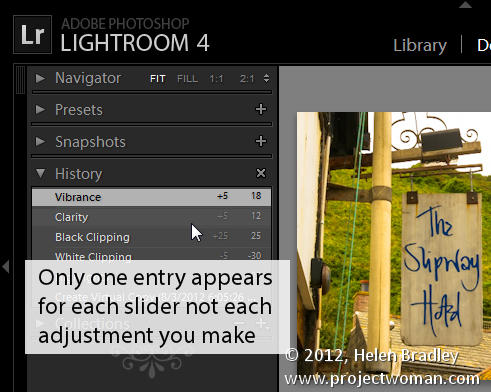
In the Lightroom Develop module you might have used the + and – keys to adjust sliders to fix your images. If you do this, whenever you pause to see how the change looks when applied to the image, Lightroom writes the change value in the history even if you’re not done. If you readjust the same slider a few times, each time you adjust it a new history entry is made.

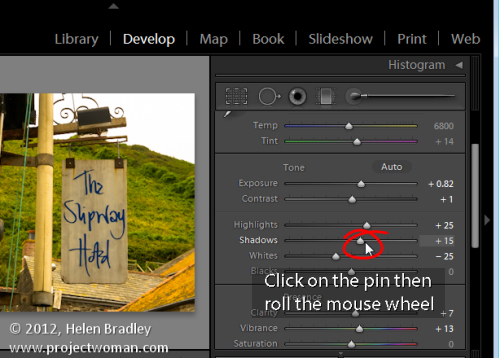
By contrast, you can use the scroll wheel to adjust the slider. Begin by clicking on the pin on the slider and then rolling the scroll wheel up to drag it to the right or down to drag it to the left. Not until you let go and go to the next tool will the change be written to the History. This means that you can experiment with different values rolling your mouse wheel left and right as you please – and until you move away from that control nothing is recorded. Your history list will be a whole lot neater and you have a much easier way to adjust the sliders.

Spot removal and the wheel

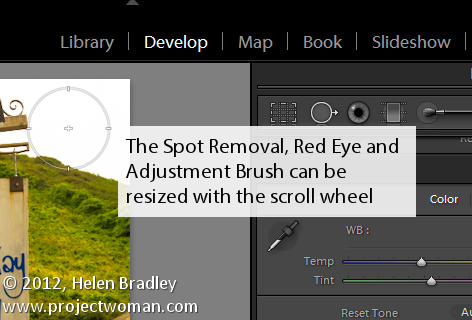
When you have the Spot Removal Tool, Red Eye Tool or the Adjustment Brush Tool selected you can size the brush to the desired size using the mouse scroll wheel.

To see this at work click any of these three tools to target it and then hold your mouse over the image. Roll with the scroll wheel to adjust the brush size. If you have the Adjustment Brush targeted then hold the Shift key as you roll with the scroll wheel to adjust the feathering on the brush.

Move with the Wheel

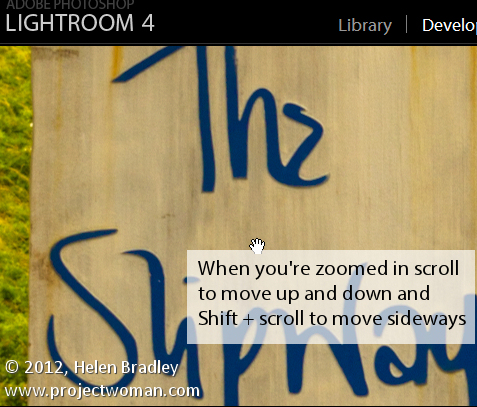
If you’re have used the Zoom feature to zoom into the image then rolling the mouse scroll wheel will move the zoomed image up or down in the work area. To scroll to the left or right use the Shift key with the mouse wheel.

A caveat…

It seems that some Mac users have experienced difficulty with the scroll wheel on various machines so your mileage with this technique may vary. On a Windows 7 machine, with Lightroom 4 and a standard two button mouse with a scroll wheel, everything worked as explained and it’s a whole lot easier than dragging sliders around to make your changes.

Thanks to Frank Schophuizen for his gracious contribution to this post.

Helen Bradley

Sunday, November 25th, 2012

Help! Lightroom Lost My Files

If there’s one thing that confuses new Lightroom users it is that quite often files that should be in Lightroom appear to have gone missing. Here are some things to look out for when this happens to you.

Is a Filter Hiding Things?

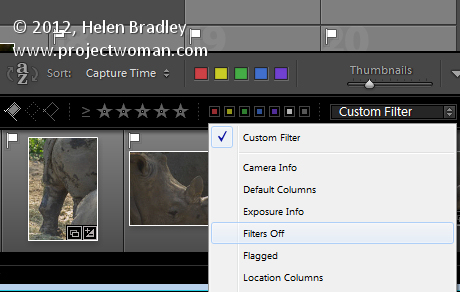
If you think a folder should be displaying more images than it does, check that there is not a Custom Filter in place. In the Library module, make sure the Filmstrip is visible and if there is a filter listed in the Filter box then that’s affecting what you’re seeing. To return to showing all your images in the currently selected folder, select Filters Off from the Filters list.

Are you looking in the right place?

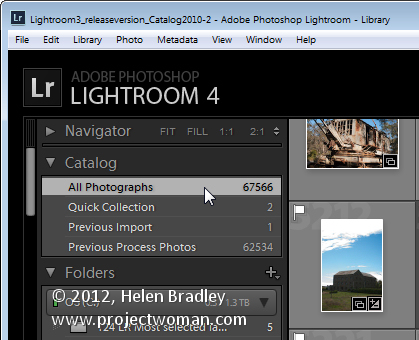
While Lightroom’s folders mimic the folder structure on your computer and external drives sometimes you really want to look through all the files in Lightroom. To do this, open the Catalog panel in the Library and select All Photographs. This selects all the photographs in the Lightroom catalog as the basis of your search.

Images in Subfolders

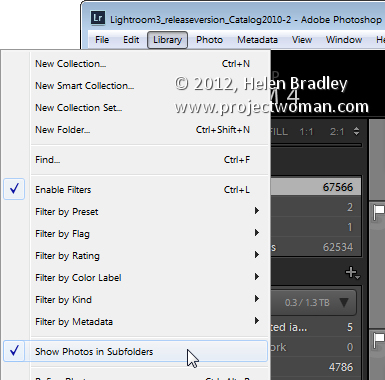
If you click on a folder that has subfolders but you see nothing or none of the images in the subfolder that is typically caused by a Lightroom setting. This setting lets you control whether or not you see photos in subfolders when you click that folder in the Library module. To view the current setting choose the Library menu > Show Photos in Subfolder. The setting can be enabled or disabled depending on your preferences but it’s often the cause of photos in subfolders not showing when you think they should be there.

Look in Folders and not Collections (or vice versa)

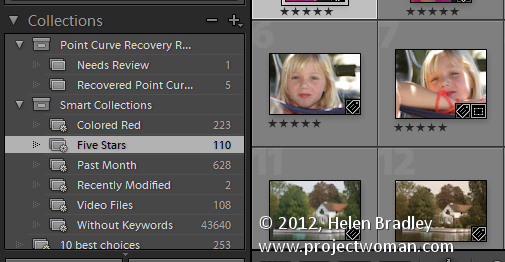
Lightroom has folders and collections and they can have the same name. You’ll find Collections in the Collections panel and folders in the Folders panel. A collection can include files from a number of folders but a folder can only contain images which are stored in that folder on your disk, so make sure you’re looking for the right folder or collection.

Contents of Smart collections Change

Regular collections are fixed so that the images, once placed in the collection, remain in that collection until you remove them. Smart Collections are dynamic so the images in them change depending on the criteria you have set for them. For example, the 5 Star Smart Collection shows all images that are 5 Star images. If you make an image a 5 star image it automatically gets added to that collection. If you change a 5 star image to a 4 star one then it no longer appears in that Smart Collection and that might be the cause of images going ‘missing’.

Search for Lost Images

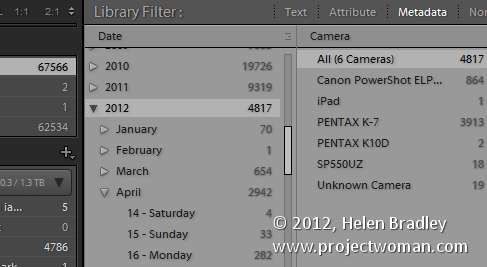
If you’ve lost photos and you know roughly when they were captured or which camera you captured them with it is possible to search your Lightroom collection for them. Start in the Library and click the Catalog panel and click All Photographs. Then choose View > Show Filter Bar. Click Metadata and you can then locate images by their metadata. For example if you know the approximate capture date was January 2012 then make sure that the first filter is set to Date and click 2012 and then January. This will show only those images that you shot during that time.

It’s also possible to filter by camera, lens and other metadata. You’ll just need to make sure that the primary field that you are filtering on is the one on the left of the Filter Bar. Images are filtered from left to right so, if the leftmost panel is Date and the one to its right is Camera type – you’ll see the camera types for only those photos shot on the specified date. If Camera type is the leftmost column and Date the rightmost one, then you’ll filter out all the images captured with a certain camera and see only those dates you actually captured images with it.

Lightroom Can’t Find the Image

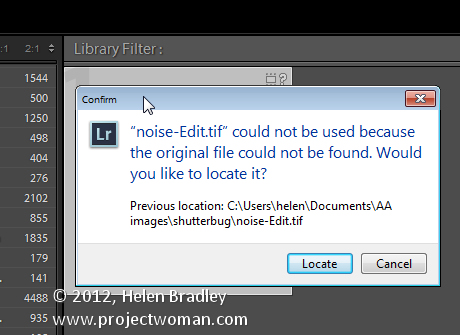
Sometimes Lightroom will display an image with a question mark in its corner indicating that the photo is missing. This means that the image was imported into Lightroom but Lightroom can’t find it any longer. To return it to Lightroom, click its question mark icon and you’ll be prompted to locate the image on disk. Click Locate, find the image on disk, select it and it will appear again and it will be editable inside Lightroom.

Lightroom Lost the Entire Folder

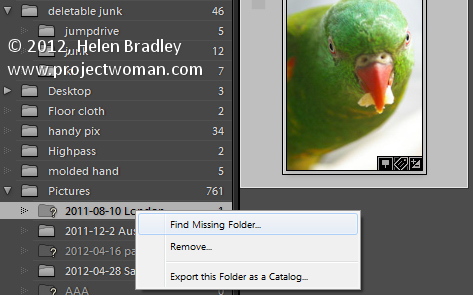
If you move or rename a folder on your disk outside Lightroom then Lightroom won’t know what you’ve done. If there are photos in the Lightroom catalog in that folder it will report the entire folder as missing when you launch it next. Missing folders will have a question mark beside their name. If you know where you moved the folder or that you renamed it, you need to tell Lightroom where it is. To do this, right click the folder in Lightroom and choose Find Missing Folder then locate the folder on disk and Lightroom will update accordingly.

A Folder is Missing Some Files

If you have a folder which you think should have more images in it than are currently showing in Lightroom this could well be the case. The Lightroom folder structure mimics the disk folder structure but only those images you import into Lightroom will actually be in Lightroom. It is also possible to remove images from Lightroom but in such a way as they remain on disk.

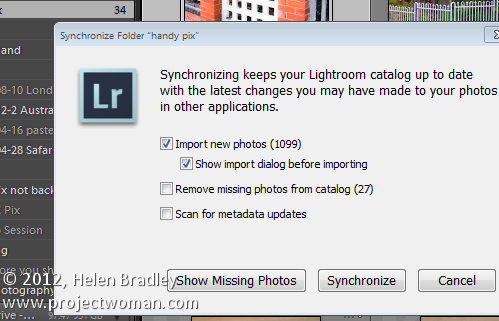
To check to see if there are additional images in a folder that aren’t showing in Lightroom, right click the folder in Lightroom and choose Synchronize Folder. Make sure that the Show Import Dialog before Importing option is enabled and select Synchronize. This shows the import dialog and those images that are in the folder but not in Lightroom so you can synchronize the contents of the folder with Lightroom.

Now it’s over to you. Have you ever experienced missing files in Lightroom and, if you did, what was the cause and how did you resolve the issue?

Helen Bradley

Sunday, November 18th, 2012

Understanding Lightroom Process Versions

If you’ve used any earlier version of Lightroom and if you now use Lightroom 4 you need to know a bit about Process versions.

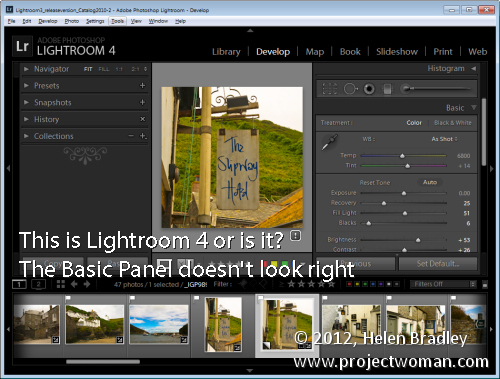
In this post I’ll give you the basics of what you need to know which will explain why you see exclamation points by some of your images in the Develop module and why the new Lightroom 4 sliders sometimes disappear unexpectedly.

Process versions

In Lightroom 3 and again in Lightroom 4 the Lightroom Process version was updated. These process versions affect how your raw images are processed by Lightroom so it’s important to understand what they are and how they work.

Initially there was only one process version used in Lightroom 1 and Lightroom 2 so upgrading from one version of Lightroom to the next didn’t create any issues. The process version used in these versions was called Process 2003.

When Lightroom 3 was released it had a new process version called Process 2010. This process version had better rendering of the raw image and that meant better detail rendering, better noise reduction and better sharpening.

Because this new Process 2010 was so significantly improved, Adobe didn’t apply it by default to images in Lightroom 3 which had been processed using the older Process 2003. To have done so might have produced unwanted changes to images which had been already processed so it was left to each user’s discretion to apply the changes or not. Images newly imported into Lightroom 3 were processed using Process 2010.

Fast forward to Lightroom 4 and the situation is repeated. There is a new process version called Process 2012 in Lightroom 4. Images newly imported into Lightroom are processed with Process 2012, and those which were processed in an earlier version of Lightroom remain unchanged.

So What is the Exclamation Point

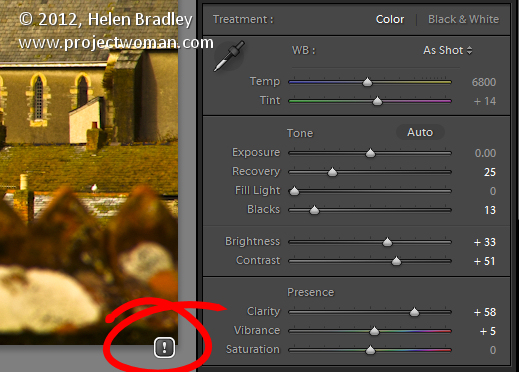
If you see an exclamation mark icon in the Develop module to the right of an image this indicates that it has applied to it a process version that isn’t the current version for the version of Lightroom you are using.

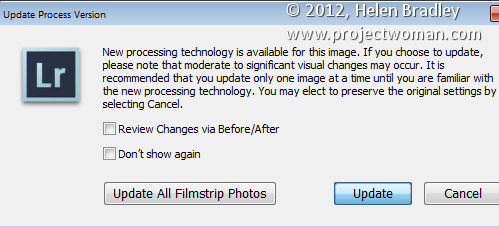
If you want to update an image, click the icon and select to update the image or select to update all the filmstrip photos. You can preview the changes before they are applied if desired.

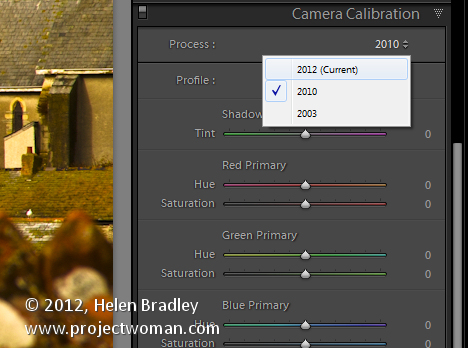
It’s also possible to update images from the Develop module’s Camera Calibration panel.  Here you simply select the desired process version from the Process list. The options are Process 2003, Process 2010 and Process 2012 (Current). In most cases, most users will choose to update the process version to the most current one.

Where did my Sliders go?

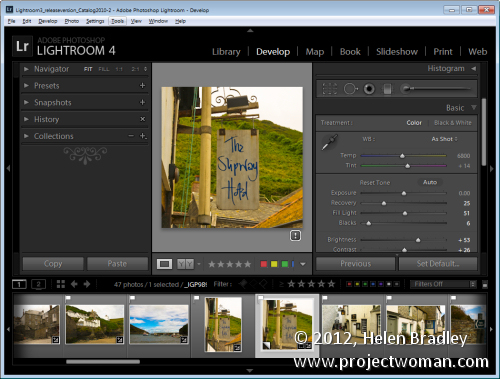
When Lightroom 4 was released the Develop module’s Basic panel was altered significantly. The sliders in that panel are now called by different names, they have different starting settings and they do different things to those in the earlier Lightroom versions. In short, the Basic panel adjustments in Lightroom 4 so significantly differ to those in Lightroom 3 that they aren’t interchangeable. Therein lies the explanation as to why your brand new sliders sometimes disappear and the older Lightroom 3 ones reappear – quite simply they do so when you are working on an image processed with an older process version.

So, if you have an image that has Process 2003 or Process 2010 applied to it, the Basic panel sliders will be those you are used to seeing in Lightroom 3 and earlier. If you’re working on a Process 2012 image the sliders are Lightroom 4 sliders. Updating the process version to the most current version will display the new sliders.

What this means to you

If you want the best processing for your images and if you want to see only one set of sliders in the Basic panel then go ahead and update all your images to Process 2012.

If you can see differences between the process versions and if you don’t want those changes applied to some or all of your images then you don’t have to update your images. It’s up to you to make the choice and you can do so for one or more of your images as and when you want to.

However, if you still have some Process 2003 or Process 2010 images in your Lightroom collection just be aware that Lightroom 4 sliders might disappear and be replaced by those from Lightroom 3 from time to time because of this.

Now it is over to you. Have you upgraded your older Process 2003 and Process 2010 images to Process 2012? If you didn’t what made you stay with the older version?

Helen Bradley

Thursday, November 1st, 2012

Lightroom – Edit in Photoshop

Learn how to take an image from Lightroom to Photoshop and back again. This will ensure that the image appears back in Lightroom, automatically added to the catalog, with the original version backed up. I also demonstrate the different possible settings so that you may customize this process.

Transcript:

Hello, I’m Helen Bradley. Welcome to this video tutorial. In this tutorial I’m going to show you how you can take an image from Lightroom to Photoshop and back successfully. I’m here in the Develop module in Lightroom and I’ve already done some work on this particular image. And I’m pretty happy with it. The problem is in this animal’s eye though you can see that there’s a little shape here that I want to get rid of.

Now I could get rid of this in Lightroom but it’s going to be a whole lot easier to take this image into Photoshop. So we’re going to do that now. To take an image from Lightroom into Photoshop I’m going to let Lightroom control the process. I’ll right click and choose Edit in. Because Photoshop has already been installed and Lightroom is aware of that I’m going to click Edit in Adobe Photoshop CS6. If I was using a different version of Photoshop I would select that from the list. I’ll click here. And now what’s happening is that Lightroom is asking me what I want to edit, either a copy of this image with the Lightroom adjustments, just a copy of the original or the original itself. In this particular case I want to edit this image with the Lightroom adjustments. So I’m going to edit a copy with Lightroom adjustments and click Edit.

If Photoshop is not already open Photoshop will be opened now. But here’s our image inside Photoshop and I’m just going to size it so that we can see the area in question. And now I’m going to bring in the tools. I have here the spot healing brush tool which is going to be the tool that’s going to help me fix this problem. I think I need to zoom in a little bit closer still so let’s get right into this problem area. And now with the spot healing brush tool I can size it down to suit the problem area and just start working over it. I could also use the clone tool if I wanted to. Any of these tools are going to help me fix this issue. And working with this tool in Photoshop is going to be a whole lot easier than working with the similar tools in Lightroom because I can just be a whole lot more accurate in Photoshop. If I want to undo it I just press Ctrl Alt Z to undo the change.

So when I’m happy with the resulting eye I’m just going to zoom out, make sure it all looks fine, which it does for this particular eye. I’ll probably fix this one while I’m here, but let’s call this good for now. And because I’m ready to go back to Lightroom now I’ve fixed the problem, I’m just going to close this image. So I’m just going to click the X button to close it. I’ll get a message which will say do you want to save changes to the document and I’ll say yes. The important thing at this point is not to choose File, Save as because you want to send the image back to Lightroom in the format that Lightroom sent it to Photoshop.

Now we’re back in Lightroom. The image that we’re looking at is the one that has been the fixed eye. And you can see here it’s called lionanimaleyes edit.tif. What Photoshop has done in conjunction with Lightroom is it’s taken the image, applied the edits to it and then sent it back as a TIF file with -edit after it. This is the original file. We haven’t lost the original. We’ve just got a copy back with the edits applied to it. Now the settings that Lightroom uses when exporting to Photoshop and receiving the image back are in the preferences setting.

I’ll choose Edit and then Preferences. And we’ll go to External Editing. You can see here that edit in Photoshop CS6 is set up as a TIF file. If we wanted to we could bring it back as a PSD file but TIF was selected here. It’s being sent out as proPhoto RGB with a 16 bit depth, a resolution of 240. And here’s the file naming. It’s coming back with the same file name with -edit on it. You can see that we’re using custom settings. Here’s the edit and here are our custom settings, the original file name with –edit applied, and then either PSD or TIF depending on what it is that we have set here for the file format. So all of this is customizable and this is where it’s being controlled as to what it goes out to Photoshop as and what it comes back into Lightroom as. And provided you use that process of just choosing File, Close or File, Save from Photoshop and not Save As so you don’t give it a name, you let Photoshop and Lightroom deal with it, then you’re going to be able to work seamlessly between Lightroom and Photoshop and back again.

I’m Helen Bradley. Thank you for joining me for this video tutorial. If you enjoyed this tutorial place click Like. You can subscribe to my channel and hear more about videos that are launched regularly every week in future.

Monday, October 29th, 2012

Lightroom – Faux Orton Effect

Learn how to create a Faux Orton Effect in Lightroom, which produces intriguing photos using glowy colors and contrasting details. I also demonstrate how to save the effect as a preset to reuse over and over again.


Transcript:

Hello, I’m Helen Bradley. Welcome to this video tutorial. In this tutorial I’m going to show you how to create the Orton effect or a faux Orton effect on an image in Lightroom.

I have an example of the Orton effect that we’re going to create here in Lightroom. This is the original image and this is the image with the Orton effect applied to it. What I’ve done is I’ve softened the image and then tried to boost the blacks a little bit. You can’t get a true Orton effect in Lightroom because you can’t apply layers in an image. So what I’m trying to do is to bring in some of the characteristics of an Orton effect, a slightly lighter more glowy sort of image with some sharp blacks in it and a sort of hazy look to it. So let’s see how we might do this.

With this image open in Lightroom, first of all I’m going to the Develop module and I’m going to upgrade this one because it’s been worked on in earlier version of Lightroom. So I’m just going to upgrade it to the new process version. And I’m happy with that so let’s just go back to the image that we’re working on. I’m going to make a virtual copy so we can see how far we’ve come. And we’re going to be working on this virtual copy.

Now the first thing I’m going to do is just adjust this image. I’m not so much worried about the histogram as I am about getting some things out of this image that I want to get out of it. But I’m going to turn off the highlight clipping because I’ve got that turned on here. You can see highlight clipping is showing here. So I want to hide this for now. Let’s turn off the histogram and let’s just adjust the image a little bit. I’m just going to set my black point. You can see I’ve got the Alt or Option key held and I’m just trying to darken this to get some blacks in the image. It needed quite a bit of darkness in the image. And let’s go up with the whites right now.

Okay, so once I’ve got the image adjusted reasonably well to get a little bit of contrast and I’m starting to see some blacks let’s start going for this Orton effect. And one of the things we’re going to do is to reduce clarity. So we’re going to bring the clarity right down on this image. I do want quite a bit of vibrance because I want a quite a bit of color. And now let’s go and add some more reduced clarity. I’m going to click the graduated filter. Now this allows me to apply a graduated filter to the image. And it needs to be anchored to a side of the image. So I want it anchored to the top so I’m just going to drag down here to create it. And because it has saturation set to minus one hundred what we’re seeing is that we’re seeing no saturation in this images at all. So that’s convincing us that this is the graduated filter. Of course I do want saturation in that image so I’m going to take it back to normal but I am going to reduce clarity. And that’s adding some more of that softening effect to this image. And I’ll click Done.

Now I can boost that even more by adding a second graduated filter to do exactly the same thing. So again, clicking on Graduated Filter, making sure I select New. This time I’m going to drag up. It doesn’t matter whether I go up or down but I just want two filters on this image. So I want to add the effect. So here’s the second filter. Again, the default on this one is for saturation to be minus one hundred. I just want to take that back to normal. And what I want to do is kill the clarity. And I can also kill the sharpness by taking that down a bit too. I might increase the exposure a little bit more in the way of highlights. And I can go to this one as well, click on this and again, bring down the sharpness on this layer, just tweak that a little bit and maybe add a little bit of exposure and highlights on that one, maybe even some shadows until I get the effect that I’m looking for. And I’ll click Done.

At this point I may want to come back and re-adjust my blacks on the whole of the image. You can see that the blacks have been affected by that adjustment and I don’t have nearly as much black as I had before. So let’s go in and adjust the blacks. Having done that I’ve brought way more black in I think than I want. So let’s just go and bring up the highlights a bit on the basic image underneath all those adjustments, and again, kick up the shadows a little bit.

So there’s the basic Orton effect applied to the image and having done that I could just go onto the next image. But I could also make this a preset that I can use in future. In the Develop module I can go up to presets here and I can click the plus symbol. So here we are New Orton because I think I have an old one, okay, and I’m going to select which options I want in there. I do want graduated filters. I didn’t use split toning. I did use color. I did use process version and calibration. I didn’t use any post-crop vignetting or grain. I didn’t use any lens correction or noise reduction here. I did use some color. I didn’t use any sharpening so I’m going to that out. I didn’t use any tone curve adjustment. But I did adjust clarity and I did adjust these settings. I didn’t adjust white balance. So now that I’ve made a selection of everything that I want added to this particular develop preset, I’m just going to click to create it.

Now this is a new Orton preset. And of course it’s been applied to this image by default. But let’s go and get another image shot in similar circumstances to this and let’s go and apply it to this image. And all I do is to click New Orton, and it is than applied to this image. The process version is applied and all of the settings that we included including the two graduated filters here and here. The reason why I used a graduated filter and not adjustment brush is that adjustment brush cannot be included in a develop preset whereas the graduated filter can. And now I’ve got a new Orton preset that I can use with any of my images. All I do is click on the image and then click on this new Orton preset and it’s automatically applied to the images.

Now if I don’t like it I can Ctrl Z to undo it. In the case of this image that I had already applied it to I kind of like it, but I think the saturation is too much. So I can use that as a starting point for working with this image. And I can then adjust the sliders because all you’re doing by creating a preset in Lightroom is actually recording what the sliders are set at. So you can use that as a starting point and then adjust the sliders as you like from there.

So there’s how to create a faux Orton preset in Lightroom to apply to your images. I’m Helen Bradley. Thank you for joining me for this video tutorial. If you liked the tutorial please like the video here on YouTube. Think about subscribing to my YouTube channel so that you get updates whenever we launch videos which at the moment is a couple of times a week.

Helen Bradley

Friday, October 12th, 2012

Create an HTML web gallery in Lightroom

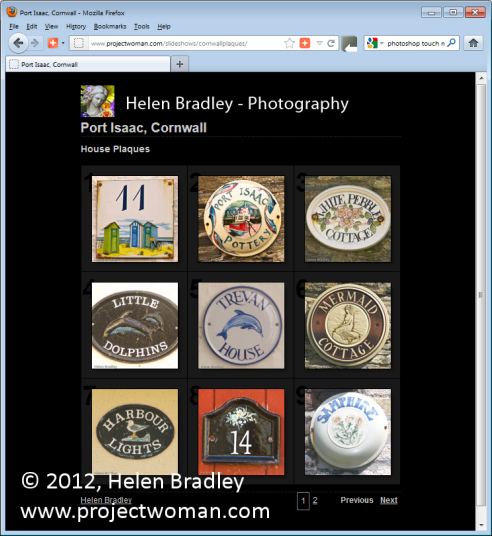
With the increasing popularity of the iPad and iPhone it’s no longer appropriate for most of us to create Flash based web galleries – they just can’t be easily viewed on these devices. If you want almost everyone to be able to see your galleries then you need to create them as HTML galleries and not Flash.

Lightroom has a range of HTML Templates you can use to create a reasonable looking gallery in a very short time.

To make your web gallery in Lightroom start by placing your images in a Collection. This makes it easier for you to work with the images and you can save the gallery so you can edit it in future if needed.

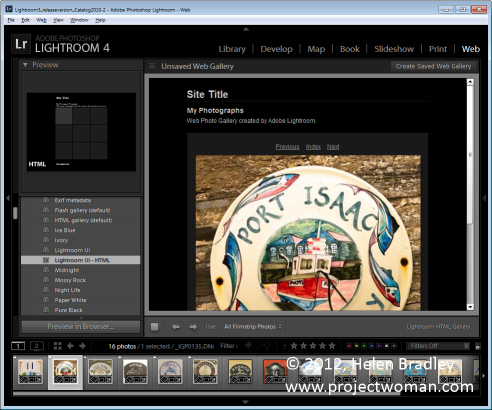
Select your Collection and switch to the Web module. From the Layout Style options, you can select Lightroom HTML gallery or, easier still, from the Template Browser panel on the left of the screen, select a gallery that is HTML based. If you look in the preview area the HTML gallery templates all have the letters HTML in their bottom left corner. Select a template to use.
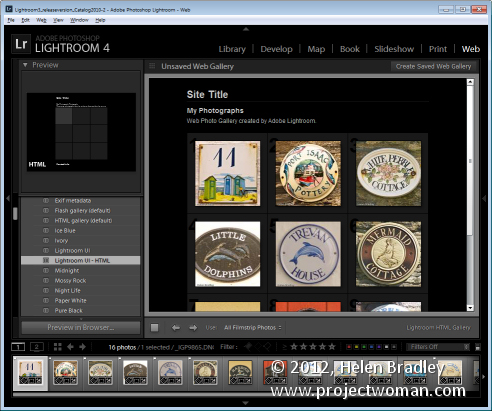
From the toolbar (press T if it isn’t visible), choose All Filmstrip Photos if you have a Collection selected and this will add all the images to your gallery. What you see on the screen in the editing area is a live version of your web gallery. You can click on any image to view it as it will look on the web.
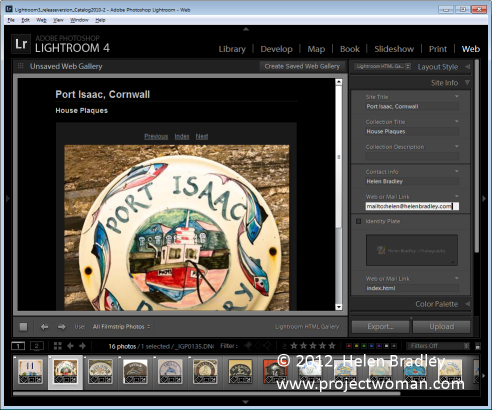
Open the Site Info panel and type a Site Title, a Collection Title and a Collection Description. If you don’t want to use all of these simply delete the placeholder text for those items you don’t want to use and the space they take up in the template will be freed for use for your images.

For the Contact Info, type your contact name if desired and then complete the Web Or Mail Link and this will be linked automatically to the contact name in the web gallery.
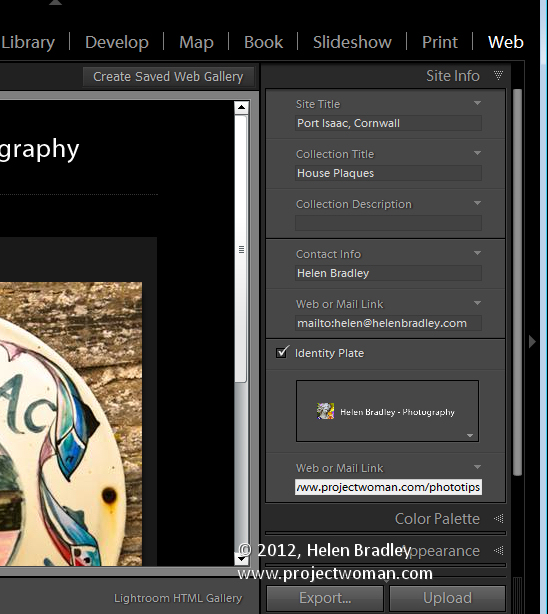
You can add an identity plate to the gallery, if desired, it will sit above the Site Title. You can link it back to your site if desired by completing the Web or Mail Link box.
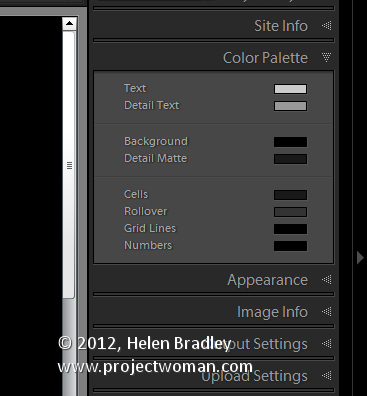
The Color Palette options let you change the colors for the various elements in the website template.

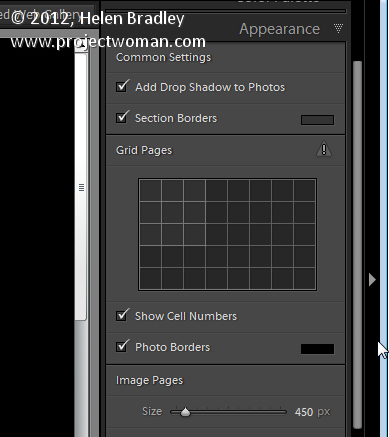
In the Appearance panel you can set the thumbnail image grid size – it defaults to 3 x 3 and cannot be any smaller but it can be considerably larger. If you want to show cell numbers over the images you can do so – this is useful when you need to give viewers an easy way to identify images they like. Images are numbered sequentially and if you have multiple pages the images on the second page continue sequentially from the numbering from the first page.
You can control the size of the full size image on the Image Page by adjusting the Size slider. You can also add Photo Borders to the images in the Image Pages. Note that the Appearance panel is divided into Common Settings, Grid Pages and Image Pages allowing you to make change that effect the entire gallery, only the grid pages or only the image pages.
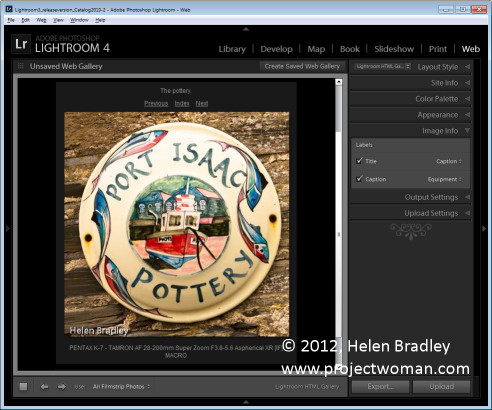
In the Image Info panel you can select to add labels to your images. These appear on the Image Page only. You can select a Title which appears above the image and a Caption which appears below the image. For each you can source the text from the image metadata and there is no reason why you can’t set the Title to be the Caption metadata and the Caption to be your Equipment metadata, for example.
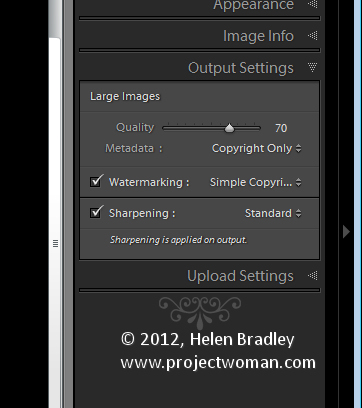
In Output Settings select the quality of the larger size JPG images – 0 is low quality and 100 is high quality. If you want to include Metadata with the image select what to include – your choices are Copyright Only or All.

Also add a Watermark if desired. If you select to add a watermark, you’ll see it on the image page and the index pages so you can check to see that it’s what you want.

Select whether or not to sharpen the images – this sharpening is only applied as the images are output so you won’t see it on the screen. If you’re unsure what to use, enable Sharpening and set it to Standard.
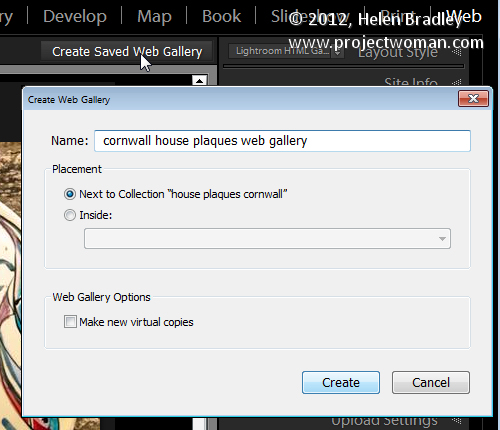
When you’re done, click Create Saved Web Gallery – this is a new option in Lightroom 4 and it appears to the top right of the main editing area. Type a name for your web gallery and click Create. Doing this ensures that the gallery is saved and once you have done this, Lightroom will track your changes from now on.

In future you can come back to the web gallery by clicking the special collection that Lightroom creates for you.
If you want to upload your gallery to the web later on, click Export to export it to disk. Otherwise you can upload it direct to your website by selecting the Upload Settings panel and configure your FTP server. For this, you’ll need your server details, user name and password. You’ll also need the server path although you can click Browse to browse your server to find it if desired. Type a subfolder in which to place the gallery – you’ll need to do this if you plan to have multiple galleries in the server folder you are using. Each gallery needs to be placed in a different subfolder or it will overwrite the previously uploaded gallery.
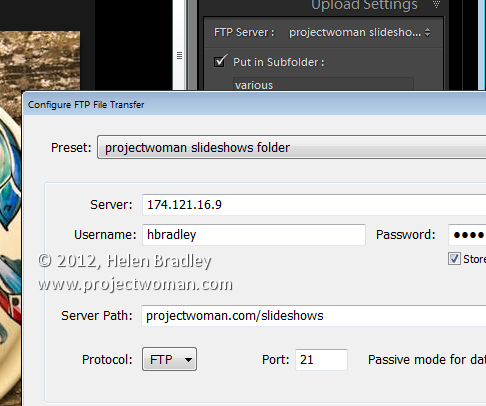
When you have everything configured click Upload to render the gallery images, create the necessary html code and upload it all automatically to your server.
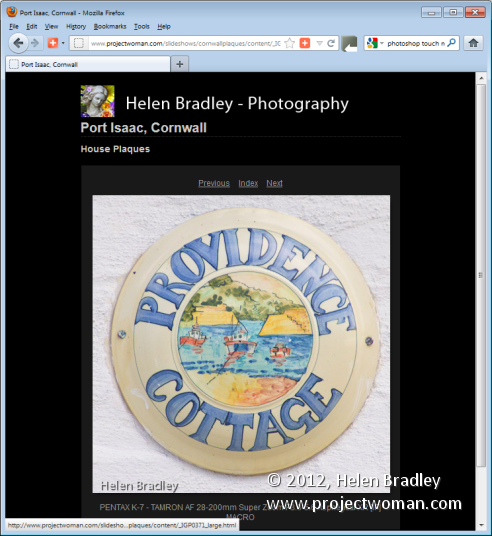
The HTML galleries in Lightroom aren’t the best looking galleries in town but having a gallery accessible to almost any device is definitely and incentive to use them in place of Flash galleries.

Helen Bradley

Thursday, October 11th, 2012

Lightroom Import Presets

Speed up and streamline importing images into Lightroom using Import Presets. Learn how to create and edit presets for importing images into a Lightroom catalog, includes backup on import, renaming, import presets, choosing previews and folders for storing images.

Check out all our tutorials on our YouTube channel.

Complete transcript of this video:

Hello, I’m Helen Bradley. Welcome to this video tutorial. In this tutorial I’m going to show you how you can streamline the importing process in Lightroom with import presets. An import preset helps you speed up the process of importing images into Lightroom because you don’t have to make all the settings each time that you import. I’m in the Library module. I’m just going to click here on Import. I already have a disk in the drive. I’ve got a camera card in the drive. And we’re going to have a look at an existing import preset because you can see that the default here right now is craft images. What this is is in import preset that I created to import images that I shoot of the crafts that I make. And it has certain settings already in it. There’s no file renaming because I don’t rename my files. Apparently there are no develop settings here but there is some metadata that’s being added to the images as they’re imported. And the destination is already selected. You can see here that the destination is craft images. This Into Subfolder is not actually being used because it’s not checked. So in actual fact everything is going straight into the craft images folder. So let’s go and create an import preset. And the way that we do it is just to make the settings that we usually want to use. Here’s the camera card. I only want to bring in new photos. In this case these are daily photos. So let’s just check. I do want standard previews made. I don’t want to import suspected duplicates. If I wanted to make a second copy I could automatically set that up but I’m just seeing that my backup drive is not attached at the moment. So let’s leave that blank. If I wanted to rename files I could select that and set up the renaming, but I don’t usually do that. Apply during import. Now there is a develop setting that I want to use here. And here it is in my user presets. And it’s a camera standard profile. What that does is makes my images when they appear inside Lightroom look the way they did on the back of the camera. And then I can go to metadata and I can select the metadata. I’m just going to click Edit Presets just to see what this metadata preset looks like and make sure it’s the one that I want to apply. Well no, that one looks a bit empty. So let’s go to Helen Bradley copyright. This looks like the right one. So I’ll click Done. Now I’m not going to apply any keywords to these image. The problem with keywords is that they’re going to be applied to all of these images. So you can see that there’s a whole range of images here. And there’s really not a keyword that I would apply to everyone of these images. So I usually keyword later on if I keyword at all. So let’s just close Apply during import. And now I need to select my destination. Now I already have a folder for these images on my removable disk. It’s actually this one. Toshiba hard drive green is where my images are kept. I’m going to go into photos and I want to pick up my daily walk from 2010 onwards. So this is the folder in which the images are going to be placed. And once I’ve made all these settings I can go ahead and import the images. But if I want to use these settings or most of these settings again in future I’m better off creating them as an import preset. So I’m going to choose Save current settings as a new preset. And here is my preset dialog. And I’m just going to call this daily walk, whatever it is that is going to remind me that these are these images and click Create. And now I have an import preset that’s going to be saved with Lightroom. It’s going to be available from this dialog anytime I come into Lightroom. All I need to do is to select daily walk and all these settings will be automatically applied to my import. Now if for example I do go and reconnect my backup drive then I could click here and just make a change to the settings. It’s not going to change the import preset but I can actually vary these things if I want to. But it gives me most of the settings that I need most of the time. So I’m going to go ahead and just click Import. So there’s the basics of using an import preset in Lightroom. You’ll find that if you repeatedly choose to use the same settings that an import preset will save you a lot of that setup time. I’m Helen Bradley. Thank you for joining me for this video training session. If you liked this video please click the Like button here in YouTube to tell others that you liked it. If you’d like to see more of these videos and be notified when they’re released please subscribe to my channel. You’ll find lots of other Photoshop, Illustrator and Lightroom tutorials in this YouTube channel. And visit my website at Projectwoman.com for more blog posts and interesting articles on these programs.

Helen Bradley

Thursday, October 4th, 2012

Lightroom Frame a photo

Learn how to add an image as a frame to use in Lightroom to print around your images. Uses the Identity Plate option to do this. Shows you how to create the effect using one of our frames that we sell here and also how to do this using your own hand drawn frame.

Check out all our tutorials on our YouTube channel.

Complete transcript of this video:

Hello, I’m Helen Bradley. Welcome to this video tutorial. In this tutorial I’m going to show you how you can frame an image ready for printing inside Lightroom so you don’t even have to leave Lightroom to add a frame to it. Before we start on this process let’s have a look and see what our end product is going to be. I have here Lightroom open and you could do this in Lightroom 4 or 3 or 2. It’s not specific to Lightroom 4. I’m in the print module and here I have a series of images that I want to print. And what I’ve done is I’ve created this frame that now sits over this image. Now you can see that the frame pulls apart. So this image can be altered. So for example I can just change the image there, move the frame back into position, and I’m ready to print this. Now I can print it direct to the printer or I have these going to print to JPG because I want to use them on my blog. Now we sell these frames on projectwoman.com, and I’m using one of the frames that we sell. But let’s have a look and see how you can do that with your own hand-drawn frame or how you could use one of our frames to do it. And to do that we’re going to start in Photoshop if you’re using your own frame because you’ll need to create it yourself. Here I am inside Photoshop and I have a frame that I’ve already created. Now what I did was I took a piece of white drawing paper and a nice thick black felt tip pen and I drew this frame. And then I scanned it in using my scanner. But if you don’t have a scanner you could always just take a photograph of it. Now I’ve cleaned this up. And what I’ve done is I’ve cut out the middle so this is hollow in here. If I add a new layer below this, and let’s just go and get my Tools Palette, and let’s drop some color in there so that you can see that it’s actually a hollow frame. So let’s just go and get a different color to the frame color. And I’m just adding a filled layer beneath it so you can see that there is actually a hollow in the middle of the frame. And that’s really important because that’s where your picture is going to go. And here my frame I’ve added a boarder to it, so a plain blue border. But you don’t have to have a border. You could remove it. And this is just white with black. So once you’ve got your frame created what you’ll want to do is to save it, and I’ve saved mine as a PNG file. Now the reason I’ve used PNG is twofold. First of all you get a nice flattened document. But PNG will store transparency. You can’t store transparency in a JPG file. So you can’t use JPG for this because you won’t have a hole in the frame for your picture to sit in. So what I’ve done is create it as a PNG with this hollow cutout because when it comes to Lightroom that hole is still going to be there. So having saved it to disk, let’s just do that, File Save As. I just want to put this in a place that I know where it’s going to be. So I have a folder here for video images. So I’m just going to put my hand-drawn frame in there and just click Save so I know exactly where it is. I’m just taking the options here, just the standard PNG options from Photoshop. So let’s close that out, close down Photoshop for now and let’s go and get Lightroom again. Okay, so let’s go and get a different folder of images because I don’t want to start with anything that we’re sure of. And I know I’ve got some really nice Safari West animals. So let’s go with the animals. And let’s go to the Print Module. And let’s go to a brand new layout. So let’s close down this preview. And I’m just going to go and start with a brand new layout. It can be anything at all. I would set up my page. And I want to be working in landscape. I’m going to click Ok. And I want this to go to a JPG file. So I’m just going to set JPG there, and I’m working in a landscape letter size image. So everything’s looking perfect there except of course that this is not what I want my print job to look like. I have an Identity Plate turned on. So I’m going to turn that off for now. I’m going to get rid of these pieces. Okay, so now I’m going to add my first image. So let’s go and find an image that is in landscape mode because my frame is a landscape image. So let’s just go and get something. There’s some distinctly not Safari images in this folder by the looks of it. I really like this one so I’m going to add it in here. So I’m just placing it. Because we’re using a custom package I can just drag and drop the image into position. And Lightroom won’t let me skew this image so whatever I do with it it cannot be skewed out of alignment. So I’m just going to put the image there. And what I want to do is to put my frame over the top. It looks like we’ve got a few settings coming in with this image such as a photo border and an inner stroke. I’m going to take all of those off. And now let’s go and get our frame. And the way that we add the frame is from the Page Panel here. We going to add it as an Identity Plate. So I’m going to click to select Identity Plate. But I want to add my own so I’m going to click here and choose Edit. Now the type of identity plate I’m going to use is Graphical. So I’ll select that, and I’m going to locate the file that I created. Now one thing I didn’t mention that is critical is that the dimensions of this frame need to be the same dimensions as the image that you’re working on. So I’ve made mine the size of a letter size sheet of paper. Now it’s very large. That’s fine. I’m going to use it anyway. And I want to save this. So I’m just going to click Save As. And I’m going to put this blue hand-drawn frame and click Save, so now I can use it anytime and click Ok. And the frame is now added to the image. And I can size it. Now the reason why I have to make sure that it is a letter size frame is that Lightroom won’t let me scale it any larger than letter size. So I have to make sure that it’s in the correct proportions before I start. And I’ve got grids and guides turned off so we’ll be able to see everything really clearly. Now the reason why the frame is in front, and we do of course want it in front but we do need to check and make sure that it is in front, is that Render Behind Image is not turned on. So if we had it behind image than it would be behind the image. We want it on the top. Now I’m ready to print that. And once I’ve printed that I can then use it for another image. And all I’m going to do is move the frame out of the way a little bit, drag and drop a replacement image into position and then just put my frame back in. Now I’m ready to print the second image and then I could continue through to create other images ready for printing. If I want to save this, and typically having done the work of setting this up I would want to save it, I can either create a saved print which will save this print layout and the image or I can just save the user template. So I’m going to click here. I’m going to call this blue frame template. Blue frame one up will tell me that it’s going to be just one up, one image on this, and just click Create. And it’s going here into User Templates. And that means that I can select it any time in the future for any image at all, and it’s going to be preset for me. So there you have the ability to create your own framing for images inside Lightroom.

Helen Bradley

Friday, July 27th, 2012

Fixing Animal Eyes in Lightroom

Learn how to add impact to your animal and bird images with this smart and easy Lightroom fix.

Come and see all our video tutorials on our YouTube channel.

Helen Bradley

Wednesday, July 25th, 2012

Moo comes to Lightroom

Yeah! The folks at Moo have released a Lightroom plug in that makes it easier than ever to get photos to Moo.

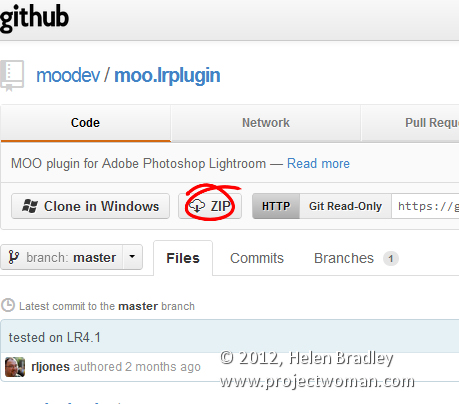
Visit this page and grab the zip file – click the Zip button to get it.

Unzip the contents and rename the folder moo.lrplugin

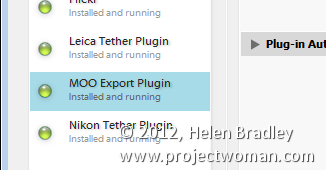
Then launch Lightroom and choose File > Plug-in Manager and grab the plug in folder. That’s all you need to do. It will be installed and ready to be used.

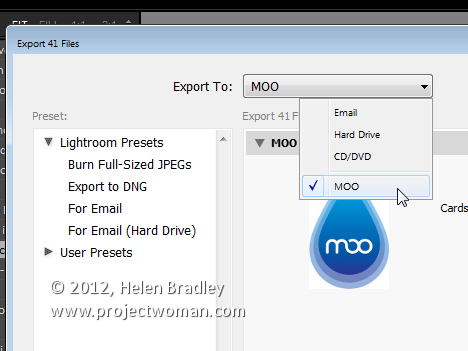
Just select the images to send to Moo, choose Export and select the Moo Export Plug-in from the Lightroom Presets in the Export dialog.

Helen Bradley