

Tuesday, November 24th, 2009
Word 2007: Make your own Click and Type controls
 Word 2007’s new Content Controls let you do some pretty snazzy things in your Word documents.
You will have worked with Word’s own controls when you add a cover page or header and footer using the Insert tab options in Word 2007. In this case you may have noticed that, if your document already has a title configured in the document properties, the title appears automatically on the cover page and in the header.
Alternatively, if it doesn’t have a title, when you double click the Title area and type one, any other object in the document that includes a title will be updated automatically. This behavior occurs because the document information is inserted using content containers which are linked to the document properties.
You can take advantage of this behavior in your own designs and you can create and use unlinked content containers to prompt for details to be inserted in your own documents.
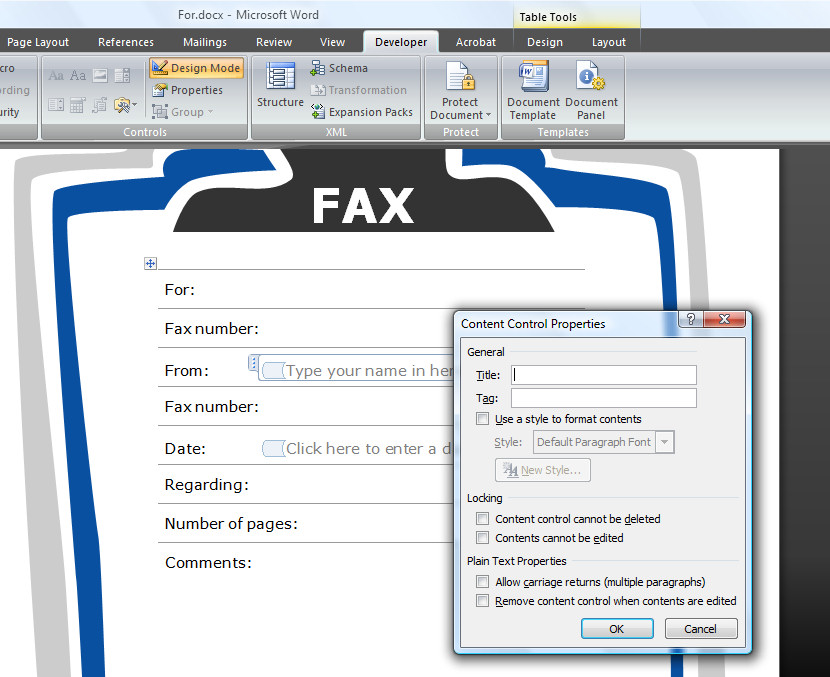
To see how content containers work you’ll need to display the Developer tab which you can do by selecting the Office button, click Word Options and from the Popular category choose the Show Developer tab in the Ribbon option.
Click the Developer tab and, in the Controls area you’ll find entries for the Building Block Gallery and for elements such as a Date Picker and a Text Box which you can use in your documents.
So, for example, to prompt a user to insert an entry from the Quick Part Gallery, click where you want the Quick Part Gallery entry to appear. Click the Developer tab and click the Design Mode button so you are in design mode.
Now click the Building Block Gallery button. This inserts a small content container with the words [Choose a building block] as the prompt. Exit Design Mode by clicking Design Mode button once again and you will see that the document contains a clickable link in this position prompting the user to choose a building block.
In practice, all the user needs to do is to click on the Choose a building block link to show the dropdown list and they can then select the building block to insert at this position in the document.
You can also provide a link that the user clicks on to type custom text. To do this, check you’re in Design Mode and select the Text button from the Controls group. Between the markers type the text describing the content to be inserted in this position.
To test this, deselect Design Mode and click the element to see it highlighted and type the text prompted for. The text you type appears in line with regular text in the document and can be formatted by right clicking on the text and apply a format to it.
Note, however, that the entire content control is formatted at the one time and individual letters and words cannot be formatted independently of the others.
Labels: click and type control, content control, developer tab, Word 2007
Thursday, November 19th, 2009
PowerPoint Placeholders
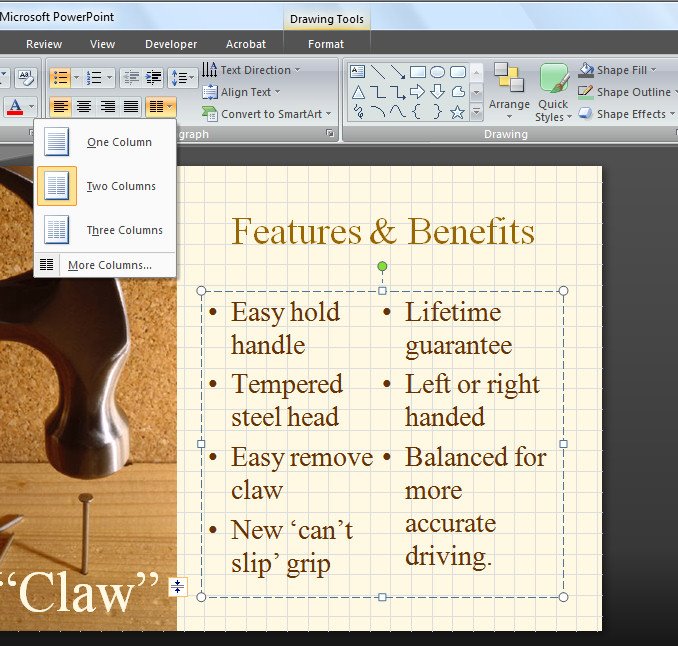 One of the long awaited features of PowerPoint 2007 is its ability to format a two column placeholder for a slide.
This lets you place multiple columns of text inside a single text placeholder.
To do this you will need to be working in Normal mode so choose View > Normal.
Click the text placeholder that contains the text that you want to display in multiple columns and from the Home tab click the Columns button in the Paragraphs group.
Select the number of columns to split the text into and it will be automatically adjusted to suit.
Simple when you know how?
Labels: multiple column, placeholder, PowerPoint 2007, two column
Thursday, November 5th, 2009
Excel 2007- In Cell Dropdown List

When you need to enter data from a small subset of entries into a range in Excel 2007 you can do it more easily using a custom designed dropdown list.
To configure a dropdown list in a cell type the list of items to use in a single column in a spare sheet in the workbook.
Select these cells and choose the Formulas tab Define Name, type DataForList as the name in the dialog, set the scope to Workbook and click Ok.
Switch to the sheet where you want to add your dropdown list to some cells, select the cells that should display a list of data to choose from and choose Data tab > Data Validation > Settings tab.
From the Allow: dropdown list choose List and, in the Source area, type =DataForList and click Ok.
Now, whenever you click a cell in this range you’ll see a dropdown list appear from which you can choose a list entry for that cell.
If you’re using Excel 2003, here is a link to an earlier post explaining how to do this in Excel 2003:
Automatic cell entries in Excel 2003
http://www.projectwoman.com/labels/validation.html
Labels: automatic, data entry, dropdown list, Excel 2003, Excel 2007
Tuesday, November 3rd, 2009
Word 2007 – Boilerplate paragraphs
 One typical use for Microsoft Word is in offices where documents and letters are created by assembling a series of standard paragraphs from a range of alternatives.
In the past Microsoft Word included the AutoText and AutoCorrect features and, like many users, you may have adapted AutoCorrect to use in creating boilerplate documents.
Some other users tweaked the AutoText tool so they could use it to insert content, such as graphics and text.
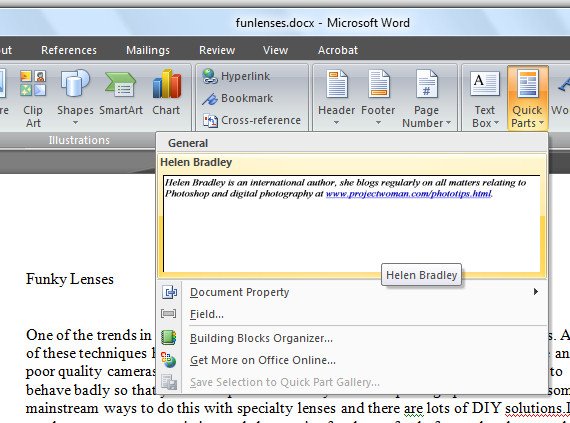
The AutoText tool no longer appears in Word 2007 and it has been replaced by a Quick Parts Gallery which makes saving, organizing and assembling documents from stored paragraphs, aka Building Blocks, much easier to achieve.
Find the Quick Parts tool on the Insert tab and click the down pointing arrow to open the Quick Parts Gallery.
Here you have a number of options including Document Property which lets you insert some of the common document properties into your document by clicking on the one to insert.
The Field option lets you insert fields much as you could in earlier versions of Microsoft Word.
The Building Blocks Organizer is the newest feature and this is a repository of text blocks which you can add to your Word documents. These Building Blocks can be sorted by Name, Gallery or Category. Some of the Building Blocks come built-in to Microsoft Word and others are legacy AutoText entries from earlier installations of Microsoft Word.
You can insert a Building Block into a document by selecting the entry in the list and click Insert.
Labels: AutoCorrect, AutoText., Building block, Quick Parts Gallery, Word 2007
Thursday, October 29th, 2009
Outlook 2007 create a new empty calendar
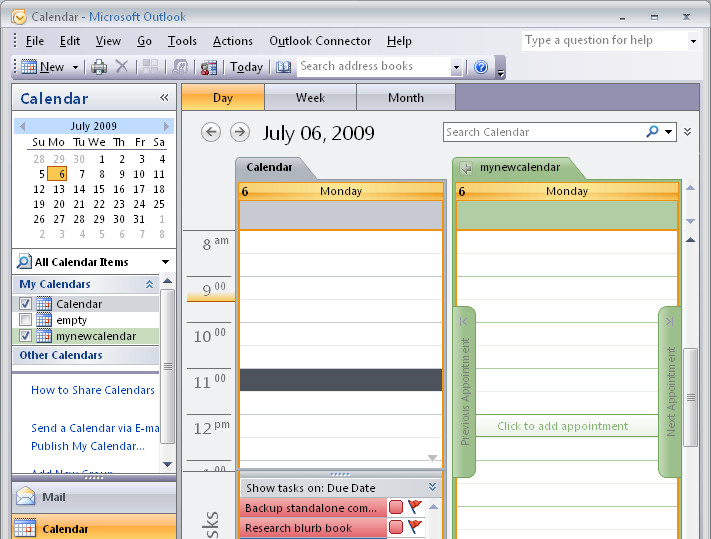 Sometimes you will need a new empty calendar in Outlook. You might need this if you’re planning an event and you need to keep everything for the even separate from your own calendar.
Or you might need a blank calendar so you can print blank pages to complete by hand.
So, when you need a blank calendar you can easily create one in Outlook. Choose File > New > Folder and give your folder the name you wan to use for your calendar.
From the Folder Contains list choose Calendar Items, from the ‘Select where to place the folder’ list choose Calendar, and click OK.
Click the Calendar option to display your calendars and, in the list, your new calendar’s name will appear.
You can click its checkbox to display it. If there is already one calendar visible, clicking its checkbox will display both calendars side by side or in overlay mode.
To change the display, right click the Calendar tab and choose either, View In Side-by-Side mode or View in Overlay mode.
Labels: blank empty calendar, create new calendar, Outlook 2007
Friday, October 23rd, 2009
Excel 2007 – Check for Duplicates
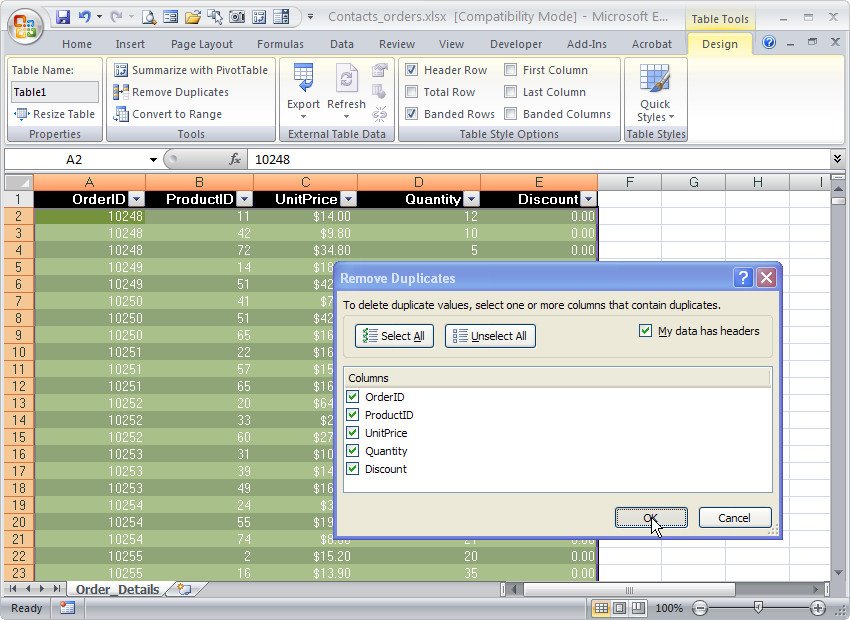
The new Excel 2007 has far superior tools for finding and removing duplicate entries in a list. Thankfully – because this has been a nightmare in earlier versions.
To find and remove duplicates from a list of data in Excel 2007 first format the area as a table by selecting it and, from the Home tab, choose Format as Table.
Click on any cell in the table and choose Table Tools > Design tab on the Ribbon.
Select Remove Duplicates to display the Remove Duplicates dialog. In this dialog are the Column headings for your data and all are selected by default. To remove the duplicate data from your worksheet leave all the column headings selected and click Ok.
If you want to remove rows where only certain data matches, leave the column headings for those particular rows selected and deselect the column headings for those columns which may have data that differs from one row to another. Now click Ok.
It is sensible to save your worksheet before running this Remove Duplicates option just in case you delete data by accident. If this happens and if you haven’t closed the file, you can recover it using the Undo button.
If you are using an earlier version of Excel, here are links to earlier relevant posts:
Excel – finding duplicates
http://www.projectwoman.com/2007/02/excel-finding-duplicates.html
Check for duplicates in an Excel list
http://www.projectwoman.com/2007/01/check-for-duplicates-in-excel-list-1.html
Labels: Excel 2007, list, remove duplicates, table
Saturday, October 17th, 2009
Word 2007 – Instant Document Elements
 Hand in hand with the new Building Blocks tools in Word 2007 are the new smart document elements created using content controls.
These elements allow you to instantly create headers, footers, text boxes and cover pages for your Word documents.
To see how these work, select the Insert tab and select the Cover Page dropdown list. From here you can select a sample cover page to use for your document.
If you select one such as Exposure a new cover page will appear in your document. This particular one includes an image and space in which to type the document abstract, the year and document title as well as your company name, etc.
You can select and delete any of these elements that you don’t want to use on your cover. Alternately, click on the elements you do want to include and type the information prompted for.
To replace the photograph on the cover page, click it to select it, right click and choose Format AutoShape > Colors & Lines tab and click the Fill Effects button. Select the Picture tab and click Select Picture to choose a replacement image.
Once you’ve selected the replacement image, enable the Lock Picture Aspect Ratio checkbox and click Ok twice. The original image will be replaced by the one you chose.
If you later change your mind and choose an alternative Cover Page, the text you’ve typed will, where it is appropriate, appear in the alternate cover page and the original page will be removed automatically.
Headers and Footers
Other elements which work similarly to the cover page are to be found also on the Insert tab and these include the Header and Footer and Text Box. To add a header to your document, for example, select the Header option and choose the header to use.
It makes good sense to choose the same style header as you used for the cover page as these are designed to look good together, although this is not a requirement and you can choose any header you like.
Similarly, you can add a footer by clicking the Footer button and choose a footer to add to the document.
Text boxes
The Text Box tool lets you add a formatted text box which contains prompts as to where you should insert your content. In this case, select a text box style that suits the type of text you want to insert such as a breakout quote or a sidebar.
Any element such as Header content or a Text Box can be reformatted by right clicking its edge and choose Format AutoShape or Borders and Shading, or whatever prompt suggests that it will let you format that particular element – what you see in the menu will depend on the element you have selected.
For example, you can change the fill color of a Text Box and, if you change it to a fill color which is a theme color, the Text Box color will update later on if you change the document theme.
To change the theme, select the Page Layout tab and choose an alternate option from the Themes list. By holding your mouse over a theme you can preview its effect on the document underneath, select the theme you want to use. To change the font used, select the Theme Fonts option to right of the Themes list and choose an alternate font combination.
Labels: cover pages, Footers, Headers, text boxex, Word 2007
Thursday, October 15th, 2009
Outlook 2007- set custom reminder sounds
When an Outlook appointment falls due, by default, Outlook is set up to do something to tell you about it. Exactly what it does depends on how it is setup.
To change the default settings for all new appointments choose Tools > Options > Preferences tab and, in the Calendar area, enable the Default reminder checkbox and set up the amount of time before an appointment that you will receive a warning about it. 15 minutes is the default but, if you prefer it to be 30, for example, then set it to this.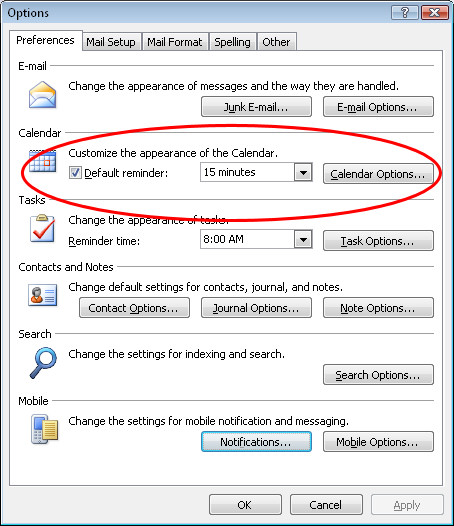 Choose the Other tab > Advanced Options > Reminder Options to set other options such as whether the reminder is displayed by default and whether a sound will be played and, if so, the WAV file that sounds.
Remember too, that you can use the Windows Sound Recorder to record your own custom sound to use.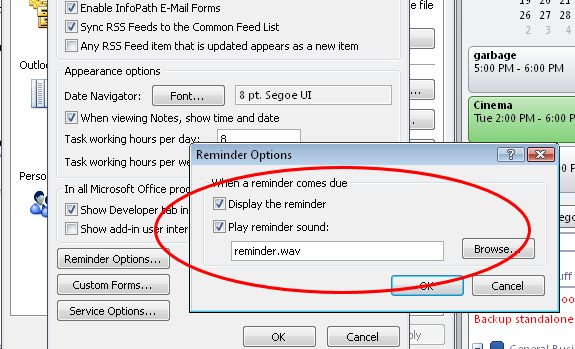
Labels: alarm, appointment reminder, default reminder, Outlook 2007, sound.
Saturday, October 10th, 2009
Word 2007 DIY Quick Parts
 Quick Parts in Word 2007 is the new replacement for AutoCorrect and AutoText from earlier versions of Word.
To add your own text to the Quick Parts gallery, type the paragraph or open a document which contains it and select it.
Click the Quick Parts button and choose Save Selection to Quick Part Gallery and, when the Create New Building Block dialog appears, type a name for the Building Block.
This will be the name you’ll use to identify it in the list so make it self-explanatory of what the Quick Part contains.
Select the Gallery to add it to, in most cases this will be the Quick Parts Gallery.
Select a Category from the list or click the Create New Category option to create your own subcategory of the Quick Parts Gallery. By creating sub categories you can organize your Quick Part entries so that they are easier to find.
Type a description of the Quick Part, if one is needed to identify it, and, from the Save In list, choose buildingblocks.dotx which is the default setting.
From the options dropdown list you can select to Insert Content Only, or insert the content in its own paragraph or its own page depending on how the content should be used. Click Ok when you are done.
In future you can insert the Quick Part into a document by clicking the Quick Part button and then select it from the dropdown list.
If it does not appear in the list, click the Building Blocks Organizer and select the Building Block by name.
You can locate building blocks in the organizer by sorting on the Gallery column and locate the Quick Part area which is where your building blocks will appear. Click the one to insert and click Insert.
Labels: Auto Correct, Auto Text, Building block, Quick Part, Word 2007
Tuesday, October 6th, 2009
Outlook Natural language Date Entry
 With so many programs requiring you to do things their way, it’s refreshing when you find a program that talks your language. Enter Outlook.
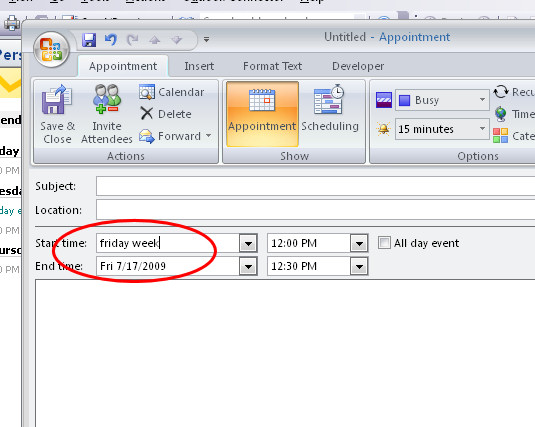
When you are setting up meeting dates in Outlook 2007 and earlier, you can use what is called “natural language” to specify the date.
For example type ‘Friday week’, ‘this Saturday’, ‘Christmas Day’ or even ‘second Monday in December’ and Outlook understands what you mean and sets the appointment date to suit your needs.
This saves you having to know the numerical date or clicking open the calendar especially if you have meetings that are scheduled by the week day rather than by date.
Labels: date entry, natural language, Outlook 2007
Tuesday, October 6th, 2009
Placeholders in PowerPoint 2007
 One new feature of PowerPoint 2007 is that you can now add your own placeholders to PowerPoint slide layouts.
In past versions of PowerPoint each slide could have only one text placeholder that would behave as a PowerPoint text placeholder – you could add text boxes but the text couldn’t be formatted in them the same way as it could when you used a placeholder. Now you can have multiple text placeholders on a slide.
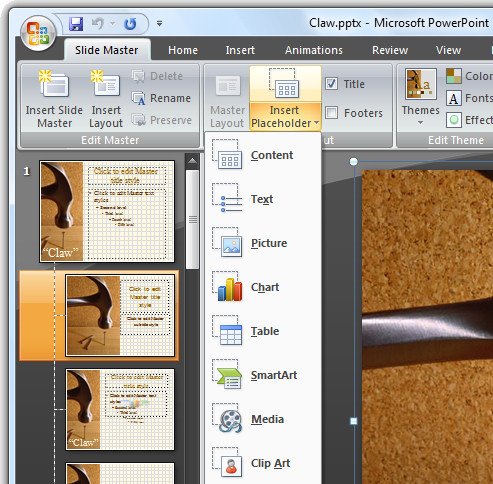
To see these at work, choose View > Slide Master to move to the Slide Master View and then click the Slide Master tab at the left of the Ribbon.
Select the master that you want to add an additional placeholder to and select Insert Placeholder from the ribbon.
From the list, select the type of placeholder to use – these include placeholders for text, picture, chart, table, SmartArt, media and clipart. You can, if desired, add multiples of these placeholders to a slide so you can have a slide layout that has all the elements on it that you need.
For example, you may wish to have a text placeholder next to a chart or text and a picture located side by side. Each placeholder can be sized and positioned anywhere on the slide.
Labels: placeholder, PowerPoint 2007, slide master
Thursday, October 1st, 2009
File Outlook 2007 Contacts your way
 I have a lot of contacts whose nicknames mean more to me than their real names.
So, while I need to use their full name in their contacts entry in my Contacts list, I’d prefer to see them shown using their nickname so I recognize it better.
To do this, I’ll open the person’s entry in my contacts list and, in the ‘File as’ area type their nickname and choose Save and Close.
Now, whenever I look for their entry in the list, they’re filed by the nickname that I associate with them and not names that aren’t so recognizable.
Labels: contacts, File As, Nickname, Outlook 2007
Tuesday, September 22nd, 2009
Outlook – Disable Contact Editing
 By default in Outlook 2007 you can edit your contact information from any view including the Contact card view.
If you find yourself making changes by accident you can disable this feature so that contacts can only be edited by opening the Contact’s information dialog.
To do this, select the Contacts folder and display the view you don’t want to be able to edit in. Choose View > Current View > Customize Current View > Other Settings and disable the ‘Allow in-cell editing’ checkbox.
Now you can look at the contacts but you won’t be able to change them without switching to another view.
Labels: disable editing., edit contacts, Outlook 2007
Wednesday, September 16th, 2009
Outlook Send a Contact’s details via Email
 To share an Outlook Contact’s details with someone else you can send it via e-mail.
This lets you get the details you have recorded about a contact to someone else without having to pull all the details across manually. It’s simple and quick.
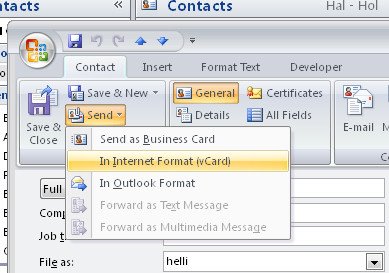
To do this, select the Contacts module and open it. Double click to open the contact’s details that you want to send to someone.
From the Contact tab on the Ribbon click the Send dropdown list and choose In Internet Format (vCard).
This opens a new message dialog with the details attached in a .vcf format file. All you need to do is to enter the recipient’s email address and your message and click Send.
When the recipient receives the message, they can click the attachment to open it and add the person’s details automatically to their Contacts list.
Labels: Outlook 2003, Outlook 2007, send Contact details via email, vCard