

Tuesday, February 2nd, 2010
Excel VBA: What Sheet is that?
 When you’re working in Microsoft Excel Visual Basic for Applications, you may need to refer to a worksheet by name. This can be confusing because the sheet names are not necessarily what are displayed in the sheet tabs at the bottom of the screen.
There is only one way to know exactly what a sheet’s name is so you can refer to it by that name regardless of what the tab says. That is to view the Visual Basic Editor and select your project in the Project Explorer. Here you will see each sheet listed by name with the sheet tab name in brackets after it.
If you want to refer to a sheet by name in your VBA code use the sheet name at the left (not the one in brackets) in the Project Explorer.
This will ensure that you always use the exact sheet that you expect to be using in your Visual Basic application.
Labels: Excel, Sheet names in code, VBA
Thursday, January 28th, 2010
Word 2007 – Formatting with Styles
 Microsoft Word 2007 provides styles that you can use to format your documents.
These make it easier for you to change the look of a document very quickly by combining styles with the new Office 2007 themes.
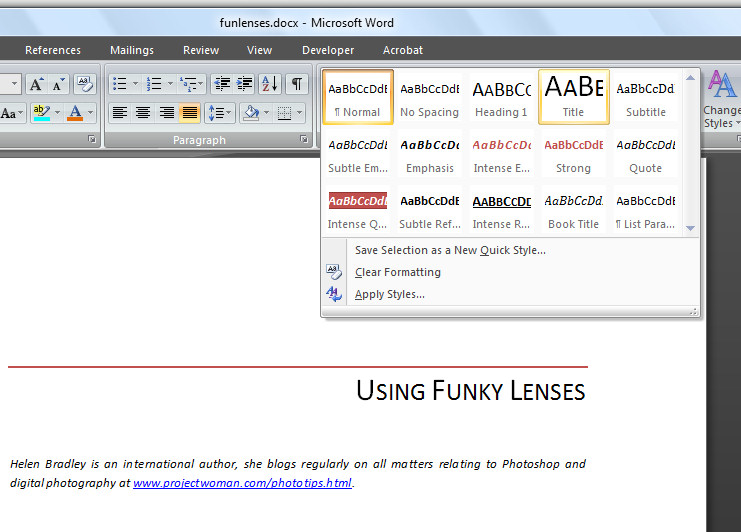
To get started with styles, with a document open on the screen click the Home tab and choose the Change Styles button.
Here you can select a Style Set for your document, for example choose Distinctive or Elegant, Fancy or Formal depending on what you want your document to look like.
Once you have selected a Style Set, the Styles group on the Home tab will display styles from that set.
To apply a style to text, select the text, for example a title, then in the dropdown Style list and hold your mouse pointer over one of the styles to see how it would look if applied to that text. Select the style that you want to use and click it to apply it.
You can also add your own choice of formats as a selectable style. For example, format a piece of text so it looks the way you want your style to appear and select this text. Open the Style list and choose Save Selection as New Quick Style.
Give the style a name, click Modify to change any of its characteristics and click Ok to save it as a Quick Style. This style now appears in the Style list and you can select it to apply to text in your document at any time.
Labels: change styles, formatting and styles, quick style, Word 2007
Thursday, January 21st, 2010
Word 2007: Drawing in documents
 One technique that has changed with Word 2007 is drawing in documents.
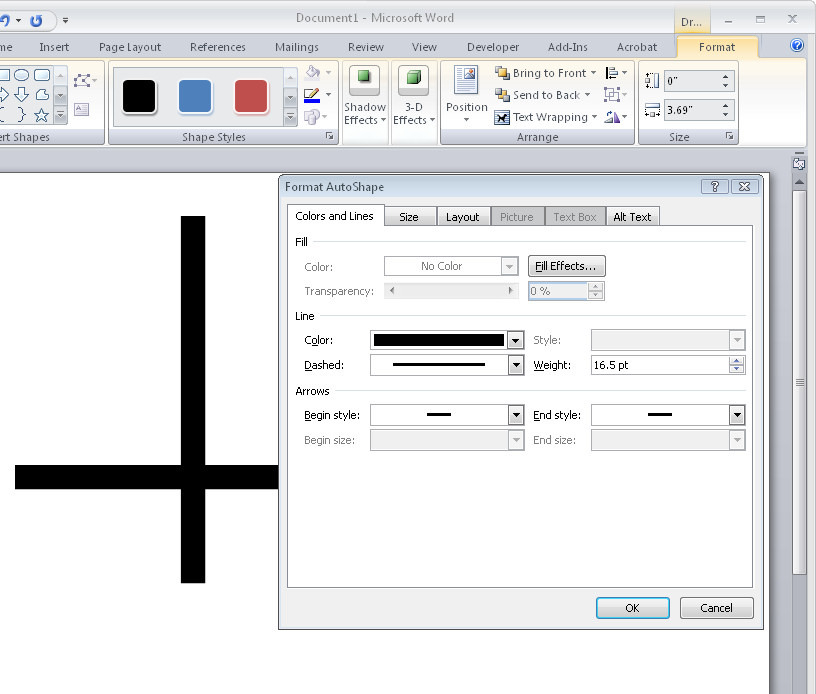
Instead of having a Drawing toolbar you now select shapes from the Shapes dropdown list on the Insert tab.
From this list you can select shapes such as lines and all the AutoShapes that you are used to using in earlier versions.
To create a drawing, for example, you can select and insert the shapes that make up the drawing and then format them using the Drawing Tools > Format options on the Ribbon.
Many of the color options that are available are connected to the theme colors so, provided you use a theme color in your drawn shapes, the colors will change automatically later if a different theme is applied to the document so the drawing stays consistent with the remainder of the document.
Find the shape formatting tools on the Drawing Tools > Format tab on the Ribbon.
What is missing in Word 2007 is the ability to right click a shape and have the format AutoShape dialog appear as it does in Excel and PowerPoint.
The Format tab and the Format Object dialog in Word offer less features than are available in the new graphics engine in the other applications.
Labels: color, Drawing, format object, format tab, shapes, Word 2007
Monday, January 18th, 2010
Restore a file association in Windows Vista

Don’t ask me how I did it – it has been one of those weeks! but I somehow associated zip files with Photoshop. So, every time I needed to extract the contents of a zip file Photoshop would open and gag on the file – not unsurprising but very annoying.
A fix was required. The solution is in the Registry but it’s not hard to find or to fix. You do need to have your wits about you and never touch anything you don’t understand. Oh! and back up your registry before you start playing with it.
Choose Start > Run > type REGEDIT and click OK and then, when the warning comes up, click Continue. You have to be an admin to use this tool.
Navigate to find this key:
HKEY_CURRENT_USER\Software\Microsoft\Windows\CurrentVersion\Explorer\FileExts\
and then locate the extension causing issues, in my case zip
Then find the UserChoice option under this, right click and choose Delete. This removes any custom choice and returns your association to what it was when Vista was first installed. Problem solved!
Finally, choose File> Exit to exit the registry editor.
Labels: default, defaults, file associations, registry, restore, Vista
Saturday, January 16th, 2010
Outlook – create Your own Signature Business Card
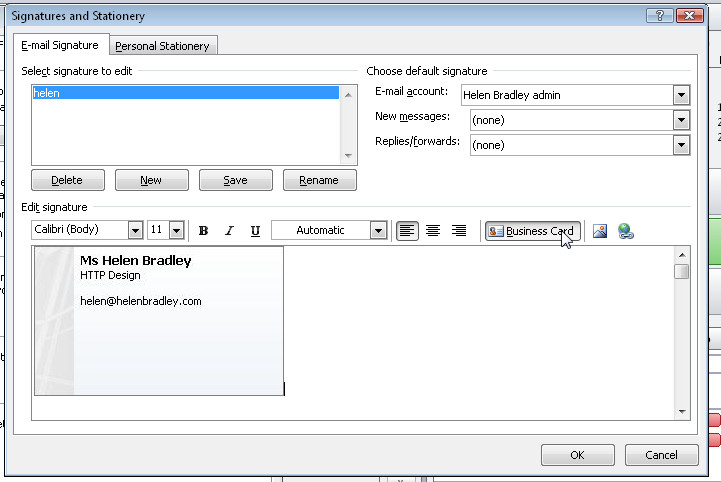 Add yourself to your Contacts list in Outlook 2007 so you can create a Business Card to send as an attachment to all your outgoing emails.
Once you have added yourself as a contact, choose Tools > Options > Mail Format > Signatures and chose the signature to attach the card to or create a new one.
Click New if creating a new card, and from the Business Card dropdown list, choose your Contact entry to attach it as a business card to each outgoing message.
Labels: attach, business card, Outlook 2007, signature
Friday, January 15th, 2010
Select a table cell contents in Word 2007

Confession time. I had a picture in a table cell in Word and try as I might I couldn’t get the little black angled cursor to appear so I could select the cell’s contents. Frustrating – yep, I’d say so.

Nope – wrong arrow, the image is so close to the table cell it’s almost impossible to get the cell select arrow to appear.
 This is what it should look like.
Then I remembered the new feature in Word 2007 – it’s on the Table Tools >Layout tab (so you have to have a table and click in it to see this option). On the far left is the Select button – new to Word 2007. Click it and you can select what to select. Oh! let’s back up a bit here – it would be a good idea to click in the cell you want to select before you begin – forgot that bit.
Using this you can select a cell then right click and, as I did, choose Copy to copy its contents. Don’t be fooled by the fact that not everything in the cell looks like it is selected – just trust that it is.
There are other options there that include Select Row, Select Column, Select Table – much easier than trying to juggle those little arrows when they just won’t appear.
Labels: cell contents, cell entry, table, table cells, Tables, Word 2007
Thursday, January 7th, 2010
Outlook 2007 – Empty Deleted Items automatically
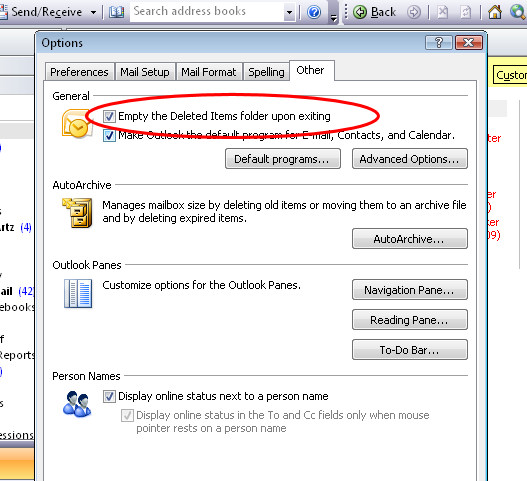 If you find you are always emptying your Deleted Items folder in Outlook 2007 before you exit the program, you can have Outlook do this automatically for you.
To do this, choose Tools > Options > Other tab. Enable the ‘Empty the Deleted Items folder upon exiting’ checkbox and click Ok.
Now you won’t have to do this – just choose File > Exit and it will be done automatically.
Labels: empty deleted items folder automatically, exit, Outlook 2007
Saturday, December 26th, 2009
Outlook 2007 Display Saturday and Sunday
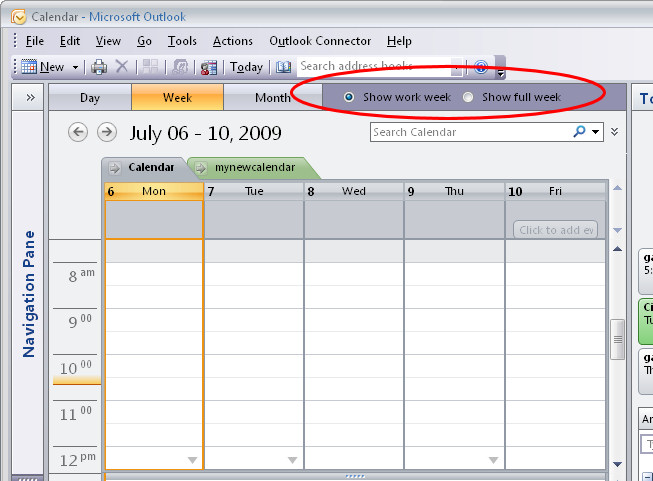 If your weekends are as full of activities as your weekdays are, you may want Saturday and Sunday to display in the Outlook 2007calendar all the time.
To permanently display Saturday and Sunday, choose Tools > Options > Preferences tab and click the Calendar Options button.
From the dialog select the checkboxes for both Saturday and Sunday and click Ok.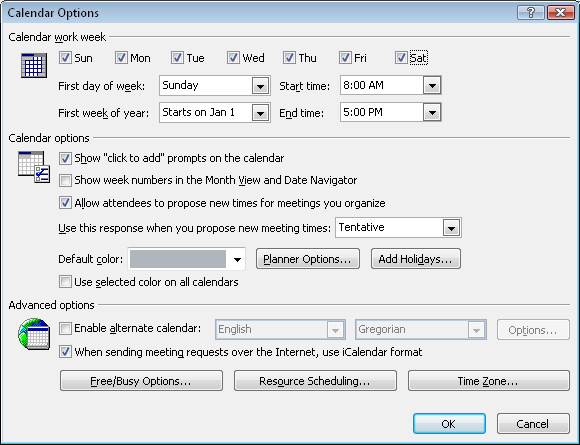 This dialog is also useful for setting a non traditional work week. If you, like my friend Frank, work from Sunday to Thursday, you can set up your work week by selecting checkboxes for those days you actually work and disabling them for other days that are your “weekend” days.
Only these days of the week will now appear in your Outlook 2007 calendar display when you have Show Word Week selected.
To toggle between viewing the Work week and the full week click the appropriate buttons on the Calendar toolbar.
If you have come to Outlook 2007 from an earlier version of Outlook, you should know that the old Compress Weekend Days option for showing Saturday and Sunday compressed into a single column is now no longer an option in Outlook 2007.
If you need to print calendars so that weekend days share a column, download and install the Calendar Printing Assistant for Outlook 2007 from here:
http://office.microsoft.com/en-us/outlook/HA101687211033.aspx
Labels: Calendar Printing Assistant, compress weekend days, Outlook 2007, Weekend days
Thursday, December 17th, 2009
PowerPoint: Create handouts in Word
 So, you’ve finished designing your presentation in PowerPoint and it’s time to you’re your final preparations.
One thing you will need is handouts for your participants. It is easy to use Microsoft Word to create custom handouts for your PowerPoint presentation.
First complete the presentation so the slides are all is complete select the Office button and choose Publish > Create Handouts in Microsoft Office Word.
When the Send to Microsoft Office Word dialog appears, select the layout for the slides and text. There are various combinations of slides, notes and blank lines that you can choose from.
Select either the Paste or the Paste Link button depending on whether you want to embed the slides in the Microsoft Word document or simply link to them.
When you are done, click Ok and wait as Microsoft Word opens and the slides, notes and blank lines are created automatically for you in a new Word document.
Once the handouts are complete, you can format the document as you wish and add a cover page, headers and footers as desired and then print your slide handouts for distribution at presentation time.
Labels: handouts, Microsoft Word, Paste, Paste Link, PowerPoint 2007, Publish
Tuesday, December 15th, 2009
Vista
Oh, I love Vista (Not!)
Ok, here’s my dilemma. I’m an administrator and I uninstall a program. It tells me during the uninstall that it has left bits and pieces behind in my Application Data folder. Ok, so I’d like to get rid of these. Problem is I can’t see the folder and when I opt to see hidden system folders, I can’t open it.
Yikes? Well not totally a problem. You see your
C:\Users\
folder really isn’t a folder – it’s a shortcut – that’s why its icon has the bent arrow on it. It is really a shortcut to a real folder – called:
C:\Users\
and that folder is totally accessible just by clicking on it.
So, you can clean up after programs if you know where to look!
Labels: AppData\Roaming, Application Data folder, uninstall programs, Vista
Saturday, December 12th, 2009
Outlook 2007 Calendar display your way
 You already know you can look at your Outlook calendar by viewing one day, one week or a month at a time.
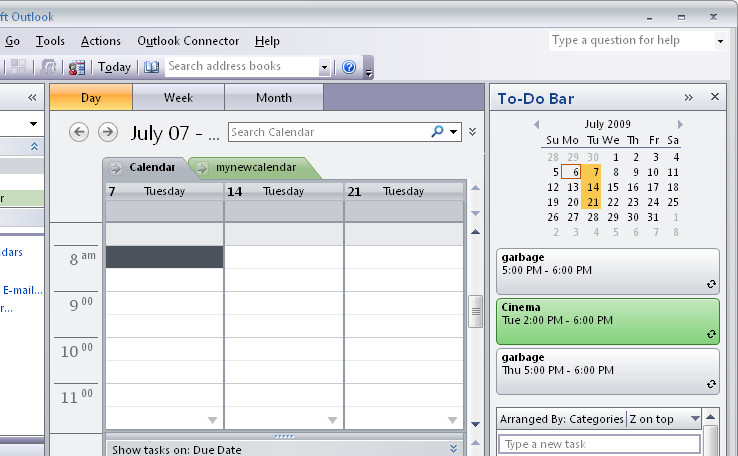
Did you know you can also view the calendar in other ways? So, for example, if you need to see your plans for the next three Tuesdays you can do this.
Make sure the To-Do Bar is visible and switch to Day view so you are seeing only one day. Click on the first day to view in the Calendar in the To-Do bar and then Control + Click on each other day to view and it will open up in the same display.
Labels: calendar view, non contiguous days, Outlook 2007, successive days display
Thursday, December 10th, 2009
Outlook 2007 Remembers important Birthdays
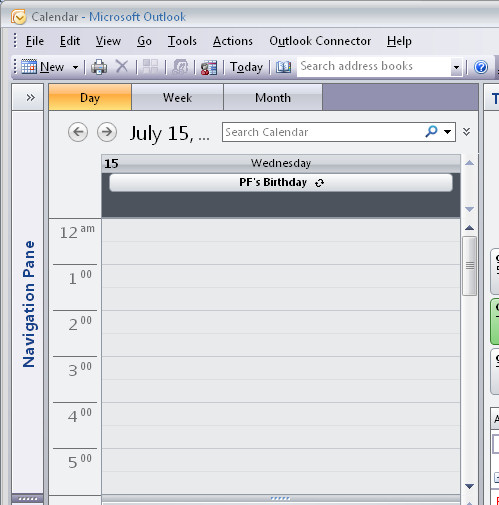 If you’re one of those people who occasionally forgets important birthdays or anniversaries, then get Outlook to help you remember them.
To do this, add the person whose birthday or anniversary you need to remember as an Outlook contact in your Contacts list.
Click the Contact tab, from the Show group, click Details to display the details area of their contact data and type their birthday or anniversary in the place provided.
When you do this, these dates are automatically added to your calendar as events so you won’t forget them.
If you need to set a reminder for the event, locate the day it happens on and double click the event and choose Open Series. On the Recurring Event tab set the Reminder to whatever suits you – if you need to organize presents and restaurant bookings then set the reminder to a few days before the event.
Labels: anniversary, birthday, event, Outlook 2007, reminder
Thursday, December 3rd, 2009
Get Smart with SmartArt
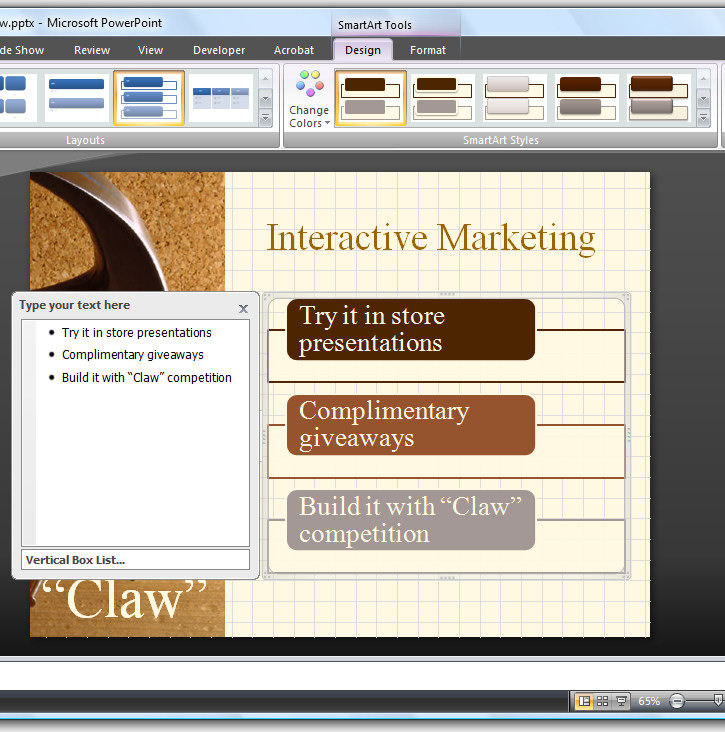 Oh yum! You just have to love the new SmartArt tool in Office 2007. It is part of Excel, Word and PowerPoint it will probably be most used in PowerPoint because this is where you will most need to display large scale diagrams.
SmartArt objects are great to use to illustrate processes, lists and the flow of information or product. In fact most business graphics can be created as SmartArt objects improving their look and readability.
In PowerPoint 2007, SmartArt objects can be created two ways either by converting a list or text selection into a SmartArt object or by creating the SmartArt object from scratch.
If you have an existing list or text you want to display as a SmartArt object, select the text and, from the Paragraph group on the Home tab in PowerPoint 20007, select the Convert to SmartArt Graphic button.
Select a graphic object to use for the text – you can preview what the graphic will look like by holding the mouse pointer over the graphic and see how the text will display in it on the slide underneath.
If none of the SmartArt designs listed are what you want, click the More SmartArt Graphics button to see more options. Right now, just look for a basic layout for your SmartArt graphic as the actual look of the graphic can be adjusted later on.
Edit the text
When you convert text into a SmartArt graphic you can edit the text by clicking on the SmartArt graphic, and select the double pointing arrows on the right hand border of the object to open the text dialog. Here you can type different text if desired or add additional entries each of which will become another element in the SmartArt design.
Once you have the text in place use the SmartArt Tools > Design tab on the ribbon to format the shape. The SmartArt Styles collection gives you a range of styles that you can choose from to apply to the graphic. If you find a style that you like but the color is not correct, apply the style and then click the Change Colors button and choose a different color scheme for the shape.
Create SmartArt from scratch
It is also possible to create a SmartArt graphic from scratch using the Insert tab. Click the SmartArt button and then choose a SmartArt design to use and you can then enter your text and format it to suit your needs. This is the same option you have in Excel and Word.
You can change the look of the text inside a SmartArt object by selecting the SmartArt object and, for example, change the text format to one of the WordArt styles in the WordArt styles list.
Having chosen a WordArt style you can then change the color of the style using the Text Fill options. Notice too that when you resize a SmartArt object the text inside the object automatically resizes to fit it.
Graphics in SmartArt
You will see that many SmartArt objects include containers into which you can insert graphics. To do this, click on the graphic icon in the SmartArt element and a dialog will open allowing you to select a graphic to use for that element.
Labels: Edit Text, graphics, power point, SmartArt, Word Art
Tuesday, December 1st, 2009
Word 2007 – Add a Date Picker control
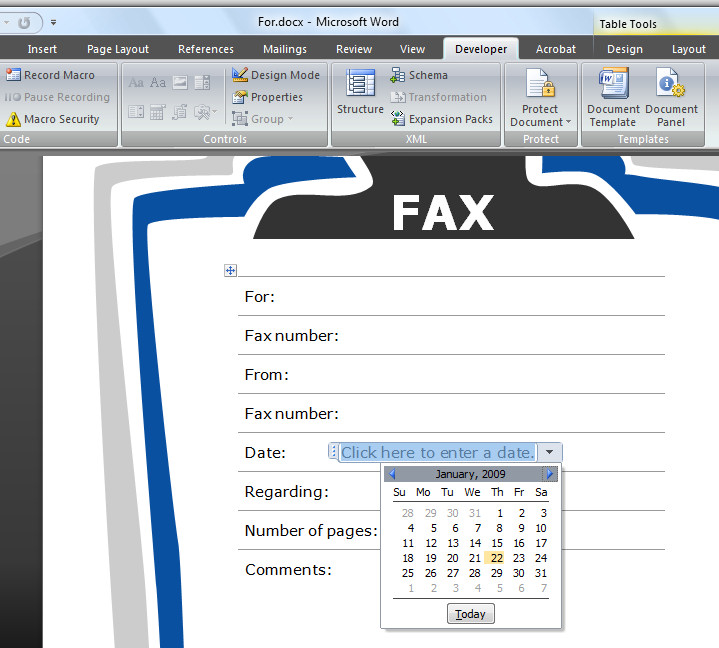 Word 2007 has a cool Date Picker control you can use to insert a date into a document.
To insert one into your document first display the Developer tab by selecting the Office button, click Word Options and from the Popular category choose the Show Developer tab in the Ribbon option.
Now click the Developer tab and, in the Controls area you’ll find entries for the Building Block Gallery and for elements such as a Date Picker and a Text Box which you can use in your documents.
Select Design Mode, click the Date Picker control to add it and then click Design Mode again to exit that mode.
The user will see a Click here to enter a date option and, when they click the content control, a dropdown date picker will appear allowing them to select a date to insert into the document.
To ensure the date is formatted in a particular way, with Design Mode enabled click the Date Picker and choose Properties from the Ribbon. From the Properties dialog select a date format to use from the list.
You can use content controls like these to create memo and fax cover sheets complete with prompts to your user as to the details required.
Labels: content control, date picker, developer tab, quick parts, Word 2007