

Thursday, September 10th, 2009
Outlook 2007 – Create a Custom e-mail merge
 When you need to email lots of people at a time, such as your business contact list you can do this from inside Outlook.
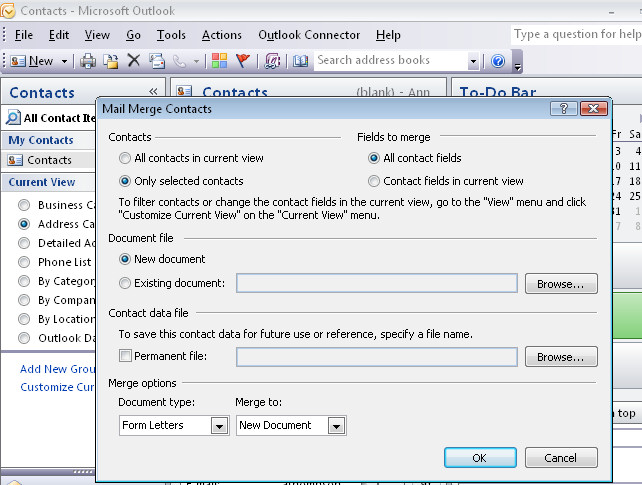
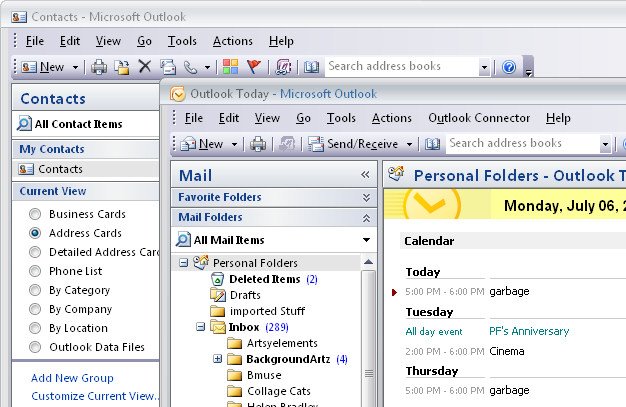
To do this, first open your Contacts area and select the Contacts to email as a group. You can do this by Control + Clicking on each contact to select them.
Then select Tools > Mail Merge to create the message. Choose Only Selected Contacts and then select whether to create a printed document or to email it and then click Ok to switch to Word to finish the process there.
Labels: contact, email, mail merge, Outlook 2007
Thursday, September 3rd, 2009
Create a Distribution List in Outlook
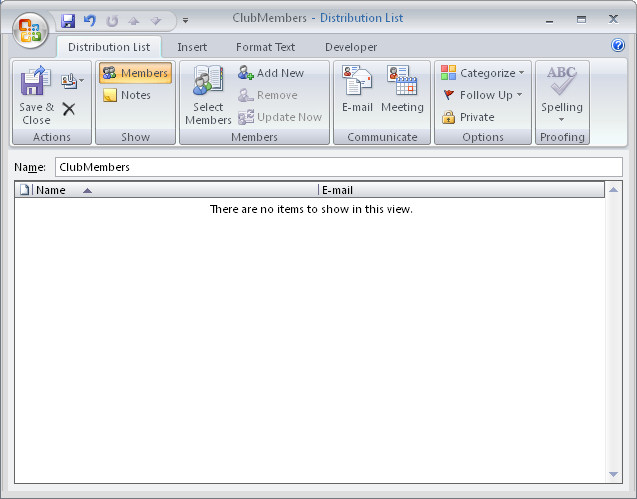
When you regularly email a lot of people at once, it makes sense to assemble a distribution list to simplify the task. Then you can send the email to all the people in the list in one step, rather than having to select each member individually.
To create a distribution list in Outlook, select Tools > Address Book and choose File > New Entry. 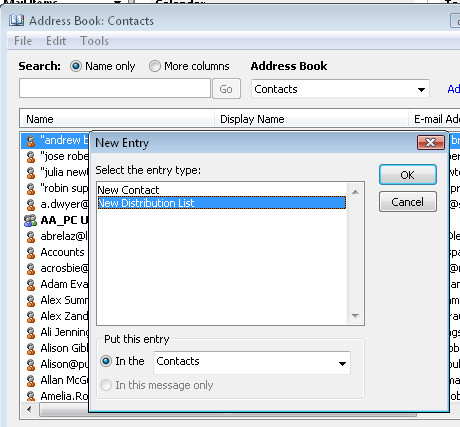 From the “Select the entry type” list select New Distribution List.In the “Put this entry” area, select Contacts and click OK.
Give your list a name and, to add members to it from your existing Contacts, click the Select Members button. Double click the members in the dialog to add them to the Members area at the foot of the dialog. When you’re done, click Ok.
To add the details of someone who isn’t in your existing Contacts, click the Add New button, then type their details into the dialog.
When you’re done, click Save & Close to finish.
In future you can add the list name to the To area in an outgoing email to send the email to the list members, or better still, include it in the BCC line to keep the members secret from each other.
Labels: BCC, Distribution List, Email a list, Outlook 2007
Thursday, August 27th, 2009
Outlook: Create a New Contact from an Email
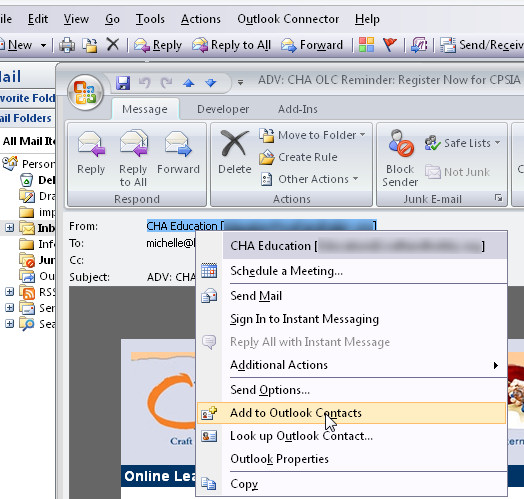
Adding a new person as a contact in Outlook is easy but not a self evident process.
To add an email address to your Contact list from the message window, right-click the address in the From: details at the top of the screen – it doesn’t look like this is clickable but it is.
Select Add to Outlook Contacts from the shortcut menu.
The Contacts dialog opens automatically with the email address in place, enter any other details you want to record and click Save & Close to end.
Labels: email address, New Contact, Outlook 2003, Outlook 2007
Tuesday, August 25th, 2009
Multiple Outlook 2007 windows
 Often it is easier to work with multiple windows in Outlook 2007 rather than having to switch between modules to show just one at a time.
You can open each different Outlook tool in its own window if you right click the icon (eg. Calendar) in Folder view and choose Open in New Window.
Each window will display on the task bar as its appropriate icon so it’s easy to switch between tools.
To ensure that each tool always opens in separate windows leave them open when you select File > Exit to close Outlook 2007. When you open the program again, all the windows will open automatically.
Labels: multiple windows, Outlook 2007, tools, windows
Monday, August 24th, 2009
Outlook Sticky Notes
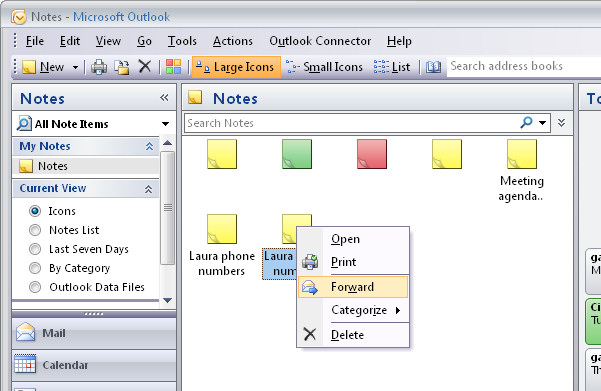 Like electronic yellow stickies, Notes are useful for storing quick reminders and other information you need close at hand.
To create an Outlook note choose File > New > Note.
Type your text into the Note area. You can move the note so it’s visible, or hide it by clicking the close button in its top right corner.
To view a note, click the Notes button at the foot of the pane on the left of the Outlook window and click the Note to view it.
To delete a note, right click it and selecting Delete, or categorize it by right-clicking it, choose Categorize and select a category from the list.
You can send a Note to someone via e-mail by right-clicking the Note and select Forward. Outlook opens a New Mail Message window with the Note already in place as an attachment.
Labels: Categorize, notes, Outlook 2003, Outlook 2007
Thursday, August 13th, 2009
Word 2007 – Sort Words, Paragraphs and Table Cells
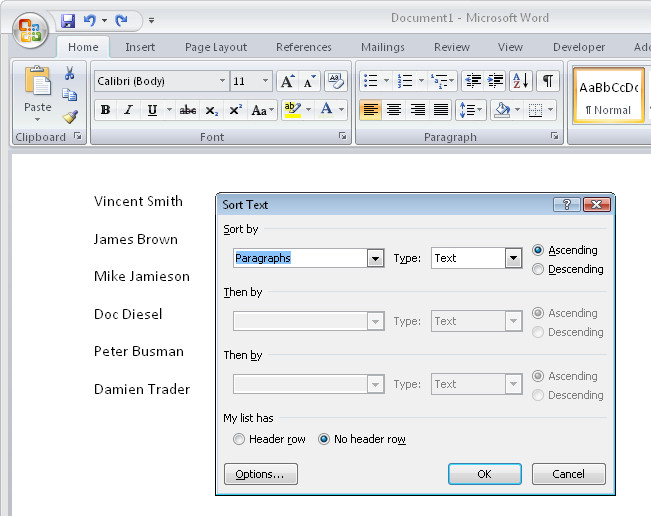
Word 2007 finally fixed a huge problem that existed in earlier versions – it looked like there was no way to sort data in a list.
This wasn’t the case – you used the table sort feature but it was far from being self evident.
Now Word 2007 uses the same tool it just puts it in a smart place.
To sort a list or series of words or paragraphs, select the text.
From the Ribbon, click the Home button and click the Sort button in the Paragraph group.
Choose Paragraph to sort on the first word and click Ok to sort the data in order.
If you’re using an earlier version of Word, then visit this post to see how to sort in Word 2003 and earlier:
Sorting a Word list
http://www.projectwoman.com/labels/Table%20Sort.html
Labels: list, Ribbon, sort, Sort button, Table Sort, Word 2007
Wednesday, August 12th, 2009
Outlook 2007 – checking folder space
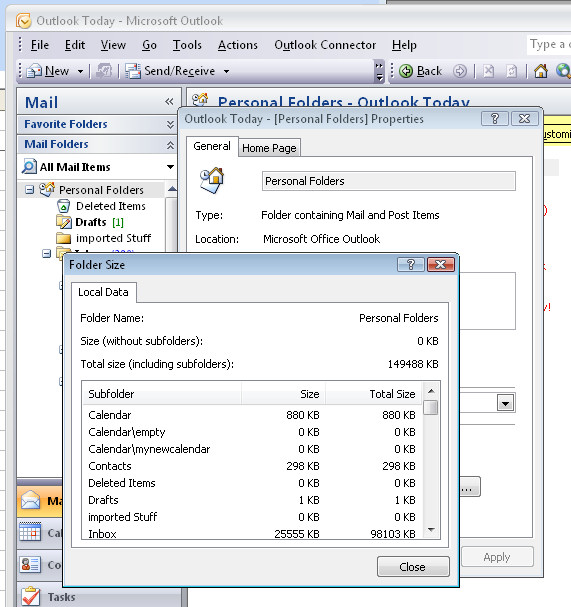 Outlook stores all your email, contacts and appointments in one big PST file. Unfortunately, working with a large PST folder in Outlook will decrease its performance.
Over time you will find that Outlook’s folders grow if you don’t regularly remove out of date messages from them.
To see how big your folder is select the Mail option and click your Personal Folders item in the folders list. Right click and choose Properties for “Personal Folders” and then choose Folder Size to read the size of you PST file.
The closer to 2Gb that the file gets to be, the worse your Outlook performance will be and beyond that, it is possible that the file can become corrupt. Keep your file size below this for best performance.
Labels: 2GB limit, folder size, Outlook 2007, Personal Folders
Thursday, August 6th, 2009
Managing Public Holidays in Outlook
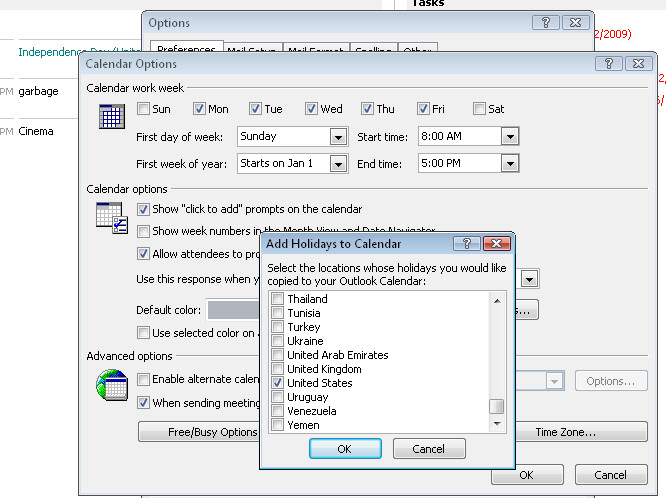
When is Memorial Day in the US or Anzac Day in Australia?
If you’re unsure, luckily for you, Outlook isn’t.
Most national holidays are stored in Outlook – you just need to find them and add them to your calendar.
Here’s how:
Choose Tools > Options > Preferences tab ad click the Calendar Options button.
Click the Add Holidays button and from the list choose the country (or countries) you want the holidays for and click Ok.
Wait while Outlook adds these details to your calendar and click Ok twice to exit.
The holidays will appear under the date in most Calendar views.
Labels: add holidays, calendar, holidays, Outlook 2003, Outlook 2007
Tuesday, August 4th, 2009
Outlook 2007- Save attachments
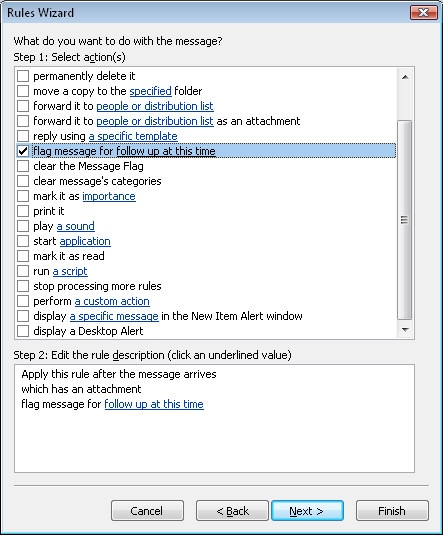 When you delete an Outlook email you’ll also delete any attachments which are included in it.
You won’t be warned you’re about to do this either so you can find yourself having lost important data if you haven’t saved it.
To save files attached to emails, right click the attachment and choose Save As from the menu and choose a place to save it to.
A good rule of thumb is to do this every time you get an attachment so you won’t be caught out in future. Even saving all attachments to a special attachments folder will save you losing them.
If you need to remind yourself to do this, you can create a rule which checks for emails with attachments and flags them for follow up. This will remind you that you need to save the attachments or at least look at them to see if you need to do this.
Labels: alert, flag, Outlook 2007, rule, save attachments
Thursday, July 30th, 2009
Outlook 2007 – Find a Contact Address
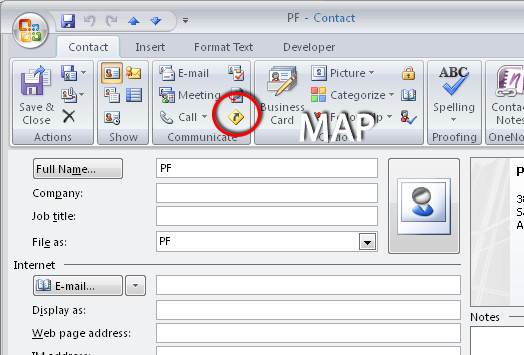 When you need to visit an Outlook contact and when you need directions to their office, you can find them yourself using Outlook’s map option.
Select Contacts and open the contact’s card. Click in the Address area so you are viewing the address that you want to find directions for. On the Ribbon, locate the Contact tab and in the Communicate group click the Map option. Your browser will open to display a map of the location you selected.
Labels: contact address, directions, map, Outlook 2007, street map
Wednesday, July 29th, 2009
Excel macro – Format By Contents
You can do so much with Excel macros – they can be so powerful.
Here is a macro that formats a cell depending on its contents when you type something in it.
If you type a number, or a formula that returns a number, it is formatted one way, if you type a date it is formatted another way and if you type a word it is formatted a different way.
The macro uses the OnEntry event which fires whenever something is entered into a cell. If you attach the macro to an Auto_Open macro you’ll ensure it is run whenever the workbook is opened.
To create the macro, choose Tools > Macro > Visual Basic Editor and, choose Insert > Module to add a module to the current worksheet. Type the code into the dialog.
Sub Auto_Open()
ActiveSheet.OnEntry = “formatCell”
End Sub
Sub formatCell()
If IsNumeric(ActiveCell) Then
ActiveCell.Font.Name = “Verdana”
ActiveCell.Font.Size = 12
ActiveCell.Font.ColorIndex = 46
ElseIf IsDate(ActiveCell) Then
ActiveCell.Font.Name = “Verdana”
ActiveCell.Font.Size = 10
ActiveCell.Font.ColorIndex = 50
Else
ActiveCell.Font.Name = “Times New Roman”
ActiveCell.Font.Size = 12
ActiveCell.Font.ColorIndex = 5
End If
End Sub
Sub Auto_Close()
ActiveSheet.OnEntry = “”
End Sub
Back in Excel choose Tools > Macro > Auto_Open to run the macro the first time to test it. Provided you have Excel configured to run macros, it will run automatically every time you open the workbook in future.
To learn more about Auto_open, AutoOpen and other fun macro naming conventions in VBA, visit this blog post:
What’s in a name? Auto_Open or AutoOpen What’s in a name? Auto_Open or AutoOpen
http://www.projectwoman.com/labels/Auto_Open.html
Labels: Auto opens, autoopens, conditioanl format, Excel 2007, format cells. number, VBA
Thursday, July 23rd, 2009
Excel: Monthly totals for daily data
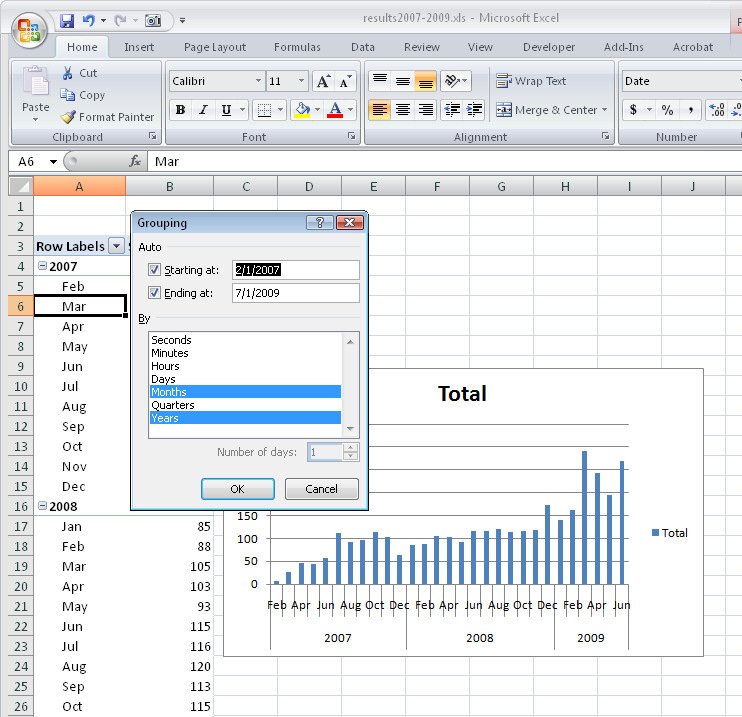
One issue I was faced with recently was the need to calculate monthly totals for worksheet data that was recorded for every day of the month for a few years.
I had a long series of dates with corresponding data in the cells to the right which I had downloaded from the web. The data needed to be viewed as monthly totals rather than as daily values for me to have a better picture of the changes over time.
The solution to doing this quickly and easily is a PivotTable. Here’s how to do it:
1
Select all the daily data including the column headings. If you have lots more columns of data than you plan to analyze, don’t worry, just select the lot for now.
2
In Excel 2007, choose Insert > Pivot Table. In the PivotTable Field List you now need to drag and drop fields into the respective boxes on the screen.
Drag the Date field into the Row Labels box and drag the field for the data that you want to analyze into the Sum Values box.
3
This gives you a list of dates and the data on the screen and you’re over half way to your monthly totals.
Click on one of the dates in the Row Labels column to select that cell, right-click and choose Group to display the Grouping box.
4
Click both the Month and the Years values in the list so that both are highlighted. Then click Ok.
5
Now your data will reappear grouped by the year and by the month within that year.
This allows you to analyze how the data has changed over time more easily than viewing it by day.
6
From here, to chart your data, click somewhere in the PivotTable, choose Insert > and then from the Chart area on the Ribbon click the Column option to create a column charts.
Select the chart sub-type and you’ll create a chart displaying the monthly totals from the PivotTable.
A PivotTable, while a little harder to get a feel for creating than a typical Excel formula, is actually the quickest and easiest way to summarizing this type data.
Labels: daily data, Excel, monthly totals, pivot tabel
Tuesday, July 21st, 2009
Twitter – follow me follow you?
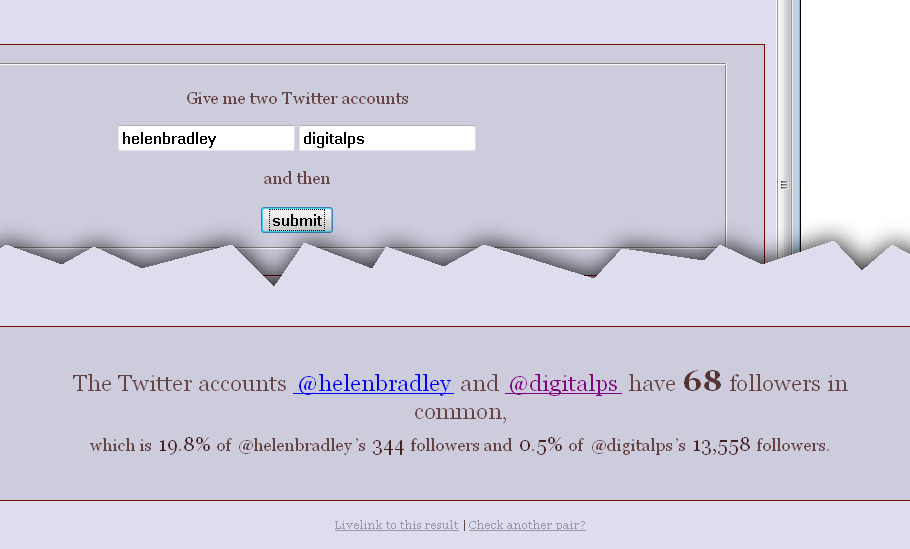
I’m often curious as to where I get some of my followers and I’d like to compare my followers with some other folk to see if I’m right in assuming I get some of my followers via them.
Enter this cool app called Followerlap. All you have to do is type two twitter ids, it doesn’t have to be yours but it can be. So, if I want to see how many of my followers are also followers of, for example, Digital Photography School, I add:
HelenBradley and DigitalPS and click Submit.
Really it couldn’t be easier. In a few seconds I know that nearly 20% of my followers also follow DigitalPS. Pretty neat hey?
Labels: cool twitter apps, follow me, followers following, share followers, Twitter
Saturday, July 18th, 2009
Word 2007 – instant tables
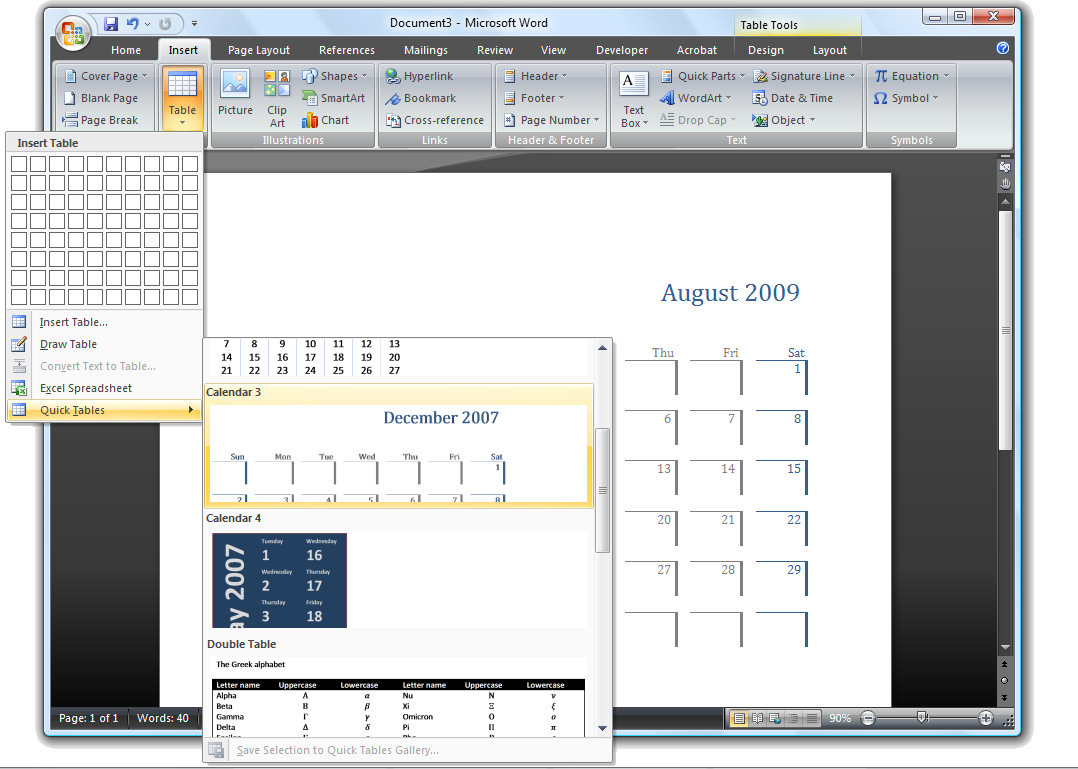
New to Word 2007 is its Quick Tables feature which provides custom formatted tables for inserting in a document. To see the tables available click the Insert tab and choose Table > Quick Tables. The preconfigured tables include calendars and tables with sub headings and other features already formatted. Click a table to insert it and, once in the document replace the text in the table with your own text such as the dates for your desired calendar month.
These tables are a quick way to create some really great looking tables, one wonders though why no one made the calendar options just a little bit smarter so they automatically enter the desired month and days. Just a thought Microsoft!
Labels: calendar, quick tables, Tables, Word 2007
Thursday, July 16th, 2009
Outlook 2007 Find a Contact Quickly
 Wherever you happen to be in Outlook you can easily find a contact.
To do this, look to the Ribbon and locate the text box that contains the words “Search Address Books”. Type part of the name in the box and press Enter.
This will locate all matching entries in the Outlook Contact list and display them in a dialog for you.
Choose the person to view and click Ok, their Contact details will then open allowing you to view their details, to email them or to send their details via email.
Labels: address book, contact, Outlook 2007, quickfind