Sunday, January 9th, 2011
Picture between columns in Word
 I get a lot of folks at projectwoman.com who come looking for help with columns and Word – anything from Word 2002 through 2003 to 2007 and now 2010. I have to think the reason is that Microsoft doesn’t make it as easy as it thinks to work with columns.
In the next few posts I’ll show you some things to do with columns that I think most folk have trouble with.
First up, how to put a picture in between columns in Word. Start by formatting your text in columns and then add your picture.
Chances are it won’t move and sit between columns. The issue is that Word inserts images as In Line With Text by default which is the setting MOST OF US WOULDN’T USE IN 1,000 YEARS – but Microsoft doesn’t really understand most users and so that’s what we get – images that are stuck – they won’t move where we want them to go and they won’t rotate.
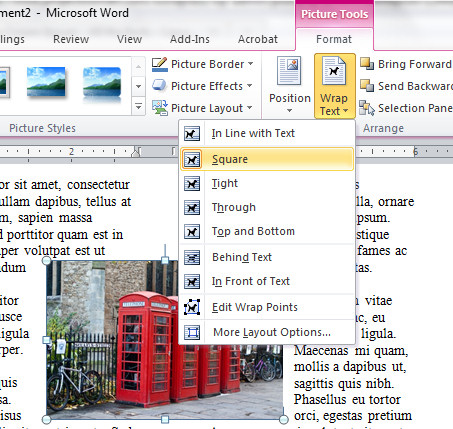
To fix this, in Word 2002/2003 from the Picture toolbar find the Text Wrapping button, click it and choose practically anything except In Line With Text – I choose Square because it is the best all round setting.
In Word 2007/2010 click the Picture and from the Picture Tools > Format tab on the ribbon click the Text Wrapping button and choose Square.
Now your picture does what you expected it to do in the first place – it moves, it can be rotated and when you drag it over the space between two columns it sits where it is put and it pushes the text out of the way around it. Neat huh?
One day… maybe Microsoft will hear our cries of frustration and insert images so they behave like they should without us having to jump through hoops to make them.
Labels: columns, pictures over columns., span columns, Word, Word 2003, Word 2007, Word 2010
Tuesday, January 4th, 2011
Microsoft PowerPoint – Free!
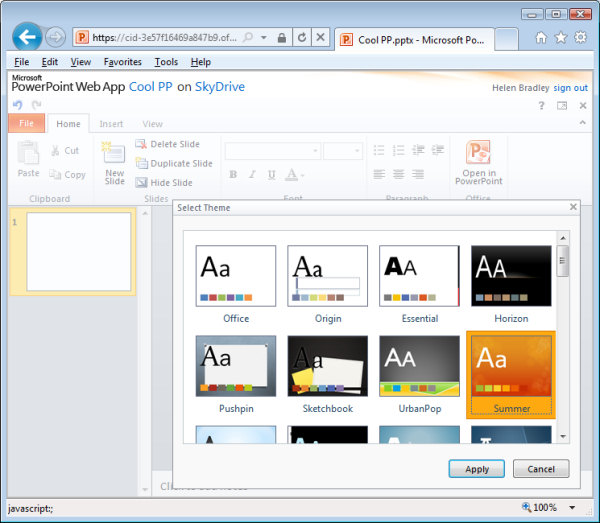
If you don’t already own Microsoft PowerPoint 2010, did you know you can download a 30 day trial version for free from Microsoft?
PowerPoint comes bundled with Office 2010 and the entire downloadable trial version of Office is available from the Microsoft web site. If you like what you see, you can purchase the full version later on.
If you like PowerPoint but can’t afford to shell out for the suite, why not settle for a cut down version – free – available online? You can find PowerPoint at www.skydrive.com sign in using a Windows Live ID – if you don’t have one (but you probably will), you can sign up for one here. Then click the Office link at the top of the page and you can choose to create a new PowerPoint presentation online.
The PowerPoint tools are a cut down version of the full PowerPoint program but they are all you need to get a good start on a presentation – you even have access to a range of great looking themes to kick start your presentation.
Better still you can share your PowerPoint presentation with others so they can view it and even edit it online and you can download the finished file to your computer. Of course, your files are stored online too so you can access them any time you like and Microsoft gives you a hefty 25GB of online storage – more than enough to create all the presentations you’re ever likely to need.
Labels: download, free, Microsoft PowerPoint, Office 2010, online, trial
Thursday, December 9th, 2010
Replace Windows Calculator
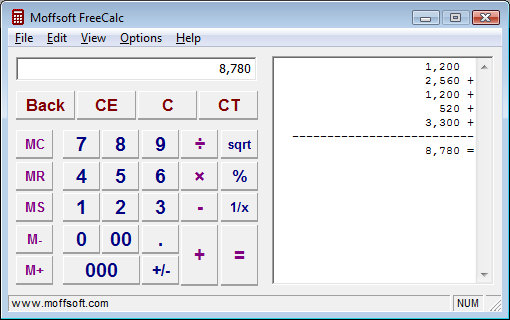
When I use a calculator I like to see the tape – that way I can see what I have done so I can check that the result is based on correctly input data and operators.
Frustratingly the Windows calculator does not include a tape function – seriously it’s not like it would be wasting trees to include one!
My solution is to use Moffsoft FreeCalc which you can find here: http://www.moffsoft.com/downloads.htm. This is a simple calculator you can enter values into using the buttons or the keyboard and it includes a tape that lets you check your entries.
Unbeatable value and a smart replacement for the Windows Calculator app.
Labels: calculator, FreeCalc, replacement, tape, windows
Friday, November 26th, 2010
Crop an image to size in PowerPoint 2010
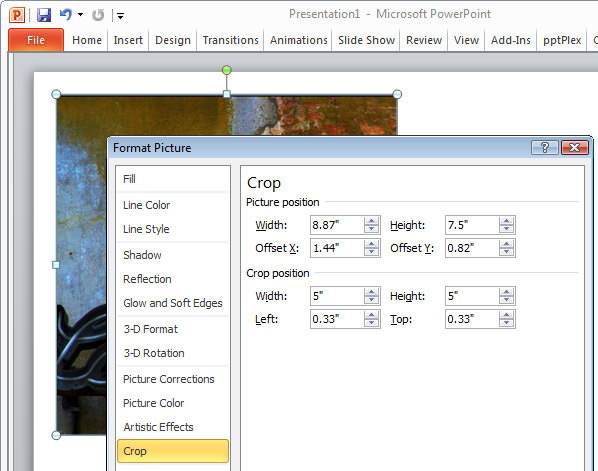
When you have an image in a PowerPoint presentation and you want to crop it to a specific size, click on the image, and from the Picture Tools > Format tab, select the Size and Position dialog by clicking in the dialog launcher in the bottom right corner of the Size group.
Click on the Crop group of options and then in the Crop Position area, type the dimensions that you want to crop the image to. Once you have done this, the image will be cropped to the desired size.
If there is not enough data in the image to crop it to that size, the image will be placed inside a placeholder the size you determined. Once you click Close to finish cropping the image you can increase the size of the image so it fills the placeholder by clicking on the Crop tool on the Picture Tools > Format tab and choose Fill. This increases the size of the image to fill the placeholder.
Labels: crop, image, Office 2010, PowerPoint 2010, resize
Wednesday, November 10th, 2010
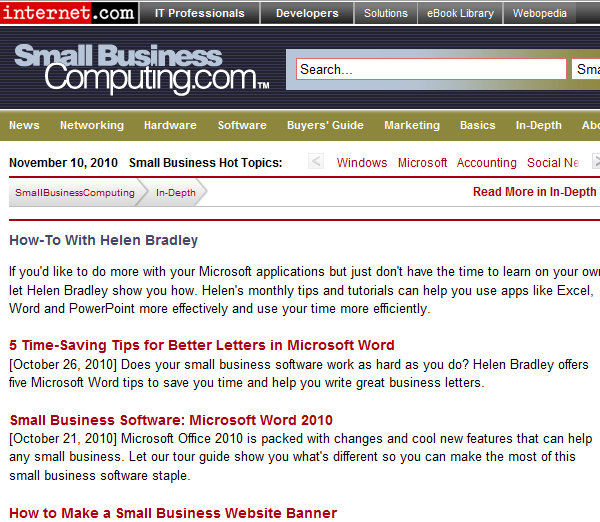
Microsoft Office columns at SmallBusinessComputing.com
I work for some totally cool people and organizations. One of them is SmallBusinessComputing.com. I write a lot of pragmatic Office columns for the site – I love getting down to the tools you most need to use every day and where you can make get the most time saved.
Well my editor loves my stuff so she has created a How To with Helen Bradley page which includes links to all my columns. You can either head over there and browse to find what you want, or read on – I’ve grabbed all the things there and the links to make it super simple for you to read any of the articles on the site. The first link to Time Saving tips for better letters in Word got picked up by one of the NYTimes business blogs:
5 Time-Saving Tips for Better Letters in Microsoft Word
[October 26, 2010] Does your small business software work as hard as you do? Helen Bradley offers five Microsoft Word tips to save you time and help you write great business letters.
Small Business Software: Microsoft Word 2010
[October 21, 2010] Microsoft Office 2010 is packed with changes and cool new features that can help any small business. Let our tour guide show you what’s different so you can make the most of this small business software staple.
How to Make a Small Business Website Banner
[September 20, 2010] Simple touches can make your small business Web design stand out. Helen Bradley explains how to create a great-looking collage banner for your small business website.
Small Business Solution: Manage Your Money in Excel
[August 23, 2010] Helen Bradley explains how any SMB can project and track cash flow with a budget in Excel.
5 Image-Editing Tips to Improve Any Photo
[July 20, 2010] Helen Bradley shows you five ways to make your small business website photos look better using Photoshop or Photoshop Elements.
MS Office Live Brings Small Business Computing Online
[June 21, 2010] Helen Bradley explains how you can leverage your small business software using Microsoft Office Live Workspaces and SkyDrive.
Microsoft Small Business Software: OneNote
[May 20, 2010] Helen Bradley introduces Microsoft’s note-taking and research tool (not to mention unsung hero), OneNote 2003.
Small Business Software: Survey Forms in Word 2007
[April 28, 2010] Surveys are a great way to find out what your customers are thinking. This Word 2007 tutorial will teach you how to create your own survey forms, plus it offers a few tips on writing better surveys.
Customer Databases as Marketing Tools
[April 21, 2010] A strong customer database is a valuable asset and a great small business marketing tool. Are you making the most of yours?
Small Business Software: 7 Tips for Excel Charts
[April 8, 2010] Use small business technology to your advantage. These seven handy Excel charting features make the data in your charts easier to read and comprehend.
Small Business Marketing: How to Create a Web Site
[March 22, 2010] A Web site is one of the most essential Internet marketing tools for a small business. Helen Bradley explains the basics of creating a Web site without spending a fortune.
Multimedia How-To: Producer for PowerPoint 2007
[March 8, 2010] Need a creative boost to your small business marketing materials? Helen Bradley shows how to add multimedia to your presentations with Producer for PowerPoint 2007.
E-mail Marketing: Create a Newsletter in Publisher
[February 19, 2010] Give your small business marketing a boost by making your own custom e-mail newsletter. Helen Bradley shows how easy it is to do in Microsoft Publisher 2003.
How To Make Image Maps in PowerPoint 2003
[January 4, 2010] Helen Bradley explains how to create clickable hotspots, or image maps, that simplify navigating a PowerPoint presentation.
Find Info Fast: How to Create an Index in MS Word
[December 17, 2009] Helen Bradley walks you through Word 2007’s built-in indexing tool and shows how to make document indexes — by hand or automatically.
PowerPoint 2003: How to Animate a Slide Background
[December 10, 2009] Helen Bradley explains how to create a moving picture background that, when used sparingly, makes a more compelling PowerPoint slideshow.
Web Site Design: Simplify with CSS
[November 23, 2009] Whether you’re redesigning your Web site or starting from scratch, consider using CSS — it’ll make future style changes much easier down the road.
Microsoft Tips: How to Make Signs in Word
[November 4, 2009] Ready for do it yourself signage? Our Microsoft tips guru explains the basics of creating professional, functional signs in Word.
Good Web Design Turns Visitors Into Customers
[November 3, 2009] A consistent Web design not only makes visitors more comfortable on your site, it increases your chances of converting them into customers.
How-To: Make a Feedback Quiz in PowerPoint
[October 9, 2009] Helen Bradley shows how you can gather information from someone while they view a Microsoft PowerPoint 2007 presentation.
How to Create Lists in Microsoft Word
[October 8, 2009] Helen Bradley walks you through the steps to create and customize bulleted and numbered lists in Word 2003.
How to Make Charts in Microsoft Access
[September 28, 2009] Helen Bradley explains how you can chart your data without ever leaving Microsoft Access.
Create Custom Functions in Excel 2007
[September 2, 2009] Helen Bradley shows how custom Excel functions save time and effort and how you can use your custom functions in all your workbooks.
How To Design Brochures in Microsoft Publisher
[August 26, 2009] Helen Bradley shares design tips to create great-looking brochures in Microsoft Publisher.
Microsoft Excel: Design Error-Free Worksheets
[July 29, 2009] Helen Bradley looks at simple ways to avoid introducing errors in Excel worksheets.
How To: No-Hands PowerPoint 2007 Presentations
[July 1, 2009] Helen Bradley walks you through building a PowerPoint slide show that can run automatically – a handy promotional tool to use at events or in reception areas.
Working with Word 2003: Add a Professional Look
[May 28, 2009] Helen Bradley shows you how to add finishing touches that make Word documents look polished and professional.
Word 2007: Working with Numbered Elements
[May 15, 2009] Helen Bradley shows how to create duplicate and sequential numbering in Microsoft Word 2007.
How to Create Custom Formatting in Excel
[February 17, 2009] Helen Bradley demonstrates Excel formatting tricks that will help you when things don’t work as planned.
Microsoft Excel 2007: Outlining Worksheets
[February 10, 2009] We show you how to summarize important data in your Excel 2007 worksheets and reduce the data to more manageable levels with the ultra-efficient outline tool.
How To Make Templates in Microsoft Word 2003
[January 27, 2009] Helen Bradley shows you how to create Word document templates to quick start your day-to-day tasks.
How to Use Teamwork Tools in Microsoft Word 2007
[January 7, 2009] When working on documents with other people, tracking changes has the potential to save time and help keep others well informed and on the same page.
Excel 101: Create Worksheets and Charts
[December 19, 2008] Helen Bradley introduces the basics of creating a worksheet and chart in Microsoft Excel.
Link or Embed: How To Add an Excel Chart to a Word Doc
[December 1, 2008] Microsoft maven Helen Bradley explains how to place an object from one Office application inside of another.
Microsoft Access: Customize Forms and Reports
[November 10, 2008] Our Microsoft application guru Helen Bradley explains how to make Access database forms and reports more functional and attractive.
Create a Web Site in Publisher 2003
[September 18, 2008] Helen Bradley shows how to use Microsoft Publisher to build a basic Web site for your business. Bonus: you can use the same design set for your Web site that you use for your print marketing materials.
Basic Formatting in Microsoft Word
[August 28, 2008] Our resident document diva, Helen Bradley takes us on a tour of the rudimentary, but essential, formatting features in Word 2003.
Create Custom Headers and Footers in Word 2007
[August 13, 2008] Tapping into the new document properties and content controls in Word 2007 generates some very sharp-looking professional building blocks.
Create Marketing Materials in Publisher
[August 4, 2008] Our designing diva, Helen Bradley shows you how to create your own sharp, professional marketing materials using Microsoft Publisher.
How-To: Animate Microsoft PowerPoint Presentations
[July 30, 2008] Our application expert Helen Bradley explains ways you can add animation effects to your slide shows.
Office 2007: Keep Excel Data Visible At All Times
[July 3, 2008] With a little imagination and skill you can work on one part of a spreadsheet and see data in other areas at the same time.
Microsoft Word: Working with Field Codes
[June 24, 2008] We look at ways to harness the power of Word Field codes to automate and simplify document production.
Discovering Dashboards in Excel 2007
[June 6, 2008] We step through the process of creating a Dashboard chart and data display in Excel 2007 for more efficient analysis of and quick access to your critical information.
Access 2003: Extracting Data Through Queries
[May 22, 2008] You’ve put in the time and effort to build and populate a database — now what? We take a look at the ways to create queries to find pearls of business wisdom. Plus: watch the video.
Microsoft Word Tips: AutoCorrect and AutoText
[March 10, 2008] Don’t get caught up in repetitive typing and correcting common typos. The AutoCorrect and AutoText tools in Word can help you to increase your efficiency and speed up your day.
Exploring Office 2007: Error-Free Worksheets in Excel 2007
[February 19, 2008] It’s critical to understand the problems that might occur in your Excel worksheets. In this article, we’ll show you how to keep them as error-free as possible.
PowerPoint Tips: Slide and Title Masters
[February 14, 2008] Mastering the art of PowerPoint masters will save you time, repetition and a whole lot of aggravation.
Hand-Drawn Charts in PowerPoint 2007
[January 24, 2008] We take a look at handy new features in PowerPoint 2007 that let you create attractive hand-drawn charts to give a visual boost to your presentations while still getting your message across to your audience.
Build Your First Database with Access
[January 14, 2008] Creating a database in Access can be a bit daunting for the uninitiated. We’ll walk you through how to build your own, plus a report and a query, too.
Exploring Office 2007: Quick and Efficient Data Entry in Excel
[January 4, 2008] There are many times in Excel when you find yourself entering the same data over and over again. In many cases, you can spare your fingers the work of typing and fast-track repetitive data entry. As the latest article in our Exploring Office 2007 series shows, it’s all about working smarter and more effectively.
Exploring Office 2007: Collaboration in Word 2007
[December 11, 2007] Microsoft Word 2007 is a great editing tool to use when you’re working with others on a project. We explore the features in Word 2007 that allow you to manage workgroup changes and contributions to documents.
Working with Action Buttons in PowerPoint 2003
[December 6, 2007] Action buttons let you navigate quickly through a PowerPoint presentation, add sounds or any number of other interactive effects. We’ll show you how easy it is to do.
[November 20, 2007] They say a picture’s worth a thousand words, but wait ’til you see what Word can do with that picture. We take a look at the application’s image tools and how using them lets you add pop to any document.
Working with Tables in Word 2003
[October 22, 2007] Tables let you organize information in a concise, visual way, but working with them in Word can be a bit tricky. We’ll take a look at some of the tools and show you how to make the most of Tables.
Take the Guesswork Out of Printing in Excel 2007
[October 1, 2007] With a little pre-planning and some knowledge of the print options that can be configured to your advantage in Excel, you can turn your next Excel print job from an exercise in frustration to an effortlessly simple and successful procedure.
[September 11, 2007] Excel offers a simple way to manage lists of data without resorting to the complexity of a database. We show you how it works in both Excel 2003 and 2007.
MS Office 2007: Applying and Customizing Themes
[August 24, 2007] One of the new features in Microsoft Office 2007 that has everyone talking is Themes. Discover how this new feature can improve your everyday productivity and efficiency while helping you create attractive, professional-looking documents and presentations with minimal effort.
[August 23, 2007] Excel makes comparing business decisions a bit easier with its Scenario Manager tool. We take a look at how you can use the spreadsheet to set up different scenarios whether it’s comparing products or budget numbers.
Exploring Office 2007: Top Ten Excel Chart Tips
[August 2, 2007] Excel charts have been given a makeover in Excel 2007 and the Chart Wizard of earlier versions is now gone. Our Exploring Office 2007 series continues with a list of the top tips for creating functional and attractive charts in the new Excel 2007 release.
[July 25, 2007] Excel jockeys saddle up. We take a look at how using Reports, Views and Outlining saves you time and simplifies your spreadsheets.
Exploring Office 2007: PowerPoint 2007 Tips and Tricks
[July 3, 2007] PowerPoint 2007 delivers a wealth of new features and enhancements that make it easier to create attractive, professional-looking presentations. Our Exploring Office 2007 series continues with a list of the top tips for getting the most out of the new PowerPoint 2007 release.
Exploring Office 2007: Outlook 2007 Tips and Tricks
[June 15, 2007] While Outlook 2007 may look a lot like older releases, there’s a great deal to like about the upgrade and plenty of new tools to help you be more productive. Our Exploring Office 2007 series continues with a list of ten top tips for using Outlook 2007.
Word Mail Merge: It’s not Just for Letters
[June 11, 2007] Microsoft Word can merge more than just mail. Use the popular app’s mail-merge feature for create lists, nametags and even catalogs with images. We’ll show you how.
Exploring Office 2007: Using SmartArt Graphics
[May 22, 2007] Office 2007 delivers an abundance of new features and enhancements, many of which aren’t exactly obvious at first glance. The first article in our new Exploring Office 2007 series takes a closer look at working with the SmartArt tool to easily create everything from simple diagrams to cutting-edge business graphics.
Take Your Excel Charts Beyond the Basics: Five Cool Tips
[May 3, 2007] Add some life to your spreadsheets and make your data easier to understand. These five tips can make Excel charts sing.
Labels: Excel, Microsoft, OneNote, Outlook, PowerPoint, Word
Thursday, October 28th, 2010
Word 2010: Add your signature as a clipart image
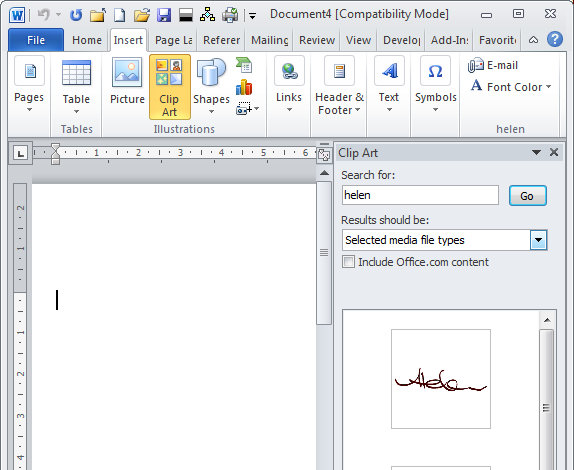
Quite often, I need to sign a Word document and convert it to a PDF or fax it. It’s easier to do everything on the computer rather than printing it, signing and then scanning it all over again.
The solution is to scan your signature and convert it into an image that you can use inside Word. To give you access to your signature image in Word, first save it as a GIF, JPG or BMP file and then from the Microsoft Office Group in your All Programs menu, select the Microsoft Office 2010 Tools > Microsoft Clip Organizer.
Choose File > Add Clips to Organizer > On My Own and browse to the folder that contains the images of your signature. I have a simple Helen signature and one for Helen Bradley. You can also do the same with your company logos and other elements that you’re likely to want to use repeatedly in Word.
Select the images and click Add. They’ll be added automatically to your clip organizer. Hold your mouse over the first image, click the dropdown arrow to its right and choose Edit Keywords.
Now in the Keyword box type a keyword that describes the image. Add one keyword, click the word Add and then add additional keywords. If there are keywords in the list that you don’t want to use, select them and press Delete. Click Apply to apply the selected keywords to the image and then click Next to do the same thing for the next image in the sequence.
I add my name and the word Signature as keywords to my signature files so they are easy to find.
Now you can close the Clip Organizer and whenever you need the image inside Word, choose Insert > Clipart, make sure that the file types are set to Illustrations if you saved the images as Gif files or set to Photographs if you saved them as JPGs or Tiffs. Type your search text which in my case is Helen and press Go.
Microsoft Word locates the signature image and you can then drag and drop it into your document. The images are permanently in the Clip Organizer so they’ll be there next time you launch Word or any Office program that can access it.
Labels: Clipart, Microsoft Office, signature
Monday, October 25th, 2010
Quick and easy PDF to Word
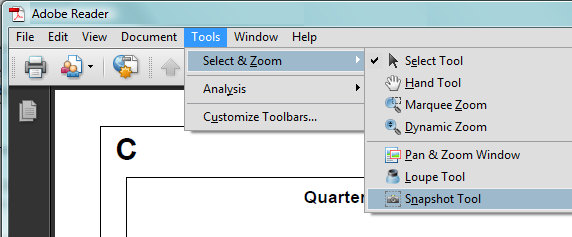
While these days it’s easy enough to get data from programs like Excel and Word into a PDF file, sometimes it’s just a little bit difficult to get it back out again.
Often all I need is a picture from a PDF file that I can drop into a Word document add a signature or some text, and then re-bundle it as a PDF and distribute.
Not everyone sets up PDF files so that they can be edited and in most cases I’ll need to do the editing myself – so for that I use Word as I can drop in a signature or a text box really easily.
The problem then becomes how do you get the data out of the PDF and into Word. Luckily the Adobe Acrobat Reader has a tool for this built in.
From the menu select Tools > Select & Zoom > Snapshot Tool. Now position yourself in the file where you want to grab the data from and drag over the area to capture.
A picture of the area is captured to the Windows clipboard which you can now paste into another program such as a Word document. It’s not the world’s prettiest solution but it is quick and easy and that works for me.
Labels: Adobe Acrobat Reader, Microsoft Word, PDF
Friday, October 15th, 2010
Drives not recognized in Vista
Having just purchased two brand new backup USB drives, unboxed them and plugged them into my computer, imagine my horror when neither appeared as drives in Windows Explorer, effectively rendering them useless. They were recognized easily by an older XP machine proving that it wasn’t the fault of the drives but it was a Vista issue. Drives these days are typically plug and play devices so they should install and run automatically without needing to be set up.
Running Control Panel > System > Device Manager and selecting disk drives from the list showed the drives in the list, so Vista knew the drives were there. It just wasn’t giving me access to them.
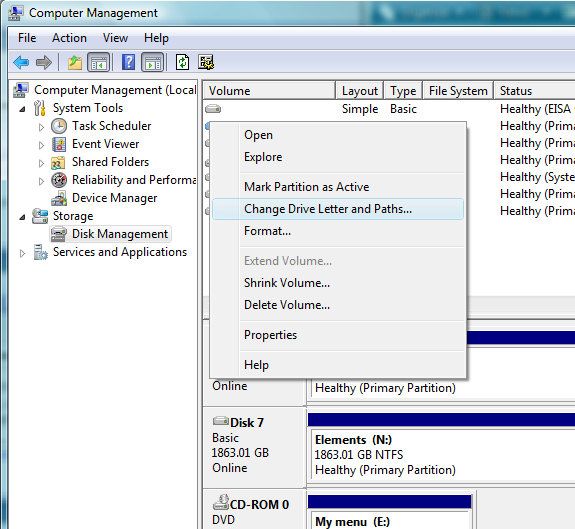
The problem was that neither drive had been allocated a drive letter so they weren’t showing up as being accessible. To fix this you have to do the work yourself. Start by selecting Control Panel > Administrative Tools > Computer Management – if necessary, you’ll need administrator access to run this.
When the Computer Management Console opens, from the Storage Options group, select Disk Management and wait as the computer loads information about your disks.
Somewhere in that list will be the drive or drives that you are looking for. Select any volume in the list at the top of the dialog that has no drive letter associated with it and then check the disk specifications below until you locate the drive you want access to.
You should note that there are possibly partitions on your hard drive that also do not have drive letters for varying reasons – don’t touch these – you’re here looking for external hard drives without drive letters.
When you locate the drive in question, right click the entry in the top portion of the dialog and choose Change Drive Letter and Paths. Click Add and then from the Assign The Following Drive Letter dropdown list, select a drive letter that is not currently in use to assign that drive to and click Ok.
When you do, the volume should now appear in the list with some sort of drive name in front of it and the appropriate drive letter. If you now restart My Computer or Windows Explorer the drive will appear ready for use.
Labels: drives, troubleshooting, Vista
Thursday, September 23rd, 2010
Handling MOD MOI movies
I hate it when camera manufacturers don’t use standard formats for their movie files.
My camera uses the MOD/MOI format which practically no player known to man (or woman) can play. It shouldn’t really be a problem as MOD is really just MPG in disguise and you should be able to rename the MOD file to read MPG and it should play – but you’ll encounter problems if you capture in 16:9 aspect ratio. Go figure!
Before you sling the camcorder into the trash and vow never to buy from that manufacturer again, read on. On second thoughts you should vow never to buy from a manufacturer that cares so little for their customers that they use impossible to read formats – after all you’re shooting movies – chances are you’ll want to do something with them – like watch them or perhaps I’m expecting too much?
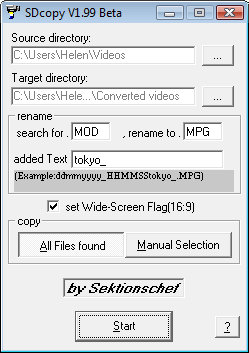
So, the solution is to download this little SDCOPY.EXE utility which comes bundled in a zip file that just needs to be extracted and then run.
It is simplicity itself, you tell it where your MOD files are and where you want the converted files to go (I recommend a second/separate folder) and if the widescreen 16:9 flag needs to be set and press Start and in a few minutes you have viewable converted MPG files.
So, thanks but no thanks Canon. I won’t be buying a new camcorder from you and thanks to Sektionschef for creating and continuing to support this handy utility.
Thursday, September 16th, 2010
Borrowing PowerPoint Image Designs
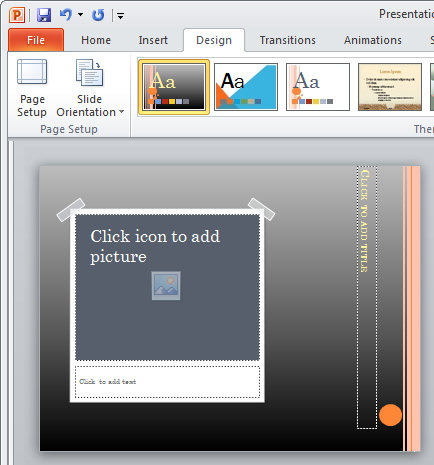
This stickytape image border comes from the Solstice Theme and here I’ve added it as a new layout in my Oriel Theme.
I saw a recent post on a blog which referred to one of my earlier posts about creating torn edge image effects in PowerPoint 2007. You can see my original post here: http://www.projectwoman.com/2007/03/powerpoint-2007-torn-photo-edges.html.
Someone who responded to the post asked if there was a way of using the photo edges from a theme but not the theme itself. Their problem was they loved the edges but because their organization had a custom theme that was always used, the person wasn’t allowed to change it. The question got me thinking about a solution and here it is!
To use an image design from a PowerPoint theme first create a new file by choosing File > New > Blank Presentation and then choose the New Slide > Picture with Caption Layout – this is the layout typically used to apply fancy styles to images.
Click on the image locator and add an image to the slide – it doesn’t matter what image you add – you just need something so you can see how the image design looks.
Now go to the Design tab and arrow over each of the Themes in turn to see what the image layout looks like. For example, Solstice has a sticky tape edge to the image, Pushpin adds the image with a pushpin background and Opulent has a layered frame look. Flow has a bent corner on the image, Couture has an interesting beveled edge and Summer has a series of illustrative dots around the image. You may find other interesting designs in other Themes such as those that you download from Office Online.
Select the Theme that has the look you want to borrow.
Now choose View > Slide Master and locate the Picture with Caption Layout. Drag over the elements that create the look that you want such as the Pushpin and frame, the sticky tape frame or the circles. Make sure to include the image placeholder. Right click the selected elements and choose Copy.
Now open a file that uses your corporate Theme – or the Theme you prefer to use. Choose View > Slide Master and locate the Picture with Caption Layout slide layout. Right click it and choose Duplicate layout.
Click the image placeholder on this duplicate layout and delete it. Right click on the layout and choose Paste to paste the elements that you copied from the other layout. Move the design elements into a new position, if desired.
You can now adjust the text and title boxes on the layout so that they don’t encroach over the elements that you’ve just added to the design.
When you’re done, click Close Master View.
To save the Theme with the new Layout, from the Design tab open the Themes dropdown palette and choose Save Current Theme and save it.
In future you can use this Theme for your slideshows and to use the layout you created select it from the Layout list where it appears with all the other layouts from the original theme.
Labels: layouts, picture styles, PowerPoint, themes
Tuesday, September 7th, 2010
Visual Basic 2008 Express – select a textbox contents
When you hand control back to a textbox in Visual Basic it’s useful if you also select the textbox contents so a user can just start typing over the current contents. Here’s how to do this – place the code in the Textbox_gotfocus event handler:
TextBox.SelectionStart = 0
TextBox.SelectionLength = Len(TextBox.Text)
How easy is that?
Labels: got focus event, gotfocus, select, textbox, Visual Basic
Saturday, August 21st, 2010
PowerPoint Save to CD doesn’t include the viewer
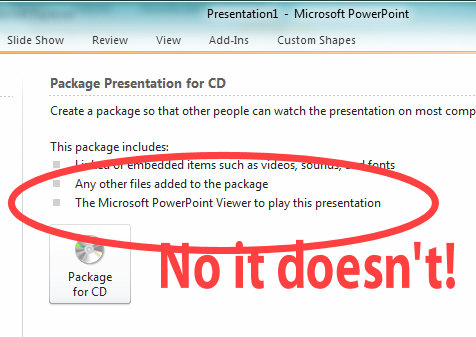 If you’ve tried to save a presentation to a CD from PowerPoint 2010, you might be misled by the onscreen instructions into believing that the PowerPoint Viewer application will be added to your CD.
This is anything but the case. The PowerPoint Viewer is not added to your CD so you won’t have it with you and if you take your PowerPoint presentation to a computer that doesn’t have the viewer on it and you don’t have an internet connection, you’re SOL. Poor show Microsoft!
What the presentation CD will contain is a HTML file that will launch when you place the CD in a computer. This contains a link to download the PowerPoint Viewer from the web. You have to go to the web site and then download and install it on the target machine – the Viewer cannot be run from the CD.
While most people won’t have a huge problem with this, it would be nice if Microsoft actually told the truth about the process and warned you what you need to have and to do. Otherwise many hapless folk are going to assume that it all works as it has in the past and arrive at presentation time without PowerPoint on the computer they are presenting on and having to download and install the viewer before they can begin. The situation will be worse still if an internet connection isn’t available.
So, as always, make sure to test your presentation thoroughly before you start. Know that you may need extra time to download the viewer or go ahead and download it ahead of time and take a copy with you that you can install on the computer you will be presenting on.
Labels: Microsoft PowerPoint 2010, package for CD, PowerPoint Viewer
Monday, August 2nd, 2010
Line feed in VBA textbox
When you need to create a line feed (new line) in a VBA text box you can do so in the string that you’re using to assemble your message using any one of a number of methods.
You can use Chr(13) which is an old style character conversion of ASCII character 13 which is the carriage return and line feed character. Or you can use vbNewLine or even vbCrLf.
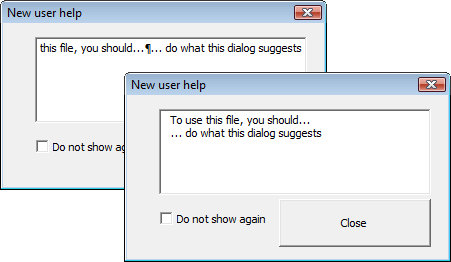
But, try as you might, all you will get in your textbox is a silly paragraph marker and not a new line if you don’t set your textbox up as a multiline text box in its Properties. Don’t say I didn’t warn you!
Labels: carriage return, line feed, Microsoft, VBA
Thursday, July 22nd, 2010
Excel – cell reference in SumIF
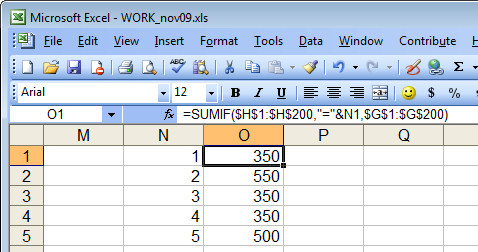 I love SUMIF. It’s a handy tool for summarizing data. So, today I was checking how much I had invoiced a client – I have actual charges for stories I write in one column and the invoice numbers that these were charged under in another. I wanted a summary so I know the total of invoice 1 was $x and invoice 2 was $y.
SumIF is the tool to use. It goes like this:
=sumif(G1:G200,”=1″,H1:H200)
this sums the values in the range H1:H200 only if the corresponding values in the range G1:G200 is 1. So, it does the deed for Invoice #1. Repeat as required for invoices 2-20 – no way!
It is much easier if I place the numbers 1, 2, 3 and so on in cells of the worksheet and reference them in a single formula that can be copied rather than writing this 20 times… or 100 times… you get the picture… it’s simply not on to do this.
Problem is – how to refer to a cell in the SumIF function. This DOES NOT WORK! =sumif(G1:G200,”=N1″,H1:H200). Excel doesn’t see the N1 as a cell reference – it sees it as a value to match.
So, you have to write it differently:
=sumif($G$1:$G$200,”=”&N1,$H$1:$H$200
the “=”&N1 references the value in N1 as the one to match and the $ symbols are needed so the formula can be copied.
Labels: cell reference, Excel, formula, sumif
Monday, July 19th, 2010
Format Hyperlinks in PowerPoint 2010
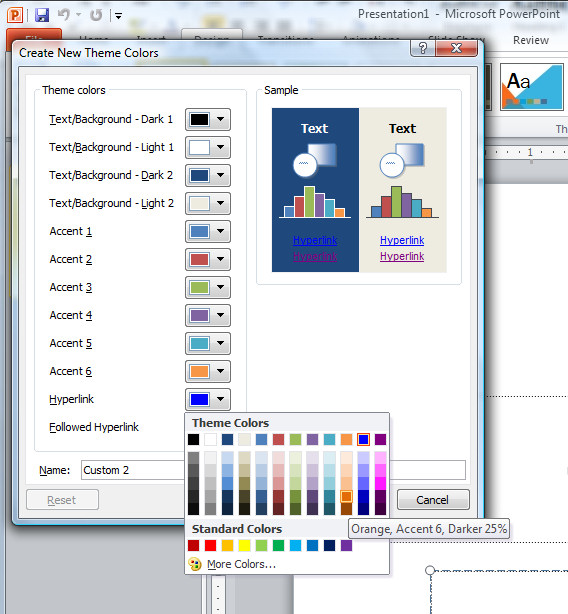 If you’ve added an email link or a website URL to a PowerPoint slide, you’ll know that PowerPoint 2007 and PowerPoint 2010 automatically format the hyperlinks for you.
Because PowerPoint doesn’t use styles, it’s not obvious exactly how the formatting gets applied and how you control it.
The first thing to know is that you simply can’t control the underlining, it’s there and it’s there to stay. You can, however, change the colors used.
Click the Design tab > Colors > Create New Theme Colors, locate the Hyperlink color and change it to something different if desired. To control the Followed Hyperlink color, select that option and change it.
You now need to save your changes as a custom color scheme, so type a name for your color scheme and click Save.
Now the chosen hyperlink color and followed hyperlink color will be used to format the hyperlinks in your PowerPoint presentation.
Labels: formatting, Hyperlinks, PowerPoint, PowerPoint 2007, PowerPoint 2010


