Thursday, September 29th, 2011
iPad 2 – Delete multiple emails at a time
There are a few ways to delete multiple emails at a time on the iPad, none of them particularly intuitive and there is no big Select All option so it has to be done individually:
Start by turning the iPad into landscape mode and click the inbox. If you click the Edit button (top left) then you can select multiple emails to delete very quickly. Then click the Delete button which appears bottom left.
To make sure I don’t have too many emails to deal with at a time, this is how I have my email account configured:
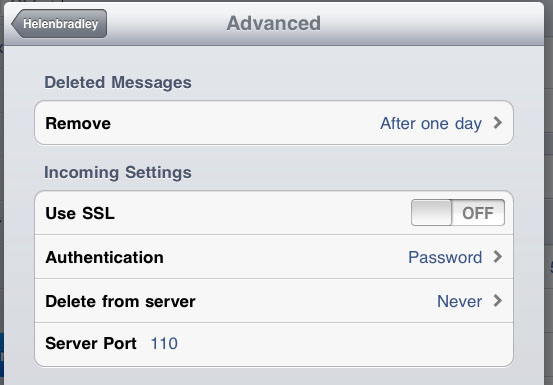
First of all, because I deal with email on my desktop, I don’t want the iPad to delete emails from the server so that option, in Settings > Email is set to Never. To find it, click your account name and click Advanced.
Then I set the Remove option in this same dialog to After one day.
All these settings and actions make checking emails on the iPad a fairly simple process – but I, like you, wish there were smarter Select All and Delete All options.
Labels: all emails, delete all, delete multiple emails, delete multiple emails at once, ipad 2, select multiple emails
Tuesday, September 27th, 2011
Timeline in Microsoft Word 2010
The new SmartArt feature in Word 2007 and 2010 helps you create timelines very easily:
Step 1
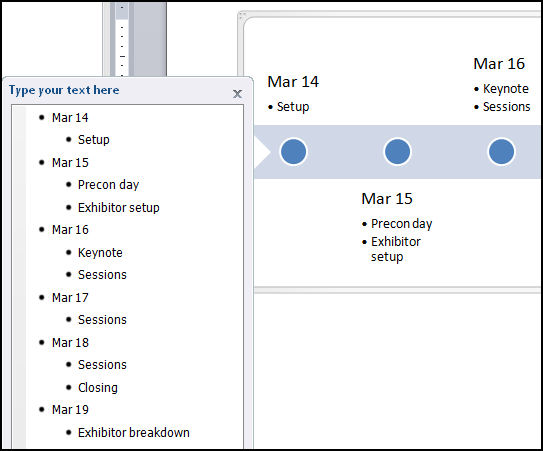
Choose Insert -> SmartArt -> Process and select one of the process options such as Basic Timeline and click Ok. Type the text into the textboxes in the SmartArt object. Alternately, click the arrows at the far left of the object and add text via the dialog.
Step 2
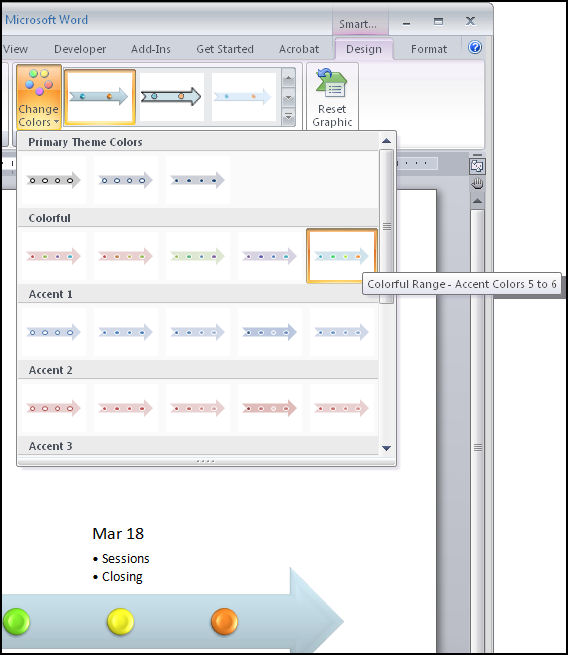
To format the timeline SmartArt, select the object and choose Format -> Design on the Ribbon and then select one of the SmartArt Styles. Click Change Colors to alter the colours used in your SmartArt object.
Step 3
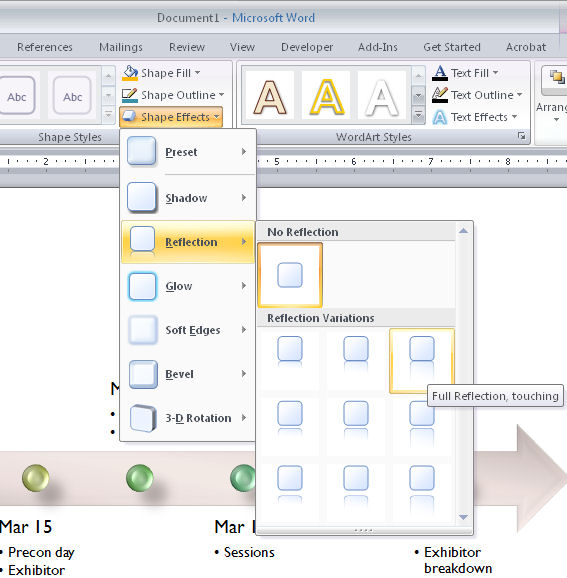
From the Shape Effects list you can customise an effect such as reflection or shadow for the art. In addition, as the look of a SmartArt object is controlled by the document theme you can choose Page Layout -> Themes and select an alternate theme for your document.
Labels: how to, Microsoft Word, smart art, SmartArt, timeline, Tutorial, Word 2007, Word 2010
Saturday, September 24th, 2011
iPad 2 -Blog to a self hosted WordPress blog
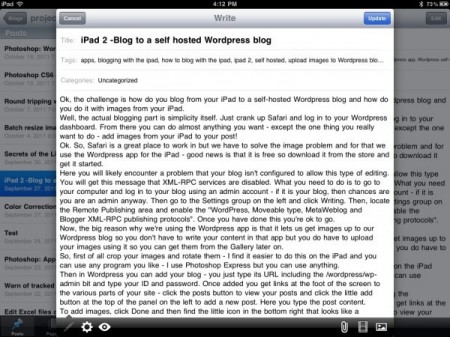
Ok, the challenge is how do you blog from your iPad to a self-hosted WordPress blog and how do you do it with images from your iPad?
Well, the actual blogging part is simplicity itself. Just crank up Safari and log in to your WordPress dashboard. From there you can do almost anything you want – except the one thing you really want to do – add images from your iPad to your post!
Ok. So, Safari is a great place to work in but we have to solve the image problem and for that we use the WordPress app for the iPad – good news is that it is free so download it from the store and get it started.
Then in the WordPress app you can add your blog – you just type its URL including the /wordpress/wp-admin bit and type your ID and password. You only do this once.
Here you will likely encounter a problem that your blog isn’t configured to allow this type of editing. You will get this message that XML-RPC services are disabled.
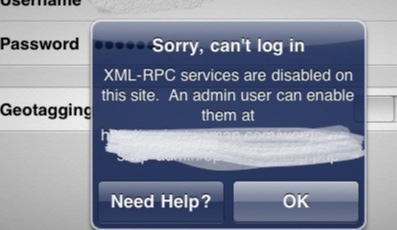
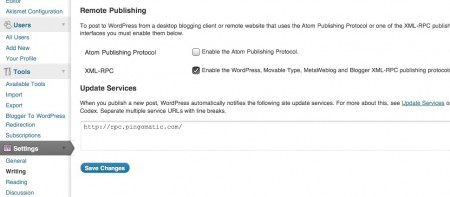
What you need to do is to go to your computer and log in to your blog using an admin account – if it is your blog, then chances are you are an admin anyway. Then go to the Settings group on the left and click Writing. Then, locate the Remote Publishing area and enable the “WordPress, Moveable type, MetaWeblog and Blogger XML-RPC publishing protocols”. Once you have done this you’re ok to go and your blog will be added to the WordPress app. If you have multiple blogs you can add more than one, which is smart.
Now, the big reason why we’re using the WordPress iPad app is that it lets us get images up to our WordPress blog so you don’t have to write your content in the app but you do have to upload your images using it so you can get them from the Gallery later on.
So, first of all crop your images and rotate them – I find it easier to do this on the iPad and you can use any program you like – I use Photoshop Express but you can use anything.
Now click on your blog name to get access to your WordPress site on your server. You will see some links at the foot of the screen which take you to the various parts of your site – click the Posts button to view your posts and click the little Add button at the top of the panel on the left to add a new post. Here you type the post content.

To add images, click Done and then find the little icon in the bottom right that looks like a landscape image – click it and add images from your Camera Roll.
Regardless of where you are when you do this all the images go one after the other into the post… this is the sucky part but it really is a small issue – at least they are there!
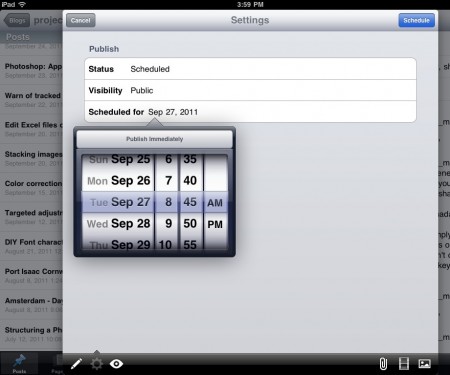
Before you leave the WordPress iPad app, click Done and click the Settings button (bottom Left) and set a Schedule for the post – I make this a day or more but at least an hour so ahead of time so I have enough time to fix the image issue back in WordPress in Safari before everything goes live.
Now, still in the WordPress app, go ahead and Upload and Update everything. Then go back to Safari and log in to your blog.
By the way, I haven’t mentioned it yet, but it really helps to have one of those bluetooth keyboards so you have arrow keys and you can use shortcuts to copy and paste and select stuff. It beats working with your fingers on the screen – if you’re serious about blogging on the iPad you really need one. I use the Zagg one which I really like.
Back in WordPress on Safari I just delete all the code which has been added for the images as they are seldom where I want them to be. Now I move into position in the post and add the images using the regular WordPress Add Image button – the pictures are all in the Gallery – thanks to the WordPress app.
In WordPress in Safari I can do things like add Captions and descriptions and scale any image that need resizing.
On a scale of 1 to 10 it would be easier to be able to do everything from inside Safari or inside the WordPress app but I wouldn’t call this difficult or unnecessarily cumbersome. I can live with the slight workaround for the sake of being able to blog with images from the iPad in WordPress to a self hosted blog.
I’d rate it around a 7/10 ease of use and functionality and I love it. In fact this is the last big issue I’ve had with the iPad and not being able to blog to my WordPress blogs would have been a deal breaker for me. I need to be able to blog on the road and I want to do this with images – in particular as I am doing an apple a day blog over at my design site and looking at heaps of cool iPad apps so not being able to include images would be horrible!
Labels: apps, blogging with the ipad, how to blog with the ipad, ipad 2, self hosted, upload images to Wordpress blog, Wordpress app, Wordpress self-hosted blog
Thursday, September 22nd, 2011
Warn of tracked changes in Word 2010
Microsoft Word 2010 has some great security settings but I am continually disappointed that Microsoft hides them away so they are so difficult to find.
One of these settings is crucial to enable so you don’t accidentally send a document out to a client with, for example, a comment in it saying what a idiot your client is. The revelation that you think they are an idiot might be news to them – and you’re not going to look too smart yourself.
The culprit is tracked changes. It is all to easy to have Tracked Changes enabled but to have your document show only the final version of the text. Behind the scenes every insertion and deletion is being stored in the document even if you aren’t seeing it. However the information will be accessible to anyone viewing that document – not a smart idea!
If you don’t think this is a big deal you might be interested to know that lots of smart people have been caught out by it, including Microsoft itself. This blog post showcases stories of businesses and government caught out by tracked changes.
To stop this happening to you, you can do a few things but I like the method that you set once and, from there on, Word will do the work for you. This involves having Word tell you if a document you are about to print or save has tracked changes in it. Ignore the warning at your own risk!
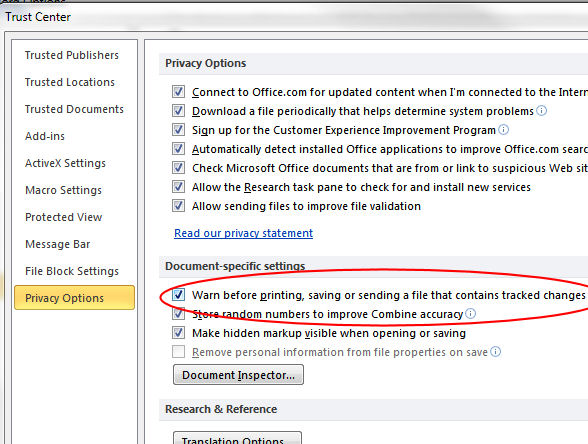
To configure this, choose File > Options > Trust Center and click Trust Center Settings then Privacy Options. Enable the “Warn before printing, saving or sending a file that contains tracked changes or comments” checkbox.
Now, in future, Word will show a warning if a document contains tracked changes even if they are hidden from sight.
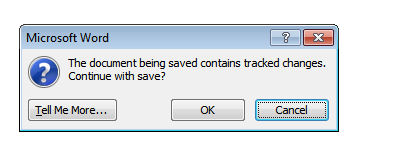 It should be on by default and it should be easier to find… but there it is… and don’t say I didn’t warn you about it.
Labels: document security, Microsoft Word 2010, tracked changes
Tuesday, September 20th, 2011
Edit Excel files on the go
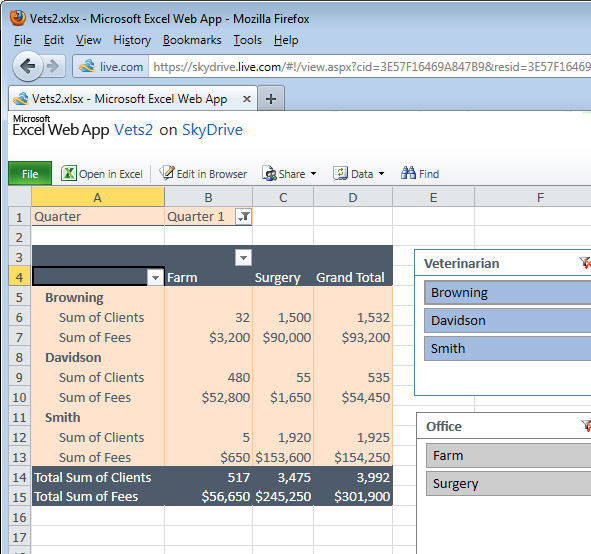
If you have access to a PC and an internet connection then your options for working with an Excel spreadsheet away from your desk are good – thanks to the Microsoft Office WebApps. Even though many of the advanced Excel tools you are used to using offline won’t be accessible online they won’t be destroyed by opening a file in the Excel WebApp either. You can view charts and filtered table data and features such as the new Slicers in an Excel 2010 PivotTable can be used to work with the data.
Of all the cloud based apps, including Google Docs, the Microsoft WebApps are your best option for working with Excel spreadsheets in the cloud when you are away from your desk and the apps are free.
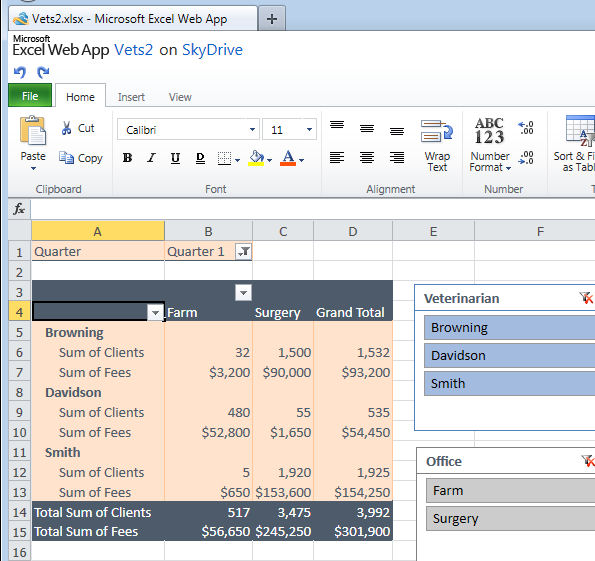
You can sign up for a free SkyDrive account at skydrive.live.com and that’s where you get access to the WebApps which include Excel, Word, PowerPoint and OneNote. I selected to upload this file then view it in the Excel viewer. To work on it beyond selecting options in the Slicers I can click Edit in Browser to open the file in the free cut down version of Excel online.
One benefit to using SkyDrive is that you can upload files from your local computer to SkyDrive where they are stored for you. You can work on the files online and later download them to your computer when you want to work on them there.
Labels: cloud Excel, Editing Excel files online, Excel 2010, Excel viewer, Excel WebApps, free Excel
Friday, July 1st, 2011
Outlook 2010: backup gets worse (if that’s possible)
If you thought Microsoft has, over the years, right royally messed up the process of backing up your Outlook PST files then the situation with Outlook 2010 has only got worse.
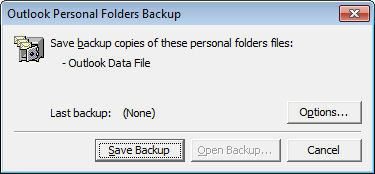
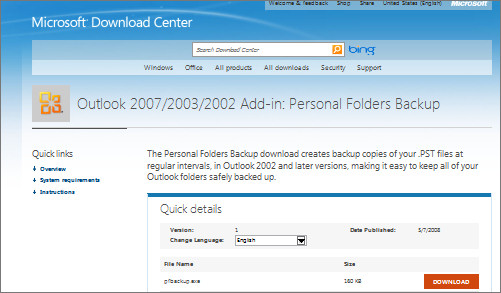
For Outlook 2002, 2003 and 2007 users Microsoft provided a Personal Folders Backup Tool that you could download from http://www.microsoft.com/download/en/details.aspx?displaylang=en&id=9003 which would install a backup routine into Outlook.
Having done this you could then select File > Backup to backup your PST file.
Over the years of course, this has prompted questions as to why the thing wasn’t built in to Outlook in the first place? It is a stupid and ill-considered omission in my book, but let’s put that aside for now because the problem only gets worse for Outlook 2010 users.
You see the Personal Folders Backup Add-In doesn’t work with Outlook 2010.
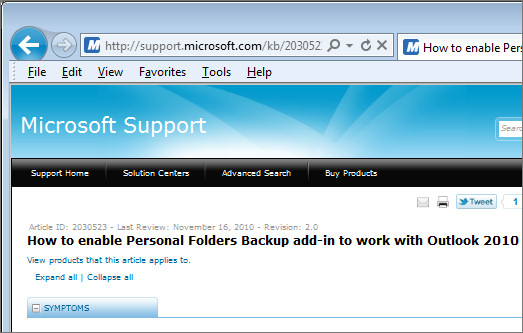
As I say repeatedly it’s Microsoft’s world and we just live in it. Microsoft knows that there’s a problem and explains that the failure of the add-in is due to the new fast shutdown functionality in Outlook. If you visit this website http://support.microsoft.com/kb/2030523 you can click the Fix It For Me link and Microsoft will fix the problem for you.
Don’t even bother asking why there is a problem in the first place. There should be (and it’s inexcusable that there is not) a backup routine built in to Outlook to make it easy for you to backup your PST file.
Consider this – everything you receive or send via email is in that PST file – and that includes attachments! Lose it and you lose the lot. Worse still, there is a physical limit to its size – beyond around 2GB the thing can become horribly unstable. So you will need to back it up or risk losing it all if your computer crashes or the thing becomes corrupt.
So, if your using Outlook 2010, run (don’t walk) to this site: http://www.microsoft.com/download/en/details.aspx?displaylang=en&id=9003 and download and install the Personal Folders Back up tool for Outlook 2002, 2003 and 2007 (yep! I know you’re using Outlook 2010! Then go to this site: http://support.microsoft.com/kb/2030523 and run the Fix It Tool – you have to have the backup tool installed first.
If you don’t like clicking Fix It buttons then there’s a detailed explanation in that same Knowledge Base article explaining how to fix the problem manually – basically it’s a fairly simple registry fix.
Labels: backup, download, Outlook 2010, problems
Wednesday, June 29th, 2011
DIY Color Changing Clip Art
Much of the illustration Clip Art in the Microsoft Clip Organizer can be edited by changing its colors. By doing this you can not only recolor the art to match the look of your document but, if you use Theme colors then the art will change color when the Theme or Color scheme changes.
Now you won’t need information technology degrees to learn this – but maybe you’ll be so good at it, you just might consider graphic design college.
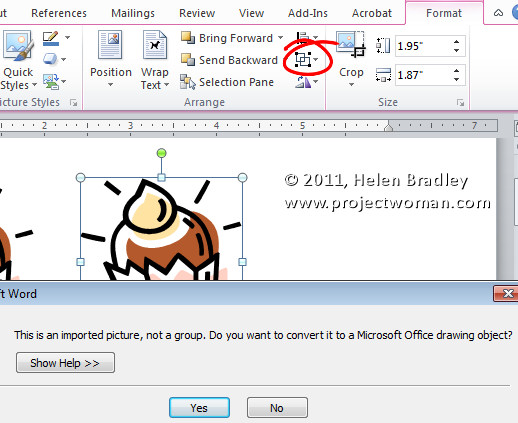
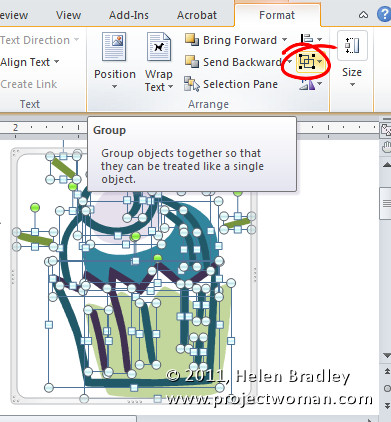
So, let’s see how the recoloring is done. First select the Clip Art and from the Picture Tools -> Format tab click the Group > Ungroup button. Answer Yes if you are prompted to convert the image to a Microsoft Office Drawing Object. In some applications such as Publisher you’ll need to repeat the process and select Ungroup again.
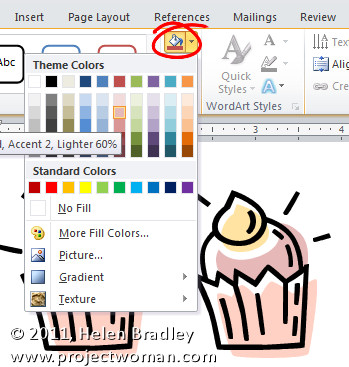
Now click on individual parts of the object and either remove them or recolor them by selecting a Shape Fill Color from the Drawing Tools > Format tab. If you use Theme colors then the colors will change later on when the theme changes.
When you are done and you have recolored all the pieces you want to recolor, select all the pieces, right click and choose Group.
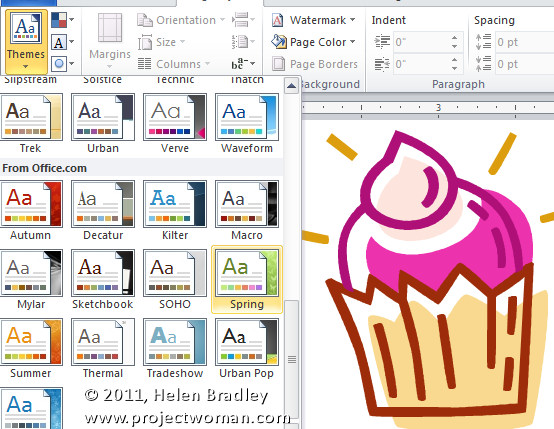
Change the document theme or Color Scheme to see the image change color to match the look of the theme.
Labels: clip art, color scheme, Excel 2010, Microsoft Office, Publisher 2010, recolor, theme, Word 2010
Wednesday, June 22nd, 2011
Word – joining up short lines
One of my readers – Joe – recently asked for some help regarding removing spaces in Word. He thought that the problem with the text was additional spaces, but when I looked into it, it appears that something else is causing the issue.
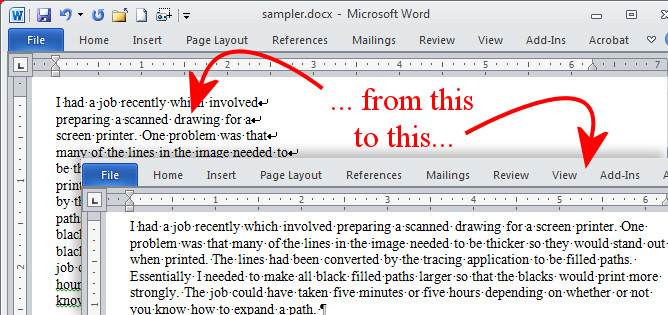
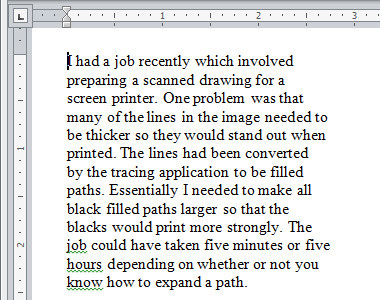
Here is a piece of sample text and you can see that it is a series of short lines which my reader wants to make into one continuous paragraph.
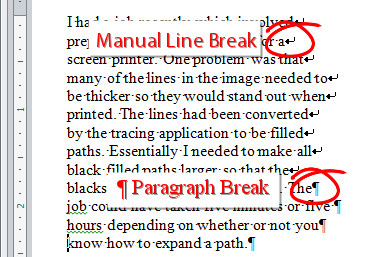
To see what is causing him issues click the Show/Hide¶ button on the Home tab of the Word Ribbon.
At the end of each line you will find either a Paragraph Marker or a Manual Line Break – each is different and you need to work out which you have at the end of each line. Also determine if there is a space before each of the markers. If there is not a space you will need to add it yourself. Here is a mix of both markers but no spaces:
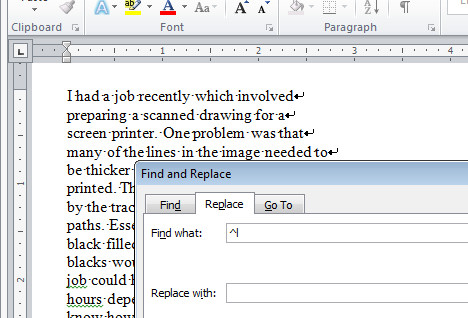
To make the lines flow into each other, from the Home tab on the Ribbon click the Replace option. If you need to replace Paragraph Markers, enter ^p into the Find What box. If you need to replace a Manual Line Break then enter ^l (lower case L) into the Find What box.
If you need to add a space, click in the Replace With box and press the Spacebar once – if you don’t need to add a space, then leave the Replace With box empty.
Click Find Next and then click Replace. Check to make sure the replacement is working as expected. If it is, click Replace All and lines will be joined together into a single paragraph of text.
Typically you only have to replace one type of marker and not both, but if you have both, then you will need to find and replace each individually.
When you’re done click Show/Hide¶ again to hide the extra characters from view.
Labels: find and replace, remove spaces, Word 2003, Word 2007, Word 2010
Tuesday, June 14th, 2011
Help! My Excel Chart Columns are too Skinny
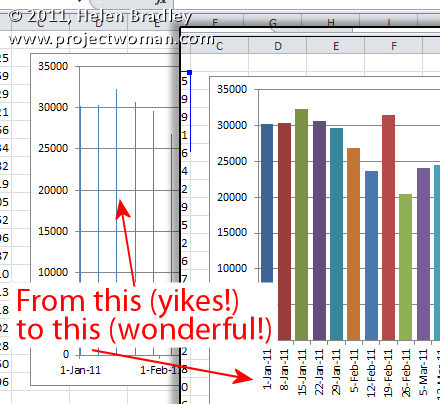
It’s probably happened to you, you’ve created an Excel chart and the columns are so narrow they are almost unreadable. The chart is ugly and it appears as if there’s nothing that you can do because nothing that should work does work.
The problem typically happens when you have a chart with an X axis that is has date data and where you aren’t plotting every day but, instead, for example, one day a week.
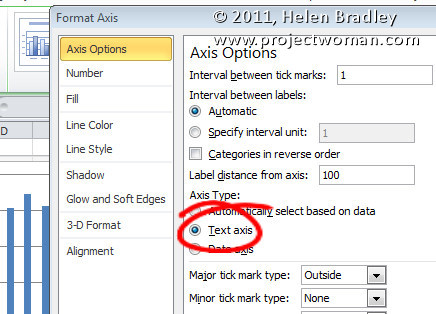
The solution is to click the X axis of the chart so that you have it selected, right click and choose Format Axis. From the Axis Options panel, select Text Axis. This turns your skinny bars into something a lot more attractive.
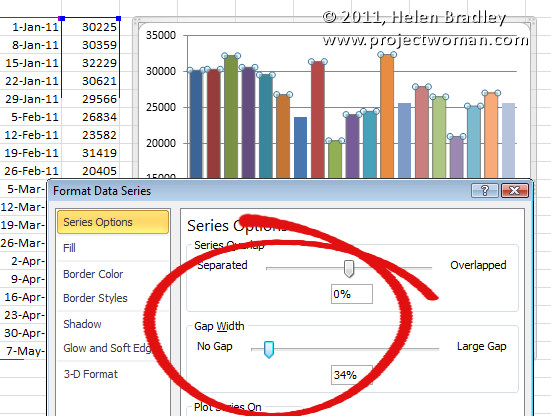
If the bars still not thick enough – and typically, for me, they aren’t – click on one bar to select the series, right click and choose Format Data Series. From the Series options, decrease the Gap Width value to around 35 percent. This option won’t work unless you first set the X axis to a Text axis although you and I both wish it would!
Labels: chart, column width, date axis, Excel 2010, gap
Friday, June 10th, 2011
Excel multi color column charts
When you have a great big Excel column chart with heaps of delicious data but all in one series, it makes sense for the chart to be plotted in wonderful technicolor. However that’s an option Excel 2010 doesn’t make it very easy to find. If you try the Chart Tools > Design tab you can choose a multi-color chart but that only colors each series a different color so it won’t work when all your data is in one series.
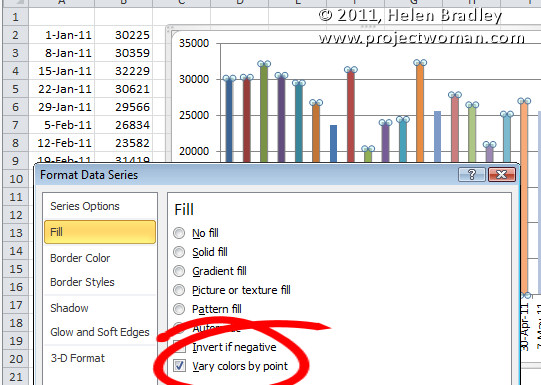
The solution is to click on one column to select it then right click and choose Format Data Series > Fill group. Locate and check the Vary Colors by Point option and you’ll have a wonderful multi-colored series – much more enlightening than a plain old single color chart don’t you think?
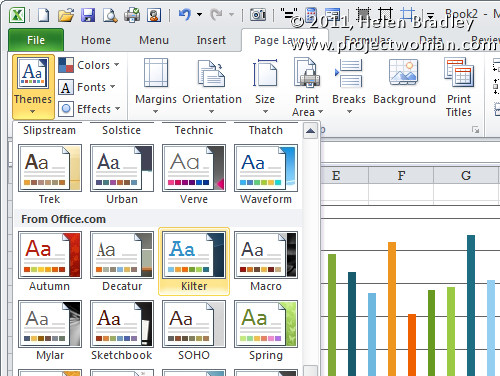
If the colors aren’t to your liking (you are getting just a little bit fussy but I do know exactly what you mean) select the Page Layout tab and check out the Themes – there’s sure to be one which will make your chart perfect.
Labels: chart, columns, Excel 2010, multi-color, themes
Wednesday, May 18th, 2011
Converting PDF to JPG
If you’re a follower of my blog, you’ll know that I often need to convert a PDF file to some other format. I’ve showed you in the past how to extract data from a PDF file direct to Word but today my problem was that I wanted a well laid out pdf document to retain its look.
Unfortunately, the way it was created I couldn’t edit it to add my signature but I could do this in Word if I could get it there.
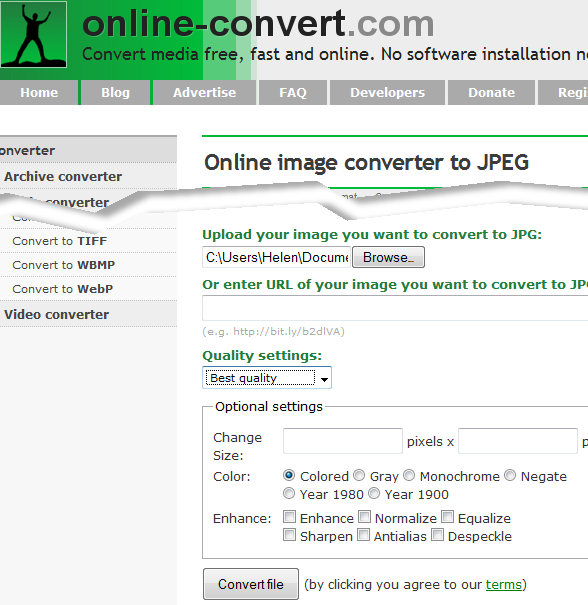
The solution was to convert it online using http://image.online-convert.com/convert-to-jpg. This easy to use site converts from 120 or more formats to JPG which is exactly what I wanted. It even allows you to upload a hefty file – up to 100 MB which means that it’s pretty damn big.
All you need do is to either enter a URL of the file to convert or click Browse and grab a file from your computer. You can set the quality settings – I selected Best Quality, and then optionally set the final image size, color and even apply some enhancements such as sharpening, anti-alias, despeckle and so on.
For a simple PDF to JPEG conversion, I left everything as it was and clicked Convert File. In less than a minute I had a zip file ready for download.
I could also have opted to have it emailed to me. You can, once you’ve downloaded your file, select to delete it or download it up to ten times within a 24-hour period. I opted to delete my file which is a nice option when a file may contain sensitive information,
If you visit the home page at http://image.online-convert.com you’ll have lots more options for converting to and from different formats.
This site is dead easy to use and it does the job – you simply can’t ask for more than that.
Labels: convert document, free file conversion site, jpeg., jpg, PDF
Friday, April 29th, 2011
Remove everything from a cell in Excel 2007/2010
In Excel 2003 and earlier you might recall that you could click a cell and choose Edit > Clear and choose to clear its Contents, Comments, Formatting or choose All to remove everything.
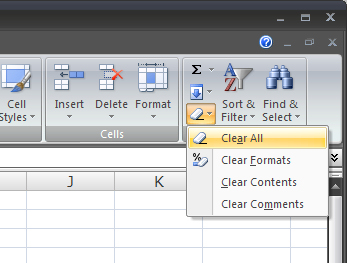
In Excel 2007/2010 there is a Clear Contents option on the right click menu but, in the absence of the Edit menu you’ll need to look elsewhere for the other options. On the Home tab of the Ribbon look for the Clear icon – it has an eraser on it and it has a dropdown list from which you can select the desired option.
It’s pretty obvious if you’re using Excel at full screen size but shrunk down it isn’t clear (pun intended) that it is there or what it does. I like to add the Clear All option to the Quick Access Toolbar so it’s easy to find and use. You will find it in the All Commands list and it is called Clear All if you’re looking for it.
Labels: delete cell contents, Excel 2007, Excel 2010
Tuesday, April 26th, 2011
Permanently fix Word’s image insert behavior
I was at dinner the other night and talking computers with some friends. We were joking about Excel not being a word processor when the subject of images came up. And Lo! and behold someone suggested that Excel was a much better option to use than Word so far as images are concerned.
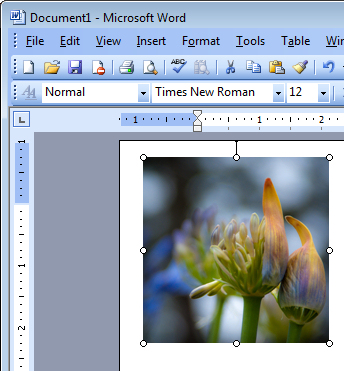
This has been a particular issue for me for years. You see Word inserts all images, by default as in line with text which is the option you’d probably never want to use.
I promised my friends to show them how to fix Word – permanently – so images get inserted as you’d want them to be – with a square wrap around. It’s a good starting point and my recommended default for Word. You can change the wrapping if you want but 99.9% of the time this is the setting you’ll want to use.
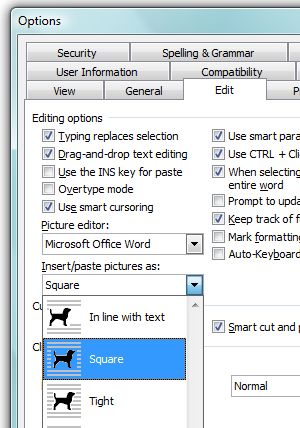
In Word 2003, choose Tools > Options > Edit tab and from the Insert/Paste Pictures as dropdown list choose Square and click Ok.
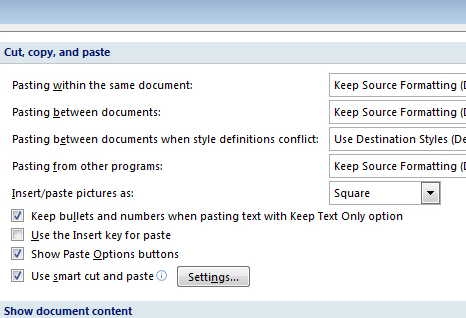
In Word 2007 choose File > Word Options > Advanced tab and locate the Cut, Copy and Paste group. From the Insert/Paste Pictures as dropdown list choose Square and click Ok.
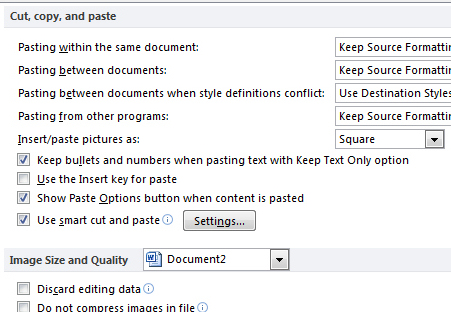
In Word 2010 choose File > Options > Advanced tab and locate the Cut, Copy and Paste group. From the Insert/Paste Pictures as dropdown list choose Square and click Ok.
Now you know how to fix it … spread the love and tell a friend!
Labels: image, insert, square, Word 2003, Word 2007, Word 2010


