Thursday, July 19th, 2012
pptPlex-cool PowerPoint Presentations
Labels: Helen Bradley, how to, PowerPoint, powerpoint presentation, pptplex cool, video tutorials
Thursday, July 19th, 2012
eBook Template in Word
Labels: ebook, ebook template, Helen Bradley, Microsoft Word, template, video tutorial, YouTube
Tuesday, July 10th, 2012
Sending to Send To
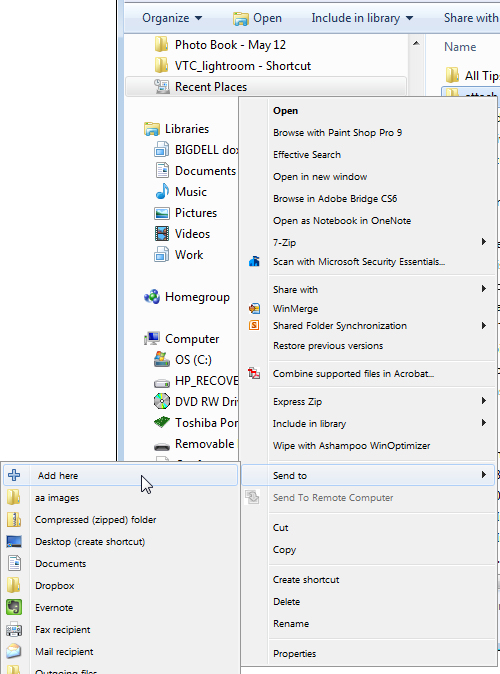
If you’re like me, you use the Send To feature of Windows Explorer quite frequently. Simply right click on a file in Windows Explorer and you have a Send To option. Click this and you’re able to send files to a list of sources.
While some of these options are built-in such as Compressed (Zip Folder), Desktop, and Mail Recipient, there are times when you’d like to add your own preferred location to this list.
For me, I like to assemble my files for emailing into a folder called Outgoing Files. I need that in my Send To list so that it’s accessible any time I need to send a file to it rather than having to copy and paste the file from one folder to another.
The problem with Send To is that it’s easy to use but difficult to add items to the Send To list itself.
Of course, you could go and find the folder and dump things in it but wouldn’t it be a whole lot easier if adding files to the Send To list were as easy as sending files to somewhere using it? I think it would be!
Enter a small free and opensource application called SendToSendTo. You can find it here: sendtosendto download
Download and install the application then restart your computer.
When you do this, locate a folder or file, right click and choose Send To. You’ll find that now you have an entry at the very top of the list called Add Here. Right click it and choose Send To > Add Here and you can then add that folder to the send to list by simply clicking Create.
What SendToSendTo does is to automatically add the folder that you point to into the Send To list.
One of the things that you’ll love about SendToSendTo is that it’s simple to install and use and it makes something that should have been easy to use all along work the way it should not as Microsoft designed it – enough said!
Labels: add locations, computer, download, Helen Bradley, how to, sendto sento, tip
Monday, July 9th, 2012
Maximum Length of YouTube Video Descriptions
There is a lot of discussion around about adding Caption text to your YouTube video descriptions. YouTube will automatically convert the audio content from your video stream to regular text – so it can be used for closed captioning. You should of course check and edit this as the results are a little weird from time to time!
You can then add this caption text to your YouTube video description so it will also be indexed by search engines. The problem is that it’s very easy to encounter an error with YouTube where it says that your video settings could not be saved the reason being that either the description is too long or contains illegal characters. This is an extremely unhelpful error message – well, YouTube you tell me – is the description too long? Or is does it contain illegal characters? Or both? WTF?
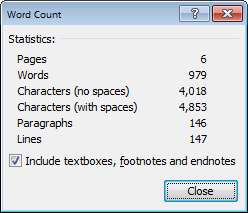
Having encountered this issue a few times, I set about to experiment and see just what is what so far as YouTube descriptions are concerned. I don’t have a definitive answer but I have a pretty good one. By simply shoving increasingly big pieces of text into a YouTube video Description I was finally able to force the error when I got to what Word reported to be 979 Words, 4,018 characters (not including spaces) and 4,853 characters (including spaces). This was 146 paragraphs of caption text which was 147 lines of text or thereabouts.
Anything over this tripped the error what the description that could not be saved. I am now assuming that somewhere around the 4850 characters including spaces mark is the limit on the maximum text in a Description.
Now to what are “illegal characters”. As you might have already realized, characters like periods (.) and commas (,) are legal. So too are regular straight apostrophes (‘), Question marks (?), equals sign (=), dash (-), colon (:), slash (/) and plus (+). The big NO, for Descriptions seems to be the Greater Than (>) and Less Than (<) symbols – they are illegal in YouTube Video descriptions so they will cause the error to occur.
So, this means you cannot include “<a href=” type code in your descriptions but you can include URLs in the form http://www.projectwoman.com as all these characters are perfectly legal.
If anyone else has additional information on what is allowed or disallowed in YouTube video Descriptions, please, feel free to join in the conversation.
Labels: captions, descriptions, illegal characters, too long, YouTube
Saturday, July 7th, 2012
Random text in Word 2010
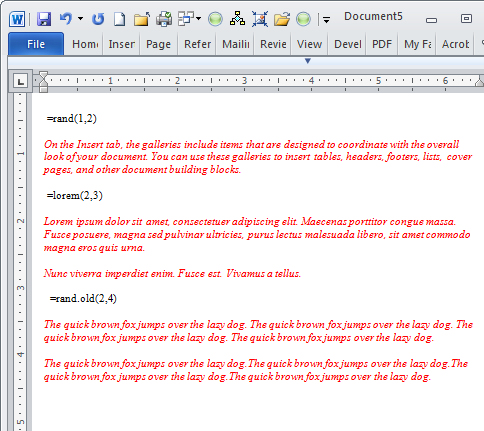
You may already know that typing =rand(1,2) on a new line in Word types one paragraph of two sentences in Word. The text is this random Word help style text:
“On the Insert tab, the galleries include items that are designed to coordinate with the overall look of your document. You can use these galleries to insert tables, headers, footers, lists, cover pages, and other document building blocks.”
But did you know there are other types of text you can type? Try =lorem(2,3) and press enter to get two paragraphs of three sentences each of the Lorem ipsum dummy text.
“Lorem ipsum dolor sit amet, consectetuer adipiscing elit. Maecenas porttitor congue massa. Fusce posuere, magna sed pulvinar ultricies, purus lectus malesuada libero, sit amet commodo magna eros quis urna.
Nunc viverra imperdiet enim. Fusce est. Vivamus a tellus.”
If you type =rand.old(2,4) and press enter you get the older Word dummy text – the Quick Brown fox..
The quick brown fox jumps over the lazy dog. The quick brown fox jumps over the lazy dog. The quick brown fox jumps over the lazy dog. The quick brown fox jumps over the lazy dog.
The quick brown fox jumps over the lazy dog. The quick brown fox jumps over the lazy dog. The quick brown fox jumps over the lazy dog. The quick brown fox jumps over the lazy dog.
So now you have plenty of random text options – of them all the Lorem one is the most handy for when you really need large portions of dummy text in a document.
Labels: filler, Helen Bradley, how to, Microsoft Office, Microsoft Word 2010, Random text, tip
Tuesday, July 3rd, 2012
Make a Website a Chrome App
I’ve been working with Google Chrome a lot lately because it makes good sense as a Browser. I have my assistant to thank for this as, without his continual poking and prodding to explore Chrome I probably would not have got there as quickly as I did.
One of the nice things about Chrome is its integration with Google+. However it’s not Google+ that I plan talking about here but rather I want to show you how to add a website as an app to Chrome.
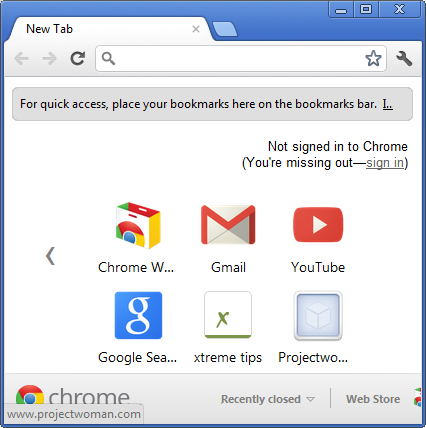
If you click the New Tab icon in Chrome and then click Apps at the foot of the page you’ll see that there are some apps already in the list such as YouTube, Gmail and so on. What I am going to show you is how to add your own choice of websites as apps and to do it quickly and easily.
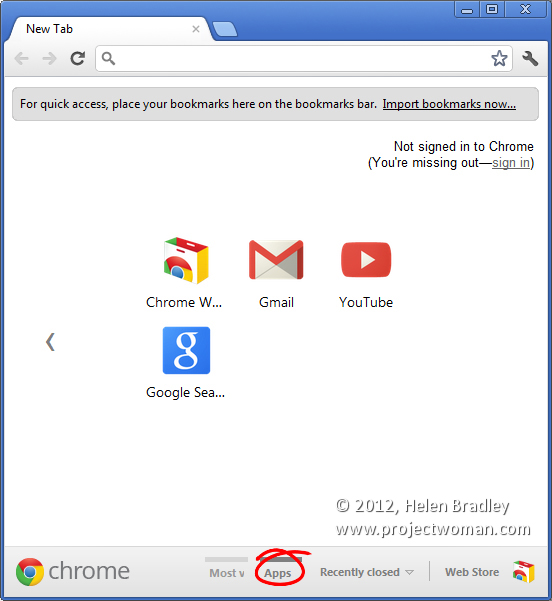
You may already know that you can create an app from a Most Visited page. Click Most Visited at the foot of the New tab and anything that’s in that list can be easily created as an App by just dragging and dropping it onto the Apps icon. This automatically makes the page an App.
The problem is that if something isn’t a Most Visited page it’s a little cumbersome to make it an App. The solution is to click the New Tab icon and display the Apps page. Size your browser down so that you can see everything clearly.
Now click the New Tab icon again and this time browse to the page that you want to add as an App. Once you’ve visited that page drag the tab for that page somewhere else on the screen so that you have two browser windows – one showing the Apps area and the other one with your web page open in it.
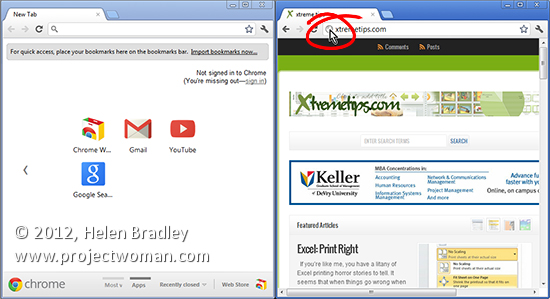
Now locate the icon immediately to the left of the page URL that you want to add as an app. As you hold your mouse over it, it will show View Site Information as a tooltip.
Drag and drop this into the Apps area in your Chrome browser. It will automatically be added as a new App. You can then drag and drop that App or any others to rearrange them to suit.
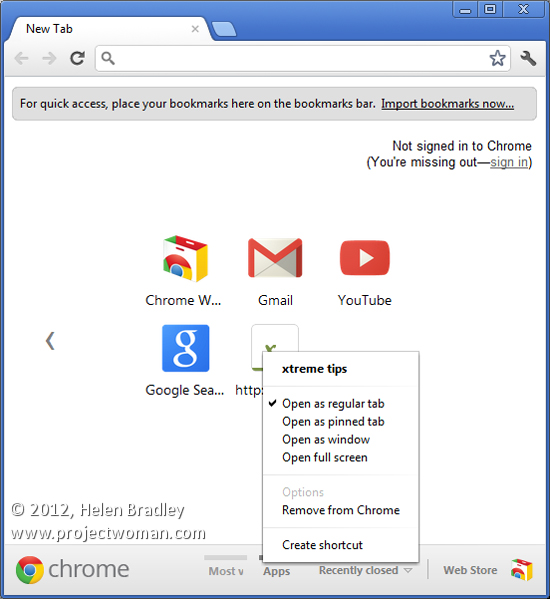
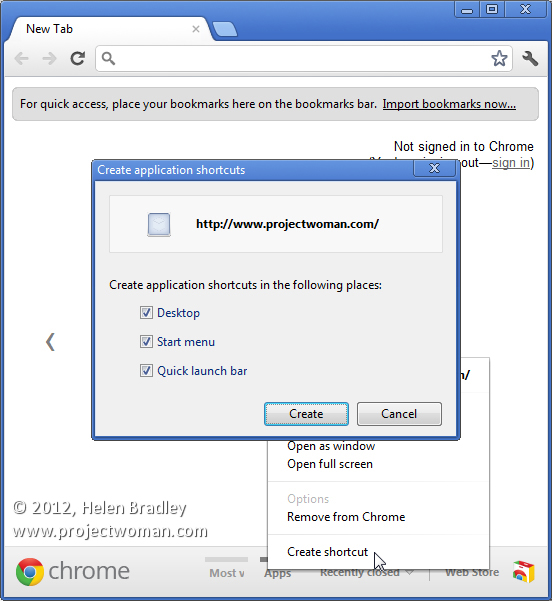
An app can also be created as a Desktop, Taskbar or Start Menu shortcut. To do this right click the web page in the Apps area and choose Create Shortcut. You’ll get a series of shortcut options including Desktop, Start Menu and Pin to Taskbar. Select the checkboxes for those that you want to create and click Create.
There’s a lot of misinformation on the web regarding adding websites to the Chrome apps collection. A lot of sites suggest you repeatedly remove Most Visited pages until you get to the page that you want to add. This solution which involves simply dragging and dropping a URL into the page is far quicker and makes a lot more sense.
Labels: apps, chrome, google, Google chrome, Helen Bradley, how to, links, tip, web Browser, website app
Wednesday, June 27th, 2012
Excel fill intermittently empty cells
Often when you’re working in Excel you won’t enter all the data because it is repetitive.
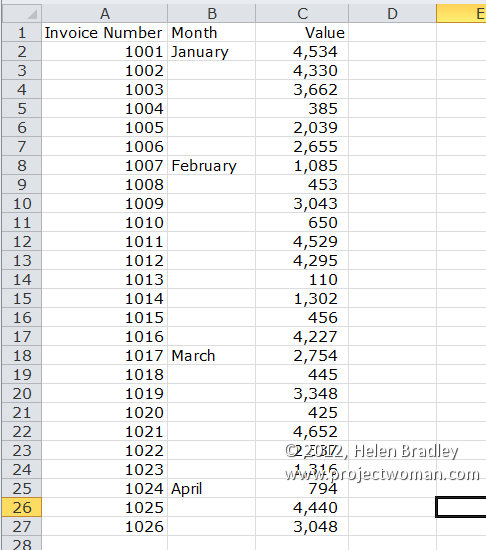
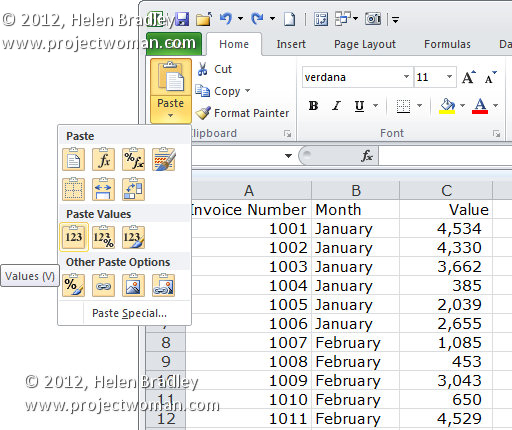
In this example, the cells in column B really should be filled with the months but because the month only changes periodically I have only typed it when the change occurs. If I need to work with this data such as in a PivotTable it may be necessary to fill the data down column B.
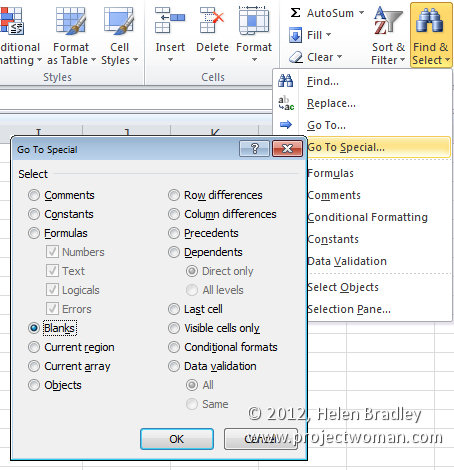
This can be done easily by selecting the cells in column B and choose the Home tab on the Ribbon, click Find & Select > Go To Special > Blanks to select the blank cells.
Type =B2 in the cell, this represents the first cell in column B with the data in it.
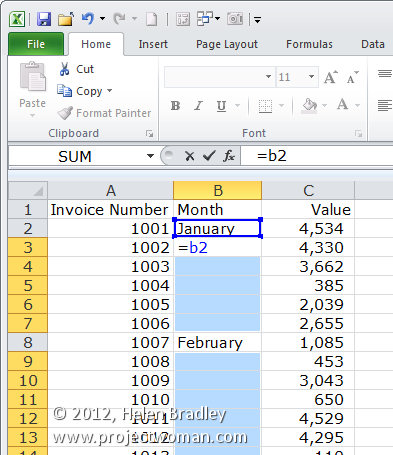
Press Control + Enter.
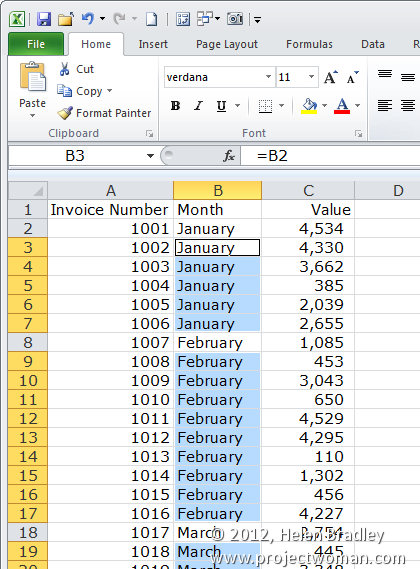
Now, to fix the cells so they contain words and not cell references, select all the filled cells in column B, choose Edit > Copy and then Paste > Values and click Ok.
Labels: empty cells, Excel, fill, fill in, helen bradle, month, time saver, tip
Wednesday, June 20th, 2012
Print big images with Paint
Well, who knew the humble Microsoft Paint could do what just about no other program can easily do? Well it can. I recently assembled a very large image from a series of screenshots of a help screen. The help screen was really long so I captured screenshots of each portion of it, assembled them into one really narrow and long file and then got stuck – how the heck could I print this? Hmm… enter Microsoft Paint… but first, here’s the entire process from Print screen to Photoshop to Paint!
I brought all the screen capture images into Photoshop, cropped them using an action to do it very quickly, rotated them counterclockwise 90 degrees and then saved the images with sequential numbering. There was a bit of overlap in each image – you need this for the panorama merge to do its stuff and they need to be rotated or they won’t assemble properly.
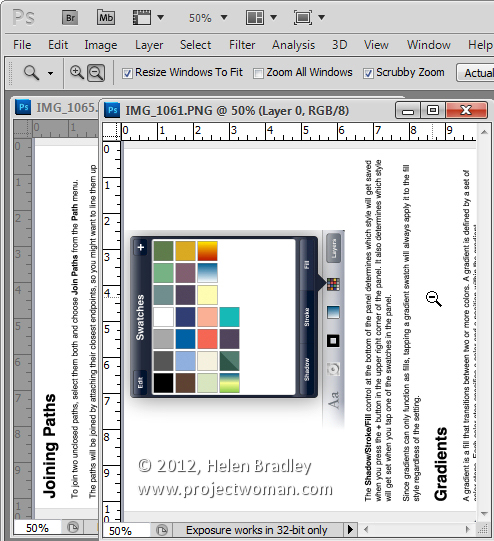
Having done that I then used the photo merge tool in Photoshop (File > Automate > Photomerge) to create a merged image from the individual images.
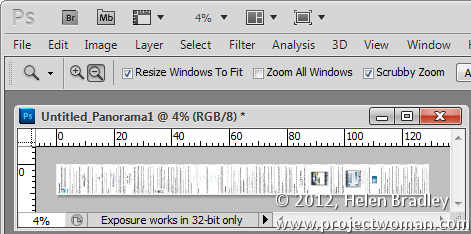
Then, once the merge was complete, I rotated the image back this time 90 degrees clockwise to get a vertical image that was 770 pixels wide and over 9,000 pixels long.
The problem with an image this size is that when you try to print it from Photoshop – it has to be squeezed down to a very small size to print on a single page and no other option is available so you can’t print it on multiple sheets.
The question then becomes how to print a very large image in lots of smaller pieces. The solution is nearer than you think and, curiously, it comes in the form of Windows Paint.

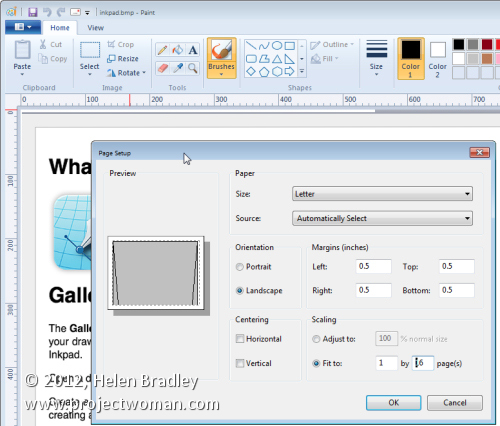
Launch Paint and open the image. Choose File > Print > Page Setup. Here you’ll find an option for sizing the printout to a fixed number of pages wide or long or you can shrink option to adjust the percentage scaling size. Wow! This is really very smart indeed.
When you do this, watch the boxes below as this will tell you how many pages tall and wide the image will be printed at. When you’re satisfied with the results, you can go ahead and click to print the document. If you have a PDF printer then you can print the document direct to a PDF file or if preferred, feed some paper into the printer and print the image. Then get out some sticky tape and stick it all together.
Labels: alternative to rasterbator, Helen Bradley, ms paint, mspaint, multi page printing, multi-page, multipage, Paint, PDF, print big images, printer, Rasterbator, scale
Wednesday, June 13th, 2012
Add or Edit Outlook E-mail Subject Lines
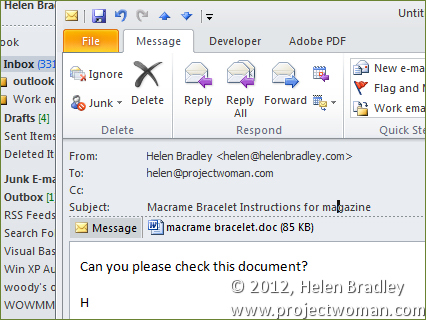
It is just plain annoying when you receive an email without a subject line or with one that makes little sense or which doesn’t relate to the email topic. Luckily you can fix this very easily.
First locate and open a message that doesn’t have a sensible subject line or which has none at all. Click in the subject area – it’s greyed out but it is actually editable. Make your desired changes to the subject and add one if there is none.
It is also possible to edit the message itself if you click the Message tab and choose Actions > Edit Message.
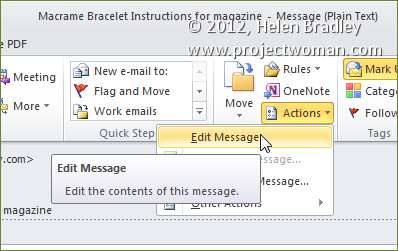
Once you are done, click Save to save your changes and close the file.
Labels: edit e-mail, edit email, edit received emails, email subject, Helen Bradley, Outlook, Outlook 2010
Wednesday, May 2nd, 2012
Office 2010 – how to save files as templates
Each of the Office applications allows you to configure a look for a document, spreadsheet, publication or presentation and then save it as a template so that you can reuse it anytime.
Templates in PowerPoint 2010
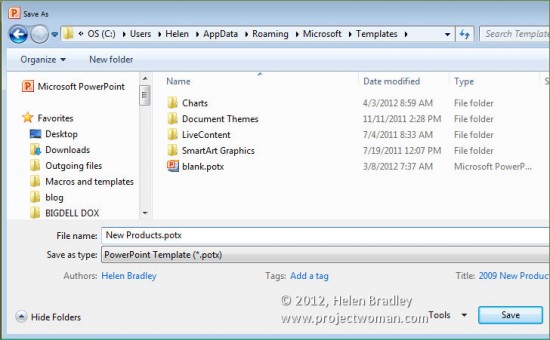
In PowerPoint you’ll create your presentation and then save it using File > Save As and select from the Save As Type list choose PowerPoint Template (*.potx). Give your presentation template a name and click Save.
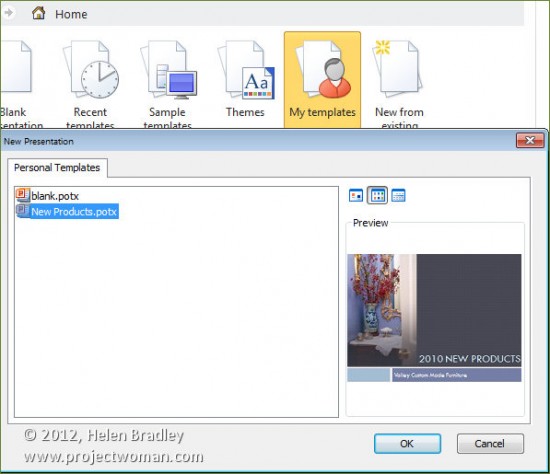
In future you can locate this presentation by choosing File > New > My Templates and click on the template to use it as the basis of a new document.
Templates in Word 2010
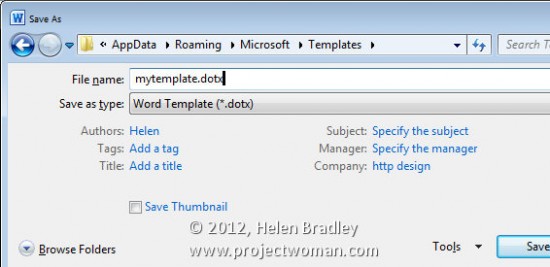
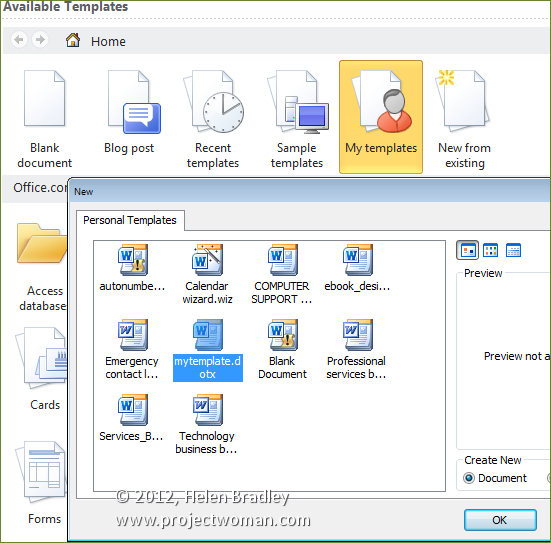
In Microsoft Word choose File > Save As and from the Save As Type dropdown list choose Word Template (*.dotx). In the top left of the dialog click the Templates option to make sure that the template will be stored in the correct location and give the template a name.
In future choose File > New > My Templates and select the template to use.
Templates in Excel 2010
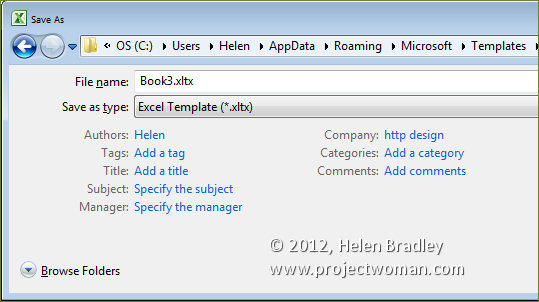
In Microsoft Excel, you can save the look of your document so that it can be used as the basis of a new document by choosing File > Save as and choose Excel Template (*.xltx ) as the file type. Type a name and save the template file.
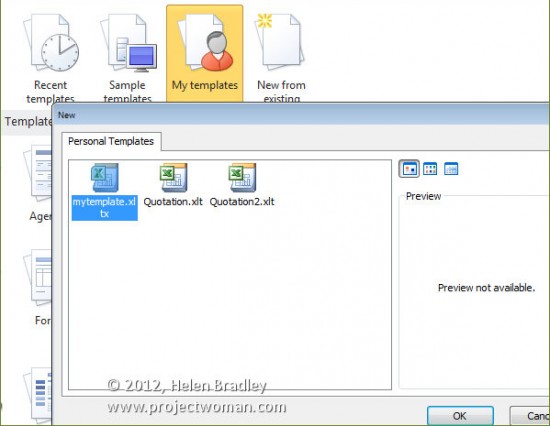
In future you can base a new worksheet on this template by choosing File > New > My Templates and select it from the Personal Templates list.
Templates in Publisher 2010
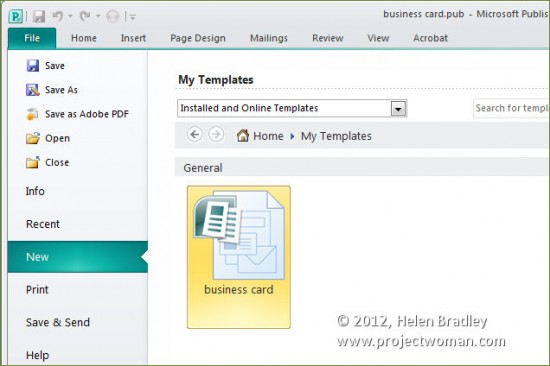
In Publisher you’ll choose File > Save As and then select Publisher Template (*.pub). Type a name for the template and click Save.
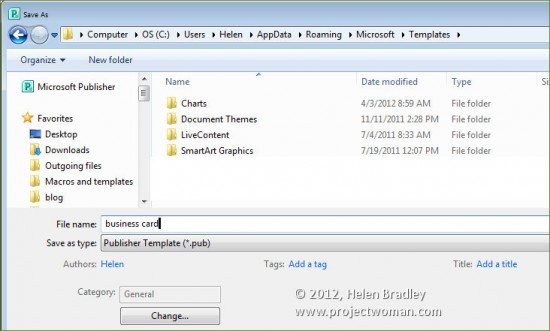
In future you can access this template by choosing File > New > My Templates, select the template and click Create. You may need to close and reopen your software before the new templates are available.
Labels: Excel, Excel 2010, Helen Bradley, how to, PowerPoint, PowerPoint 2010, publisher, Publisher 2010, save as a template, templates, tips, Word, Word 2010
Monday, April 30th, 2012
Save an Excel Chart as a Picture
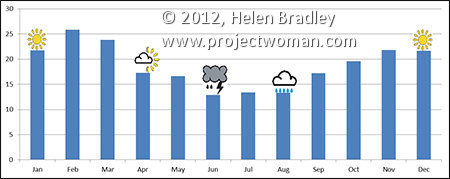
You can save a chart as a picture from inside Excel so you can use it elsewhere such as in a report or on the web.
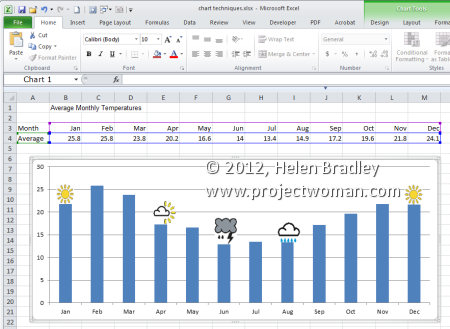
To do this you will use a workaround and the simplest way to do it is to size the chart on the worksheet so it is a good size. Choose File > Save As, select the location to save the file in and from the Save As Type dropdown list choose Web Page (*.htm;*.html), type a name and click Save.
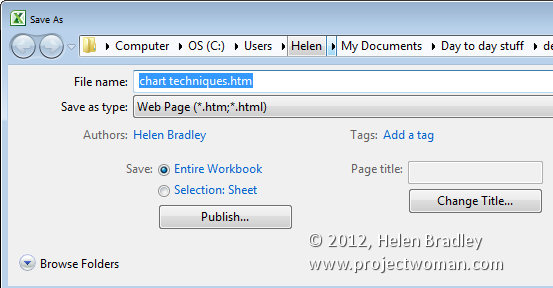
This converts the worksheet to an html file and because html files cannot contain images the chart is saved as a separate png image file and linked to the html file.
You can find your chart in the folder that you saved the html file into. So, if your file was called sales.htm then the images will be in a folder called sales_files. Of course, you’ll also need to save your Excel worksheet if you want to save the data and chart to work on in Excel in future.

Labels: Excel 2010, gif, graph, Helen Bradley, png, save chart as image
Thursday, April 26th, 2012
Harness the power of Business Information sets in Publisher
Publisher’s Business Information Sets make it easy to populate documents with information about people and businesses. You only need type the text once and you’ll know it is always correct wherever it happens to be used.
To use these sets, in Microsoft Publisher use File > Info and select the Edit Business Information. Here you can view the information sets that you have available. While they’re called Home/Family, Other Organization, Primary and Secondary Business, you can make them anything you want them to be.
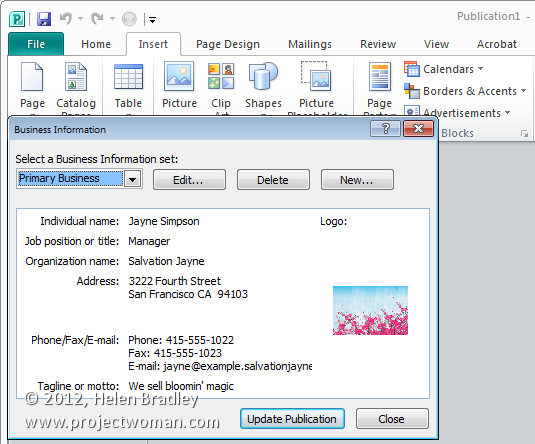
So select an option and click Edit. Enter the information for your business including the person’s name, address and information. Click Add Logo to add a your company logo.
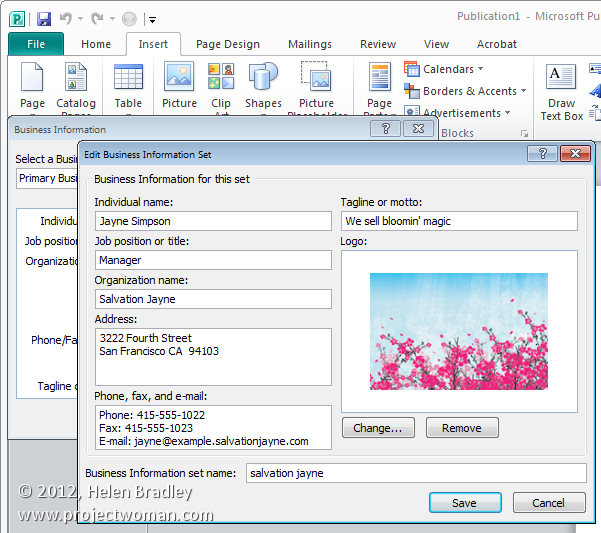
You can also type a new set name in the set name box. By adding to the business information sets details you use frequently, you can use this information in any document later on such as business cards and brochures.
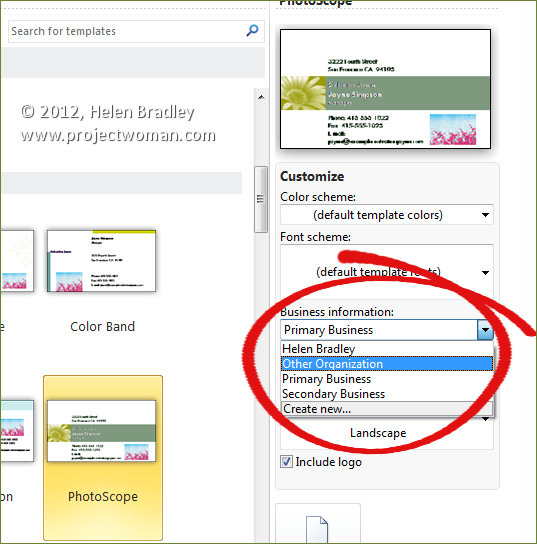
To do this, select the business card template to use and then select the business information set to use with it. You can choose to include your logo or not as circumstances demand. Click Create and the business card will be created for you with all the details already in place.
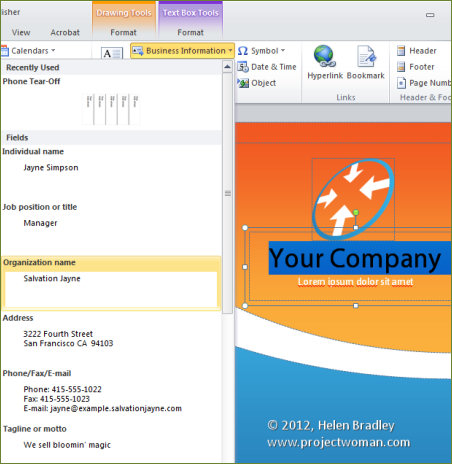
You can also use business information in regular documents by choosing Insert and then from the Business Information dropdown list select the items that you want to use in a document. For example, you can drag and drop telephone information into any document from the business information set.

You can also change the business information in a document. So, if you’ve created a business card and want to do the same thing for another person for whom you have a business information set created, just choose File > Info > Edit Business Information and select the set to use and click Update Publication. This allows you to quickly change information in documents and create flyers for multiple businesses or business cards from multiple people.
Labels: business information, documents, Helen Bradley, how to, populate, publisher, tips
Tuesday, April 24th, 2012
Add Custom Keyboard Shortcuts in Word 2010
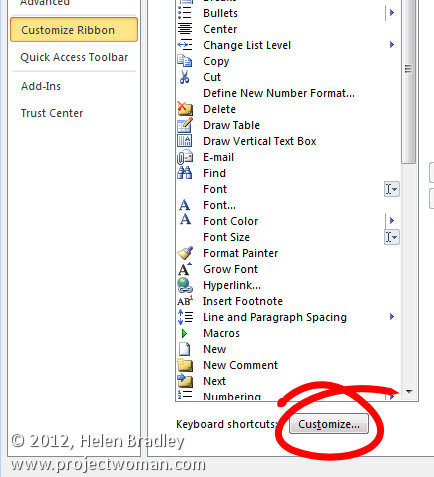
In Word 2010 you can set keyboard shortcuts for ribbon buttons using the program options. Choose File > Options and click Customize Ribbon. Click the Customize button at the foot of the dialog – this is available in Word 2010 but not in Excel 2010 curiously.
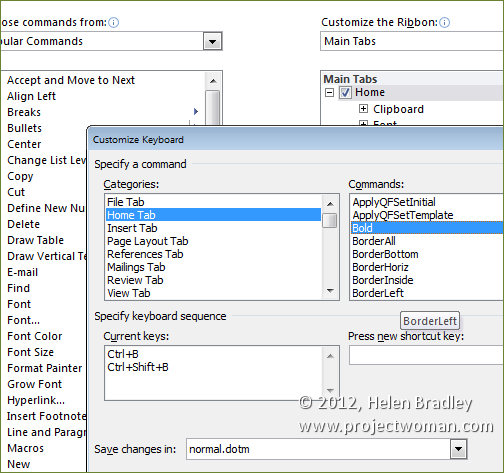
Click the tab that you’re interested in and locate the button on the tab that you want to customize. For example, if you choose the Home tab and click Bold as the command you’ll see that there are already keyboard shortcuts associated with that command.
Many other commands do not have keyboard shortcuts associated with them and if you want to add them you can do so.
For example, there is no keyboard shortcut for the Font Color Picker. Select Home tab and then Font Color Picker and press a new shortcut key. For example the shortcut Alt + Ctrl + Shift + C is not currently assigned.
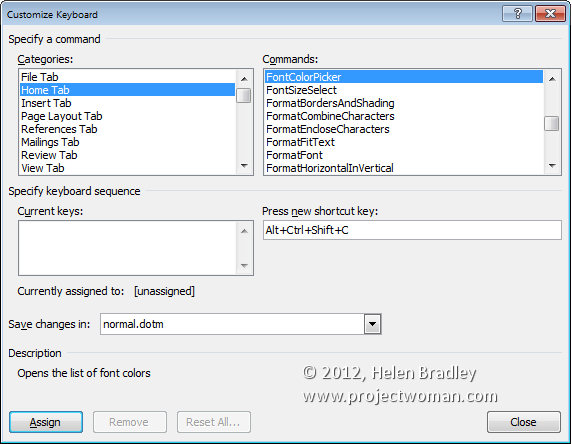
Click in the box and press that keyboard combination. If you want to use that for the Font Color Picker, you can do so by clicking Assign. This assigns this keystroke to the Font Color Picker tool.
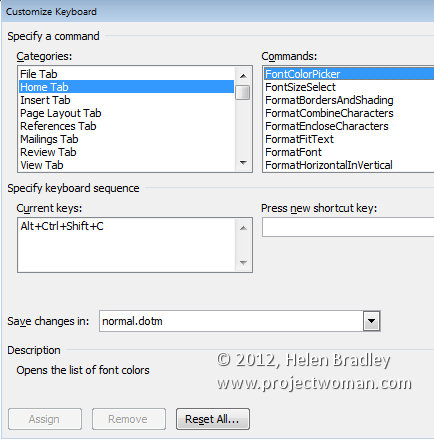
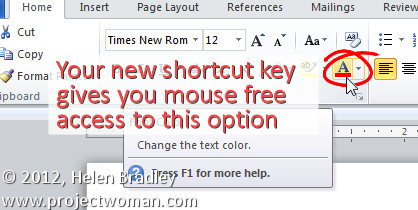
To test this, click Close and then Ok. Now when you select a piece of text you can apply the currently selected font color to it by pressing Ctrl + Alt + Shift + C.

Labels: customise, customize, Excel 2010, Helen Bradley, key shortcuts, keyboard assignments, Keyboard Shortcuts, keystroke short cuts, short cut key, Word 2010
Friday, April 20th, 2012
Must know Windows 8 keystrokes
Windows 8 makes a lot of use of keystrokes – more use than other versions of Windows ever has. Here is a list of handy keystrokes, you won’t use all of them but some are totally awesome for getting around. My fave? This week it is Windows + E! yeah instant access to My Computer – you gotta love it!
Windows key display the Start menu
Windows + tab display the task switching panel
Windows + C reveal Charms
Windows + D switch to the desktop
Windows + M switch to the Desktop
Windows + H Share charm
Windows + I Settings charm
Windows + K Devices charm
Windows + L Lock the screen
Windows + P shows second monitor options
Windows + Z display an app’s application bar
Windows + T Cycle through small images of open apps – press Enter to switch
Windows + Q Open Metro search charm
Alt + Tab Cycle through open apps
Windows + , (comma) Show desktop (temporarily)
Right click an application window reveal the application bar
Windows + PrtSc Capture a picture and save it to the Pictures folder
Windows + Space change input language and keyboard
Windows + R Display the Run dialog
Windows + T Cycle through programs on the taskbar
Windows + F Find other computers on your network
Windows + E Open Windows Explorer and show My Computer
Windows + left arrow Dock a desktop app to the left of the screen
Windows + right arrow Dock a desktop app to the right of the screen
Windows + Shift + Up arrow maximize desktop app’s height (width is unchanged)
Windows + Shift + Down arrow restore/minimize desktop app’s height (width is unchanged)
Windows + 1 (or 2, 3…) Launch or switch to the application at this position on the taskbar
Windows + Shift + 1 (or 2, 3…) Launch a new instance of the application at this position on the taskbar
Windows + + (plus) Magnifier – zoom in
Windows + – (minus) Magnifier – zoom out
Labels: Helen Bradley, help, how to, keystrokes, must know, short cut, shortcut, tips, Windows 8


