Monday, July 5th, 2010
Units of measure in PowerPoint
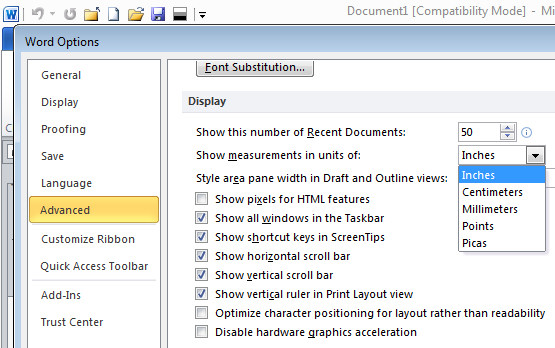
Ok, so its easy to change units of measure in Word by setting the Word Options to measure in inches or cm – depending on where you live. However, if you’re using PowerPoint don’t waste your time looking in PowerPoint for the setting – it ain’t there.
Instead, the measurements in PowerPoint are tied to your geography. If you live in the US you get inches, if you fess up to living else where you get your local units of measure. To change where you live, launch the Control Panel and look for a Regional settings option and set your location there.
For those of us who live in the US but who think imperial measurements suck big time and who yearn for the metrics of our childhood in the far off land of Aus, thanks to Microsoft we are s*** out of luck. You see, if I set my region as Australia or the Uk to get metrics, everything else goes pear shaped and Google starts serving up UK or Australian pages in preference to US ones, or I get £ by default in Excel. It’s all round not a good choice. So, I’ll have to suck it up and learn to embrace feet and inches – but provided you still call the land of your birth home chances are you’ll be just fine.
Labels: PowerPoint 2007, PowerPoint 2010, Units of measure, Word 2007, Word 2010
Thursday, July 1st, 2010
Don’t spell check this – Word 2010
I write a lot of code in Word documents, Excel spreadsheets and in PowerPoint slide shows. I’m not totally unusual in including macros in my files as well as detailing the macro code within the various documents.
However, as you can imagine, Office applications spit the dummy when they see code and everything gets squiggly lines under it. Which makes your documents look horrible when anyone who has Spell Check as you type enabled opens one of these documents.
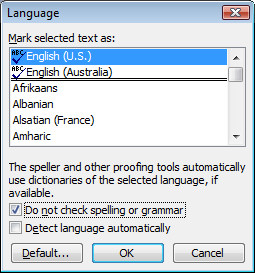
In Word 2003, 2007 & 2010 I can stop proofing by selecting the code, double click on the proofing language in the program Status bar and reselect the language to use and click Do not check spelling or grammar. For some reason if you don’t reselect your language in Word 2007 and 2010 the Do not check spelling or grammar option isn’t applied – go figure. It took me a while to work this one out.
In PowerPoint 2010 and 2007 just choose Do not check spelling and it works fine. In PowerPoint 2003 where I spent this morning, there’s actually a language entry for No Proofing.. so select that and your text won’t be spell checked.
Labels: no proofing, PowerPoint, spell check, Word
Sunday, June 20th, 2010
Word 2010 – print the current page
If you’re used to using Word you might remember that, when you want to print just the current page you need to click in the page and then choose to print it. The current page isn’t the one you are looking at – necessarily – it is the one where the insertion point is located.
Fast forward to Word 2010 – all of a sudden – all bets are off. When you click File to move to the backstage view and click Print you see the print preview to your right. Whatever page shows there is the page that will be printed if you choose to print the current page. If that’s not the page you want to print, use the navigation tools to move to the page to print and then click Print.
It’s smarter and it really is how it should work. It won’t cause problems for new users because they don’t know how Word used to work, it’s us old users who need to rethink the logic here. Lucky for us though the page where the insertion point was located is the page that shows in Print preview by default.
Labels: print current page, print preview, Word 2010
Wednesday, June 16th, 2010
Problems with Excel formulas?
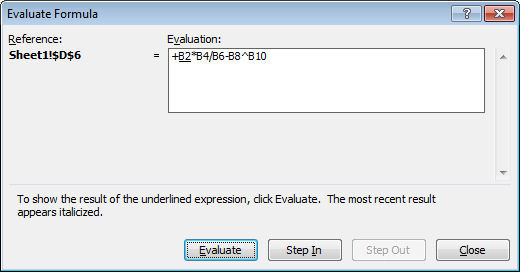 If you are having difficulty understanding how a formula is calculating in Excel – perhaps because it appears to give you the wrong results – you can step through it to see how it is working.
To do this, select the cell containing the formula and choose Tools > Formula Auditing > Evaluate Formula – in Excel 2007 find the Evaluate Formula option on the Formulas tab.
Click Evaluate and each time you do this, a portion of the formula will be evaluated and you can see it at work.
Use the Step In and Step Out options to see the actual values in place of any appropriate cell references.
This step by step processing should show you what is happening in your formula allowing you to troubleshoot any difficulties with it.
Labels: Excel 2003, Excel 2007, Excel 2010, Excel formulas, formula auditing, troubleshoot
Saturday, June 12th, 2010
Create your own Excel startup page
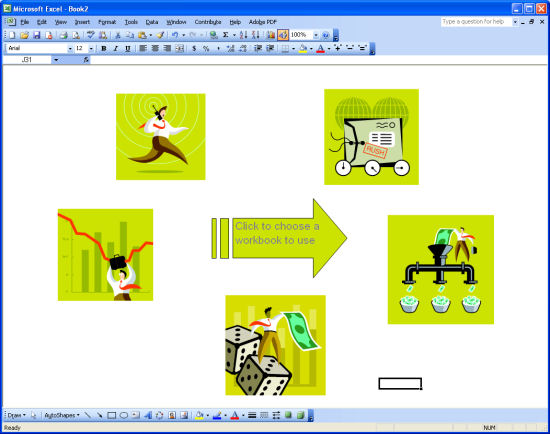
Here’s how to create a cool startup page for Excel – it has links to all your favorite workbooks so you can click on any of them to immediately open that file.
Step 1
To a new workbook, add one picture for every workbook you want to link to your startup page by choosing Insert > Picture > ClipArt. Size and arrange the images neatly. Choose Tools > Options > View tab and disable Gridlines, Row & Column Headers, Horizontal Scroll bar, Vertical Scroll bar, and Sheet Tabs.
Step 2
Right click one image, choose Hyperlink and link to a workbook you work with regularly. Type a description of the workbook in the Screentip dialog. Link each image to a workbook. Protect the worksheet by choosing Tools > Protection > Protect Sheet and click Ok.
Step 3
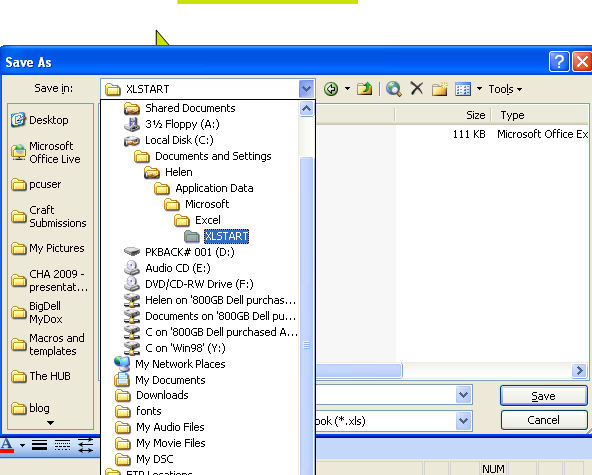
Choose File > Save As > and select your XLSTART folder which is likely to be: C:\Documents and Settings\<username> \Application Data\Microsoft\Excel\XLStart. Name your file menu.xls, close it, exit and restart Excel. The menu workbook will appear every time you launch Excel – giving you one-click access to your favourite workbooks.
Labels: default workbook, Excel, splash page, xlstart
Thursday, May 20th, 2010
Word 2010 opens in compatibility mode
New version of Word 2010 – same old WordArt. Yep, if you’ve previously altered your Normal.dotm file for Word 2007, chances are it is affecting your brand new 2010 version and all you can see is documents created in Compatibility mode.
To solve the problem search for Normal.dotm and either delete it or rename it. Then restart Word 2010 – nice huh? No more compatibility mode and all the cool features of word are available to you.
Labels: compatibility mode, Normal.dotm, Word 2010
Monday, March 29th, 2010
Flash movies and Windows 7
 Today I had a particularly annoying half hour. It was a simple enough scenario, I wanted to play a Flash videos on my 64 Bit Windows 7 computer. Internet Explorer – Nada! Firefox – Nada! My Conclusion – this is not good…
For reasons better known to the folks at Adobe, the company has not yet updated its Flash player to support 64-bit browsers on 64-bit operating systems. The key to the problem is the combination operating system and browser you’re using.
A 64-bit browser on a 64-bit operating system won’t play Flash movies, but a 32-bit browser running on a 64-bit operating system will – with some tweaking.
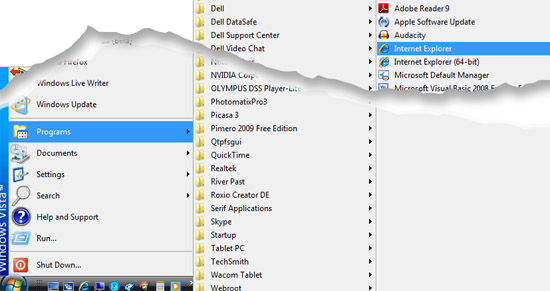
So what do you do? The solution with a Windows 7 machine is deceptively simple. Select the Start button, choose Programs and then look for Internet Explorer. You will find there are two versions of Internet Explorer installed: Internet Explorer and Internet Explorer (64-Bit). Internet Explorer is the 32-bit browser so, if you run that and not the 64 bit version you’re half way to the solution.
What I’ve done is to replace the link to the Internet Explorer (64-Bit) browser on my system everywhere it appears such as in the Start menu and the Quick Launch Bar with the 32-bit version. I can live without the ‘benefits’ of a 64-bit browser if I can view Flash movies the way I expect them to play.
If you find the movies do not play or stop part way through, as I did, right click the movie and see which version of Flash Player you’re using. If it is version 10 then uninstall it (using Control Panel > Programs), and go find version 9 and install it in its place. You can download version 9 from here: http://kb2.adobe.com/cps/142/tn_14266.html – this is a source of archived older Flash Players.
So, if anyone from Adobe is listening, please can you get us a 64-bit Flash Player? While there is one available at labs.adobe.com for Linux there is nothing yet available for 64-bit browsers running on 64-bit operating systems for Windows or Mac. Given that so many people are switching to 64-bit operating systems, if only because it allows you to address great wads of memory, it really is time that the big name companies came to the party and provided basic tools compatible with these systems.
Labels: 32 bit browser, 64 bit browser, Flash movies, Internet Explorer, Windows 7
Monday, March 1st, 2010
How to install fonts in Windows 7
Ok. It should be dead easy to install fonts into Windows if you have been doing it since Windows 3.1. Until Windows 7 you went to the Control Panel, chose Fonts then installed them using the handy dandy dialog. Ok. Not so simple but it worked and it has done so for years.
Fast forward to Windows 7. No Font dialog as I remember it and no font install option. Ok, step backward, think, investigate, light bulb moment encountered.
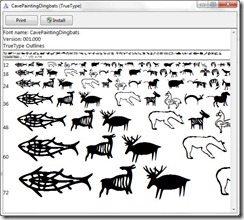
In Windows 7 there are multiple ways to install fonts but seriously only one I’d bother using. Open the folder containing the font file, unzip it to see the TTF file if it is zipped then double click the font’s ttf file name. A dialog opens showing you what the font looks like and, at the top, you will find an Install button. Click it and seconds later the font is installed. Really? It’s how it always should have been done.
You can drag and drop the .ttf file into the fonts list via the Control Panel but seriously – why bother going to the effort. You can also right click on a font’s .ttf file and choose Install from the menu too but I like to check the font before installing so it is method #1 for me.
Labels: Control Panel, font, install, windows, Windows 7
Friday, February 26th, 2010
Windows Vista – Missing Mail icon
Things have moved in Windows Vista 64 bit and sometimes it’s hard to find things you know should be there.
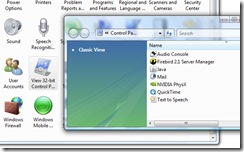
One item that is hard to find is the Mail icon that you need to use to add profiles for Outlook, for example. You’ll find it in the Control Panel but not alongside all the other icons. Instead, click the View 32-bit Control Panel Items View 32-bit Control Panel Items group. There you will find Mail alongside other options like Java, QuickTime and some others.
Labels: missing features, Vista
Thursday, February 18th, 2010
Word 2007 – Picture styles
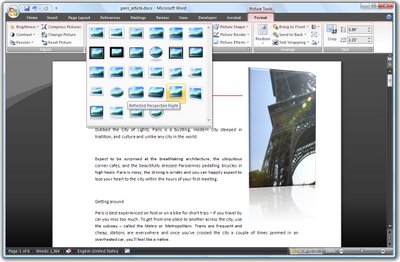 Word 2007 comes with a range of styles you can use when inserting images into your document.
To see them at work, insert a picture into your document, click the image and choose Picture Tools > Format on the Ribbon.
The Picture Styles are formats you can apply to your image and they include some very attractive looking options.
Once you’ve selected a picture style you can adjust things like the Effects which are attached to it.
For example, you can create a picture reflection by selecting the picture and then choose the Picture Effects > Reflection option to create a reflected edge.
You can also recolor the picture border if desired by using the Picture Border option. If you have a picture inserted in a document and formatted the way you like it but determine that you don’t like the picture and want to replace it, choose Picture Tools > Format and click the Change Picture option and choose an alternate picture to use. The format will remain and only the picture itself will change.
Labels: edge, format picture, picture styles, reflection, Word 2007
Thursday, February 11th, 2010
Word 2007 Quick Tables
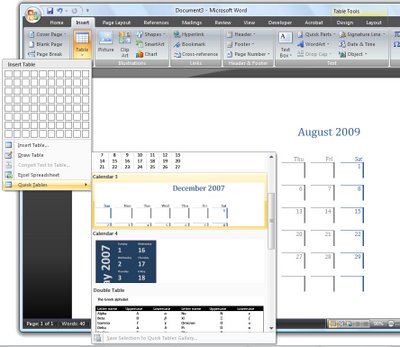 New to Word 2007 is the Quick Tables feature.
To see what is available, click the Insert tab, choose Table > Quick Tables and choose from a range of preconfigured tables such as calendars and tables with sub headings and other features.
Once the table is inserted into the document, you can replace the text in it with your own text such as the dates for your desired calendar month.
Most of the elements that you’re used to selecting from the Tables menu in previous versions of Word can be found on the Tables Tools > Layout tab and these include the ability to repeat header rows at the top of the table and options for adjusting the text direction and inserting and deleting rows.
Once you have a table formatted in the way you want it to look you can add that particular format to the Quick Tables Gallery so you can use it anytime.
To do this, click inside the table and choose Table Tools > Layout tab. Click Select > Select Table so the entire table is selected. Now, from the Ribbon, choose Insert > Table and click on the Quick Tables option.
Choose Save Selection to Quick Tables Gallery and the Create New Building Block dialog will appear. Complete it as you would for a regular Building block element with the exception that this time, leave the Gallery option set to Tables so the table will appears in the Quick Tables Gallery.
Click Ok when you’re done. In future, your custom designed table will be selectable from the Quick Tables Gallery.
Tuesday, February 9th, 2010
Controlling Images in Word 2010
For many years now Microsoft has made it hard for new users to control inserted images in their documents.
Unfortunately, Word 2010 is no exception and, by default, images are inserted into a new Word document as inline images. This means that they cannot be moved or easily positioned on the page without you needing to first change the image’s wrap settings.
This leaves hapless new users with absolutely no clue that this feature is available or needed much less where to find and set it.
To change the way that images are inserted into Microsoft Word documents to make it a one-step process that never needs to be tweaked, in Word 2010 choose File > Options and select the Advanced tab. Locate the Cut, Copy and Paste options and set the Insert/Paste Pictures As setting to Square, Tight, Behind Text, In Front Of Text, Through or Top And Bottom – in fact anything other than the default Inline With Text.
Once you’ve done this, when you insert an image into a document it will be inserted with the setting that you determined. This makes it easy to move the image around the screen and position it exactly where you want it to be.
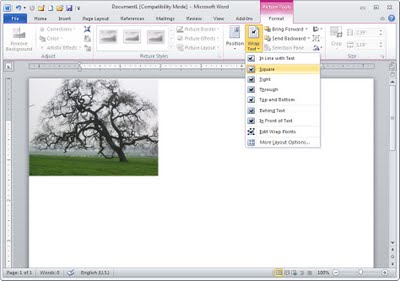
If you have images in your document and if you need to change their wrapping so that you can work with them, click the image, click Picture Tools > Format and from the Wrap Text dropdown list, select Square or another setting (other than Inline with Text).
Microsoft, this default setting earns you a score of -10 it’s not the typically required setting and it doesn’t make good sense as a default.
Thursday, February 4th, 2010
Tables in Word 2007
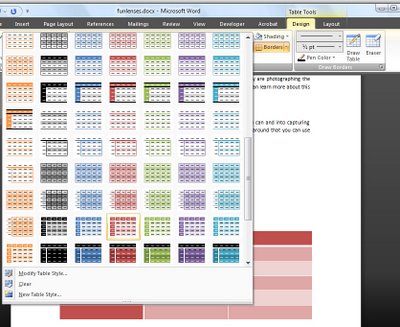 The table options in Word 2007 allow you to create quite sophisticated tables more easily than you’ve been able to in the past.
Click the Insert tab and click the Table button and drag over the number of cells you want for your table.
With the table selected, choose Table Tools > Design tab and choose a Table Style from the dropdown list.
Many of the styles are linked to theme colors so you can create a table with an attractive style which like other Word objects changes color to match the theme when it changes.
When you have a table style selected you can configure other options for it by, for example, selecting the Banded Rows checkbox in the Table Style Options group and adjusting the look of the first and last columns and header row using the checkboxes.
Labels: format, table style, table tools, Tables, Word 2007


