Friday, September 23rd, 2011

Photoshop: Applying fixes using masks

Sometimes a photo needs two opposing fixes applied to different areas of the image. This poses a dilemma – if you fix one area you’ll make the other areas far worse than they started out being and vice versa. The solution is to apply both fixes but to do this on different layers and to blend the results together using a mask. Here’s how to do it:

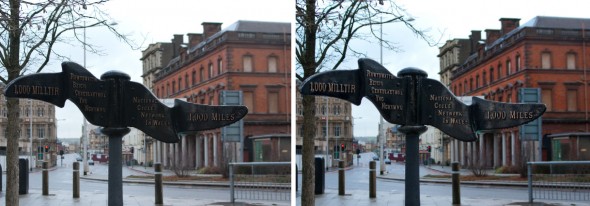
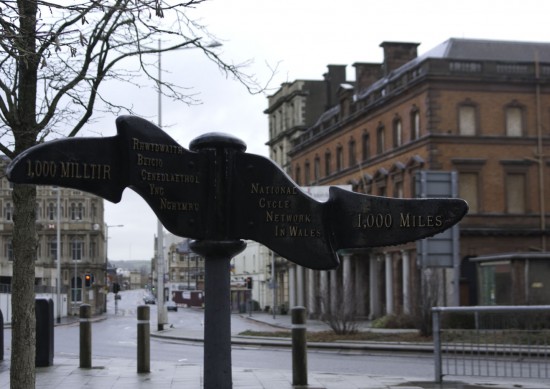
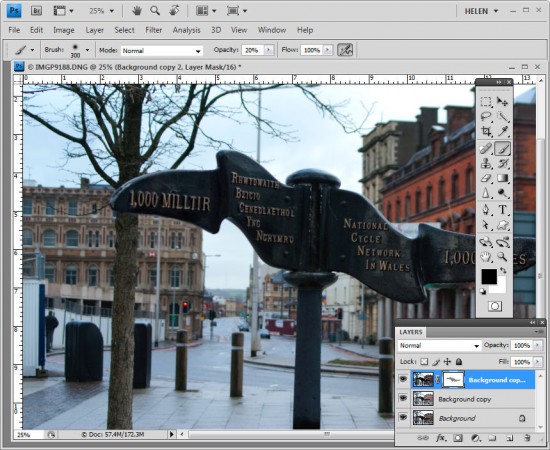
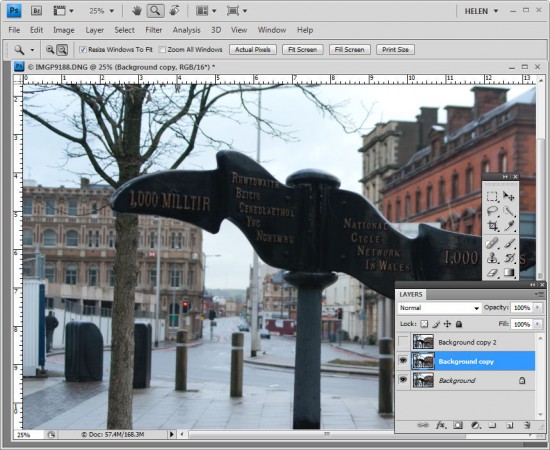
Look at this photo – the sign in the middle is dark and hard to read and the area behind it is lighter than it should or could be. The camera has exposed primarily for the lighter areas in the image but the entire image needs work.

Step 1

Make multiple duplicate layers

To fix the image make two copies of the background layer so that you do your work on duplicate layers. To do this, right click the Background layer in the Layers palette and choose Duplicate Layer and then repeat this step a second time. Disable the visibility icon on the topmost layer and select the middle layer.
Step 2

Using Shadow/Highlights to lighten the darks

To bring detail out of the darker area in the sign, I’ll use the Shadow/Highlights tool. To do this choose Image > Adjustments > Shadows/Highlights and adjust the Shadows but leave the highlights settings untouched. Typically the default setting will be all you need but you can fine tune the settings using the sliders which appear when you click Show More Options if desired. Ignore the impact that this fix has on the lighter areas of the image.
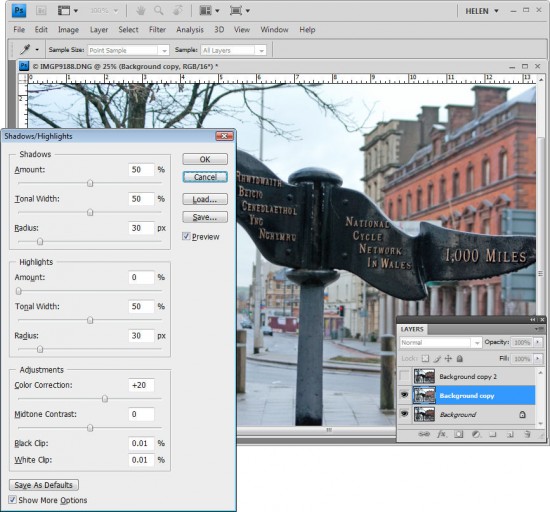
If you prefer to use another tool for this fix, do so. The important thing is to fix the shadows and ignore any changes to the highlights.

Step 3

Levels to fix the highlights

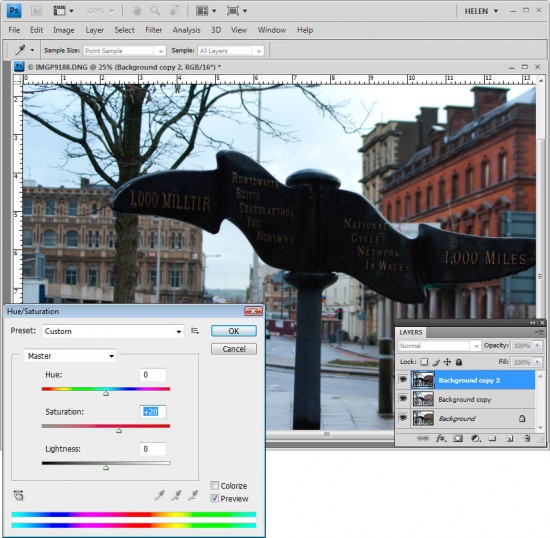
Enable the visibility icon on the top layer and select the top layer – this hides all the changes you have made so far. Choose Image > Adjustment > Levels and adjust the levels to improve the contrast in the lighter areas of the image – this time ignore the darker areas entirely as they are not part of this fix. You can also adjust the saturation using Image > Adjustments > Hue/Saturation if desired.

Again, if you prefer to use another tool, do so. The important thing is to fix the highlights and ignore any changes to the shadows.

Step 4

Blending the results with a mask

The top layer contains the adjustment for the lighter areas of the image and the middle layer contains the adjustment for the dark areas of the image. To blend these layers, I’ll use a layer mask to selectively adjust the opacity of the top layer so I can see the fix applied on the middle layer through it.

Unlike the layer opacity slider which sets every pixel to the same opacity value, a mask lets you adjust the opacity selectively so one area can be 100% opaque and others can be partially or fully transparent.

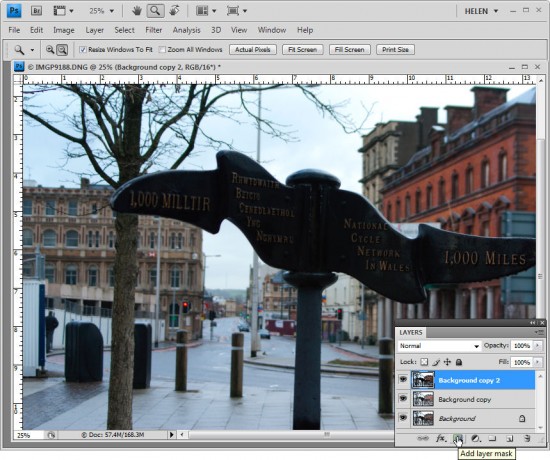
To add a mask to the top layer, first select the topmost layer and click the Add Layer Mask button at the foot of the layer palette. This adds a white layer mask to this layer. When working with masks, “black conceals and white reveals” so the white mask reveals everything on the top layer and the image is unchanged.

Step 5
Set the foreground color to black, select a soft round brush and set its Opacity to approximately 20%. Click on the mask to select it – it will have a small border around it showing that you have it selected. Now paint over the darkest areas of the image to reduce the opacity of the top layer where you are painting – this reveals the fix from the layer below. Using a low opacity brush lets you reduce the opacity gradually to build up the effect.

Continue and paint over the darker areas of the image to reveal more of the layer below through the mask. It can help to see how much more detail you can still recover if you turn the visibility of the top layer on and off. Make sure to select the layer mask again before painting on the mask – if you don’t do this, you’ll paint on your image.

If you go too far, make white your foreground color and paint on the mask to bring back parts of the top layer of the image. This is one of the benefits of using a mask – simply by painting you can apply or remove the fix. You wouldn’t have this flexibility if you used the Eraser tool on the top layer, for example.

To finish, I rotated the image to straighten the sign and cropped it to remove the distracting elements on the left side of the image.

Helen Bradley

Thursday, September 22nd, 2011

Warn of tracked changes in Word 2010

Microsoft Word 2010 has some great security settings but I am continually disappointed that Microsoft hides them away so they are so difficult to find.

One of these settings is crucial to enable so you don’t accidentally send a document out to a client with, for example, a comment in it saying what a idiot your client is. The revelation that you think they are an idiot might be news to them – and you’re not going to look too smart yourself.

The culprit is tracked changes. It is all to easy to have Tracked Changes enabled but to have your document show only the final version of the text. Behind the scenes every insertion and deletion is being stored in the document even if you aren’t seeing it. However the information will be accessible to anyone viewing that document – not a smart idea!

If you don’t think this is a big deal you might be interested to know that lots of smart people have been caught out by it, including Microsoft itself. This blog post showcases stories of businesses and government caught out by tracked changes.

To stop this happening to you, you can do a few things but I like the method that you set once and, from there on, Word will do the work for you. This involves having Word tell you if a document you are about to print or save has tracked changes in it. Ignore the warning at your own risk!

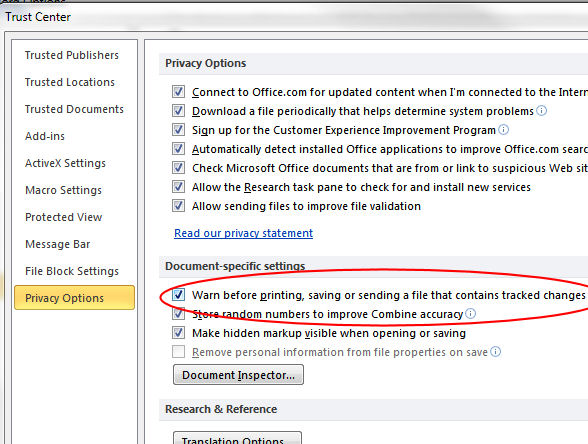
To configure this, choose File > Options > Trust Center and click Trust Center Settings then Privacy Options. Enable the “Warn before printing, saving or sending a file that contains tracked changes or comments” checkbox.

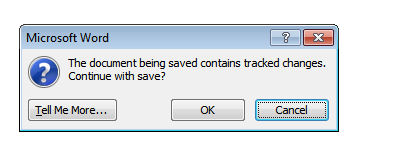
Now, in future, Word will show a warning if a document contains tracked changes even if they are hidden from sight.

It should be on by default and it should be easier to find… but there it is… and don’t say I didn’t warn you about it.

Helen Bradley

Tuesday, September 20th, 2011

Edit Excel files on the go

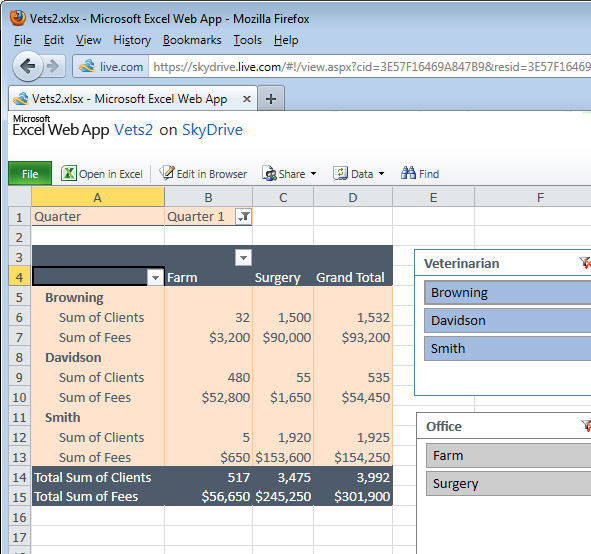
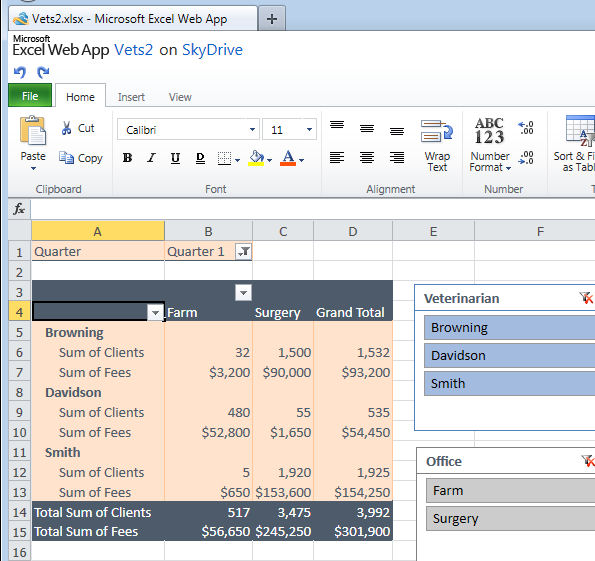
If you have access to a PC and an internet connection then your options for working with an Excel spreadsheet away from your desk are good – thanks to the Microsoft Office WebApps. Even though many of the advanced Excel tools you are used to using offline won’t be accessible online they won’t be destroyed by opening a file in the Excel WebApp either. You can view charts and filtered table data and features such as the new Slicers in an Excel 2010 PivotTable can be used to work with the data.

Of all the cloud based apps, including Google Docs, the Microsoft WebApps are your best option for working with Excel spreadsheets in the cloud when you are away from your desk and the apps are free.

You can sign up for a free SkyDrive account at skydrive.live.com and that’s where you get access to the WebApps which include Excel, Word, PowerPoint and OneNote. I selected to upload this file then view it in the Excel viewer. To work on it beyond selecting options in the Slicers I can click Edit in Browser to open the file in the free cut down version of Excel online.

One benefit to using SkyDrive is that you can upload files from your local computer to SkyDrive where they are stored for you. You can work on the files online and later download them to your computer when you want to work on them there.

Helen Bradley

Tuesday, September 20th, 2011

Stacking images in Lightroom

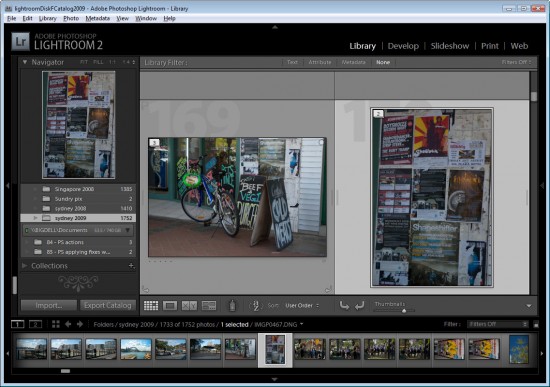
When you have a lot of similar images from a shoot, you can organizing them using the Lightroom Stacks feature. This allows you to stack images together so that only one image representing the stack appears in the Grid, Filmstrip and Loupe. This can clean up the screen reducing the number of images you see.

Get started with Stacks in Lightroom
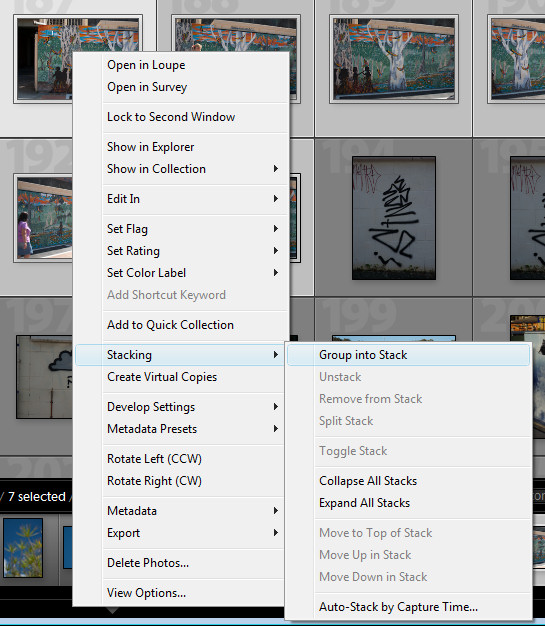
To stack images, in the Library module, select the images to stack, right click and choose Stacking > Group Into Stack. This stacks the images on top of each other.

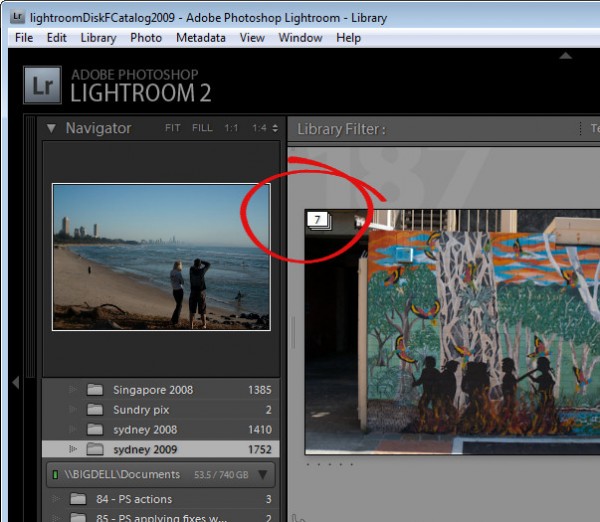
In Grid view you will see a small number in the top corner of the image at the top of the stack showing the number of images in the stack.

You can add an image to a stack by dragging and dropping it on top of a stack.

Expand a Stack
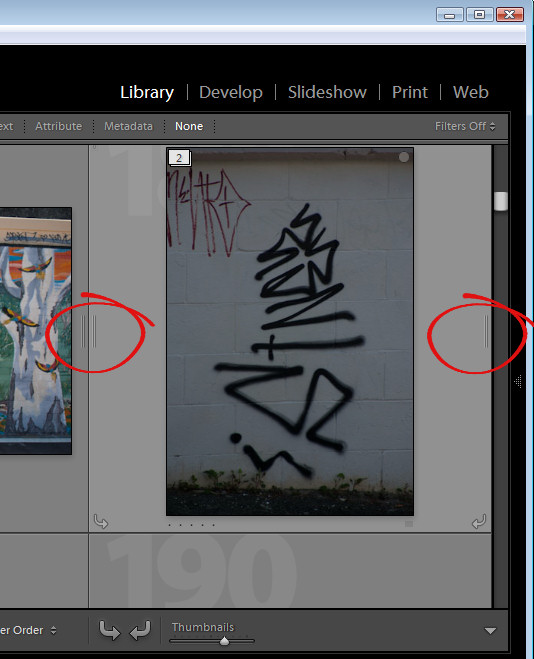
To expand a stack, right click on the number showing the number of images in the stack and choose Expand Stack from the Stacking shortcut menu or click the double line marker either side of the stack. Click the double line marker again to collapse the stack or right click an image in the stack and choose Stacking > Collapse Stack.

When you expand a stack, the images from the stack have a darker color underneath them indicating that this is an expanded stack.

There is some important terminology to know about stacks. You collapse and expand a stack to view or hide the images in the stack. If you unstack a stack you permanently remove the stack – you do not remove the images just the stack. There is no restack command so, when you unstack a stack, your only option for getting it back is to reselect the images and stack them again. You also cannot create a stack in a collection – you may only stack images in a folder.

Change the visible image
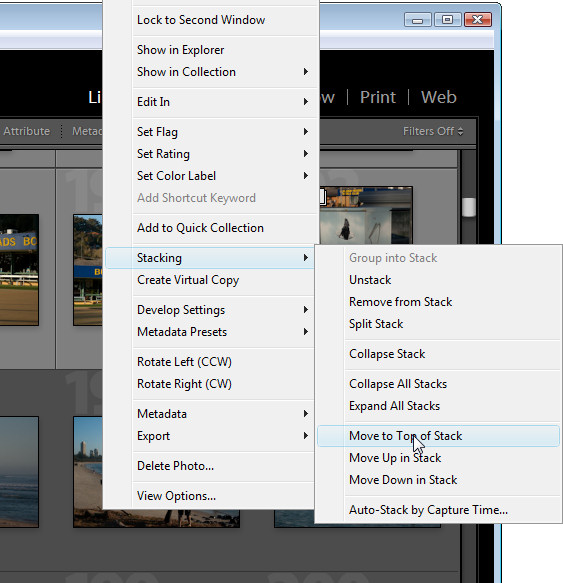
To change the image at the top of the stack, expand the stack, click the image to use as the top image and choose Stacking > Move to Top of Stack. The topmost image is the one that is visible when you collapse the stack again.

Remove an image from a Stack
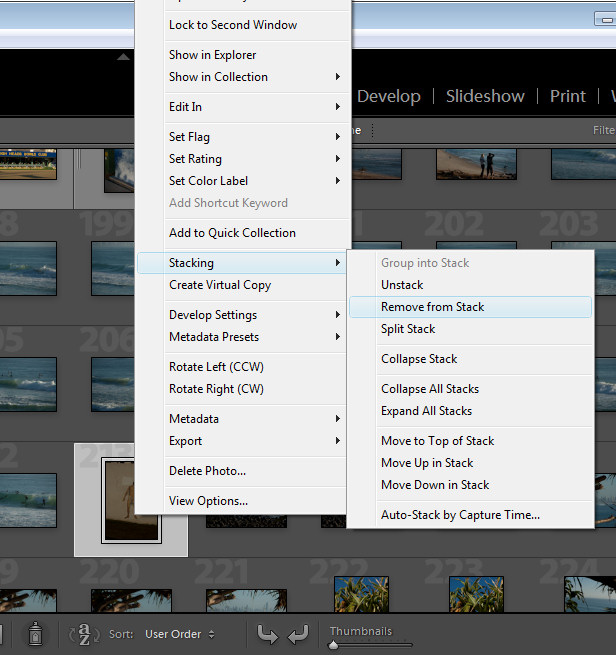
You can remove an image from a stack by expanding the stack, right click the image to remove and choose Stacking > Remove from Stack.

Stack for HDR
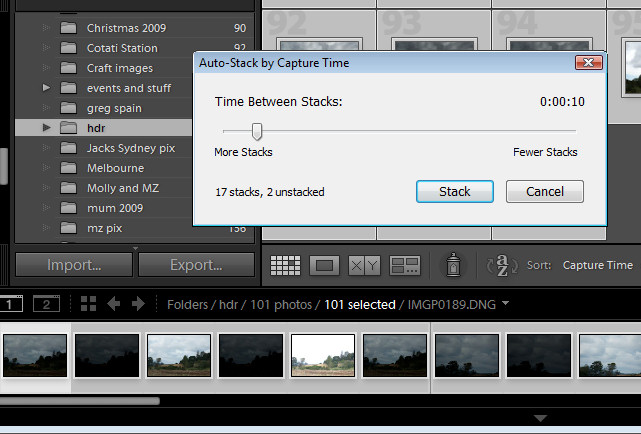
There is another stacking option you can use, for example, where you have captured a series of images to use for a panorama or where you have captured a series of bracketed exposures for HDR processing. Because these images will have been captured within a short period of time, you can stack them based on capture time. To do this, select all the images, right click and choose Stacking > Auto-Stack by Capture Time. Set the time between stacks value – as you do you will see an indicator telling you how many stacks this will give you and how many images will remain unstacked. Use this as a guide to the optimal value to use. Click Stack to have Lightroom create your stacks for you.

Once this is done, right click and choose Stacking > Collapse Stacks to view the stacks that you have made. This is a quick way to group images that are most likely to be part of the same sequence of images and if one or more stacks aren’t correctly formed, you can either unstuck them or split a stack in two by right clicking the image at the point that the split should be made and choose Stacking > Split Stack.

Stacks are a useful way to restore order to a large folder of images containing a lot of similar images. By stacking images you’re not altering the images in any way, simply organizing them a little more neatly.

Helen Bradley

Thursday, September 15th, 2011

Color correction in Lightroom

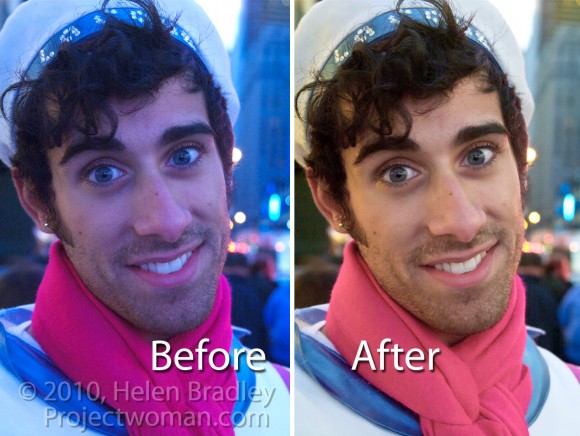
Lightroom has tools for correcting color not just across the entire image but also for correcting individual colors.

This image was captured in New York’s Time Square where the light is unpredictable at best especially at night because of the bright advertisements and neon signs. Because the colors of the lights change constantly it’s impossible to correct the color in camera using its white balance adjustment. Instead this has to be handled in post production.

Step 1
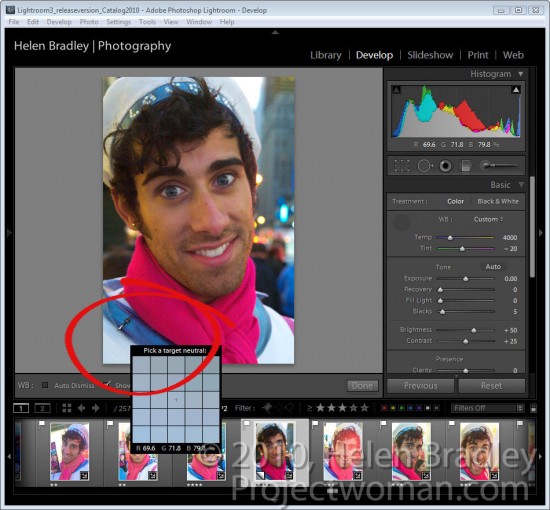
To start off color correcting an image in Lightroom’s Develop module, open the Basic panel and click the White Balance Selector which is the eyedropper in the top left corner of the panel.

Deselect the Auto Dismiss checkbox on the toolbar so the tool remains visible. Click on the image in a place that should be neutral gray to adjust it. If you don’t get the right correction the first time, click again on a different area of the image until you get an adjustment that looks correct to you. What you’re looking to do at this point is to remove the overall colorcast in the image.

Notice as you hold the White Balance Selector over the image that the Loupe shows a gird of pixels around the area you have the mouse held over and it also shows the relative percentages of red, green and blue in the pixels over which the mouse is hovering. Where the color in an image should be neutral grey, these values should be the same and if they are not, there is a color cast.

When you have a result you like, either return the White Balance Selector to its position in the Basic panel or press Escape.

Step 2
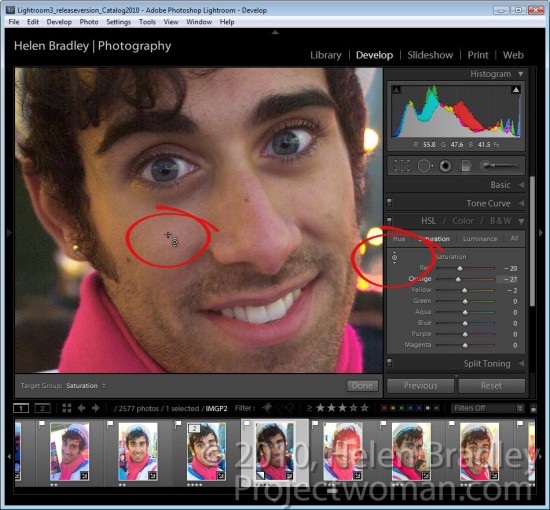
If some individual colors are still incorrect you can adjust these using the HSL panel. To do this, select HSL and then Saturation and use the Targeted Adjustment Tool to drag on an area of the image downwards to decrease or upwards to increase the color saturation at that point in the image. In this case, the skin needed to be desaturated because of the color of the light reflected on it.

Step 3
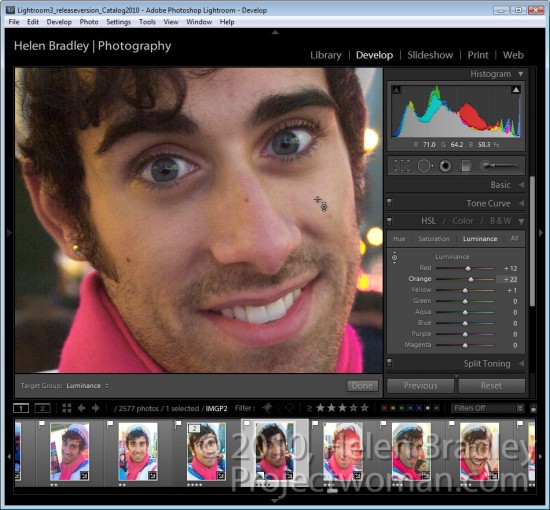
When you have adjusted Saturation, click Luminance and, if necessary use the same Targeted Adjustment tool to increase or decrease the Luminance in areas that are too dark or too light.

For this image I decreased the Saturation and increased the Luminance of the skin tones until I had a result I liked.

Once you’ve fixed the color problems, you can return to the Basic panel and continue to adjust the image using the tools there.

While sites like Times Square will never be an ideal place to capture images you can compensate at some level for poor color using the tools you have at hand in Lightroom.

Helen Bradley

Monday, September 12th, 2011

Targeted adjustments in Lightroom

Many of the features in the Lightroom 3 Develop module have targeted adjustment tools available to help you make the adjustment. Here’s where to find and how to use these on image adjustment tools.

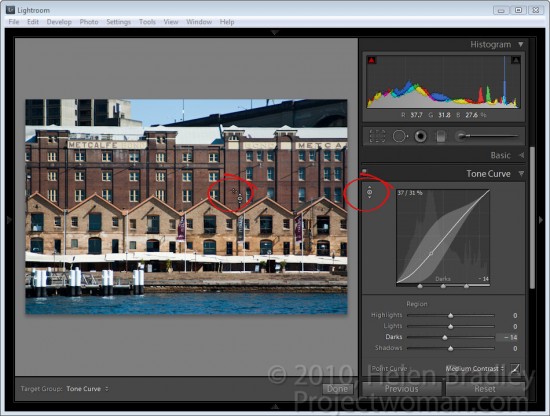
Tone curve
When you select the Tone Curve panel you can adjust an area of the image by clicking the targeted adjustment tool and then drag on the area of the image that you want to lighten or darken.

Click and drag up to lighten and click and drag down to darken.

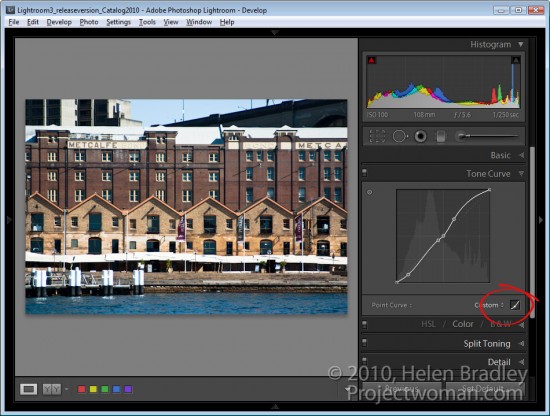
If you click the Point Curve icon at the bottom of the dialog, you will change the look of the Tone Curve panel and the sliders will disappear. Now if you drag on the image using the targeted adjustment tool you will create control points on the curve. You can adjust these control points by dragging on them.

Control points are not added if you do not have the Point Curve icon enabled. So if you’re seeing the sliders, you’re not in this point curve editing mode.

To delete a control point, double click on it or right click it and choose Delete Control Point.

When you are working on the point curve in the tone curve panel, you can decrease the mouse sensitivity by holding the Alt or Option key as you drag on the image. This decreases the sensitivity so you will make smaller changes in the curve with even quite significant movements of the mouse.

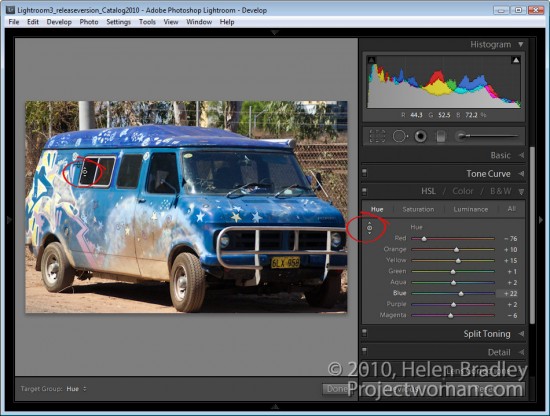
HSL Adjustments
There is also a targeted adjustment tool in the HSL adjustment panel.

Here you can select Hue, Saturation or Luminance and then select the targeted adjustment tool and drag on the area of the image that you want to change. If you’re working in Hue, you’ll be applying a color shift to the selected area of the image. If you’re working in Saturation, you’ll be adjusting the saturation of the color under the mouse pointer as you drag on the targeted adjustment tool. Drag up to increase saturation and down to decrease it.

If you’re working in Luminance dragging up will lighten the color under the cursor and dragging down will darken it.

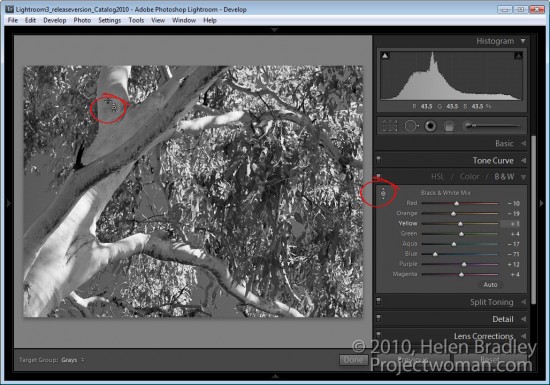
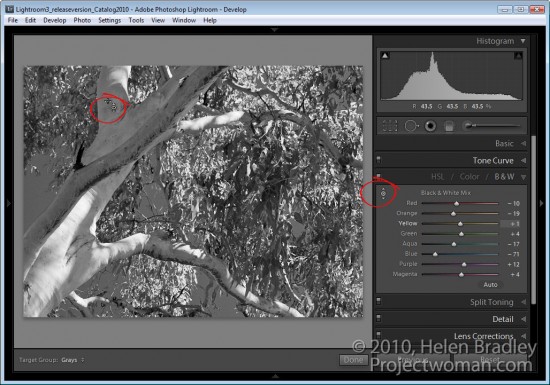
B&W Adjustments
In the B&W or black and white adjustment area there’s also a targeted adjustment tool. In this case, when you drag up or down on a selected area of the image, you’ll lighten or darken that area so you can craft your own greyscale image.

Unlike in other versions of Lightroom, when you exit a panel while you have the targeted adjustment tool enabled it will be automatically disabled and you don’t have to remember to turn it off.

Helen Bradley

Monday, August 8th, 2011

Port Isaac Cornwall – home of Doc Martin

In spite of some minor hiccups in getting here, I am now in Port Isaac, Cornwall. I’ve walked for miles up hill and down and here are the shots from the first day – click here or click the photo:

Helen Bradley

Monday, August 8th, 2011

Amsterdam – Day 1

Here is a slideshow of images from Day 1 in Amsterdam – click the image or click here to view it:

Helen Bradley

Tuesday, July 12th, 2011

Structuring a Photoshop workflow with Configurator

In a previous post, I explained how to create panels for Photoshop using Configurator. This time I want to show you a way to structure panels as something more than just a place to put the tools you use most often.

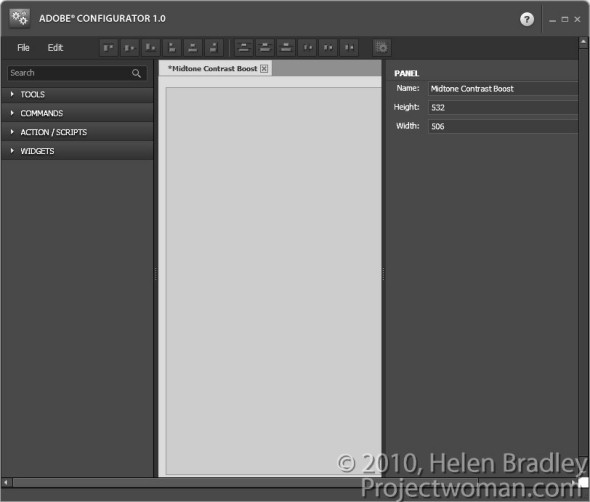
To follow along, you’ll need to download Adobe Configurator 1.0 if you’re using Photoshop CS4 or Adobe Configurator 2.0 if you’re using CS5. You can find both programs for downloading at http://labs.adobe.com/technologies/configurator/. Panels created using Configurator 1.0 only work in Photoshop CS4 so, if you’re using CS5, you must download the new Configurator 2.0.  To get started, launch Configurator and choose File > New Panel to create a new panel.

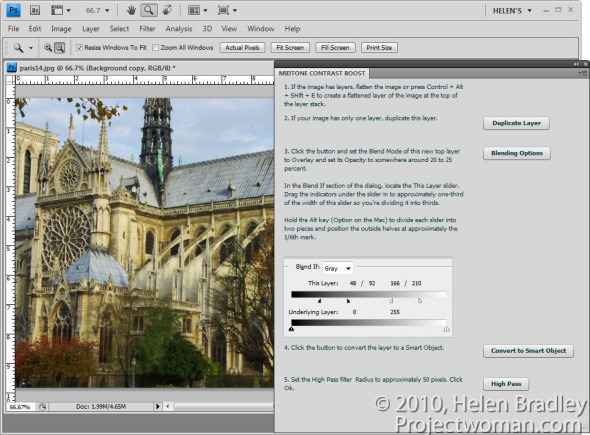
The panel I’ll show you how to create will step you through the process of enhancing midtone contrast in Photoshop that I discussed in a previous blog post. It will contain not only buttons that you press but also text that explains the workflow.  You can get the instructions for your panel from the steps in that post.

1          Set the panel title to read Midtone Contrast Boost and size the panel so it is quite large.

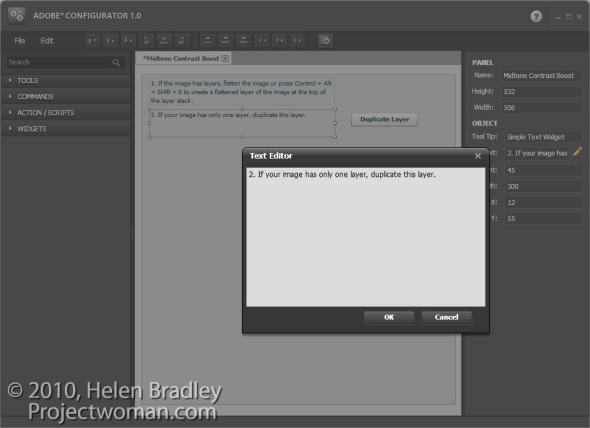
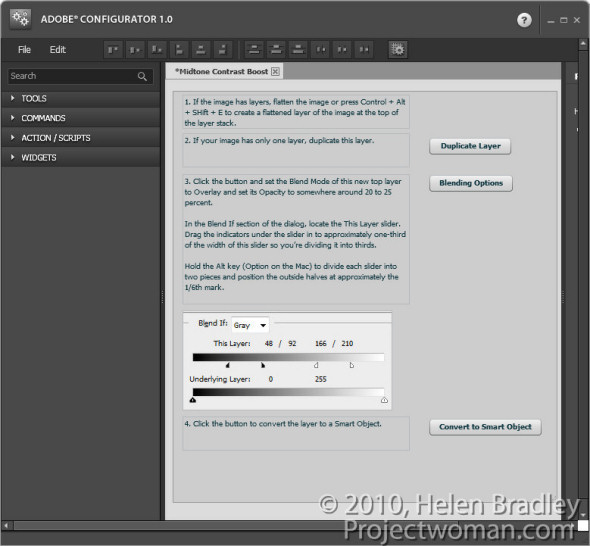
2 The first step in the midtone contrast workflow is to ensure that you have a flattened image or and, if not, you should flatten it. Open the Widgets area in Configurator and double click Simple Text to add a textbox to the panel.

Type number 1 and then the instructions for the first step into the text box.

Add a Simple Text box for the instructions for the second step. If you need to duplicate the background layer then this can be done using a button so add one to the panel by choosing Commands > Layer > New > Duplicate Layer/Group and drag the button onto the panel. Rename this button by typing a new entry in its caption property.

3 Add the instructions for the third step which are to adjust the opacity, blend mode and  blending options for the layer. This can all be done with one command so you can add a button to launch the Layer Style dialog at the Blending Options area. To find this button choose Layer > Layer Style > Blending Options and drag the button into position.

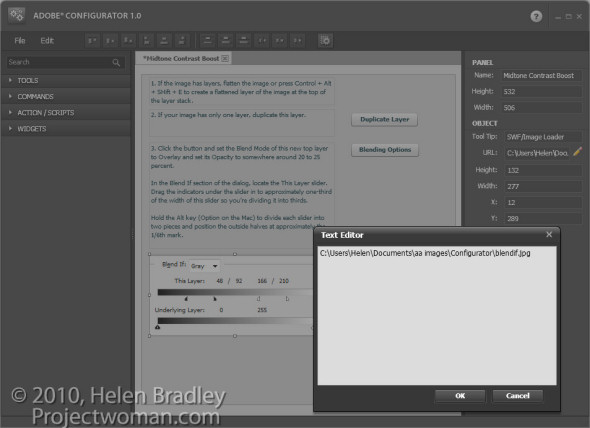
You can also add images to the panel illustrating crucial steps. For example, you could take a screen grab of the Blending Options dialog, crop it to show only the relevant portion of the dialog and save it as a JPG image. Make a note of the image’s width and height in pixels. To add the image to your panel, double click the SWF/Image Loader widget to add it. In the URL box, type the location of the image on your disk. Set the width and height of the Image Loader to match the width and height of the image and position the image in the panel.

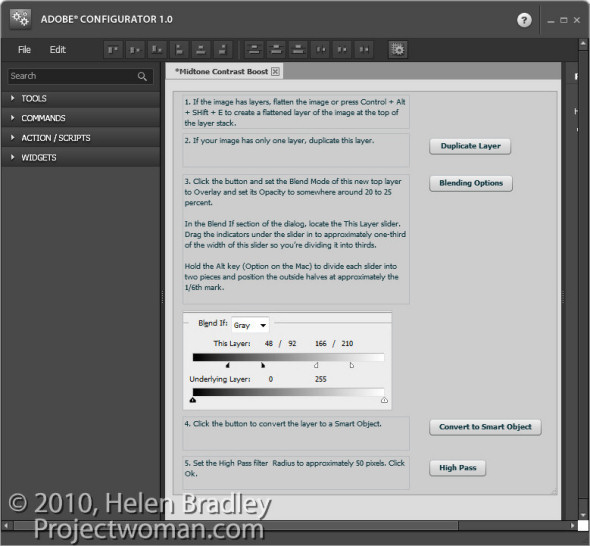
4 The next step of the midtones contrast process is to convert the layer to a Smart Object. Add an explanation of this process to your panel and add a button to perform the task by choosing Commands > Layer > Smart Objects > Convert to Smart Object.

5 The next step is again a command, so choose Commands and then Filter > Other > High Pass and drag that command button into the panel. Add a textbox explaining this step.

To line everything up, select each of the textboxes in turn and select an appropriate alignment option from the toolbar.

Once you’ve completed your panel, save the design by choosing File > Save Panel. Saving the design means you can come back at a later date and alter the panel if required.

Export your panel to use in Photoshop by choosing File > Export Panel, select your Panels folder and click Ok.

When you next open Photoshop, you can load your panel by selecting Window > Extensions and click the panel’s name.

Panels like this, which step you through a process, are a handy way to document processes that you want to remember and use. They can also be shared with others as a learning tool.

6 Always test your panel once you have created it to make sure that it works as expected. If it needs to be changed, return to Adobe Configurator, open your saved panel file, make the changes, save it again and then re-export the panel. Back in Photoshop, close the panel and reopen it to get access to the changed form.

Helen Bradley

Saturday, July 9th, 2011

Copyright watermark your images in Lightroom 3

In Lightroom 3 Adobe built watermarking into the Export module (and it is available in the Print, Slideshow and Web modules as well).

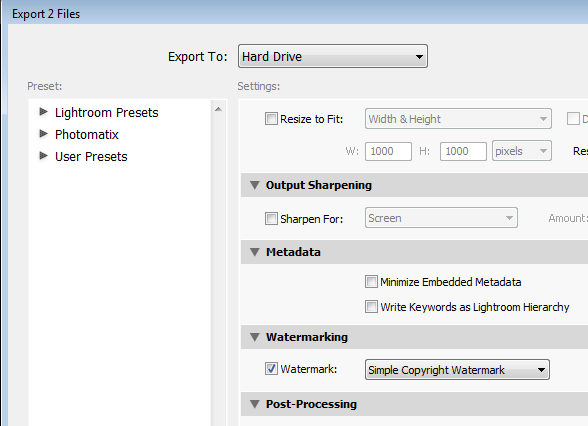
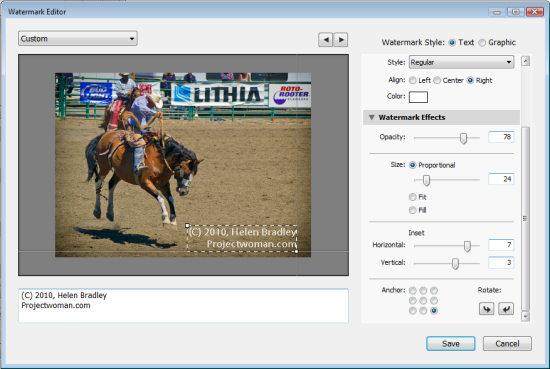
To watermark your images, select one or more images in the Library module, right click and choose Export > Export. In addition to choosing options such as the export location, file name and file type and sizing an image you will find the new watermarking option near the bottom of the dialog.

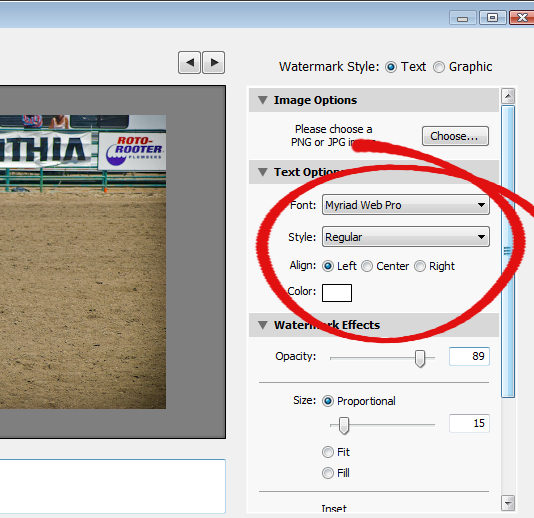
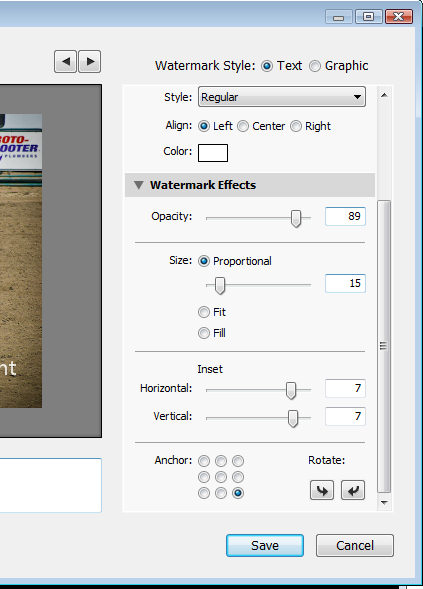
Enable the Watermark checkbox and from the dropdown list, select Edit Watermarks to display a watermark dialog. You can apply a text or a graphic watermark. For a text watermark, click the Text option button, then from the Text Options select your Font and Style.

Alignment controls the text alignment within the small box that it is placed inside so you will use this option if you have multiple lines of text. Color is the text color which you can select from a color picker – unfortunately there is no contrasting shadow added so you have to choose a text color that works on most images.

The Opacity setting adjusts the transparency of the copyright text and you can adjust this downwards to blend the copyright text in with the underlying image a little. Select Proportional size, Fit or Fill as desired. For my watermark I selected Proportional which is typically the option you will want to use.

The Anchor options allow you to place the copyright text within one of nine areas on the screen varying from top/left through center and to bottom/left.

Once you’ve selected the Anchor, adjust the Inset values to bring the text in from the vertical and horizontal margins so that it doesn’t sit at the very edge of the image.
You can rotate the text by clicking one of the Rotate options.

On the left of the dialog under your image is a text box with the word “copyright” in it. You can replace this with your own text – to create the copyright symbol type (C).

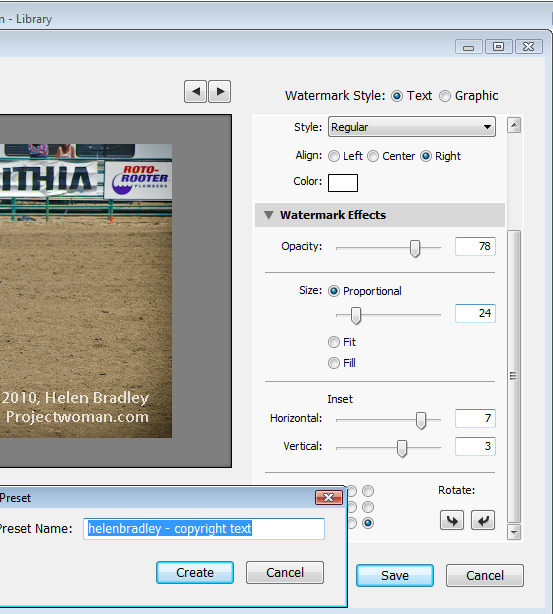
When you’re done, click Save and type a name to save the copyright data as a preset so you can use it again in the Export or any other module that supports watermarking of images.

If you are editing an existing watermark, click the down-pointing arrow in the top left of the dialog where it will show (edited) after the preset name and choose Update Preset or Save Current Settings as a New Preset depending on what you want to do.

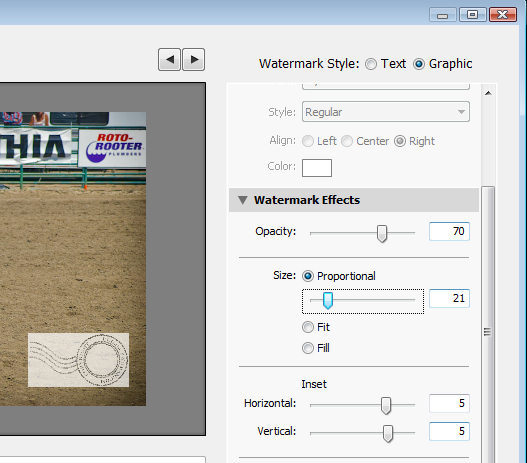
Instead of a text watermark, you can use an image you have created. To do this, enable the Image option at the top of the dialog and click to select the image to use.
A watermark saved as a JPG image will not be transparent so the watermark will appear as a solid rectangle on your image, as shown here.
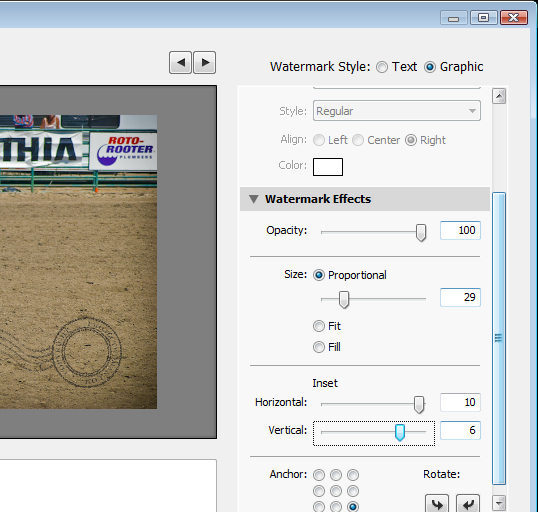
If you want to have a transparent background around your watermark, create the watermark as a PNG image with transparency in Photoshop or another editor, and import that as your watermark.

When you export your images, your watermark will be automatically added to them.

These same watermark options are also available, for example, in the Flickr Publish Services so you can automatically watermark images as you upload them to your Flickr account.

Helen Bradley