Tuesday, January 25th, 2011

When you’re ready to prepare your photo for printing or sharing on the web. Use the Image > Resize > Image size option to adjust the image size.
Make sure the Constrain Proportions and Resample Image checkboxes are selected so you can set the desired size correctly.
For web display, set the resolution to 72 pixels per inch and then set the Width and Height dimensions to the desired value. Remember as you do this that even a very large monitor is only 1920 x 1080 pixels in resolution so you don’t generally want an image to be more than that size if you’re just putting it up on your website, for example.
For printing, set the resolution to anything from 150 – 300 pixels per inch and set the size to your desired print size such as 5 x 7in. Because you are resizing the image (not cropping it), it probably won’t resize to the exact proportions but you can get it close to this.
To save the image, choose File > Save As and, if you are planning to display it on the web save it in the JPEG format.
For printing and storing locally on your computer, the TIFF format, Photoshop .PSD format or a high quality JPEG are acceptable.
If you plan to both print a copy of the photo and share one on your web site, for example, size it for printing first, and save that copy and then resize for the web and save this version with a different name.
Other stories in this Simple Photo- Editing Workflow series:
Step 13 – Sharpen
Step 12 – Major Surgery
Step 11 – Getting to black and white
Step 10 – Fixing Redeye
Step 9 – Fixing Imperfections
Step 8 – Fix Skin tones
Step 7 – Fix Color problems
Step 6 – Fix muddy images
Step 5 – Fixing under and overexposed images
Step 4 – Straighten
Step 3 – Crop an image
Step 2 – Make a duplicate
Step 1 – Assess the image
Helen Bradley
Labels: constrain proportions, Photoshop Elements, resample, resize, Simple photoediting workflow
posted by Helen Bradley @ 8:54 am0 Comments - links to this post
Thursday, January 20th, 2011

When you have finished working on an image you should sharpen it to make the edges in the image look crisper so that they look better when printed on paper and displayed on the screen.
In Photoshop Elements, choose Enhance > Unsharp Mask and set the Radius to around 1.0 – 2.0 pixels. Select a low Threshold value of somewhere between 3 and 10 and adjust the Amount as required.
You will require a higher level of sharpening for images that you will print than you need for display on your computer screen or on the web, for example.
Use the Preview option to check the before and after results of sharpening to ensure you are getting the desired result. You should see the sharpening effect clearly at 100% view, but you should avoid making visible halos around the edges in your image.
If your image was a little soft and lacking sharp focus before you begin, use a larger Radius value for the sharpening.
If you have been creating layers as you fix your image you must apply sharpening to a flattened version of the image, so choose Layer > Merge Visible to do this.
Other stories in this Simple Photo- Editing Workflow series:
Step 12 – Major Surgery
Step 11 – Getting to black and white
Step 10 – Fixing Redeye
Step 9 – Fixing Imperfections
Step 8 – Fix Skin tones
Step 7 – Fix Color problems
Step 6 – Fix muddy images
Step 5 – Fixing under and overexposed images
Step 4 – Straighten
Step 3 – Crop an image
Step 2 – Make a duplicate
Step 1 – Assess the image
Helen Bradley
Labels: Photoshop Elements, Sharpen, Simple photoediting workflow, unsharp mask
posted by Helen Bradley @ 8:18 am0 Comments - links to this post
Monday, January 17th, 2011

Quite often you will find that an otherwise pleasant image has been ruined by some distracting background element.
To remove this, use the Clone Stamp tool. Start by sampling an area of the image to use as the source data to fix the problem – you do this by Alt + Clicking on the portion of the image to use.
Then “paint over” the problem area. The results will be less obvious if you click with the brush rather than drag in a painting motion.
You may need to resample the source area from time to time as you work to find a good match for the area you are painting onto.
It is best to use a brush that is an appropriate size for the task – for detail work it should be quite small, for example, and it should have a low hardness value so you don’t get harsh edges on the fixed area.
If you are familiar with using layers, apply the fix to a new empty layer so that you can adjust and blend the layer later on if need be.
If you are cloning onto a new layer, make sure to have the All layers checkbox selected on the tool options bar so you sample from all the layers – the layer you’re working on won’t have any data so you can’t sample from it alone.
Other stories in this Simple Photo- Editing Workflow series:
Step 11 – Getting to black and white
Step 10 – Fixing Redeye
Step 9 – Fixing Imperfections
Step 8 – Fix Skin tones
Step 7 – Fix Color problems
Step 6 – Fix muddy images
Step 5 – Fixing under and overexposed images
Step 4 – Straighten
Step 3 – Crop an image
Step 2 – Make a duplicate
Step 1 – Assess the image
Helen Bradley
Labels: clone stamp tool, Photoshop Elements, sample all layers, Simple photoediting workflow
posted by Helen Bradley @ 8:02 am2 Comments - links to this post
Friday, December 31st, 2010

A couple of weeks ago I spent four days on the Isabella – a canal boat – travelling from her moorings at Bishop’s Stortford down to Tottenham in London.
I was totally pampered by owners Grahame and Sue and got to see some wonderful English scenery as we chugged along at a princely 4MPH which is pretty fast until you realise that every mile you hit a lock and those take around 15 minutes to get the boat in and out of – so 4MPH very quickly becomes about half that speed overall. It’s a great way to unwind and to really appreciate this beautiful country and the magnificent legacy of those people who built these great inland waterways and the continuing efforts of everyone charged with keeping them navigable.
Click here to view the slideshow of images from the trip.
Helen Bradley
Labels: canal boats, canal cruise, narrow boats, slideshow, UK
posted by Helen Bradley @ 4:09 pm0 Comments - links to this post
Thursday, December 30th, 2010

I recently got asked how you make a photo flip book – you know one of those little books you flip the pages from and something happens?
Well as luck would have it those cool folks over at O’Reilly used to have a magazine called Craft! and they asked me to write an article for them on just this very topic. So, click this link and you will see how to create your very own photo flip book.
I used clips from a movie file for this flip book so there’s lots of fun for everyone involved from writing the signs to making the film and then the tech side of extracting the frames and making the book.
It’s a great snow day/rainy day project.
Helen Bradley
Labels: flip photo book, flipbook, how to, movie, Photo flip book, Tutorial
posted by Helen Bradley @ 9:26 am0 Comments - links to this post
Wednesday, November 10th, 2010

I’ve been playing around this week with my new Pentax K-7 shooting a range of images to use to illustrate Depth of Field for an article I’m writing. I’ve also been drawing pictures to illustrate Hyper-focal distance – I love my job!
As I was trawling the web I found the DOF Master website which calculates all things hyper-focal and DOF.
There you can calculate the depth of field required for various situations – simply select your camera and the focal length of the lens that you are using. So, for example, if you have a 28 – 200 lens and are planning to shoot at 100 mm, then select 100 mm for the focal length. Select the f stop that you intend to shoot at at for that focal distance. Then select the distance between you and the subject and click Calculate.
So, for example, for my Pentax K7, shooting at 100 mm with f/5.6 at a subject 10 feet away, the depth of field is approximately .67 feet and the hyper-focal distance would be 290 feet.
If you’re using a fixed focal length lens, then there is also an online depth of field table available on that site. Select the focal length of your lens and the camera that you are using and click Calculate – you’ll get a printable table showing the near and far range of the depth of field at a given distance and aperture, as well as the hyper-focal distance. How cool is that?
Helen Bradley
Labels: aperture, depth of field, dof, focal length, hyper-focal distance
posted by Helen Bradley @ 1:02 pm0 Comments - links to this post
Saturday, October 23rd, 2010

I just recently got back from the very wonderful Kangaroo Island off the coast of South Australia. Here is slideshow of images from the Island. No Kangaroos, sorry.. but some great scenery none the less. Click here to view it!
Helen Bradley
Labels: Australia, Kangaroo Island, slideshow
posted by Helen Bradley @ 4:26 pm0 Comments - links to this post
Wednesday, May 26th, 2010
 Redeye is caused by the camera’s flash and is often difficult to avoid. Some photographers, and I count myself in that group, would prefer to have to deal with redeye if that means we get good photos. Often the redeye reduction feature on a camera signals to your subject that the image has been taken before it has – they relax and start moving and you get unwanted movement in the shot. When there is a balance to be struck between redeye and movement – I’ll take redeye everytime.
If your photograph has a subject with redeye you can fix it using the redeye tool in Photoshop Elements.
Click the Zoom Tool and click and drag over the eyes in the image to make them large enough that you see them clearly.
Click the Redeye removal tool and click on the red part of the eye. If necessary, adjust the Darken amount and the Pupil Size on the toolbar to get a good result. Fix each eye and then save the image.
Helen Bradley
Labels: Photo-editing workflow, Photoshop Elements, redeye
posted by Helen Bradley @ 5:09 pm2 Comments - links to this post
Monday, May 24th, 2010

Some images look much better in black and white than they do in colour.
Increasingly photo editing programs are shipping with very good tools for converting to black and white. These allow you to select which portions of an image become black and which become white which is necessary when you want to differentiate between colours which have the same intensity such as green and red values which would, otherwise, be converted to the same shade of gray.
In Photoshop Elements, choose Enhance > Convert to Black and White and select a style from the list at the left of the dialog. These include Infrared, Newspaper, Urban Snapshots, Scenic Landscape, Vivid Landscape and Portraits. While the names suggest the type of image they are well suited to it is a matter of personal preference as to which you use.
Once you have chosen the image type you can select from options at the bottom of the image to adjust the various colours to darker or lighter shades of grey. You can also select the more or less contrast options to adjust the image contrast.
When you have a result that you like, click Ok.
Helen Bradley
Labels: black and white, Photo-editing workflow, Photoshop Elements
posted by Helen Bradley @ 9:12 am2 Comments - links to this post
Monday, May 17th, 2010
 There’s been a lot of excitement over the Content Aware Fill feature in Photoshop CS5 (Edit > Fill > Content Aware). It’s a big new feature but it’s often the little day to day changes that really make a difference. For me there are two big “little” changes that I love.
One is the ability to stop Photoshop wanting to save files to where they came from. So, now, when you choose Save As, Photoshop doesn’t have to default to where the file came from and it can be made to point to the last place you saved a file into. This could mean the difference between using Photoshop for day to day screenshots and not.
Until now I’ve used PaintShop Pro and I’ve done so for around 10 years because it defaults to the last save location which works best for me. Now, at last Photoshop can be configured to behave the way I want it to behave. You will find this setting in Edit > Preferences > File Handling – disable the Save As to Original Folder checkbox.
The other big plus is that the Ruler tool now includes a rotate feature. In the past you’d choose the Ruler tool, mark the horizontal line then go to Image > Image Rotation > Arbitrary to make the rotation. Now there’s a Straighten option on the tool options bar when you select the Ruler tool.
Still on my wishlist is a one step paste to new image option. I’d love to be able to have something on the clipboard and choose Paste to New Image and have a new image the size of the clipboard object automatically created for me. Shouldn’t be too difficult – really! For now I have an action which does it but it would be nicer to have a menu item.
Helen Bradley
Labels: Photoshop CS5, Rotate, ruler., Save As
posted by Helen Bradley @ 2:25 pm0 Comments - links to this post
Wednesday, May 12th, 2010
 On Sunday I spent the day in Harajuku and walking with hundreds of Tokyo residents in the beautiful Yoyogi Park. The park is slap bang in one of the busiest areas of Tokyo within spitting distance of Shibuya and Harajuku and around 10 minutes walk from Shinjuku a major shopping area and with the largest railway station you ever want to get lost in. Yet this park is a peaceful oasis where kids run and play, people walk, sit and throw frisbies and laughter fills the air. The Japanese laugh a lot – and the sound of laughter is something that I really noticed here.
Harajuku didn’t offer up quite the wealth of photo opportunities I had hoped for but I still got some great images. Click here to view the final Tokyo 2010 gallery.
Helen Bradley
Labels: Harajuku, Tokyo, Yoyogi Park
posted by Helen Bradley @ 3:42 pm0 Comments - links to this post
Saturday, May 8th, 2010
 Yesterday I spent a few hours in Sekaido, a 7 storey art supply store in Shinjuku then headed out to Ginza as I hadn’t been there before. There are some seriously funky things here – it was Saturday so they close some of the main streets and put tables and chairs out for people to sit at. The neon is pretty amazing the shops – well let’s just say expensive and big name. In the Sony building the stairs play music as you climb them! All in all – fun and well worth a visit but it’s far from being my favourite place in Tokyo.
For my money, Shinjuku is far more interesting and colourful and there are way fewer tourists there. I’ve found some cool graffiti and sticker art around Shinjuku too which is an unusual find in Toyko.
But today is Sunday so I’m headed to Harajuku with high hopes of some amazing shots – it’s the centre of youth culture and dress up is the name of the game.
For now, click here to view a gallery of Ginza and Shinjuku street art images.
Helen Bradley
Labels: Ginza, graffiti, neon, Shinjuku, street art, Tokyo
posted by Helen Bradley @ 4:44 pm0 Comments - links to this post
Thursday, May 6th, 2010
 I visited Ameyoko last night to get some Japanese crackers that are hard to find and cost a fortune at the duty free store at Narita. This is an old market – used to be a black market in WWII and it runs along the Yamamoto railway line between two stations. In the evenings it’s busy with commuters stopping by to purchase food for dinner or to shop for clothes – new and second hand. It’s a fun and vibrant place to visit.
This morning – early – it was fish market time. I’ve missed this the last two times in Tokyo once because it was closed to tourists and the other because it was closed for New Years. Today I got to see what all the excitement is about. It’s packed, noisy, smelly and so much fun. You really have to be on your guard as the market workers are there to work which means moving fish around at a blindingly fast pace and tourists aren’t given any priority at all!
Click here to view the first of my Tokyo galleries.
Helen Bradley
Labels: Ameyoko, Tokyo, Tsukiji Fish Market
posted by Helen Bradley @ 4:34 pm1 Comment - links to this post
Wednesday, May 5th, 2010

Good morning! I’m in Tokyo for a few days and lucked into the best hotel I’ve stayed at here – ever. While I loved the Park Hyatt last time I was here, its location sucks big time. It’s a hike to Shinjuku station and then a total nightmare trying to find your metro line – I’ve asked station attendants and all I’ve got is shrugs saying “I don’t know” when asking the whereabouts of lines I know stop in that station! So, I bypassed the horrors of Shinjuku and headed out to Shidome – what a blast. Lots of great hotels here so lots of people and great places to eat and right on two lines – just enough metro access without having to deal with the confusion of trying to find your line.
This morning was breakfast at the neighbouring Conrad Hotel at Chef Gordon Ramsay’s Brasserie – on the 28th floor with great views and a breakfast to match this great location – and they had french press coffee – what is there not to like about this place!
Helen Bradley
Labels: coffee, Tokyo, travel photography
posted by Helen Bradley @ 4:05 pm1 Comment - links to this post
Wednesday, March 10th, 2010
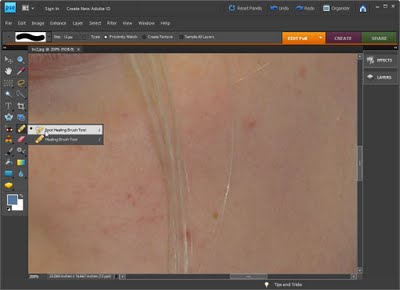
If you have a photograph of someone who has blemishes on their skin you can remove these by using the Spot Healing Brush tool.
Select the Zoom tool and zoom in onto the areas that require fixing.
Click the Spot Healing Brush tool and adjust the brush size so it is just big enough to cover the problem area.
Click once on the area and the blemish will disappear. If the fix is not perfect choose Edit > Undo Spot Healing Brush, adjust the brush size and try again.
Helen Bradley
Labels: blemishes, Photo-editing workflow, spot healing brush
posted by Helen Bradley @ 2:42 am1 Comment - links to this post


