Thursday, October 8th, 2009

Fixing Animal Eyes in Lightroom 2


Often when I look at the photographs that I’ve taken at the zoo, for example, the animals’ eyes are underexposed and lifeless.

To fix animals’ eyes in Lightroom so that they look compelling and still realistic, here is my fixing “animals eyes” workflow:


Step 1
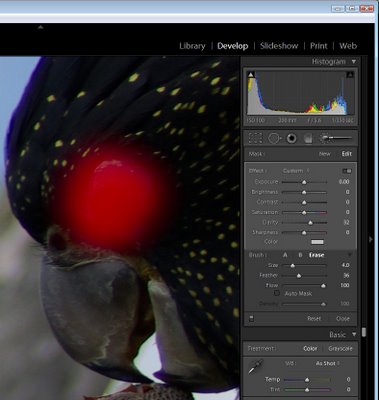
Display the image in the develop module in Lightroom. Zoom in using the zoom tools so that you can see the area that you’re working in very clearly.

Click the Adjustment Brush in the top of the Develop module panel and size the brush so that it is the right size to work on the animal’s eye. Click once on the eye and then paint over the area that you want to affect. If you can’t see your paint and want to see it, press the O button to enabled and disable the ruby overlay.


Step 2
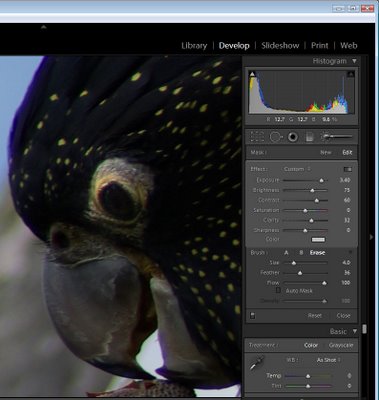
Once you’ve painted over the eye, adjust the Exposure and Brightness upwards until you have a highly unrealistic and over fixed solution.

Adjust the Contrast so that you build some contrast back into that area of the eye – this actually darkens some of the areas you have just lightened.

Adjust the Saturation and Sharpness if required.


Step 3
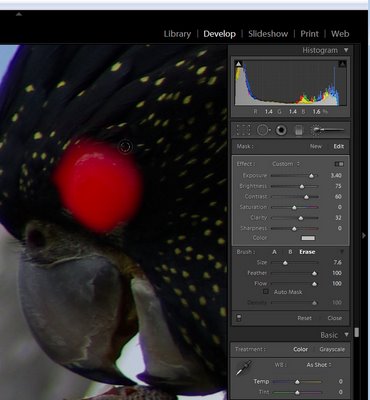
If the effect is too strong around the edges of the eye, click Erase, set the Feather to a high value and paint around the edges of the selection to erase the effect.


Step 4
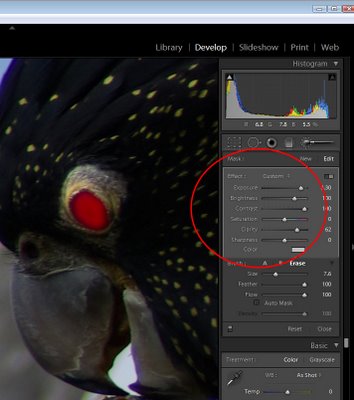
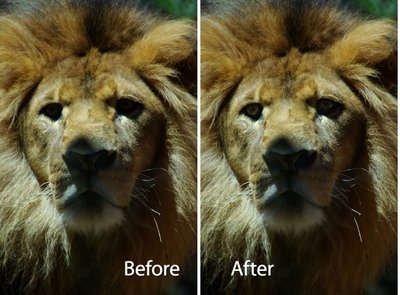
In this image, I tacked both eyes separately and I did both in two steps. The first fix solved the overall eye problem including the surrounds and then I repeated the process this time focusing only on the pupils to ensure that there was good contrast where the pupil would be expected to have caught the light.


Here you can see the result when steps 1-3 were performed in Lightroom on the lion’s eyes.

Helen Bradley

Friday, October 2nd, 2009

Resizing images in Lightroom 2


One of the hardest things for a new Lightroom user to work out how to perform is a simple image resizing. Look as hard as you like and there simply isn’t a resize menu command. There is, of course, a way to resize images and it is done as you Export them from Lightroom which makes sense when you know how Lightroom works but if you’re a new user it’s just plain confusing.

So, here’s how to batch resize in Lightroom:


Step 1
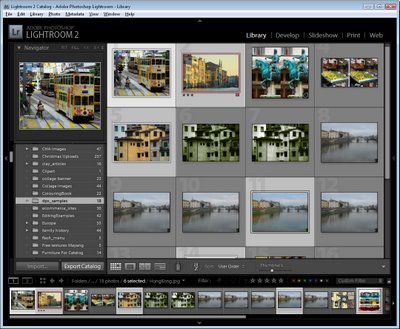
Select the Library module and select the images to export. Choose File > Export.


Step 2
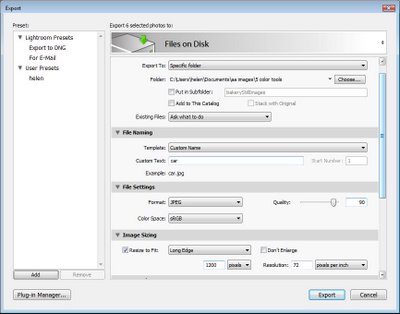
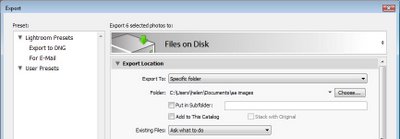
The Export dialog gives you a series of choices for the exported images. Start by selecting where the exported images should be stored. Choose either a specific folder or the same folder that the originals are stored in.

To place the images in a subfolder of your chosen folder, select Put in Subfolder and type the name of a new subfolder to create. If you want the exported images to be available in Lightroom, select the Add to This Catalog checkbox. From the Existing Files dropdown list, choose what to do if files of the same name appear already in the selected folder.


Step 3
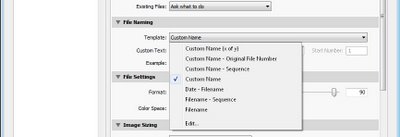
From the File Naming options select what you want your files to be named.

For example, selecting Filename will give the files the same name as the original images. Custom name – Sequence lets you give the files a custom name and Lightroom will add a sequential number to each file. Type the Custom Name in the Custom Text box.

You can also select Edit from the dropdown list and create your own file naming template.


Step 4
In the File Settings area, select the export format such as JPEG for the web and the Quality – the higher the quality, the larger the file size.

In the Color Space area choose sRGB for the web.


Step 5
In the Image Sizing area set the file size and resolution. So you can, for example set the Resolution to 72 pixels per inch for the Web or 300 ppi for printing.

To size the images, enable the Resize to Fit checkbox. By selecting Dimensions you can set the final dimensions for each image such as 800 x 1200 and the images will be sized as close to this as they can be given their current aspect ratio. They won’t be larger than this and one measurement at least will be 800 or 1200. Lightroom does this regardless of whether the images are in Portrait or Landscape orientation so portrait and landscape images will end up the same sizes.

If you select Width & Height you can set the longest dimensions of each image in each direction. All images will be sized so their Width is no larger than the value you set and their Height is no larger than the value you set – the same width and height values are applied to portrait and landscape images so a Width of 400 and Height of 600 will give a larger portrait image than it will a landscape one because the landscape image can’t be wider than 400, forcing its height to much less than this.

The Long Edge and Short Edge options let you set the maximum length of the long or short edge of a photo – so Portrait and Landscape images are treated alike here.

If you enable the Don’t Enlarge checkbox you could have images much smaller than your selected dimensions if the originals are already under the selected size.


Step 6
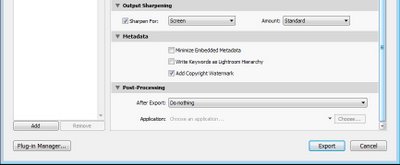
You can apply sharpening by selecting the Sharpen For checkbox from the Output Sharpening options and select to sharpen for Screen, for example, and set a Low, Standard or High Value of sharpening.

In the Metadata area, select to add metadata if desired and from the Post-Processing options select what to do with the images afterwards, for example you could open the images direct in Photoshop or in an alternate editor or another application or show them in Windows Explorer.

When you’re done with the selections, click Export and the selected images will be exported.


Step 7
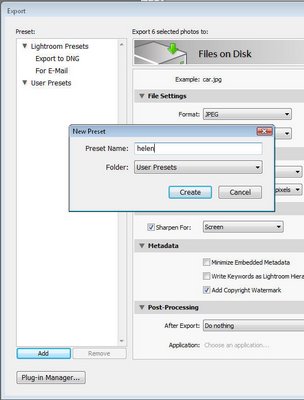
If you’ll use these settings again, save them to use next time by clicking the Add button at the foot of the Preset list, type a name for the preset, select the folder to add the preset to or just leave it set to User Presets and click Create.

In future, you can return to the Export dialog and select these options by clicking the Preset name. You can still make changes to the settings, if desired, and export a new set of images.

Helen Bradley

Monday, September 14th, 2009

Lightroom: Add a light source


The Lightroom Graduated Filter tool can be used to add a secondary light source to an image where one was not in existence when you shot it. This often works better to rescue an unexposed area of an image than, for example, applying a Shadow/Highlight fix in Photoshop.

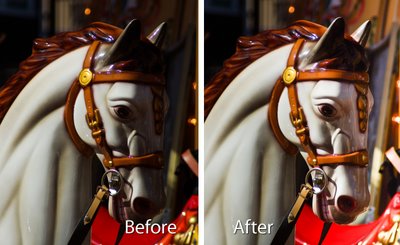
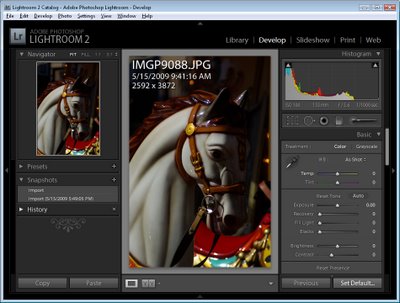
This image is extremely dark on the right – a problem caused by capturing the carousel horse in broad daylight on a very sunny day..

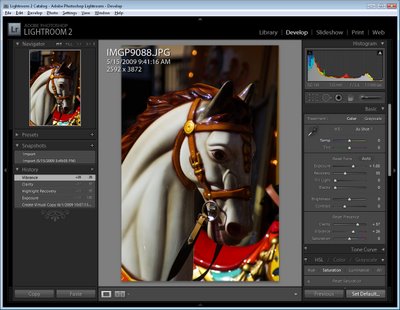
After adjusting the Exposure in Lightroom and tweaking the image using the small Recovery, Clarity and Vibrance sliders the image is still dark in areas where I would like to see more of the detail in the underlying image.

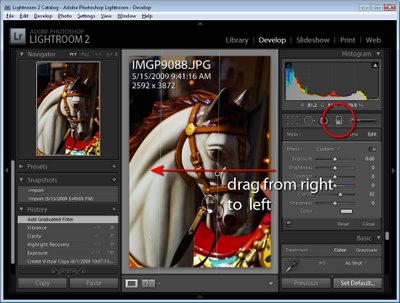
To bring in some light on the right, click the Graduated Filter tool and drag the selector in from the right edge of the image so that the midpoint of the filter is over the point where the problem ceases to exist (around the level of the carousel horse’s eye).

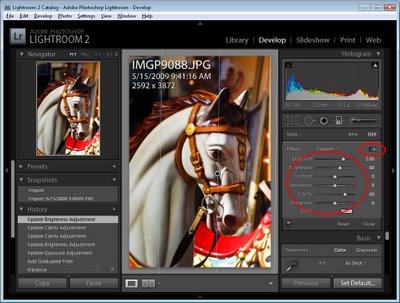
With the Effect Sliders visible, increase the Exposure and then, if desired, adjust the Brightness and Clarity sliders. Click Close when done.

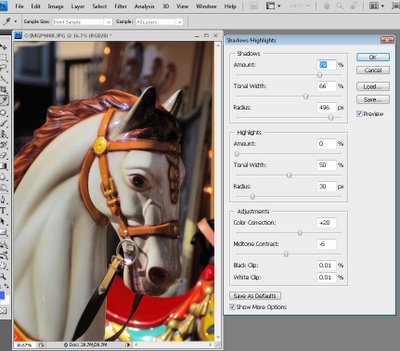
In many cases you will find the Graduated Filter gives better results than, for example, the Shadows/Highlights filter in Photoshop shown here, and it’s a lot less work.

If you’d like to learn more about using the adjustment tools in Lightroom, here are a couple of useful recent posts:

Fixing Blemishes in Lightroom

Spot fixing with the Adjustment Brush

More Adjustment Brush techniques in Lightroom

Helen Bradley

Saturday, September 5th, 2009

Working with Virtual copies in Lightroom


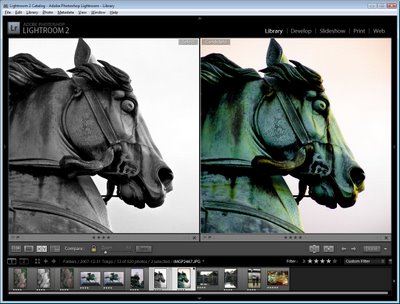
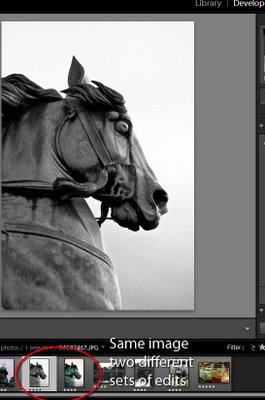
The Virtual copy feature of Adobe Photoshop Lightroom lets you experiment with multiple editing options for an image without duplicating the original image. So, for example, if you have an image that you think would look good either with its color enhanced or rendered in black and white you can apply both fixes to the same image to see which you like best using virtual copies. No only will you see both versions in Lightroom, you can export each as a different image and you can work with them independently of each other.

Follow these steps to see virtual copies at work:

Step 1
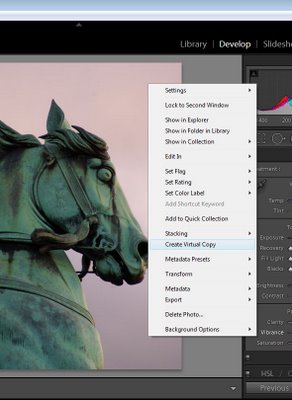
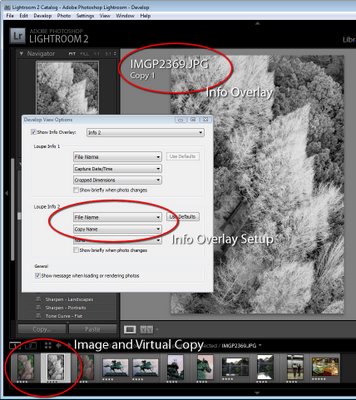
Inside Lightroom locate the photo to adjust in the film strip, right click it and choose Create Virtual Copy. In the film strip you will see both images and, when you select them, you will see they have the same file name. If you have the Info Overlay displayed it too shows the same data for both images.

Step 2
Once you have created the virtual copy you can edit it independently of the original and compare the results. You can also make additional virtual copies and each behaves independently of the original but is, in reality, the same image.

step 3
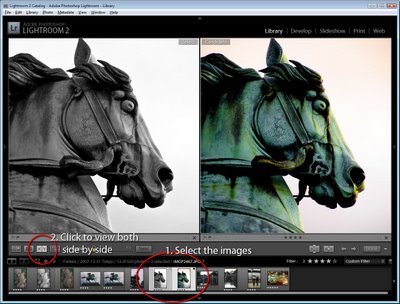
To view the two images side by side, return to Library view, select both the image and the Virtual copy and click the XY button above the filmstrip. This shows the two images side by side.

Tip
One problem with virtual copies is determining which is the original and which is the copy. You will need to do this, for example, if you want to delete the virtual copy leaving the original in place.

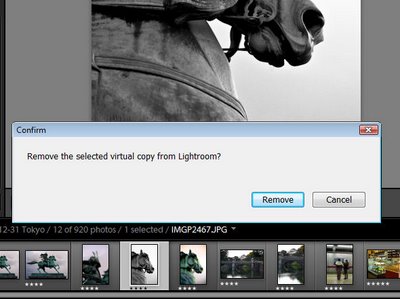
To delete a virtual copy, right-click the version of the image that you think is the virtual copy and choose Delete Photo. If it is the virtual copy you will see the dialog prompt “Remove the selected virtual copy from Lightroom?” – click Remove to delete it.

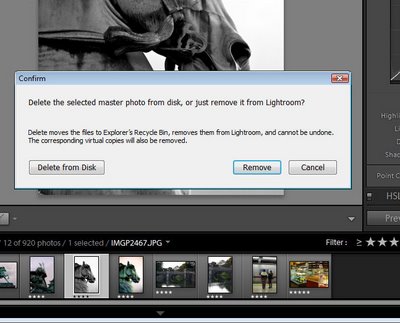
If the selected version was not the virtual copy you will see the prompt “Delete the selected master photo from disk, or just remove it from Lightroom?”. This tells you that the selected image is not the virtual copy but the original. Click Cancel if you do not intend removing both the original and the Virtual copy(ies) from Lightroom or from your disk.

If you use Virtual copies a lot you can configure the Info Overlay to show you which image is a copy. To do this, choose View > View Options and click Show Info Overlay. Reconfigure one of the info sets to include not only the File Name but also the Copy Name. The original image will display the filename only and virtual copies will display the filename and Copy 1 (or Copy 2).

Helen Bradley

Saturday, August 29th, 2009

Moving a Lightroom Catalog


I’ll explain how to successfully move Lightroom files and a catalog to a new disk.

One issue that stumps many people is how to successfully move a Lightroom catalog from one computer to another or from a local hard drive to a removable one.

Having just faced this situation head on and having made a right royal mess of my first attempt, here’s my take on the smartest way to do this.

The problem in moving the catalog and files for me was that I didn’t want to lose the editing history for any of my files so it was critical that everything moved correctly and, in the end, the ideal method was to make Lightroom responsible for the move so all along it stayed informed about what was happening.

Step 1
Start by backing up your Lightroom catalog and files – if everything goes pear shaped at least you’ll have your backups.

Step 2
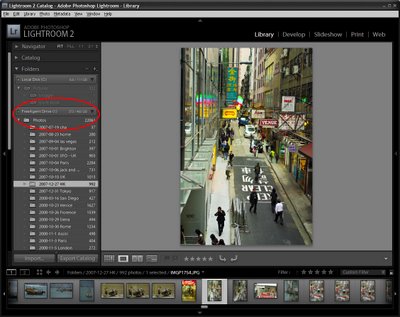
Plug in your external drive (or fire up the new computer) and copy one photograph into the root folder on the drive, or if you want your photo folders to be stored inside a folder called Photos, for example, and not in the root folder, create this folder and copy one photo into it. There must be an image in a folder for you to import the image (and the folder) into the Lightroom Folders collection.

Step 3
Now locate your Lightroom folder which contains your catalog and preview images and move it onto the new drive. This has to be done with Lightroom closed.

Step 4
Launch Lightroom and it will report it can’t find the catalog – so far so good. Point Lightroom to the Lightroom folder on your new drive and click the catalog file (it has the lrcat extension) – Lightroom will open the catalog and find everything intact because you haven’t moved anything yet – except its catalog.

Step 5
Inside Lightroom, choose File > Import from Disk and import the single image that you copied into the folder on your new drive. This adds the root folder for your images on the new drive to the Lightroom Folders collection.

Step 6
Make sure the Library is visible and the Folders area opened. Now drag and drop each folder of images from your local disk onto your new drive in the Lightroom folder view. I did this one folder at a time but you can, if you wish, drag the root folder from your old disk and drop the lot into your new folder on the new drive – it depends how you want everything organized. Lightroom works pretty fast when moving the files so it doesn’t take too long. The most inconvenient part of the move for me was that Lightroom can only move one folder at a time so the process had to be supervised manually – when one folder was moved, I dragged and dropped the next one and so on.

If you prefer to do so, you could move all the folders containing your photos outside Lightroom – this would be an easier process than doing it inside Lightroom if you want to retain the same overall folder structure. Then launch Lightroom and, in the Folders list, right click the old root folder and choose Update Folder Location and point to the new location for the files.

Once the Lightroom catalog and all your photo files and folders are on the external drive or on the new computer, your images will be instantly accessible anytime by simply opening Lightroom.

External drive letters issue
If you’re using an external drive to store your Lightroom catalog and files you may encounter problems when attaching the drive to a second computer as it may recognize it as having a different drive letter. If this happens, Lightroom will still show you previews for all your images but you’ll encounter missing file warnings if you try to edit one. The easiest solution at this point is to right click the root folder in the Folders list in Lightroom and choose Update Folder Location. Navigate to find this root folder on your external drive and, when you locate it, all the images in that folder will be immediately found.

Helen Bradley

Monday, July 20th, 2009

5 Lightroom mistakes to avoid

If you are new to working in Lightroom your first few weeks will be a steep learning curve. Here are my top 5 mistakes to be aware of and avoid when you’re starting out. I hope they’ll save you wasting time, getting frustrated and generally tearing your hair out.

1 Think – Navigate on the left – Keyword on the right.
Ok, so this isn’t exactly true but basically, in the Library module, your navigation options are on the left and bottom of the screen and the Keywording options are on the right.

The typical mistake you’ll make is to open the Keywording or Keyword List areas of the panel on the right and click on a checkbox for a keyword or click one of the keyword sets thinking that somehow this will select and display images with those keywords – Not so! Instead you just added those keywords to the selected image or images.
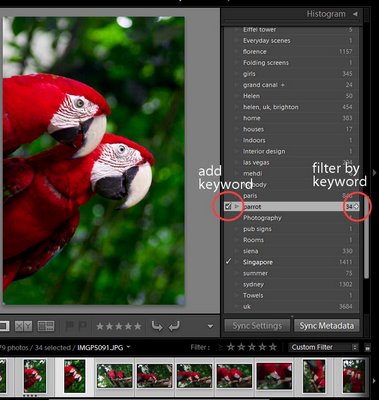

You can filter by keyword using the Keyword list in the panel on the right and you do so by clicking the small arrow to the right of the keyword – that switches to display all the images with this keyword.

2 Don’t move your photos – except in Lightroom.
This is a biggie. Once you bring images into Lightroom, Lightroom tracks where they are on disk. If you delete or, worse still, move the images from one folder to another one, the links inside Lightroom will be broken. If you rename your folders then the links to them and to the images in them will be broken too. In a very short time you can wreak havoc on your Lightroom catalog – this is the voice of experience speaking here! In short, once your photos are in Lightroom, manage them in Lightroom.
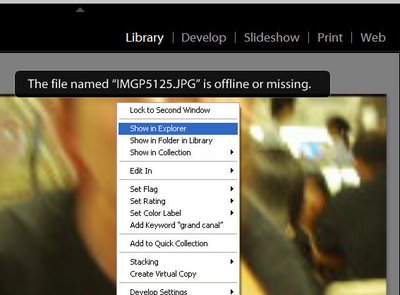

If you break the links to your photos, Lightroom will still display the previews and it will tell you the “The file named xxx is offline or missing”. If you moved the image, right click it and choose Find in Explorer and you can then click Locate and browse to locate the folder you moved it to.
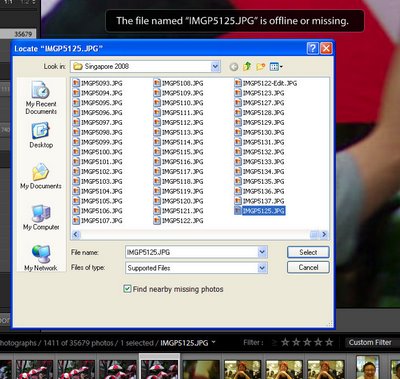

When you locate the missing image, click it to select it and also enable the “Find nearby missing photos” checkbox as chances are if this image has been moved other photos in the same area of the catalog will have moved too and Lightroom will now locate and update their details in the catalog too.

3 Don’t by pass a valuable organizing opportunity
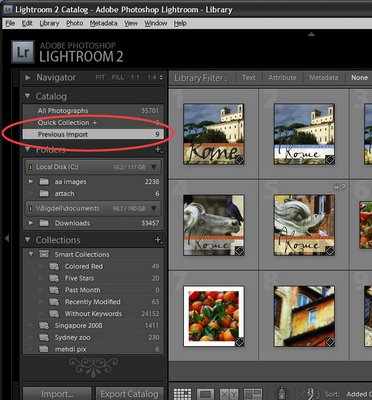

When you import images into Lightroom they’re immediately added to a new category called Previous Import. They stay there until you import more images. Having all your newly imported images in a single collection lets you do things with them such as adding keywords, sorting them, moving them into new folders and even preprocessing them as a group and without having to search for them.

However, you’ll need to do some fancy footwork if you want to bring in more than one set of images into Lightroom and to manage them all at once using this temporary catalog. One such situation would be where you capture two or more cards of related images at a time such as a wedding or other event, or photo walk.

In this situation, you can avoid losing the benefits of the Previous Import catalog by dumping all the images from multiple cards into a single folder on your disk outside Lightroom and then import the folder of images into Lightroom. Now all the imported images will appear in the Previous Import catalog and you can organize and pre-process them as a group. They stay in this category even if you close Lightroom and reopen it and only disappear when you import another set of images.

4 Don’t make work for yourself
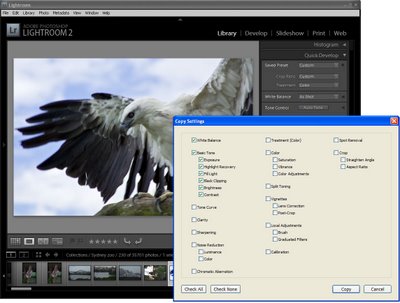

When you capture a number of images in a single location or with a particular light you can batch process them in Lightroom and save yourself hours of work. To do this, choose one representative image from the group and use either the Quick Develop tools in the Library module or switch to the Developer module and make your initial fixes there. Fixes that you might apply to a sequence of images include White Balance, Exposure, Recovery, Fill Light and Blacks. Remember you don’t have to get it 100% right, just better than it was.

When you’re done, right click this image and choose Develop Settings > Copy Settings and select the settings that you have just made to the image and that you want to copy and click the Copy button. Now select the other images in the sequence, right click and choose Develop Settings > Paste Settings to paste these changes onto all the selected images. These changes give you a starting point for your work in Lightroom.

5 Don’t risk losing your sidecars
If you’re working in Camera RAW (not DNG) any changes you make to an image in Lightroom are stored in the sidecar XMP file for the image – because it is not possible to write data into a proprietary Camera RAW file. So, when you send a RAW image to someone else they can’t see your edits unless they have the sidecar XMP file that goes with it. Long term you need to make sure your RAW files and their XMP files always stay together.

Because of this, many users prefer either to capture in the non proprietary DNG format rather than Camera RAW if their cameras offer this as an option or to convert to DNG as the RAW image files are imported into Lightroom. Converting to DNG rather than working in Camera RAW ensures that changes can be stored in the DNG file making it easier to manage your images now and in the future.
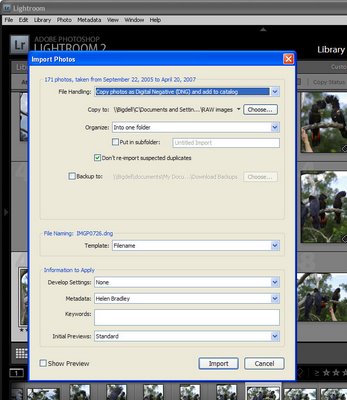

To convert to DNG as you import your files, choose File > Import Photos From Disk and select the folder or files to import. When the Import Photos dialog appears, choose the “Copy photos as Digital Negative (DNG) and add to catalog” command and then choose a folder to store them in. Complete the remainder of the dialog options and click Import to import and convert them in the one step.

Helen Bradley
Friday, July 10th, 2009

Fixing Blemishes in Lightroom

Spot_before-after.jpg
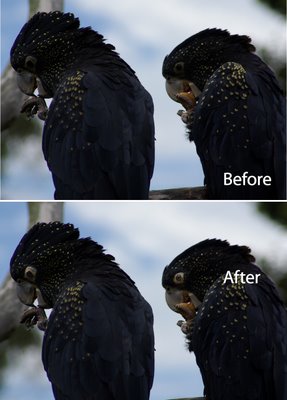
When you have an image which needs some spot fixing before printing you can often do the work in Lightroom and avoid the necessity of a round trip to Photoshop. Lightroom has both a Clone and a Heal tool available for fixing blemishes and removing problems such as spots caused by dust on your camera’s sensor.

To see how to use these tools in Lightroom, start by selecting an image to fix and select the Lightroom Develop module.

Step 1

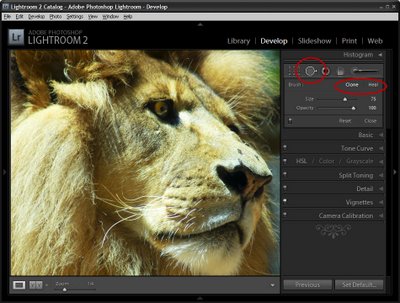
Locate the Spot Removal tool which is situated below the Histogram and to the immediate right of the Crop tool. You can also select it by pressing its shortcut key N.

For the brush options, you have the choice of Clone or Heal so select the option to use.

Clone works similarly to the Clone Stamp in Photoshop where you select the portion of the image to fix and then the portion to replace it with. Apart from choosing the Size of the brush and the Opacity Lightroom simply replaces one area of the image with another without making an attempt to blend the fix.

If you choose Heal then Lightroom samples the area you’re trying to fix and attempts to blend in the replacement area so the fix is less apparent.

Step 2

Select Clone or Heal and then adjust the size using the slider or the square brackets [ and ]. Your brush size needs to be large enough to cover the area to fix.

You can click on the area to fix and leave Lightroom to choose the source image data to fix it with or click on the part of the image to fix and continue to hold the left mouse button as you drag to find an area to use to for the fix. You will see a preview of how the fix will look to help you determine a good part of the image to use. Only let go the mouse button when you have your selection in place.

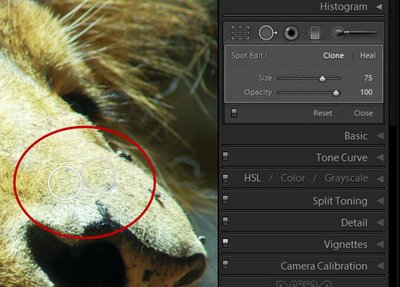
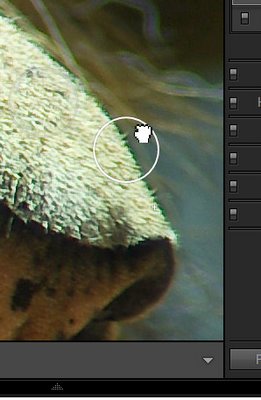
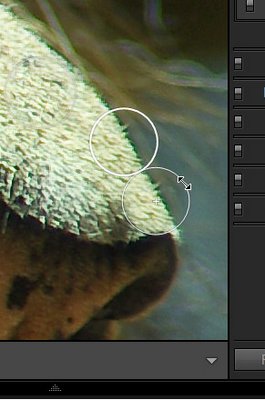
When you have applied the fix you will see two circles on your image – they appear when you hold the Spot Removal Tool over the image. The circle with the thickest edge is the selected area and the circle with the + symbol in it defines the area you are fixing.


If you did not get the fix exactly right you can click inside either of the circles and drag the selected circle to a different position.


You can also select a circle and then position your mouse over the edge till it turns into a double headed arrow and then drag to resize it.

You can change a fix applied using the Heal option to a Clone fix (or vice versa). To do this, select either of the two circular marker and click Heal or Clone in the Develop tools panel to change the fix type. This allows you to experiment to find which gives the better results.

In our example, Heal worked well on the lion’s nose in areas which were all hair and Clone worked along the top edge of the nose where the fix markers spanned part of the nose and part of the background behind.

To see the image without the circular markers, press H to hide them. Press H again to display them.

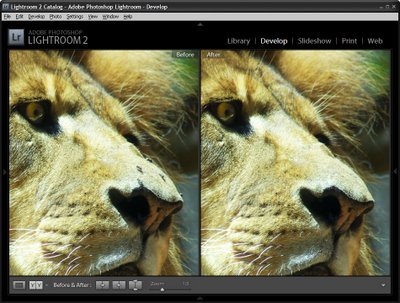
To see the Before/After results reflecting just the effect of applying the Spot Removal Tool, click the On/Off switch in the Spot Removal tool area of the Develop panel. This works better than the backslash key (\) which toggles on/off all the fixes you have made to the image and not just the most recent one.


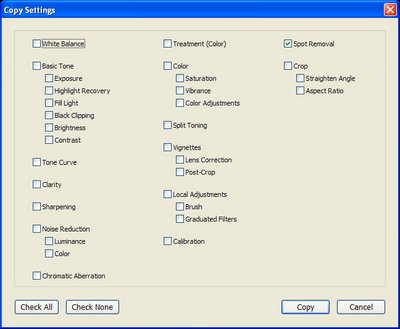
If you have problems such as sensor dust that appear in the same position in a series of images, you’ll appreciate the ability to copy the Spot Removal tool fix from one image to others. Right-click the fixed image, choose Settings > Copy Settings and from the Copy Settings dialog enable the Spot Removal checkbox disabling all other options that you do not want to copy. Click Copy to copy the effect and then paste it onto the other images which also suffer the same problem. While this may not be an ideal fix for all of them, it will give you head start on fixing most of them.

Helen Bradley
Wednesday, July 1st, 2009

Creating a Triptych in Lightroom


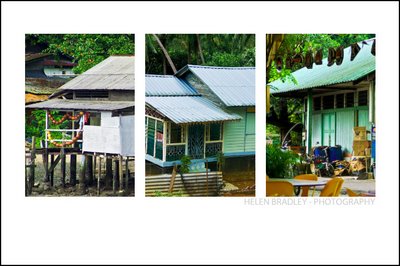
When presenting your photos you will sometimes want to create and print them as a series of three images on a single sheet of paper rather than a single image. You might want to do this, for example, to use to decorate a gift card or for framing.

Using Lightroom you can assemble multiple images ready to print and a triptych or series of three images is one way to do this. Here’s how to use the Lightroom Print module to assemble a triptych for printing and how to save it as a reusable preset:


Step 1
You can create a triptych for any images that you have in Lightroom so begin by selecting the folder or collection which contains the images in the Library Module.


Step 2
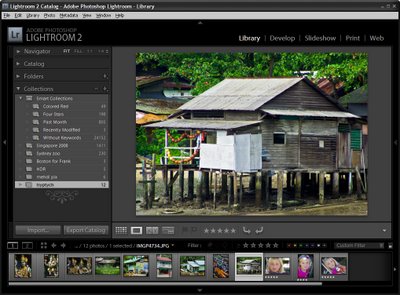
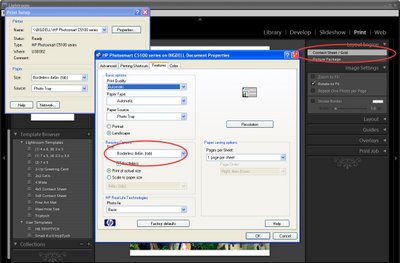
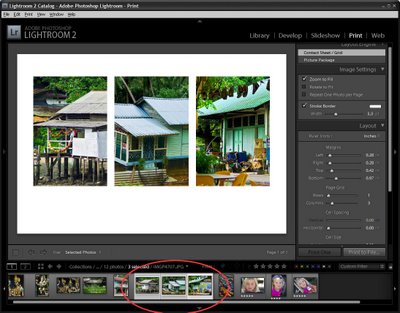
Switch to the Print module and from the Layout Engine options in the top right corner of the screen, select Contact Sheet/Grid.

In the bottom left of the window click Page Setup, select your printer and select the paper size to print on. Lightroom uses the paper size you select as the paper size for your contact sheet. Select Portrait or Landscape orientation as desired (I chose 4 x 6 in Landscape), and click Ok.


Step 3
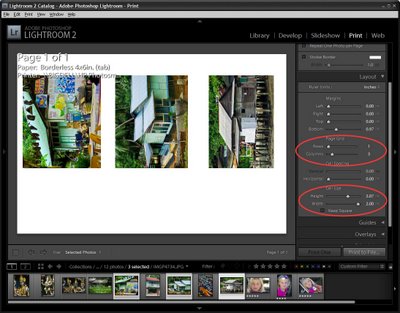
Use the layout options on the right of the screen to configure the output image to show three images.

Set the Layout to 1 Row and 3 Columns. Set the Width and Height of the cells using the sliders and the Top and Bottom margins to your desired values. I like to add more space below the images and less above them.

To fill the three slots with images, select three images in the filmstrip by Shift + clicking on them.

To display or hide the guide lines, enable or disable the Show Guides checkbox in the Guides area of the panel.


Step 4
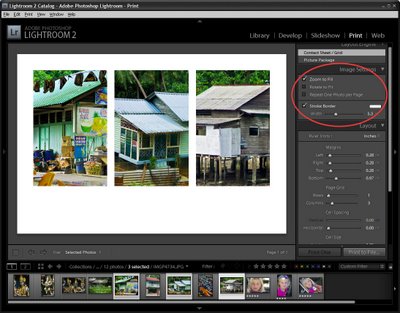
In the Image Settings area at the top right of the screen, enable the Zoom to Fill checkbox and disable both the Rotate to Fit and Repeat One Photo per Page checkboxes. Use your mouse to drag each image around in the cell to find the best position for it.

To add a space between the images either adjust the Cell Spacing: Horizontal value or if you don’t plan to use a contrasting border, enable the Stroke Border checkbox and add a white border around the images.


Step 5
The images appear from left to right in the order they appear in the film strip. To change the order in the triptych, drag them into the desired order in the film strip.


Step 6
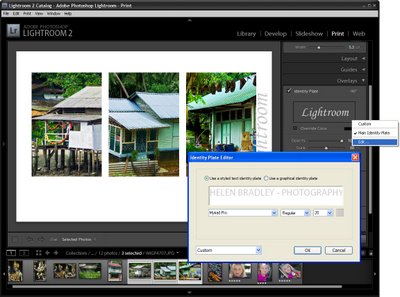
To add an overlay, open the Overlay group and enable the Identity Plate checkbox. Where the identity plate shows Lightroom, click the down-pointing arrow and click Edit.

Type your name or other information into the identity plate area, format the text and click the Custom dropdown list and choose Save As to save it so you can use it again in future. Click Ok.

Adjust the Opacity slider to make the Identity plate more transparent and use the Scale slider to scale it to size.

Opposite the Identity Plate checkbox is an indicator that probably reads -90 degrees. It is a dropdown list so click it and choose an alternate rotation for the identity plate, if desired. You can also drag the identity plate into position using the mouse.


Step 7
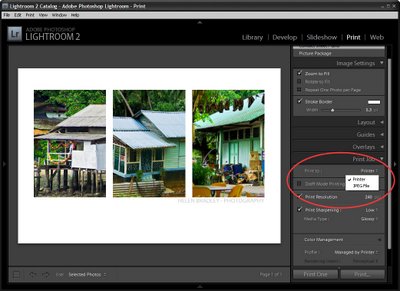
To print the finished image, click the Print button at the foot of the panel.

You can also save the image as a JPEG file by selecting Print to JPEG file. Select the file resolution and the JPEG quality and click the Print to File button to create an image that you can print later on or send to a commercial printer.


Step 8
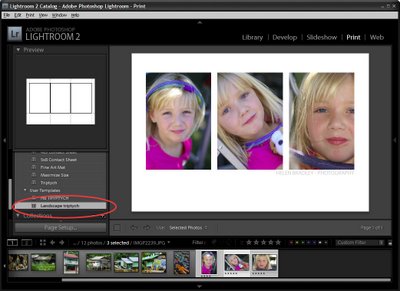
To save your new design, from the left of the screen click the + symbol adjacent to the words Template Browser and type a name for the template and click Create. You can then use it at any time by selecting it and selecting the three images to add to it.

Ready to learn more about Lightroom? Here are links to two of my other Lightroom tutorials:


Sharpening in Lightroom 2


Lightroom: Spot fixing with the Adjustment Brush

Helen Bradley
Tuesday, June 30th, 2009

Lightroom: More Adjustment Brush techniques


You just gotta love the Adjustment brush in Lightroom 2. It makes Lightroom a great tool for quick fixes and, honestly, I’ve used Photoshop a lot less since I started using Lightroom. I love the combination, Lightroom is fast and so smart and Photoshop is there for when I need specialist effects. So, on to today’s post…

In an earlier post I talked about using the Adjustment Brush in Lightroom 2 at a simple level – sort of Adjustment Brush 101. In this post I’ll show you some advanced features of the adjustment brush which help you make multiple adjustments to the image at one time and to do so more easily. Consider this Adjustment Brush 102.


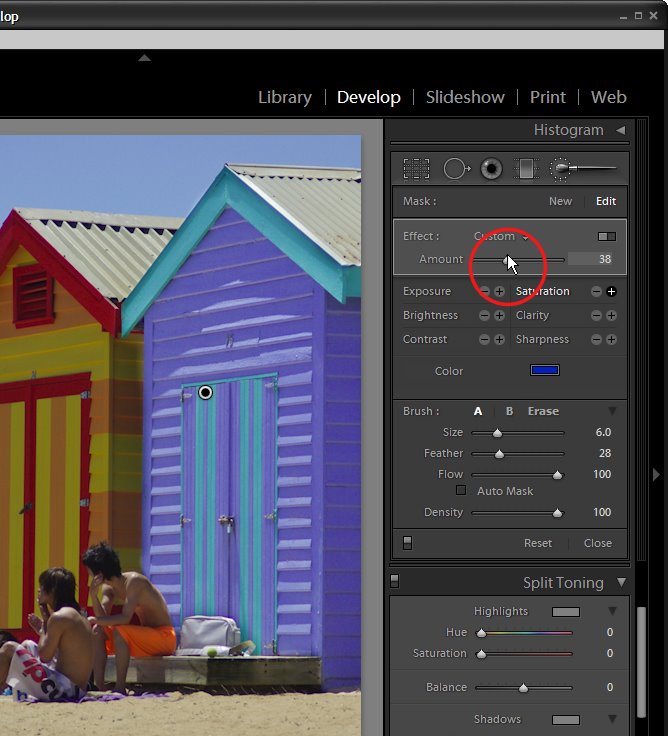
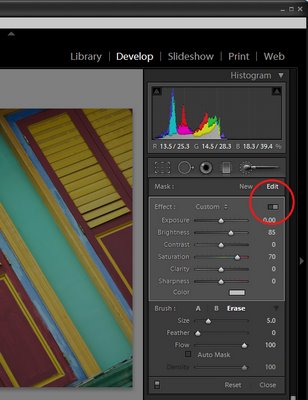
In the Develop module, when you have the Adjustment Brush selected there is a switch that you can click to switch between Button and Slider mode. In button mode you can adjust one of the Exposure Brightness, Contrast, Saturation, Clarity and Sharpness settings at a time. In Slider mode, you can adjust any one or more of these options.


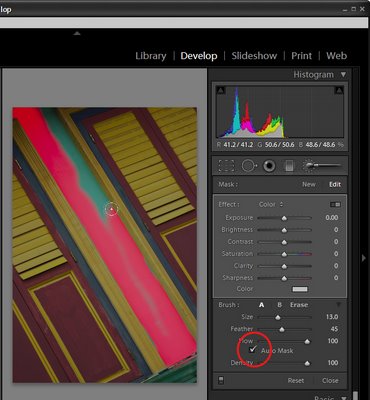
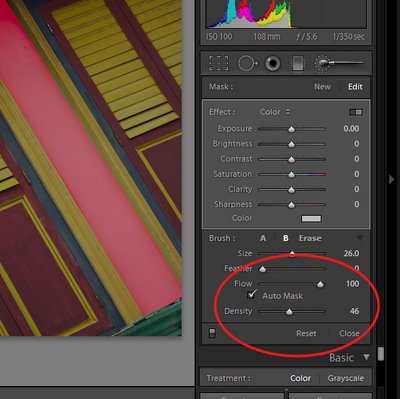
In the Brush area of the panel you will see an AutoMask option. When this is enabled, you can paint around the inside edge of an area and the AutoMask feature will mask the area ensuring your brushstrokes don’t go over the edge. This works best on areas where the edge is distinct and recognizable. When you paint, make sure you have the main part of the paint brush inside the area you want to effect.

To toggle between AutoMask being on or off as you paint, hold the Control key as you paint (Command on the Mac).


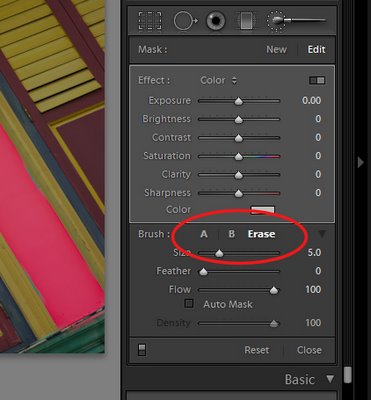
In the Brush area you will see two brushes, A and B. You can switch between the two by clicking on the A or B indicator. Each brush has its own Size, Feather, Flow and Density settings, and AutoMask can be enabled for either or both of the brushes. Having two brushes lets you configure each differently and switch easily between the two.

Each brush can be switched into the third brush mode – Erase mode by holding the Alt key (Option on the Mac) as you paint with either brush.


Setting the brush size defines the area of the brush and it is the central circle which you see when you are painting. The Feather amount adds an additional softness to the brush which is shown by the second outer circle. A hard brush has a Feather of 0 and it shows as a single circle.

Flow specifies the flow for the brush which can be set to less than 100 so you can build up an effect gradually by painting over an area multiple times. The Density slider adjusts the opacity and controls the maximum opacity of the brush strokes. So, if you have Flow set to a low value and Density to 50, the maximum opacity that the brush can reach regardless of how many times you paint over an area is 50.


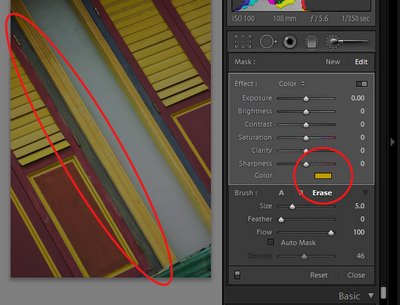
In the Effect area is a Color option which allows you to paint over an image with a color of your choice. To do this, select the color to use and then paint over the area to apply it to. You can use this to colorize a black and white image or, as I’ve done here, paint over a dark blue area with yellow to make it dark green.

Tip: Interested in learning more about Lightroom? Check out my post on understanding Clarity, Vibrance and Saturation in Lightroom 2.

Helen Bradley
Friday, May 22nd, 2009

Keywords and Lightroom – the basics


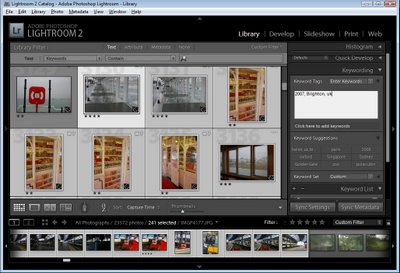
As with any photo management tool Lightroom 2 offers you the ability to add keywords to your images. In this way you can make it easier to find images later on by searching for them by keyword. One simple way of adding keywords to your images is to do this as you import your images into Lightroom. Of course this requires that you’re importing a series of images which all share the same keywords. As this is not always the case, you may need to add keywords from inside Lightroom and I’ll show you how to do this.

Start in the Library module in Lightroom. While it appears possible to select multiple images in the Filmstrip whilst in Loupe view and add keywords to them this is not the case. The keywords will be added to only the first of the selected images and not all of them. Not only is this frustrating but it also is a little misleading.

Step 1
Instead, to add keywords to multiple images at the one time you need to select Grid view (G). Select the images to add the keyword to and type a keyword in the Keyword Tags panel on the left of the screen (open Keywording) to access this. You can also drag and drop a keyword from the Keyword Suggestions onto the selected images.


Step 2
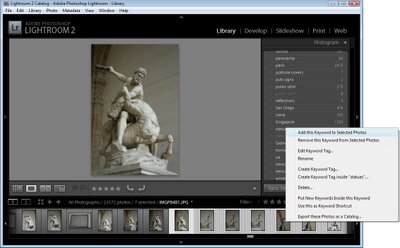
You can add keywords to any image from the Keyword List by selecting the images, then right click the keyword in the Keyword List and choose Assign this keyword to Selected Photos.

Step 3
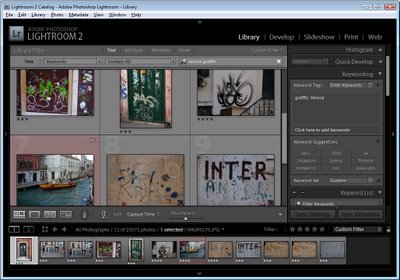
Once you have added keywords to your images you can find the images by keywords by accessing the Filter panel. Press \ to toggle the display of this panel which appears above the Grid panel of images. Select Text, in the first box, select Keywords in the second box select Contains All (or Contain) and type the keywords in the last box. Contains All is an AND search and requires that an image contain both keywords such as Florence and Church. Contain is used for an OR search which would return all images with either or both the keywords, Florence or Church. To cancel the search, click the X button in the search field.

While keywords aren’t the easiest thing to get a grip on, in Lightroom they are key to being able to index and find your images quickly.

I contribute to the Digital Photography School blog and this post first appeared on that site.

Helen Bradley
Page 2 of 3123