Wednesday, August 20th, 2014

A Great Microsoft Office Tutorial Resource

Great find! A list of good quality Microsoft Office tutorial resources

I’ve recently discovered an enormous list of Microsoft Office tutorials that may be worth checking out. Each piece of Office software has several listed tutorials ranging from beginner to advanced difficulty and general to specific usage.

Best of all, each tutorial has a brief summary of its contents so you can quickly decide if its new and interesting information. Hopefully every Office user will find something of use. You can visit the page here.

Thursday, July 31st, 2014

Force Excel to Recalculate a Worksheet

Help! My Excel formulas aren’t updating – how can I make Excel recalculate everything?

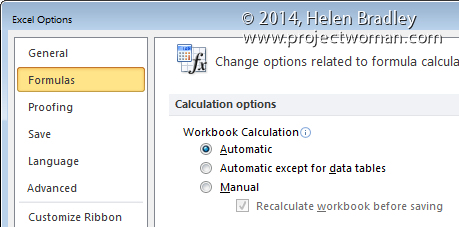
I have been working on a very large and very complex worksheet today. It uses a lot of custom functions to manage the calculations and as I was working on the functions I was plagued with a problem. You see Excel refused to update the cells that contained formulas based on my functions. It meant I was continually thinking that the problem was with my code. Sometimes the code was a problem but when formulas don’t update you just don’t get any visual feedback as to what is going on. I checked the Options to make sure that Calculation was set to be done automatically and it was.

Turns out the problem is a known one and can happen in Excel. How horrible is that? Excel won’t recalculate? Wow! That’s like Word not spell checking or not letting you type the letter e!

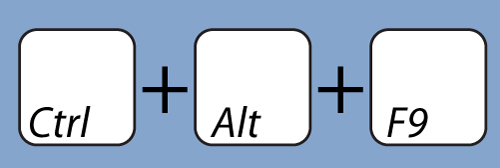
Anyway the solution is to press Control + Alt + F9 to force every formula in the worksheet to recalculate. When you do this, it might take a while for it all to recalculate but at least the data will now be accurate!

Thursday, July 24th, 2014

Insert Text from a File into Word

You can quickly insert text from a file into your document using Word’s Text from File command. This used to be as simple as choosing Insert > File  but the command got hidden behind an additional layer of the UI in Word 2007, making it almost entirely invisible to most users.

To insert text from a file in all recent versions of Word, open the Insert tab in the ribbon and, in the Text settings find the Object button. Click the small arrow to the right of the Object button, and choose Text from File…. Choose the file you want and click Insert. The file type selection here defaults to Word documents only, so if you wish to insert a .txt file or other non-Word document, you’ll have to change the file type to your desired type or All Files.

If you insert a Word document it will include all elements of the document such as images and special formatting. If you wish to include the file’s header or footer (if it has one), you should insert the file into a new section of your document. Be careful when inserting multiple files with different formats, since text from one file may take on another file’s format if the inserts aren’t separated properly.

Monday, June 16th, 2014

Resize and Position Photos in SmartArt Placeholders


Yikes! Just how do you resize a photo inside a PowerPoint or Word SmartArt placeholder

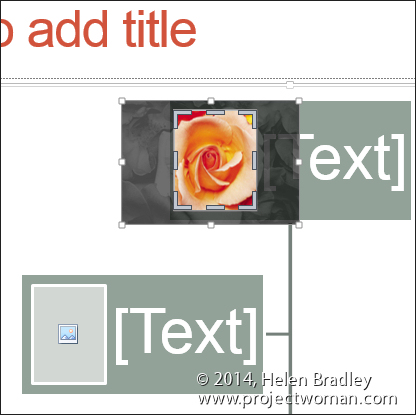
I got an email from a reader this morning. He has a PowerPoint slide (but it could as easily be a Word document or an Excel worksheet) and he wants to size a photo inside a placeholder. You see he was making an organization chart and he was dealing with lots of different head shots – all photographed differently. He wanted to make the faces the same relative size inside the placeholders – but to do this he had to get access to the photos inside the placeholders.

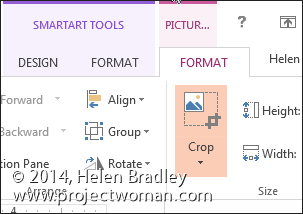
You see that’s the problem, every time you right click the placeholder and choose Size and Position you’re affecting the placeholder not the thing inside it! The solution is to use the Crop tool – so click on the placeholder and choose Picture Tools > Format tab and click the Crop tool.

Now you get handles around your photo and you can drag the handles to resize the image and you can move it to change its position inside the placeholder. When you’re done, click Crop again to finish. Easy when you know how.

Thursday, April 10th, 2014

Make a Style that forces a page break in Word

If you always start a new page for a particular type of heading – include the page break in the style

When you always start a major heading item on a new page in a Word document you can configure your heading style so it has the page break built into it – saving  you having to insert it manually.

To do this, select some text with formatted with the style that is to include the page break and locate the style in the Style gallery. If it does not appear there, display the Styles and Formatting task pane by clicking the dialog launcher in the bottom right of the Styles area in the ribbon.

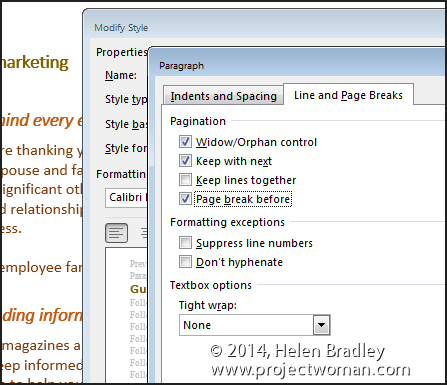
Right click the Style name, choose Modify and then Format.

Click the Paragraph option and then click the Line and Page Breaks tab.

Enable the Page Break Before checkbox and click Ok twice.

The page break is now part of the style so a new page will be started each time you use that style. The style will also update and effect any text already formatted using that style in the current document.

Helen Bradley

Sunday, March 23rd, 2014

Easily Paste Web Content into Excel with Destination Formatting

When pasting large data tables from your web browser into an Excel file you’ll probably be displeased to find that they do not match the formatting of the worksheet.

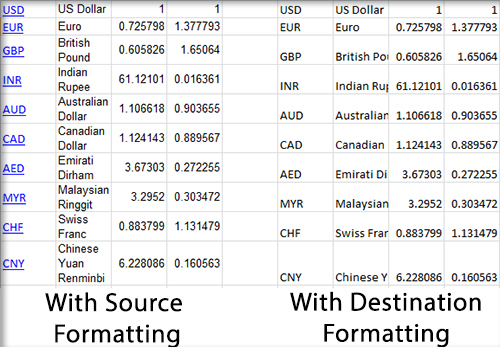
By default Excel will paste the data with the formatting it used on the source web page instead. This is rarely useful, since it’s very unlikely the web page had formatting that is compatible with your document. As you can see in the image above, using the source formatting can result in the inclusion of links, improper font and font size, and a number of other formatting issues.

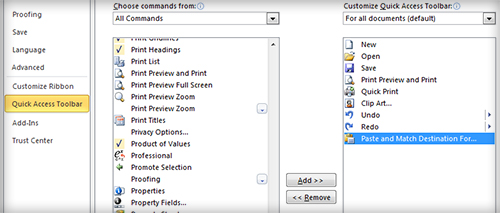
To make Excel paste the data with destination formatting (i.e. the formatting of the destination Excel worksheet), you’ll need to add a special command to your quick access toolbar. To do this, select File > Options > Quick Access Toolbar. Above the left column, select the Choose commands from dropdown and choose All Commands. Scroll down the list and find Paste and Match Destination Formatting. Select it and click Add, then OK.

Now whenever you wish to paste web data into Excel, click the Paste and Match Destination Formatting button in the Quick Access Toolbar instead of using the standard paste tool. This will result in the data being automatically formatted to match the look of the rest of your worksheet.

Helen Bradley

Helen Bradley

Friday, March 21st, 2014

How to Fix Excel Printing a Workbook to Multiple PDF Files

Learn how to  make sure that printing multiple sheets to a pdf gives one pdf and not many

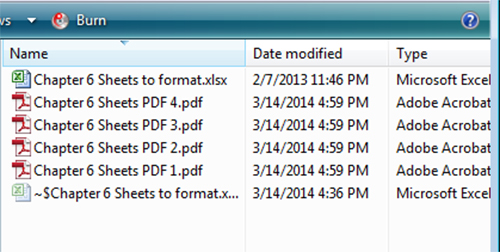
If you have ever tried to print a large Excel workbook to a PDF file, you’ve probably run into this issue. You press print, Excel asks you to name the PDF, and then it begins to print. Everything seems fine, but then Excel asks you to name another PDF, then another, then another, ad infinitum. When the operation finally finishes, Excel has properly printed the workbook to a PDF format, but your worksheets have been split into several different PDF files. Some PDFs contain multiple worksheets, others only a single one, but all you really wanted was one PDF file with the entire workbook.

It turns out this issue is caused by having different Page Setup options on each worksheet. For example, Excel can’t print two pages with different paper sizes to the same “piece of paper” (actually a PDF in this case). Instead, it insists on having two different PDFs to print to, one for each paper size. So, to resolve this issue, you must make sure each worksheet’s page setup agrees with the others.

Fortunately, doing this is very simple. To begin, in your Excel workbook, right click one of your worksheet tabs at the bottom of the window and choose Select All Sheets. Any changes to the Page Setup options will now be applied to every worksheet.

This means we don’t have to check each worksheet to make sure it has the same settings as the others; we simply choose which settings we want and all the worksheets will automatically match. To do this, go to the Page Layout tab in the ribbon. In the Page Setup section, click the small arrow in the bottom right corner to open the Page Setup dialog.

The Page tab of the dialog contains the critical options that can lead to this issue, namely the paper size and print quality settings. Change these to whatever you wish, typically something like letter paper at 300 dpi. Other settings, such as orientation and scaling, do not cause the multiple PDFs issue so if you wish you can change them for individual worksheets. Still, it’s best to have all worksheets print with the same settings. Once you have chosen your desired settings click OK and they will be applied to every worksheet.

You can now print your workbook to a single PDF file.

Helen Bradley

Helen Bradley

Thursday, March 20th, 2014

Create Your First Access Database – Pt 4 – Report Design

Database in Microsoft Access

Learn to create a database in Microsoft Access. This video steps you through the process of creating a report for your Access database file. In other parts of this series you can learn how to create the database, write Queries and create a Form for easier data entry.

For a text version of this video check out this article on my website: First Steps with Access

Helen Bradley

Helen Bradley
Wednesday, February 26th, 2014

Excel – Replace charts with pictures

Enhance your Charts with Visuals

by Helen Bradley
Why have boring old column and bar charts when you can have picture charts instead?

Learn how to replace bars and columns in Excel charts with small images stacked up to show the values being compared.

Image charts like this are one of Excel’s secrets so let me show you how to make them.

In the video you will learn how to replace columns and bars in Excel charts with images. You will see how to find images to use and how to stack and resize the images to fit the chart’s columns and bars.

Helen Bradley

Thursday, January 9th, 2014

Format Painter missing in Word on the Mac

It’s actually not missing but it’s not where you expect to find it either.

I use Word on the PC every day and on the Mac only when I am traveling – I love my MacBook Air with its solid state drive – it’s light and an easy traveling companion.

What I don’t like is having to work out all the curly questions you have when things work differently in one operating system to another. Cue today’s issue. I was copying and pasting content from my website into Word on the Mac and I needed to remove the formatting – well I found the Clear Formatting button sort of where I expected it to be on the ribbon.

But when it came to copying a format from one piece of text to another I got stumped. You see the Format Painter isn’t on the ribbon where you expect it to be if you’re used to using Word on the PC. In fact Word on the Mac is a totally different animal.

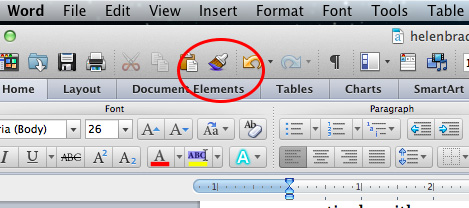
To find the Format Painter look upwards – up from the ribbon, up from the ribbon tabs and up to what we Windows folk would call the QAT or Quick Access Toolbar. On that toolbar of tools in Word on the Mac is the Format Painter. Click the text to copy the format from, click the Format Painter and then click the text to paint it onto. It’s a simple process BUT you have to find the Format Painter button first!

Hopefully this helps you!


Helen Bradley

Page 2 of 111234510Last »