Using OpenType, you can add caps, ligatures, and other styles to your fonts to beautify your text.
To get started with OpenType in Microsoft Word 2010, and in particular if you have the font Gabriola installed, type some text using the font Gabriola. Include some numbers because Gabriola has a particularly attractive range of numbers.
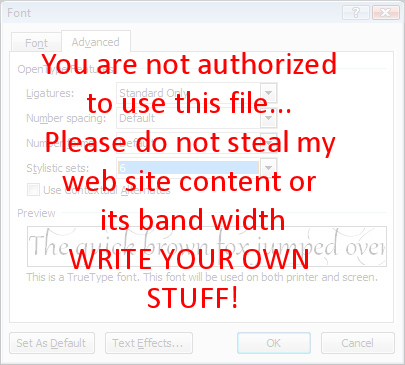
With the text selected from the Font group click the dialog launcher to open the Font dialog and select the Advanced tab.
From the Ligatures dropdown list, select Standard Only and from the Stylistic Sets dropdown list select style 6 and click Ok to apply it to the text. You will see that the text changes to show some attractive swashes on some letters. If you change to a different Stylistic Set you will see that some characters may change. You may need to increase the line spacing to see the full swashes appear.
This OpenType font feature only works for fonts that actually have these characters in them, which include Gabriola, Calibri, Cambria, Constantia, Corbel, Consolas and Palatino Linotype. You must also be working on a .docx format document and not in compatibility mode in Word. If you don’t have access to these font features, choose File -> Options -> Advanced and scroll to the bottom of the screen and click Layout Options. Ensure that the Disable OpenType Font Formatting Features checkbox is disabled.
In Word, if you set the typeface to Gabriola and then start typing you’ll notice that as you type, the characters may change because the position of the characters in relation to other characters around them has an effect on how individual characters are drawn.
When creating a long document with many different sections, it’s often necessary to create a table of contents to make navigation easy. Fortunately, Google Docs can generate a table for you almost entirely automatically.
To do this, you must first create section headers using the list under Format > Paragraph Styles. Simply highlight a section title and apply an appropriate heading style for it. Each style grows progressively smaller from 1 to 6. Major sections, such as chapters, should use the largest headings while smaller subsections should use progressively smaller headings.
Once you have created all of your headings, select where you want the table of contents to be in your document and choose Insert > Table of Contents. The table will automatically fill with links to each heading and arrange itself according to the heading styles chosen. Smaller headings will be indented beneath larger headings in the table, indicating that they are subsections.
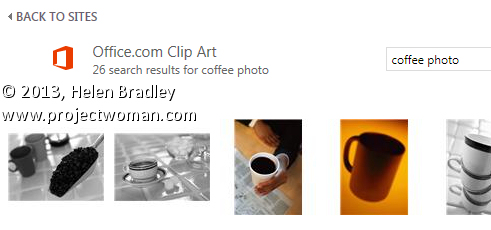
Learn how to find only photos or only illustrations when searching Office 2013 online images
In Office 2013 the old Clip Art feature was removed and now you can insert an image by searching for it online at a number of places. One of these is the Microsoft clip art collection which is now stored totally online and not partly on your computer.
So far, so good.
The problem is that the old task pane feature which let you determine the types of images you want to search for is now gone. So, on the face of it, when you search for something like coffee you get illustrations and photos. In many cases much more than you want or need.
Often, I know ahead of time I want a photo or an illustration so I want my search to return only one type of image. There’s no information at all as to how to do this but you can! Instead of searching for coffee, type coffee photo to find photos relating to coffee or coffee wmf to find just illustrations as these are generally wmf format images.
It isn’t a perfect solution and you will miss out on some images as well as get the occasional illustration with your photos or vice versa.
However, if you’re not too fussy about missing out on some imagery then using this search format will weed out a lot of the stuff you don’t want and serve up mostly the type of content that you do want.
This tip works in any of the Office 2013 applications – PowerPoint 2013, Excel 2013, Publisher 2013. Word 2013 and more.
Word’s Reviewing tools make it easy to show someone the changes you’ve made to a document.
You can set Word to record the changes before you make them by selecting the Review tab on the ribbon and click Track Changes > Track Changes.
Now, in Word 2007 & 2010, every addition to your document will be underlined and every deletion will be marked with strikeout. Word 2013 defaults to Simple Markup so you will need to choose All Markup to see the changes marked up.
These changes are retained when you save the document.
You can apply the changes permanently at any time by selecting Review > Accept or Reject and choose Accept All Changes (or Reject All Changes).
Word 2013 has a new feature which lets you force Track Changes to be enabled. Choose Review > Track Changes > Lock Tracking to enable this feature. Now if you save the document and send it to someone, any changes they make to the document will be recorded in the document. They cannot disable this feature without having the password to unlock the setting and disable it.
In the pre-ribbon versions of Word you would use the Table commands to sort data in a Word document.
In Word 2007, 2010 & 2013 you can’t use the table sort options any longer for plain old text simply because you can’t select the table options if you don’t have a table – it’s a Catch 22 situation.
Luckily, Word now includes a proper sort option for any text – not just table text. To use it, first select the text to sort and then click the Sort button on the Home tab of the Ribbon.
When the Sort Text dialog opens you can choose what to sort such as Paragraph or Field and the type of sort. If you want a case sensitive sort so A is treated differently to a then click Options and check the Case Sensitive checkbox.
Once you are done select the sorting options, click Ok to perform the sort.
How to use linked text boxes to flow text throughout a document automatically
If you’re familiar with using desktop publishing software you’ll know that it is useful to be able to create text boxes and have the text flow automatically from one to the next. You use this feature to start a story on one page of a newsletter, for example, and to have it continue on a later page.
Word 2007, 2010 and 2013 can do this for you too, if you use the built in text box feature. To do this, first choose Insert > Text Box > Draw Text Box and click and drag to draw a text box on the page.
Repeat this and add a second text box on another page in the document.
Now select the first text box, right click and choose Create Text Box Link.
Now click in the second text box to link the two together.
In future, any text which you type into or paste into the first text box and which won’t fit because the box is not large enough to accommodate it, will flow automatically into the second text box.
Learn how to create a simple animation in PowerPoint. You will add a shape which, when clicked will trigger an image to be displayed. It is a smart animation with lots of potential uses which, once you see how it is done, will be simple to adapt to your own needs.
Transcript:
Hello, I’m Helen Bradley.
Welcome to this video tutorial. In this tutorial I’m going to show you how you can create an animation where you click a button to show an image. Before we get started with this tutorial let’s have a look and see what it is that we’re going to achieve.
I have an image here and a shape and when we play the presentation this is what we’re going to see. We’re going to see a slide without the picture and when I click on this shape I’ll see the image displayed. And we’re going to create this animation where we click on a shape and an image appears.
So back in PowerPoint let’s go to a new slide and I’ve already inserted my image. I just chose Insert and then Online Pictures. I searched for an elephant and I’ve just inserted it on the slide. So there’s nothing special about what I’ve done to date. Now I’m going to choose Insert and then Shapes and I’m going to choose my rounded rectangle shape.
And I’m going to add it to my slide and I’m going to add some text to it. And I’m just going to click away from the shape. Now that we have our shape and our image we’re ready to create the animation. To do this I’m going to click the Animations tab on the Ribbon. And I want to animate the elephant so I’m going to click on the elephant image and I’m going to choose an animation for it.
So I could choose an animation such as fade so it will fade in. And then I’m going to open the Animation task pane over here by clicking on Animation Pane because I want the elephant to be animated but I don’t want him to appear on a click and I don’t want him to appear after the slide is opened. I want him to appear when you click this particular shape.
And that’s a different animation. This is the elephant animation so I’m going to right click it and choose Effect Options because that allows me to control how this effect is going to play. And I’m going to click the Timing tab.
And I want this to be triggered by the clicking of this shape so I’m selecting to Start Effect on Click of and I’m going to select Rounded Rectangle and just click Ok. And now this image is going to animate when we click this shape. Let’s close down the task pane and let’s go and test it.
I’ll click the Slide Show. You have to do that because you have to test this slide as it would appear inside a working slide show. And you can see here we have our slide on the screen and just our filled rectangle. I’m gray. I have a trunk. Click to see what I am. The elephant image is not visible yet. However when I click the shape the elephant appears and we would then progress through the slide show.
So this is a simple animation effect that you can create so that you can click a shape and something happens. The animation is all added. All the effects are added to the image itself. You’re going to animate it with some sort of an entrance effect and then adjust its timing so that it is triggered by a click on this shape here.
I’m Helen Bradley.
Thank you for joining me for this video tutorial. Look out for more PowerPoint tutorials on this YouTube channel as well as additional tutorials on other Office applications and Photoshop, Lightroom and Illustrator.
Visit my website at helenbradley.com for tips, tricks and tutorials on all these applications.
I’ve been working on a project which involves adding shapes to a PowerPoint slide using VBA.
One big big problem with PowerPoint is that there is no longer any macro recorder. This means you can’t get information about methods and properties by recording the steps you perform to, for example, add a shape to a slide. In other programs you can get a lot of useful information from recorded macros – in PowerPoint – nada!
So, if you, like me are struggling to make sense of a language that uses such wonderfully nonsensical properties like TextFrame.TextRange then here is the benefit of my research.
Here, in no particular order, is a grab bag of MSDN articles and references for adding and formatting (and adding text to) shapes in PowerPoint using VBA. Enjoy! and if you have any additional useful resources, please add them to the comments to keep us all from going crazy!


