Monday, January 24th, 2011

Join two tables together in Word

How to join two tables together in Microsoft Word

Quite often you’ll find that you have two tables in a Word document and you want to join the two together to make just one table. The solution is simple but way from obvious.

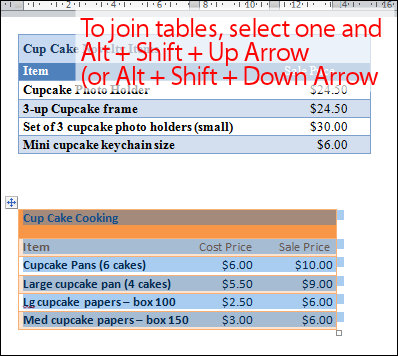
To do this, first select over all the cells in one of the two tables. If the table is underneath the one you want to join it up to, then press Alt + Shift + Up Arrow to move the table up the document so that it joins the bottom of the table before it. Keep pressing the key until the top row that you have selected joins the bottom border of the one above.

If you have selected the topmost table, then press Alt + Shift + Down Arrow until the top table locks onto the table below.

You can also drag one table up or down until it joins but this method is very slick. It also works on a single row so you can take one row from one table and move only it to join up with another table or to become a table all of its own. Experiment with this key combination – I’m sure you will love it.

Once you’ve done this, the tables will be joined to make one single table. If desired, you can then adjust the positioning of the columns so that the columns match between the two tables – this isn’t required but you may want to do it if the columns are supposed to be the same throughout.

Helen Bradley

Thursday, January 20th, 2011

Word – place a table over newspaper columns

Place a table over two columns in Word

Sometimes you’ll need to include a table in a document but place it so that it’s placed over a series of columns rather than inside the column itself.

To do this, click where you want the table to appear and insert the table at this point.

Hold your mouse over the table and you’ll see the table selector above the top left corner of the table. Click it to select the table and drag the table into position.

The default text wrap settings for a table in Word is that the text wraps around the table so there’s no special option to set to make this happen.

You can widen the table cells as large as necessary. If desired, the table can be sized so it fits the full width of the page or you can make it any size that you want.

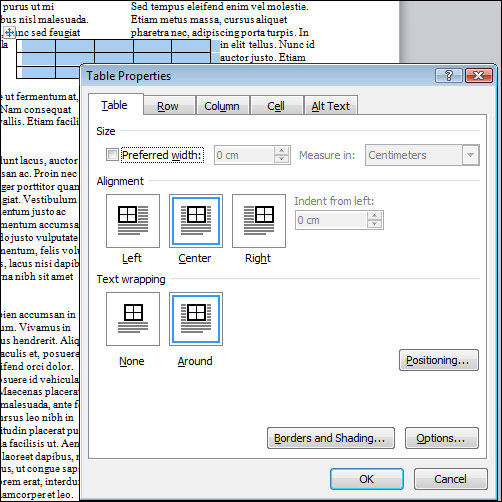
To adjust the wrapping of text around a table, right click the table selector (the little square above its top left edge) and choose Table Properties > Table tab. Here you can select how text flows around the table or you can make it not flow around it if you want the table to push the text completely out of its way.

Here too you can alter the alignment of the table – by choosing Left, Center or Right.

This table behavior is consistent across Word 2007, 2010, 2003 and earlier versions.

Helen Bradley

Thursday, January 20th, 2011

Step 13 – Simple Photoediting workflow – Sharpen the image

When you have finished working on an image you should sharpen it to make the edges in the image look crisper so that they look better when printed on paper and displayed on the screen.

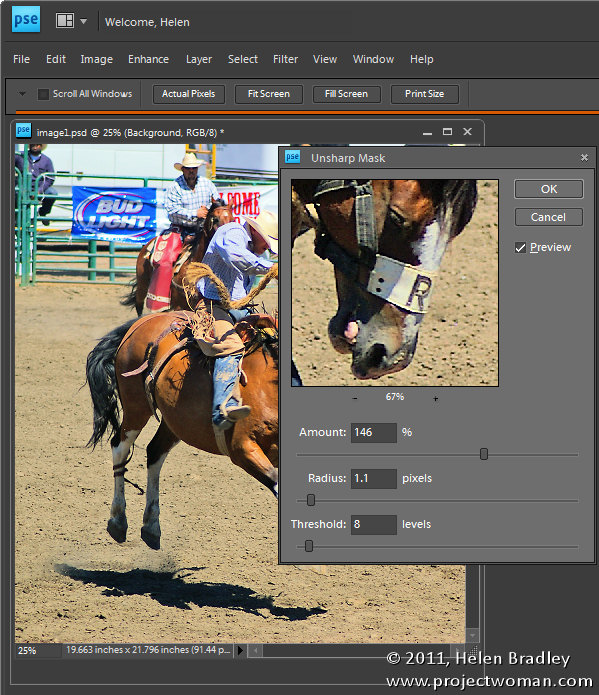
In Photoshop Elements, choose Enhance > Unsharp Mask and set the Radius to around 1.0 – 2.0 pixels. Select a low Threshold value of somewhere between 3 and 10 and adjust the Amount as required.

You will require a higher level of sharpening for images that you will print than you need for display on your computer screen or on the web, for example.

Use the Preview option to check the before and after results of sharpening to ensure you are getting the desired result. You should see the sharpening effect clearly at 100% view, but you should avoid making  visible halos around the edges in your image.

If your image was a little soft and lacking sharp focus before you begin, use a larger Radius value for the sharpening.

If you have been creating layers as you fix your image you must apply sharpening to a flattened version of the image, so choose Layer > Merge Visible to do this.

Other stories in this Simple Photo- Editing Workflow series:

Step 12 – Major Surgery

Step 11 – Getting to black and white

Step 10 – Fixing Redeye

Step 9 – Fixing Imperfections

Step 8 – Fix Skin tones

Step 7 – Fix Color problems

Step 6 – Fix muddy images

Step 5 – Fixing under and overexposed images

Step 4 – Straighten

Step 3 – Crop an image

Step 2 – Make a duplicate

Step 1 – Assess the image

Helen Bradley

Tuesday, January 18th, 2011

Word: Inserting a line Between Columns

Word - how to add lines between columns in a Word document

One of the features of Microsoft Word is the ability to insert a line between columns in a Word document.

In Word 2003 and earlier choose Format > Columns and there is an option for Line Between in the dialog. Select it and click Ok and a line will appear between the columns.

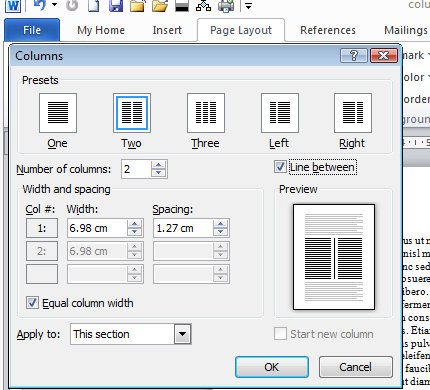
In Word 2007 and 2010 the option is harder to find. You need to select the Page Layout > Columns > More Columns Option. This opens the Columns dialog, which gives you the opportunity to select the Line Between checkbox.

If you want to disable this feature, go back to the columns dialog and disable the checkbox.

Helen Bradley

Tuesday, January 18th, 2011

Use Lightroom to Remove Sensor Dust

One of the annoyances most photographers encounter from time to time is sensor dust. This is dust that you get on the camera’s sensor and which shows up in your images as dark marks or flaws on your photos. Most often you’ll see this in the sky but it can appear anywhere in an image and it will appear in the same place in all your images – the tell tale sign that you have problems.

Of course, the only way to get rid of the dust is to clean your camera either using its dust removal option or by physically cleaning it. However, chances are that the reason you know you have a dust problem is that you see it on your photos. For these images, at least, cleaning the camera won’t help. Instead, digital removal is required.

If you’re faced with a series of photos that have dust problems, Lightroom can simplify the process of fixing them. Its Spot Removal tool can be used to fix sensor dust and, the benefit of doing the work in Lightroom rather than Photoshop, for example, is that once you have one image fixed, you can automatically fix most of the others.
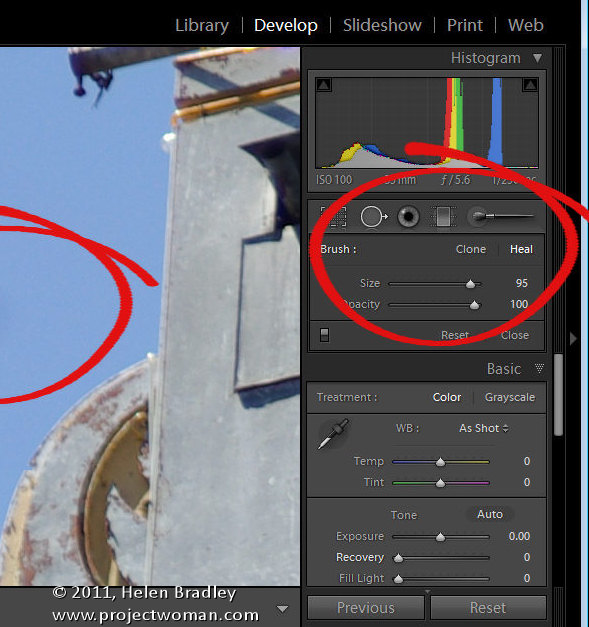
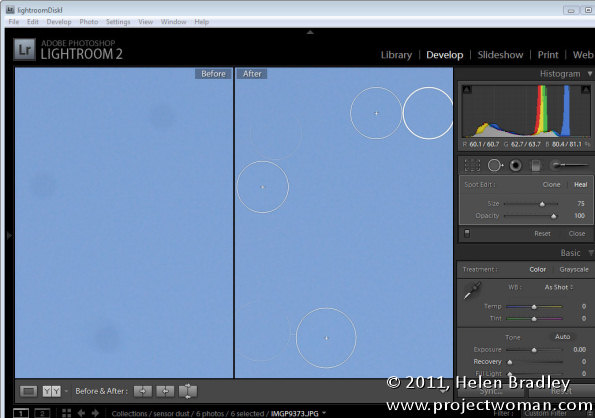
To get started, locate one image in the sequence that has sensor dust issues. Switch to Develop move and select the Spot Removal tool. Set it to Heal (the other option is Clone). Set the brush size to something large enough to cover the problem area and set its Opacity to 100 percent.
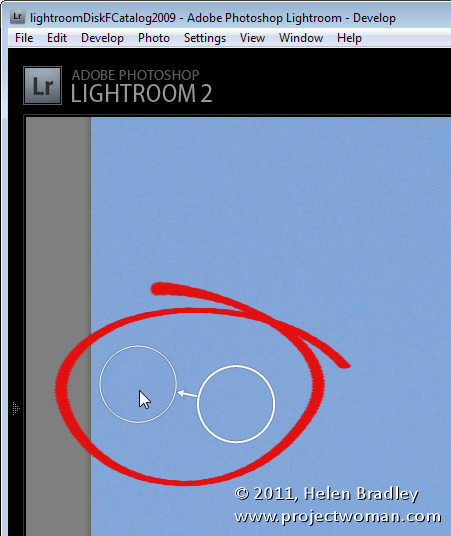
Click on the dust to set the location for the fix. You’ll see two circles appear on the image; one over the problem area (the spot circle) and the second over the area used to fix it (the sample circle). You can tell which circle is which as the arrow between them points from the sample circle towards the spot circle.

You can drag to reposition either circle and you can drag on one circle when the mouse pointer shows as a double headed arrow to resize the pair.
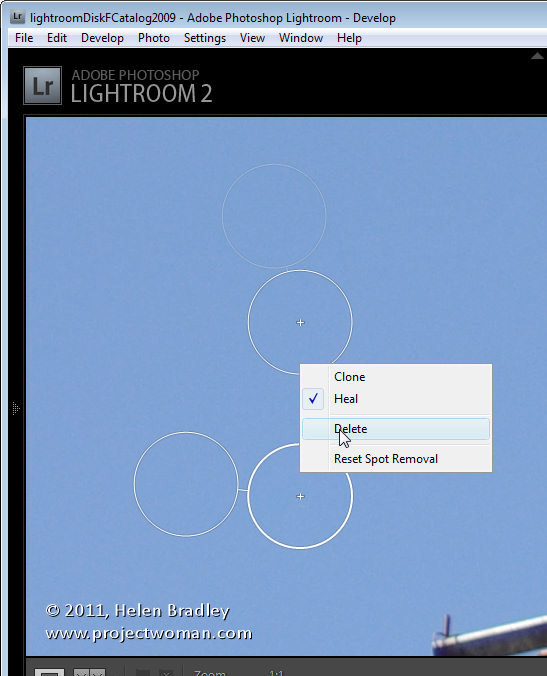
You can add multiple fixes to one image and, if you make too many, right click on the one to delete and choose Delete from the menu.

You can also use the right click menu to change from Heal to Clone to see if you get a better fix with this setting.
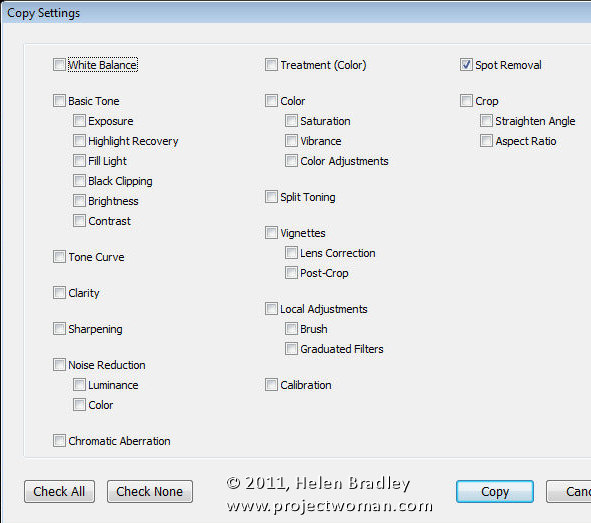
Once you have fixed the spots on the current image, you can copy these to other images. To do this, click the Close button to close the Spot Removal Tool drawer.

Right click the image and choose Settings > Copy Settings and when the dialog appears, select Spot Removal, disable all other options and click Copy.
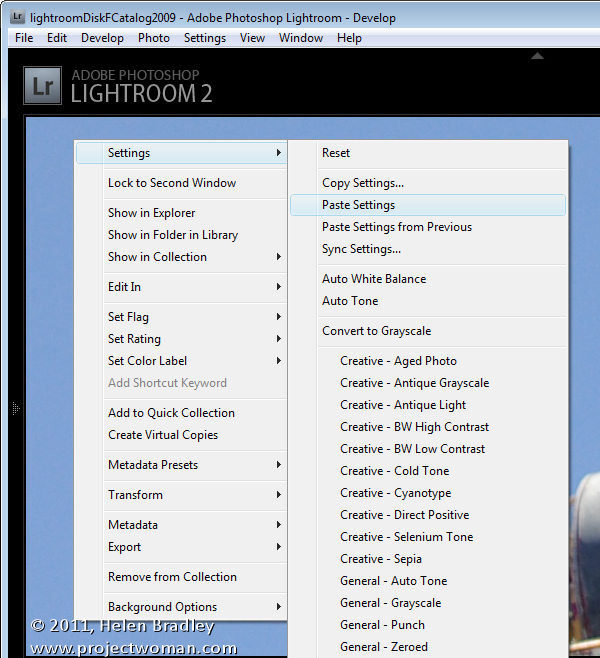
Select one or more images in the sequence that you shot and that need the fix applied to them. These do not have to share the same aspect ratio as Lightroom can fix portrait and landscape images at the one time.

Right click and choose Settings > Paste Settings. This will paste the fix onto the other images. Alternately you can select the fixed image and one or more other images, click Sync and select Spot Removal.
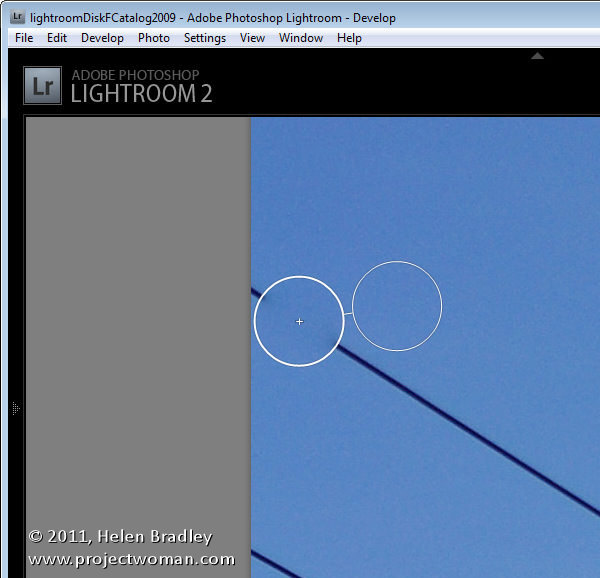
Check each fixed image in turn. Some images may have image content under the sample circle that doesn’t provide a suitable match for the problem area so you will need to move the sample circle to adjust the fix.

However, the entire process should be quicker than performing the fix to each image individually in Photoshop, for example.

Helen Bradley

Monday, January 17th, 2011

Step 12 Simple Photo-editing workflow – Performing major surgery

Quite often you will find that an otherwise pleasant image has been ruined by some distracting background element.

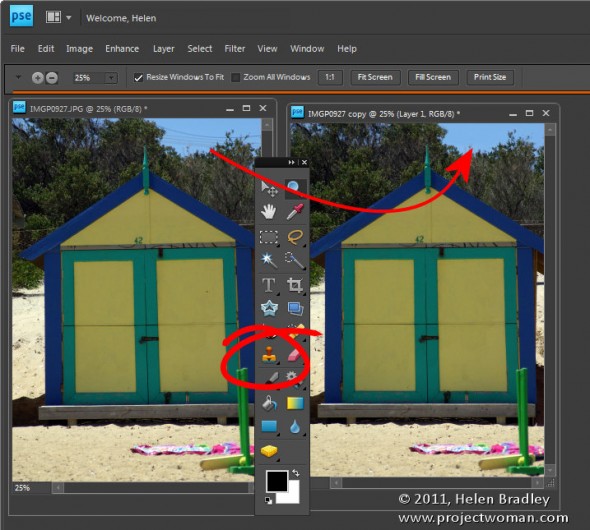
To remove this, use the Clone Stamp tool. Start by sampling an area of the image to use as the source data to fix the problem – you do this by Alt + Clicking on the portion of the image to use.

Then “paint over” the problem area. The results will be less obvious if you click with the brush rather than drag in a painting motion.

You may need to resample the source area from time to time as you work to find a good match for the area you are painting onto.

It is best to use a brush that is an appropriate size for the task – for detail work it should be quite small, for example, and it should have a low hardness value so you don’t get harsh edges on the fixed area.

If you are familiar with using layers, apply the fix to a new empty layer so that you can adjust and blend the layer later on if need be.

If you are cloning onto a new layer, make sure to have the All layers checkbox selected on the tool options bar so you sample from all the layers – the layer you’re working on won’t have any data so you can’t sample from it alone.

Other stories in this Simple Photo- Editing Workflow series:

Step 11 – Getting to black and white

Step 10 – Fixing Redeye

Step 9 – Fixing Imperfections

Step 8 – Fix Skin tones

Step 7 – Fix Color problems

Step 6 – Fix muddy images

Step 5 – Fixing under and overexposed images

Step 4 – Straighten

Step 3 – Crop an image

Step 2 – Make a duplicate

Step 1 – Assess the image

Helen Bradley

Saturday, January 15th, 2011

Create and Undo Columns in Word

Create two columns in Word and remove columns

Continuing the short series on working with columns in Word, here’s how to create a column layout in Word.

Create two columns

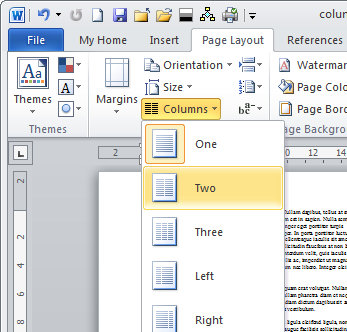
To turn an entire document into columns in Word 2007 and 2010 click the Page Layout tab and select Columns > Two. This immediately formats all the text in your document into two columns.

In Word 2003 you’ll choose Format > Columns, select Two (or Three etc.,) and click Ok.

Remove two columns

To undo the change and set your document back to one column in effectively undoing the two columns, repeat the process. In Word 2007 or Word 2010, choose Page Layout > Columns > One. The default for any document is one column so all you’re doing is going back to the default. In Word 2003 choose Format > Columns > One.

Make only part of the document into columns

If you want only part of a document to be in columns then select that part of the document first. For example, you may select all the content after the heading, leaving the heading unselected so it will be full width of the page. With that content selected, choose Page Layout > Columns and then select the number of columns.

This will make just the selected text into columns, leaving everything else full width of the page.

Again, if that piece of text ever needs to be returned to a single column just click inside it, choose Page Layout > Columns > One and it will be restore to the way it used to look.

So, that’s how to make text in columns in Word, how to delete columns and how to make only part of a document into columns.

Helen Bradley

Thursday, January 13th, 2011

Unlocking layers in Photoshop

Unlock the Background layer in Photoshop

When you first start working with layers in Photoshop, you’ll discover something about the background layer. The layer is locked which means a few things. Firstly, you can’t move the layer anywhere else in the layer stack because it’s locked. Secondly, while you can use the eraser on the bottom layer – because it is the bottom layer the eraser doesn’t erase to transparent and instead it erases to the background color. You also can’t add a layer mask to the background layer again, because it is locked and it cannot have any transparency applied to it.

When used on a Background layer the Background Eraser and Magic Eraser might look like they are making the background layer transparent but they are, in fact, first converting the background layer into a regular layer unlocking it in the process and then they perform the erase.

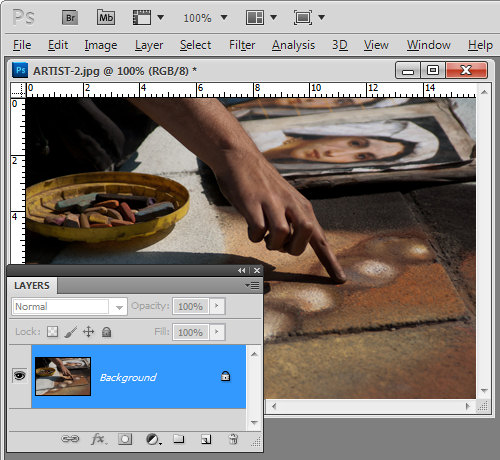
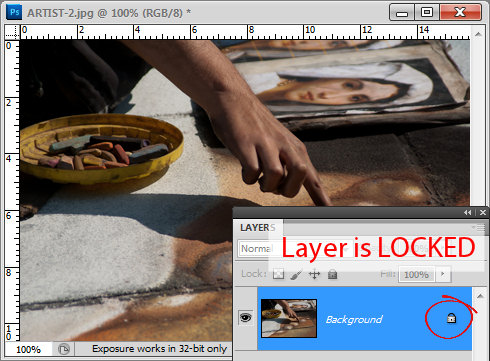
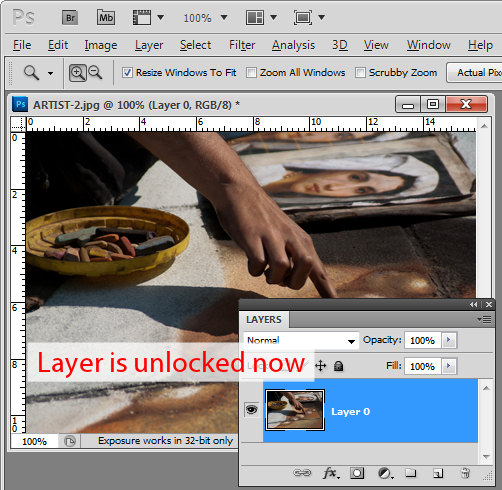
You will see that the background layer of a document is locked if you open the layers palette by choosing Window > Layers. There is a lock icon opposite the layer.

How to unlock a layer in Photoshop and Photoshop Elements

There are a few ways to unlock the layer in Photoshop (these also work in Photoshop Elements). The first one is to double click on the background layer and a New Layer dialog will appear. If you want to rename the background layer, type a name for it, otherwise just click Ok and the background layer will be converted to Layer 0. You’ll see that the lock icon is now removed allowing you to add a layer mask to the layer and delete content from it as well as move it elsewhere in the layer stack.

Another way to unlock a locked layer is to drag the lock icon onto the trashcan. You can also right click the background layer and choose Layer from background and click Ok.

Photoshop - how to unlock a layer in Photoshop and Photoshop Elements

Helen Bradley

Thursday, January 13th, 2011

Moving between columns in Word

jump move and switch between columns in Word
One of the most difficult things that people find with working with columns in Word is moving between the columns.

The reason is that the process itself is anything but easy.

The Tab key, which will move you between cells in columns in a table, doesn’t work inside newspaper style columns in Word so that key is out.

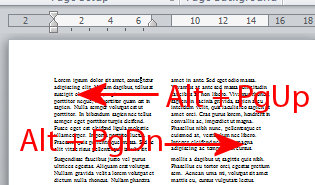
Instead, to move or jump from one column to the next you’ll press Alt + Page Down to go to the column on the right (the second column) or Alt + Page Up to move to the first column.

When you click Alt + Page Down, if you are in column 1 you’ll go to the very top of column 2. If you keep pressing the key you’ll flip between the top character in each column.

If you’re somewhere in column 2, when you press Alt + Page Up you’ll go to the top of column 1.

These are the only specialist keys for moving or switching between columns – we could use more – like jumping from a line in one column to the same line in the one next to it – but nada! Sorry!

Helen Bradley

Tuesday, January 11th, 2011

Who StumbleUpon Me?

find out who stumbledupon stumbled your web page

If you have a website or blog you will find that, if you’re lucky, you get StumbleUpon from time to time by someone. StumbleUpon is a good long tail link – if you get some positive feedback to the stumble you can get a lot of traffic over a long period of time – really good stuff if you’re tying to build your blog traffic.

I sometimes wonder just who ‘stumbled’ my sites by adding them to their StumbleUpon account. So I want to find out the person who first found the link, how many views it has had  and what folks think of it.

Here’s how to find who StumbleUpon your site:

First get the full URL of the page of your site that got stumbled – you’ll find this in your stats – you have to know what page people are stumbling or you won’t find the initial stumbler.

Then type this into your browser toolbar:

http://www.stumbleupon.com/url/<type your url in here>

In place of the <type your url in here> type the full url with or without the http:// part of the url – just don’t use the < or > characters.

Provided the person hasn’t set their page to private you can find the person who stumbled your site. It’s great information and a good way to track what folks think of your posts.

Helen Bradley