Monday, January 24th, 2011

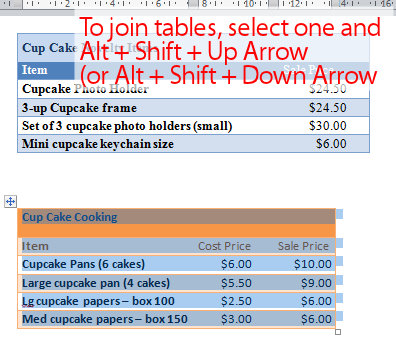
Quite often you’ll find that you have two tables in a Word document and you want to join the two together to make just one table. The solution is simple but way from obvious.
To do this, first select over all the cells in one of the two tables. If the table is underneath the one you want to join it up to, then press Alt + Shift + Up Arrow to move the table up the document so that it joins the bottom of the table before it. Keep pressing the key until the top row that you have selected joins the bottom border of the one above.
If you have selected the topmost table, then press Alt + Shift + Down Arrow until the top table locks onto the table below.
You can also drag one table up or down until it joins but this method is very slick. It also works on a single row so you can take one row from one table and move only it to join up with another table or to become a table all of its own. Experiment with this key combination – I’m sure you will love it.
Once you’ve done this, the tables will be joined to make one single table. If desired, you can then adjust the positioning of the columns so that the columns match between the two tables – this isn’t required but you may want to do it if the columns are supposed to be the same throughout.
Helen Bradley
Labels: join two tables, shortcut keys, Word, Word 2003, Word 2007, Word 2010
Categories:Uncategorized
posted by Helen Bradley @ 9:36 am50 Comments links to this post
Thursday, January 20th, 2011

Sometimes you’ll need to include a table in a document but place it so that it’s placed over a series of columns rather than inside the column itself.
To do this, click where you want the table to appear and insert the table at this point.
Hold your mouse over the table and you’ll see the table selector above the top left corner of the table. Click it to select the table and drag the table into position.
The default text wrap settings for a table in Word is that the text wraps around the table so there’s no special option to set to make this happen.
You can widen the table cells as large as necessary. If desired, the table can be sized so it fits the full width of the page or you can make it any size that you want.
To adjust the wrapping of text around a table, right click the table selector (the little square above its top left edge) and choose Table Properties > Table tab. Here you can select how text flows around the table or you can make it not flow around it if you want the table to push the text completely out of its way.
Here too you can alter the alignment of the table – by choosing Left, Center or Right.
This table behavior is consistent across Word 2007, 2010, 2003 and earlier versions.
Helen Bradley
Labels: columns, table over columns, Word, Word 2003, Word 2007, Word 2010, Wrap text
Categories:Uncategorized
posted by Helen Bradley @ 9:19 am1 Comment links to this post
Tuesday, January 18th, 2011

One of the features of Microsoft Word is the ability to insert a line between columns in a Word document.
In Word 2003 and earlier choose Format > Columns and there is an option for Line Between in the dialog. Select it and click Ok and a line will appear between the columns.
In Word 2007 and 2010 the option is harder to find. You need to select the Page Layout > Columns > More Columns Option. This opens the Columns dialog, which gives you the opportunity to select the Line Between checkbox.
If you want to disable this feature, go back to the columns dialog and disable the checkbox.
Helen Bradley
Labels: line between columns, Word, Word 2003, Word 2007, Word 2010
Categories:Uncategorized
posted by Helen Bradley @ 9:06 am4 Comments links to this post
Saturday, January 15th, 2011

Continuing the short series on working with columns in Word, here’s how to create a column layout in Word.
Create two columns
To turn an entire document into columns in Word 2007 and 2010 click the Page Layout tab and select Columns > Two. This immediately formats all the text in your document into two columns.
In Word 2003 you’ll choose Format > Columns, select Two (or Three etc.,) and click Ok.
Remove two columns
To undo the change and set your document back to one column in effectively undoing the two columns, repeat the process. In Word 2007 or Word 2010, choose Page Layout > Columns > One. The default for any document is one column so all you’re doing is going back to the default. In Word 2003 choose Format > Columns > One.
Make only part of the document into columns
If you want only part of a document to be in columns then select that part of the document first. For example, you may select all the content after the heading, leaving the heading unselected so it will be full width of the page. With that content selected, choose Page Layout > Columns and then select the number of columns.
This will make just the selected text into columns, leaving everything else full width of the page.
Again, if that piece of text ever needs to be returned to a single column just click inside it, choose Page Layout > Columns > One and it will be restore to the way it used to look.
So, that’s how to make text in columns in Word, how to delete columns and how to make only part of a document into columns.
Helen Bradley
Labels: create text in columns, delete columns, Page Layout, Word, Word 2003, Word 2007, Word 2010
Categories:Uncategorized
posted by Helen Bradley @ 9:43 am2 Comments links to this post
Thursday, January 13th, 2011

One of the most difficult things that people find with working with columns in Word is moving between the columns.
The reason is that the process itself is anything but easy.
The Tab key, which will move you between cells in columns in a table, doesn’t work inside newspaper style columns in Word so that key is out.
Instead, to move or jump from one column to the next you’ll press Alt + Page Down to go to the column on the right (the second column) or Alt + Page Up to move to the first column.
When you click Alt + Page Down, if you are in column 1 you’ll go to the very top of column 2. If you keep pressing the key you’ll flip between the top character in each column.
If you’re somewhere in column 2, when you press Alt + Page Up you’ll go to the top of column 1.
These are the only specialist keys for moving or switching between columns – we could use more – like jumping from a line in one column to the same line in the one next to it – but nada! Sorry!
Helen Bradley
Labels: columns, jump, move between columns, shortcut keys, switch, Word, Word 2003, Word 2007, Word 2010
Categories:Uncategorized
posted by Helen Bradley @ 8:03 am6 Comments links to this post
Tuesday, January 11th, 2011

Ok, so you’ve formatted your text to be two columns in Word and you’ve typed something in the first column. You haven’t filled the first column because you don’t want to. Fair enough – it’s your document – your choice.
But you do want to type something in the next or second column but however hard you try – Word won’t play nice. It wants you to fill column one before you get to fill column two – you don’t want to – so you’re at a stalemate.
The solution is to force Word to the top of the second column and you do this by inserting a break. In Word 2002/2003 choose Insert> Break > Column Break.
In Word 2007 & 2010 choose Page Layout tab> Breaks > Column.
Now you can type at the top of the second column. Yeah!
Helen Bradley
Labels: columns, Type in second column, Word, Word 2003, Word 2007, Word 2010
Categories:Uncategorized
posted by Helen Bradley @ 7:40 am14 Comments links to this post
Sunday, January 9th, 2011
 I get a lot of folks at projectwoman.com who come looking for help with columns and Word – anything from Word 2002 through 2003 to 2007 and now 2010. I have to think the reason is that Microsoft doesn’t make it as easy as it thinks to work with columns.
In the next few posts I’ll show you some things to do with columns that I think most folk have trouble with.
First up, how to put a picture in between columns in Word. Start by formatting your text in columns and then add your picture.
Chances are it won’t move and sit between columns. The issue is that Word inserts images as In Line With Text by default which is the setting MOST OF US WOULDN’T USE IN 1,000 YEARS – but Microsoft doesn’t really understand most users and so that’s what we get – images that are stuck – they won’t move where we want them to go and they won’t rotate.
To fix this, in Word 2002/2003 from the Picture toolbar find the Text Wrapping button, click it and choose practically anything except In Line With Text – I choose Square because it is the best all round setting.
In Word 2007/2010 click the Picture and from the Picture Tools > Format tab on the ribbon click the Text Wrapping button and choose Square.
Now your picture does what you expected it to do in the first place – it moves, it can be rotated and when you drag it over the space between two columns it sits where it is put and it pushes the text out of the way around it. Neat huh?
One day… maybe Microsoft will hear our cries of frustration and insert images so they behave like they should without us having to jump through hoops to make them.
Helen Bradley
Labels: columns, pictures over columns., span columns, Word, Word 2003, Word 2007, Word 2010
Categories:Uncategorized
posted by Helen Bradley @ 8:23 pm4 Comments links to this post
Monday, July 5th, 2010

Ok, so its easy to change units of measure in Word by setting the Word Options to measure in inches or cm – depending on where you live. However, if you’re using PowerPoint don’t waste your time looking in PowerPoint for the setting – it ain’t there.
Instead, the measurements in PowerPoint are tied to your geography. If you live in the US you get inches, if you fess up to living else where you get your local units of measure. To change where you live, launch the Control Panel and look for a Regional settings option and set your location there.
For those of us who live in the US but who think imperial measurements suck big time and who yearn for the metrics of our childhood in the far off land of Aus, thanks to Microsoft we are s*** out of luck. You see, if I set my region as Australia or the Uk to get metrics, everything else goes pear shaped and Google starts serving up UK or Australian pages in preference to US ones, or I get £ by default in Excel. It’s all round not a good choice. So, I’ll have to suck it up and learn to embrace feet and inches – but provided you still call the land of your birth home chances are you’ll be just fine.
Helen Bradley
Labels: PowerPoint 2007, PowerPoint 2010, Units of measure, Word 2007, Word 2010
Categories:Uncategorized
posted by Helen Bradley @ 9:48 am3 Comments links to this post
Tuesday, May 4th, 2010

I don’t like Word’s basic bullet design and generally I’ll want bullets of my own liking. For example I’ll use bullet lists to create checkbox lists for things I need to do.
Bullet style
To get a checkbox list working in Word 2007 requires a little bit of list knowhow.If you’ve created your list items you can simply select the list and, from the Home tab, select the Multilevel list button and choose Define new list style.
You need to use this rather than the Bullet Lists > Define new bullet options because otherwise you don’t get control over the tabs and Word’s tab settings for bullets don’t always make good sense.
The Define New List Style option gives you the ability to control all of this. Start by typing a name for your list so that you can find it easily again later on. The select Bullets which is a small button to switch from numbers to bullet style. Click Insert symbol and select Wingdings as your font.
You can then select a bullet style such as a shadowed box, select it and click Ok.This is applied as the bullet style.
Spacing
To adjust the spacing between the edge of the page and the bullet and the bullet and the text, click the Format button and choose Numbering. Set the Aligned at value to the distance that you want between the left edge of the page and the bullet itself. I set this to 0 inches.
Set the text indent at a value to the distance you want between the bullet and the text. This is a hanging indent so it ensures that all lines of text are wrapped automatically to the value you set. I like to set this to .75 inches if I’m using large bullets. Click Ok. You can then click Ok again to set this as your bullet style.
You can ignore the rest of the numbering if you’re simply using a one level bullet. Click Ok.
To apply this bullet style to your document click the multilevel list and select the list style from the list styles area of the dialog. If you hold your mouse over it, you’ll see the list style appear in a small dialog with the name that you gave it showing. Click it to apply it to your list.
Helen Bradley
Labels: bullet list, Custom, list, list style, Word 2007
Categories:Uncategorized
posted by Helen Bradley @ 9:01 am4 Comments links to this post
Thursday, February 18th, 2010
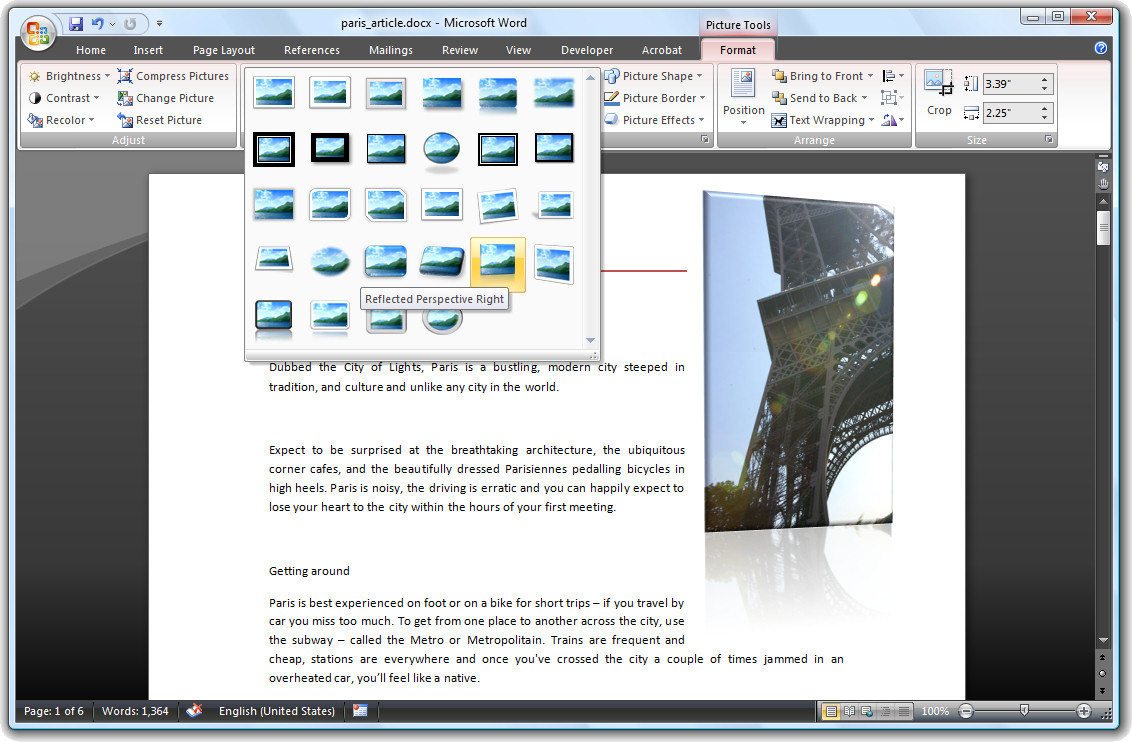
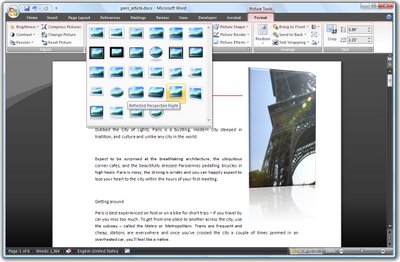 Word 2007 comes with a range of styles you can use when inserting images into your document.
To see them at work, insert a picture into your document, click the image and choose Picture Tools > Format on the Ribbon.
The Picture Styles are formats you can apply to your image and they include some very attractive looking options.
Once you’ve selected a picture style you can adjust things like the Effects which are attached to it.
For example, you can create a picture reflection by selecting the picture and then choose the Picture Effects > Reflection option to create a reflected edge.
You can also recolor the picture border if desired by using the Picture Border option. If you have a picture inserted in a document and formatted the way you like it but determine that you don’t like the picture and want to replace it, choose Picture Tools > Format and click the Change Picture option and choose an alternate picture to use. The format will remain and only the picture itself will change.
Helen Bradley
Labels: edge, format picture, picture styles, reflection, Word 2007
Categories:Uncategorized
posted by Helen Bradley @ 10:38 pm2 Comments links to this post

