Check out all of our tutorials on out YouTube page
Thursday, July 19th, 2012
eBook Template in Word
Labels: ebook, ebook template, Helen Bradley, Microsoft Word, template, video tutorial, YouTube
Categories:office
Thursday, July 19th, 2012
Create a file the size of the Clipboard in Photoshop
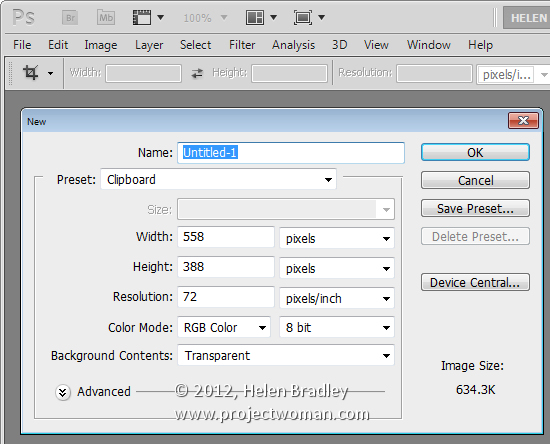
It is easy to save an image copied from the web to a Photoshop file. To do this, first copy the image to the Windows clipboard then choose File > New and press Ok.
The Photoshop file will be sized automatically to exactly the same image size as the image on the clipboard.
Now choose Edit > Paste to paste the image into position and you are ready to save it.
Labels: Clipboard, copy image, file size, helan bradley, how to, image, paste image, Photoshop, tip
Categories:photoshop
Thursday, July 19th, 2012
Trevor’s Tip of the Week – Quick Color Match
 photo by: lcrumling via www.sxc.hu)
Want to quickly match a color without disrupting your work flow? Press the I key to activate the Eyedropper tool, then click on the color your trying to replicate to sample it.
Labels: color, color matching, eyedropper, Photoshop, tip, trevor adobe, trevor payne
Categories:photoshop, trevor tip
Monday, July 16th, 2012
Why downsizing in Dreamweaver destroys images, and how to avoid this
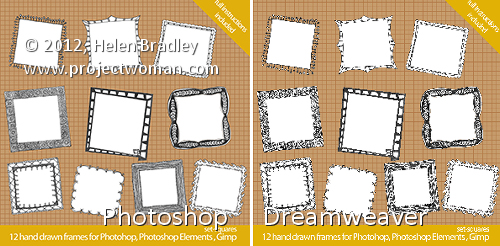
In the images above, you can see that the image on the right looks appalling in comparison with that on the left.
The two images are the same size but the one on the left was scaled down from a large size in Photoshop and the one on the right was scaled down by downsizing it in Dreamweaver.
The results are a great example of why you should never downsize an image in a web editor instead of a graphics program! The resized version on the right is downright nasty in comparison to the one on the left.
If you need to scale down your images – these were reduced from 2,376 x 2,376 pixels in size to 300 x 300 – then it’s vital that you use a proper tool to do so.
Photoshop has an image resize tool which you can get to by choosing Image > Image Size. Type the width and height of the finished image and then from the Resample image dropdown list select Bicubic Sharper (Best for Reduction). If you compare the results with different settings, you’ll see that the Bicubic Sharper typically gives the best result for downsizing images.
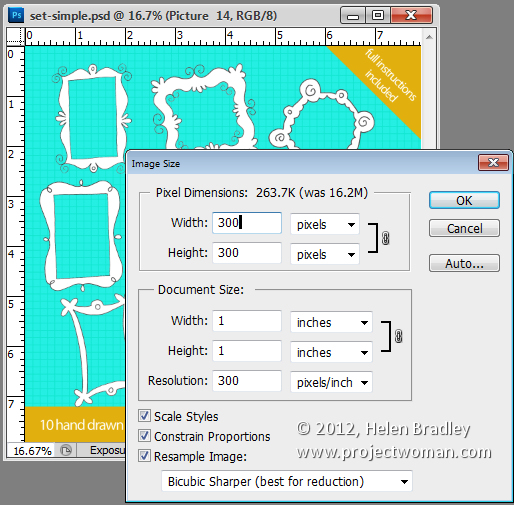
When you use this option the resulting images look as good downsized as they do on the screen in front of you.
Downsize them, save them and then import them into Dreamweaver and use them at that size. You will love your images a lot better when you do this.
Labels: downsizing images, Dreamweaver, Helen Bradley, how to, photo editing, Photoshop, photoshop vs dreamweaver, resizing images, tip
Categories:photoshop
Thursday, July 12th, 2012
Trevor’s Tip of the Week – Disappearing Ants
 (photo by: Miwa via www.sxc.hu)
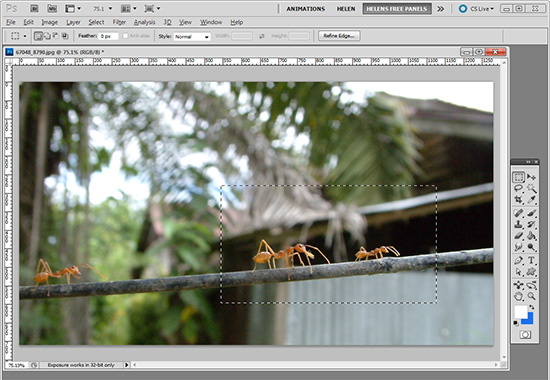
When those marching ants are too distracting on a selection you can make them disappear by pressing Ctr + H on a PC or Command + H on a Mac. Don’t forget to reverse it when you’re done by using the same commands.
Labels: how to, marching ants, Photoshop, quick tip, tip, trevor adobe, trevor payne
Categories:photoshop, trevor tip
Wednesday, July 11th, 2012
Using Adobe Camera Raw presets in Bridge
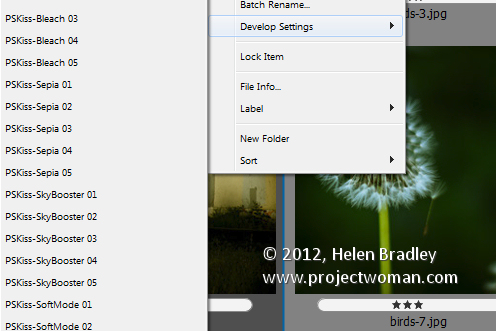
If you have a preset, for example a preset that applies an auto tone correction to an image in Adobe Camera Raw then you can apply this to an image in Bridge without needing to open Camera Raw.
Right click the image in Bridge, choose Develop Settings and then select the preset from the list.
Any preset can be applied automatically simply by selecting it. If you need to undo it, choose Develop Settings > Clear Settings. This will remove the settings from the image.
This strips out any ACR changes that you’ve made to the image.
A bonus of this feature is that the fix can be applied to jpg as well as raw images direct from Bridge.
Labels: ACR, adobe raw, bridge, develop settings, Helen Bradley, how to, images, jpg, tip
Categories:photoshop
Tuesday, July 10th, 2012
Sending to Send To
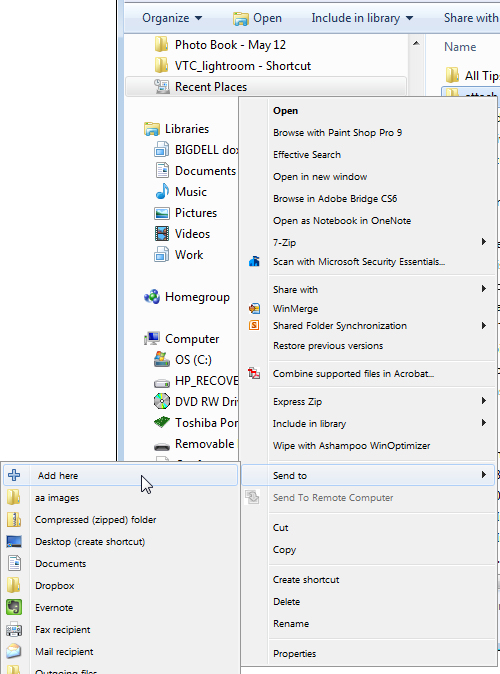
If you’re like me, you use the Send To feature of Windows Explorer quite frequently. Simply right click on a file in Windows Explorer and you have a Send To option. Click this and you’re able to send files to a list of sources.
While some of these options are built-in such as Compressed (Zip Folder), Desktop, and Mail Recipient, there are times when you’d like to add your own preferred location to this list.
For me, I like to assemble my files for emailing into a folder called Outgoing Files. I need that in my Send To list so that it’s accessible any time I need to send a file to it rather than having to copy and paste the file from one folder to another.
The problem with Send To is that it’s easy to use but difficult to add items to the Send To list itself.
Of course, you could go and find the folder and dump things in it but wouldn’t it be a whole lot easier if adding files to the Send To list were as easy as sending files to somewhere using it? I think it would be!
Enter a small free and opensource application called SendToSendTo. You can find it here: sendtosendto download
Download and install the application then restart your computer.
When you do this, locate a folder or file, right click and choose Send To. You’ll find that now you have an entry at the very top of the list called Add Here. Right click it and choose Send To > Add Here and you can then add that folder to the send to list by simply clicking Create.
What SendToSendTo does is to automatically add the folder that you point to into the Send To list.
One of the things that you’ll love about SendToSendTo is that it’s simple to install and use and it makes something that should have been easy to use all along work the way it should not as Microsoft designed it – enough said!
Labels: add locations, computer, download, Helen Bradley, how to, sendto sento, tip
Categories:office
Monday, July 9th, 2012
Maximum Length of YouTube Video Descriptions
There is a lot of discussion around about adding Caption text to your YouTube video descriptions. YouTube will automatically convert the audio content from your video stream to regular text – so it can be used for closed captioning. You should of course check and edit this as the results are a little weird from time to time!
You can then add this caption text to your YouTube video description so it will also be indexed by search engines. The problem is that it’s very easy to encounter an error with YouTube where it says that your video settings could not be saved the reason being that either the description is too long or contains illegal characters. This is an extremely unhelpful error message – well, YouTube you tell me – is the description too long? Or is does it contain illegal characters? Or both? WTF?
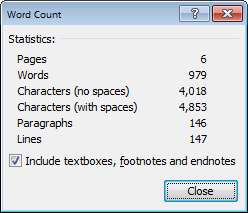
Having encountered this issue a few times, I set about to experiment and see just what is what so far as YouTube descriptions are concerned. I don’t have a definitive answer but I have a pretty good one. By simply shoving increasingly big pieces of text into a YouTube video Description I was finally able to force the error when I got to what Word reported to be 979 Words, 4,018 characters (not including spaces) and 4,853 characters (including spaces). This was 146 paragraphs of caption text which was 147 lines of text or thereabouts.
Anything over this tripped the error what the description that could not be saved. I am now assuming that somewhere around the 4850 characters including spaces mark is the limit on the maximum text in a Description.
Now to what are “illegal characters”. As you might have already realized, characters like periods (.) and commas (,) are legal. So too are regular straight apostrophes (‘), Question marks (?), equals sign (=), dash (-), colon (:), slash (/) and plus (+). The big NO, for Descriptions seems to be the Greater Than (>) and Less Than (<) symbols – they are illegal in YouTube Video descriptions so they will cause the error to occur.
So, this means you cannot include “<a href=” type code in your descriptions but you can include URLs in the form http://www.projectwoman.com as all these characters are perfectly legal.
If anyone else has additional information on what is allowed or disallowed in YouTube video Descriptions, please, feel free to join in the conversation.
Labels: captions, descriptions, illegal characters, too long, YouTube
Categories:office
Saturday, July 7th, 2012
Random text in Word 2010
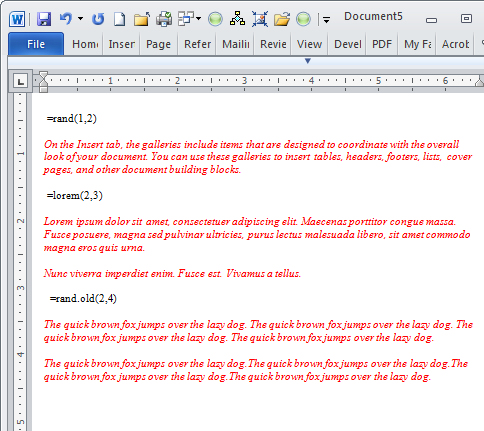
You may already know that typing =rand(1,2) on a new line in Word types one paragraph of two sentences in Word. The text is this random Word help style text:
“On the Insert tab, the galleries include items that are designed to coordinate with the overall look of your document. You can use these galleries to insert tables, headers, footers, lists, cover pages, and other document building blocks.”
But did you know there are other types of text you can type? Try =lorem(2,3) and press enter to get two paragraphs of three sentences each of the Lorem ipsum dummy text.
“Lorem ipsum dolor sit amet, consectetuer adipiscing elit. Maecenas porttitor congue massa. Fusce posuere, magna sed pulvinar ultricies, purus lectus malesuada libero, sit amet commodo magna eros quis urna.
Nunc viverra imperdiet enim. Fusce est. Vivamus a tellus.”
If you type =rand.old(2,4) and press enter you get the older Word dummy text – the Quick Brown fox..
The quick brown fox jumps over the lazy dog. The quick brown fox jumps over the lazy dog. The quick brown fox jumps over the lazy dog. The quick brown fox jumps over the lazy dog.
The quick brown fox jumps over the lazy dog. The quick brown fox jumps over the lazy dog. The quick brown fox jumps over the lazy dog. The quick brown fox jumps over the lazy dog.
So now you have plenty of random text options – of them all the Lorem one is the most handy for when you really need large portions of dummy text in a document.
Labels: filler, Helen Bradley, how to, Microsoft Office, Microsoft Word 2010, Random text, tip
Categories:Uncategorized
Friday, July 6th, 2012
Editing JPG images in Camera Raw from Photoshop Elements
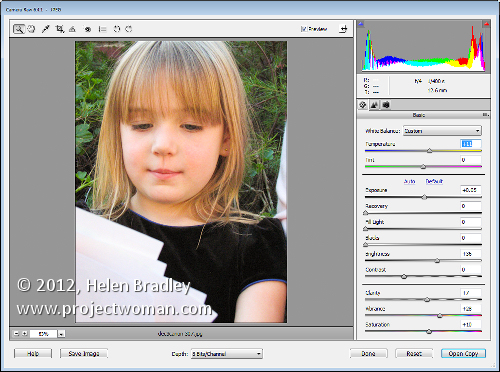
If you capture in jpg you may believe that you cannot take advantage of the Camera Raw processing features built into Photoshop Elements. This is because, by default, when you open a jpg image in Photoshop Elements it will open automatically in Elements bypassing the Camera Raw tool.
Only when you open a raw or dng file does will the Camera Raw tool appear allowing you to use its features to edit your image.
You can, however, get Photoshop Elements to open any image including a jpg image as a Camera Raw file. To do this, choose File > Open As and locate the jpg image to work with. From the Open As dropdown list, select Camera Raw as the option and click Open.
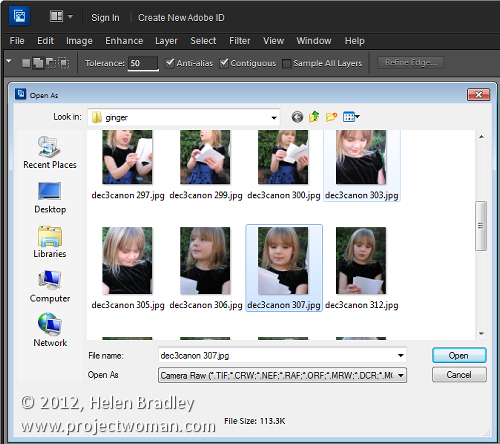
This treats the jpg image as a Camera Raw image so you have access to the superior processing tools available in Camera Raw for processing the image.
When you’ve finished with Camera Raw, click Open Image to move the image to Photoshop Elements with the Camera Raw adjustments in place. If you don’t want to go into Photoshop Elements then just click Done to save the fixed version of the image.
Labels: Camera Raw, dng, editing jpg, Helen Bradley, how to, images, jpg, jpg file, Photoshop Elements
Categories:photoshop


