Wednesday, July 31st, 2013

Learn how to use the color sliders to get a great Black and White image
You can convert any image into black and white by pressing the letter V or select B&W. However, you can also craft your own black and white image to get a better result than you get with the default settings if you drag on the color sliders in the Black & White Mix panel.
Each slider controls one of the underlying colors in the image. Drag to the right to lighten a color in the black and white or to the left to darken it.
Using the sliders, you can get a crafted black and white image that looks the way you want it to look.
Sliders for which there is not corresponding color in the underlying image will have no effect or little effect when you drag on them.
Helen Bradley
Labels: b & w, B&W, Black, Black & White, Black & White Mix, black and white, color, color sliders, craft, desire, Develop, Develop Module, effect, Lightroom, Photoshop, Reset Black & White Mix, sliders, tip, trick, Tutorial, underlying, white
Categories:Lightroom, photoshop
posted by Helen Bradley @ 6:33 amNo Comments links to this post
Sunday, July 28th, 2013

Quickly Converting your Image to Black and White with this shortcut key
The simplest way to convert an image to black and white is to press the letter V. This is a toggle so press it once to turn the image into black and white and again to make it a color image.
You can also convert an image to black and white by clicking the B&W option in the HSL/Color/B&W panel.
If Auto is enable click it to get a black and white conversion tailored to the needs of the image.
And, if the sliders are already all at different values you can reset them all to zero by holding Alt (Option on the Mac) and then click the ‘Reset black and white mix” option. Choose which is the best starting point for your conversion and progress from there.
If Auto is enabled, click it to get a black and white mix appropriate to the image.
Helen Bradley
Labels: Alt, Auto, B&W, Black, Black & White, black and white, color, convert, Develop, Develop Module, HSL, Lightroom, option, Photoshop, Reset Black & White Mix, slider, tip, trick, Tutorial, V, white
Categories:Lightroom, photoshop
posted by Helen Bradley @ 6:27 amNo Comments links to this post
Wednesday, July 24th, 2013

How to use the Color sliders to change color and remove color casts
When an image has a colorcast or a color that you’re wanting to play down in it, select the Color option in the HSL/Color/B&W panel. Here you can select the color to minimize the impact of and reduce its impact by dragging on the Saturation slider to reduce its saturation. Drag to the right on the Luminance slider to lighten the color.
This tool also allows you to take one color and alter its hue. So, for example you can target yellow and drag it towards green or towards orange by dragging on the Yellow Hue slider. In this way, any color in the image can be adjusted to one of its adjacent colors.
Helen Bradley
Labels: adjust, B&W, color, Color Option, colorcast, Develop, Develop Module, HSL, Hue, isolate, light, Lightroom, Luminance, Photoshop, reduce, saturation, tip, tool, trick, Tutorial
Categories:Lightroom, photoshop
posted by Helen Bradley @ 6:18 amNo Comments links to this post
Sunday, July 21st, 2013

Change the Tone Curve to allow it to behave as a draggable Point Curve
In Lightroom, you can make the Tone Curve behave as a Point Curve clicking the Click to edit the Point Curve indicator at the foot of the Tone Curve panel.
When a tone curve is set to be a point curve you can drag on any point on the curve to adjust the tones in the image at that correspond to that point on the curve.

With the point curve selected, click on the Targeted Adjustment Tool in the top of the Point Curve dialog and drag on the image to lighten or darken the image at that point. Drag upwards to lighten, down to darken.
To delete a point on the curve, hold your mouse over the point, right click (Command + Click on the Mac), and select Delete Control Point.
Helen Bradley
Labels: command click, Delete Control Point, Develop, Develop Module, dialog, indicator, Lightroom, Lightroom 3, Lightroom 4, Photoshop, Point Curve, right click, targeted adjustment tool, tip, tone, Tone Curve, trick, Tutorial
Categories:Lightroom, photoshop
posted by Helen Bradley @ 6:10 amNo Comments links to this post
Thursday, July 18th, 2013

Using the Tone Curve to Adjust your Image
Using the Tone Curve, you have the choice of preset settings: Linear, Medium Contrast or Strong Contrast. Use these as a starting point for adjusting the image.
Select the starting point then drag the Highlights and Lights sliders to the right to lighten these areas. Drag to the left on the Darks slider to darken the Darks. To bring detail out of the shadows, drag to the right on the Shadows slider.
Helen Bradley
Labels: adjust, Darks, Develop, Develop Module, highlights, Lightroom, Lights, Linear, Medium Contrast, Photoshop, Point Curve, shadows., Strong Contrast, tip, tone, Tone Curve, trick, Tutorial
Categories:Lightroom, photoshop
posted by Helen Bradley @ 6:00 amNo Comments links to this post
Monday, July 15th, 2013

Blackest of Blacks and Lightest of Lights
When you’re printing, you’ll want a good range of tones across your image from the blackest of blacks to the lightest of lights. Use the Blacks adjustment slider to ensure that you will have some black tones.
To see the blacks in the image, hold the Alt key (Option on the Mac) as you drag on the Blacks slider and stop when you see the first few colored pixels appear on the screen
Helen Bradley
Labels: adjust, Alt, Blacks, dark, Develop, Develop Module, image, key, light, Lightroom, option, pixel, slider, tone, white
Categories:Lightroom, photoshop
posted by Helen Bradley @ 7:47 amNo Comments links to this post
Wednesday, July 10th, 2013

Understand the differences between Vibrance and Saturation
The difference between Vibrance and Saturation is often misunderstood. If you drag the Vibrance slider to the right, you increase the saturation in under-saturated colors in the image. Fully saturated colors are adjusted less and skin tones are protected.
In contrast, increasing the Saturation boosts the saturation across the entire image which can destroy skin tones and which can oversaturate already saturated colors.
Typically you’ll use Saturation if your image needs an overall boost to all colors and use Vibrance to boost under-saturated colors.
Helen Bradley
Labels: color, Develop, Develop Module, difference, image, Lightroom, saturation, skin tone, slider, tone, under-saturated, vibrance, vs
Categories:Lightroom, photoshop
posted by Helen Bradley @ 10:07 amNo Comments links to this post
Sunday, July 7th, 2013

Recover Detail with the Recovery Slider for Clipped Highlights
When you have clipped highlights you can recover detail from them in Lightroom 3 if you hold the Alt key (Option on the Mac) and drag on the Recovery slider.
As you do this you will see the clipped highlights in the image and they will disappear as you drag to the right. Do not adjust the Recovery slider any further than you need to to recover your clipped highlights.
In Lightroom 4 you can achieve the same effect if you hold Alt or Option as you drag on the Whites slider – the whites are the lightest portion of the image.
Helen Bradley
Labels: Alt, Clipped, Clipped Highlights, Develop, Develop Module, image, key, Lightroom, option, recover, recovering, recovery, recovery slider
Categories:Lightroom, photoshop
posted by Helen Bradley @ 7:07 amNo Comments links to this post
Thursday, July 4th, 2013

Learn how to check to see if you have any Clipped Highlights in your image
You can see the clipped highlights in the image by clicking on the white triangle in the top right corner of the histogram. Portions of the image that show red are clipped highlights.
Next time we’ll show you how to recover detail in these clipped highlights.
Helen Bradley
Labels: Clipped, Clipped Highlights, Develop, Develop Module, histogram, image, Lightroom, portion, red, white
Categories:Lightroom, photoshop
posted by Helen Bradley @ 3:03 pmNo Comments links to this post
Sunday, June 23rd, 2013

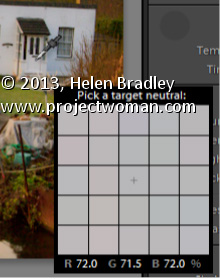
Learn how to quickly and easily adjust an image’s White Balance
In the Lightroom Basic panel’s White Balance area is a White Balance Selector. You can get to it by pressing the letter W. Hold the White Balance Selector over an area of the image which should be a neutral color, such as gray, black or white – gray is the better choice.
You will see the Loupe appear (which is a grid of 25 cells showing the color under and around the cursor). Click once to set the white balance, using the center color as a reference. If the result isn’t what you want, click again to sample another area. Continue until you get a good fix for the image.
Helen Bradley
Labels: 25, adjust white balance, Develop, Develop Module, develop toolbar, eyedropper, grid, Lightroom, Loupe, neutral color, w, white balance, white balance adjustment, white balance selector
Categories:Lightroom, photoshop
posted by Helen Bradley @ 7:49 am1 Comment links to this post

