Sunday, April 24th, 2011

Photoshop – “repeat rotate with a copy” shortcut

This week I discovered a totally cool new keystroke combination which I just have to share. Here’s the back story…

I love making regular shapes from irregular ones. Think kaleidoscopes but not always made from images – sometimes I make the kaleidoscope shapes from other shapes. Shapes are the best kept secret in Photoshop because, unlike brushes, they can be scaled up or down to any size and they don’t lose their smoothness.

So, here’s how to make shapes from shapes and how to put my new keystroke to use:

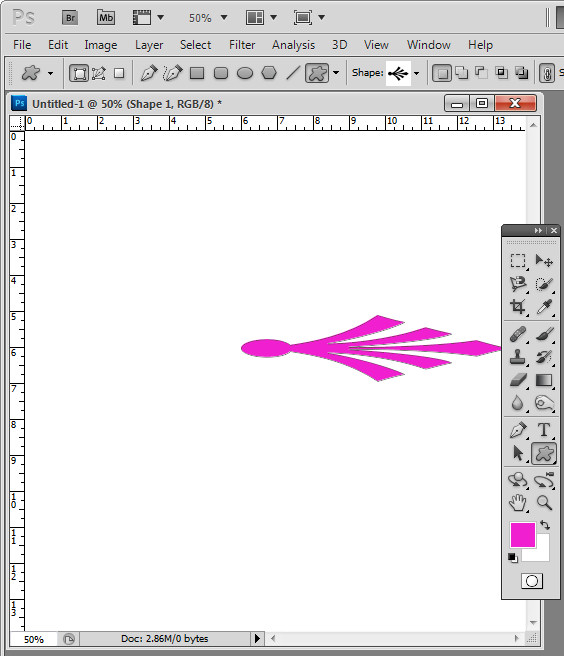
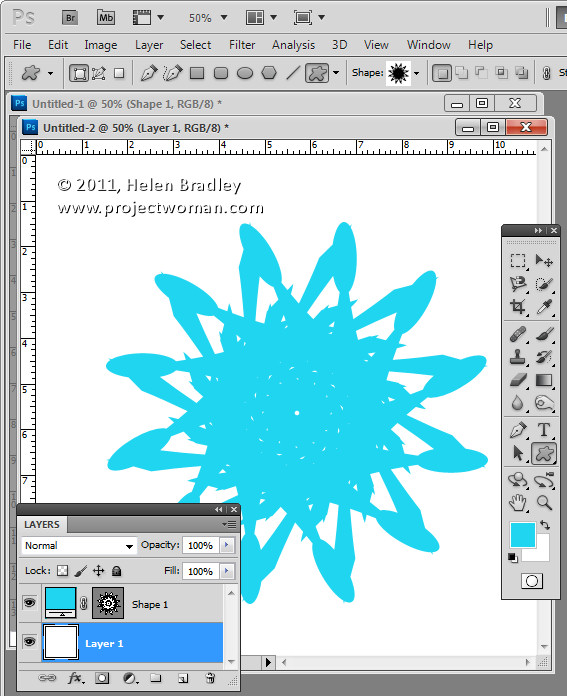
Click the Custom Shape tool and select a shape to use – you can use anything – I’ve used an ornament. On the Tool Options bar, click the Shape Layer icon – it’s the first of the three at the far left of the bar.

Drag the shape onto the image. It will appear as a new layer. It doesn’t really matter what color your shape is right now.

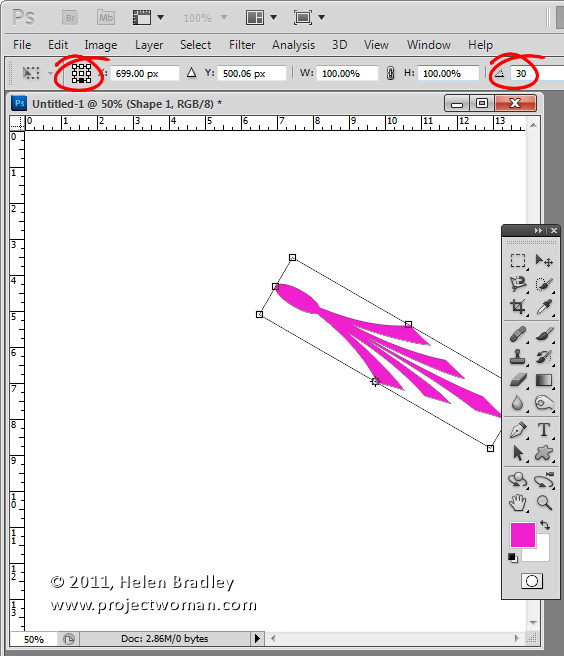
Click the Move tool then choose Edit > Free Transform Path (or press Control + T), click to select the point around which the shape will rotate. You do this using the small indicator on the toolbar – you can choose any of the squares to get an interesting effect – each one will give a different result.

On the Tool Options bar set the Angle to something which is a factor of 360 – 10, 15, 30, 45, 60 and so on. I typically use 30. Press Enter to confirm the rotation.

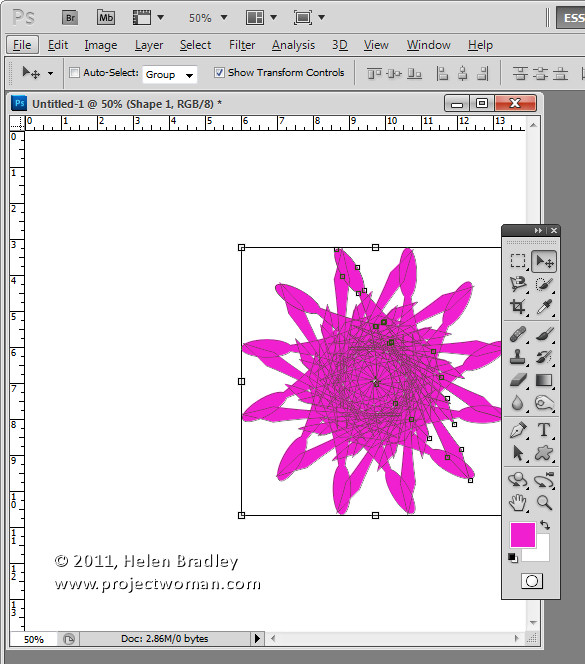
So far you have created a shape and rotated it. Now for the fun stuff – it is time to use the new keystroke combination. With the shape layer selected press Control + Alt + Shift + T (Command + Option + Shift + T on the Mac). Press it a few times until you have duplicated the shape sufficient times to rotate around 360 degrees. The key combination Control + Alt + Shift + T (Command + Option + Shift + T on the Mac) repeats the most recent rotation with a new copy of the shape. Totally cool stuff.

If the final shape goes off the edge of the image you can automatically resize the canvas to include the shape by selecting Edit > Reveal All.

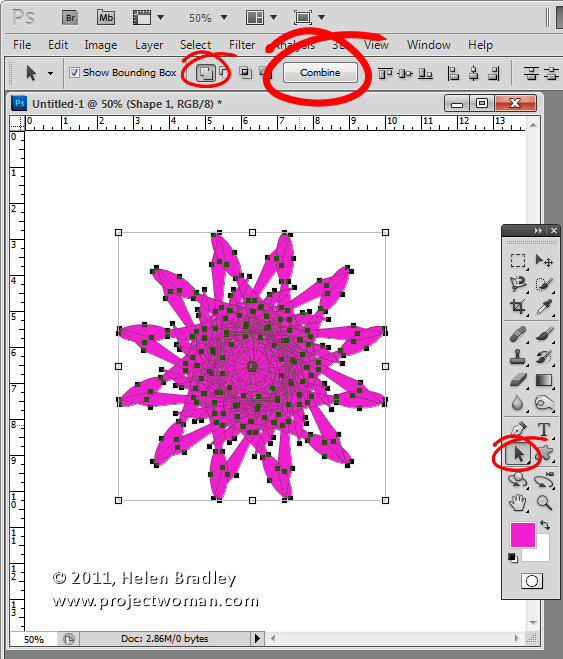
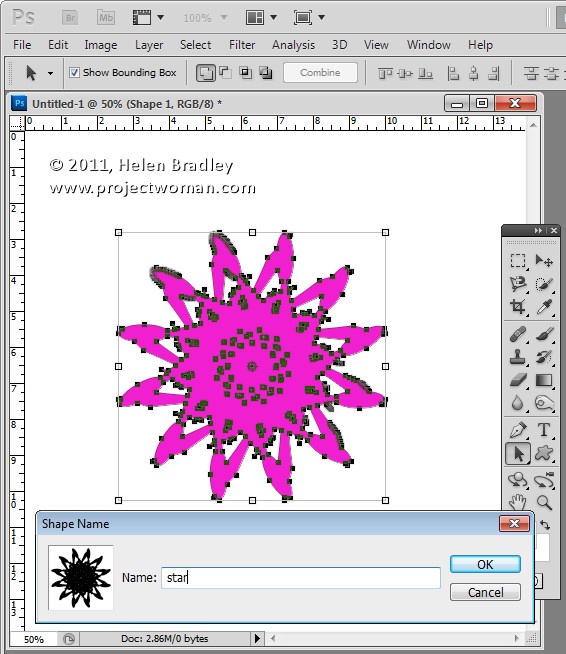
If you like the final shape you can make it a single shape – instead of multiples – by selecting the Path Selection tool and drag over all the shape so you have it selected. From the Tool Options bar select the Add to Shape Area icon and click the Combine button. This makes a single shape from all the combined shapes.

To save the shape so you can use it again in future – with it still selected, choose Edit > Define Custom Shape. Now your kaleidoscope shape is a shape you can use any time in Photoshop by selecting it from the Custom Shape collection.


Helen Bradley

Wednesday, April 20th, 2011

Photoshop – How to fill a shape with a gradient

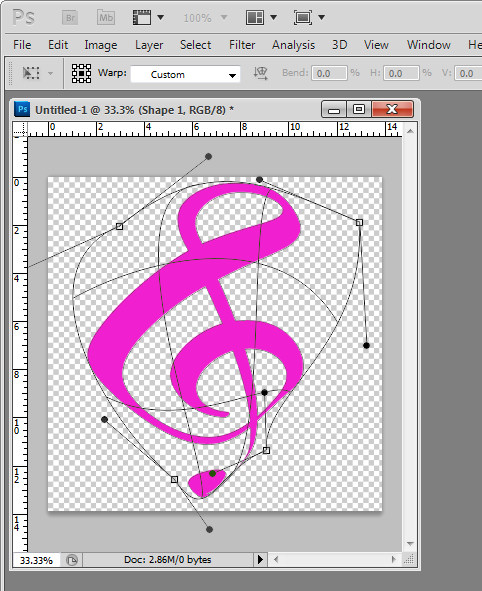
Tricky this one. There are three ways to create a shape in Photoshop and I’ve been working with shape layers so I can warp the result. So far so good. You select the Custom shape tool and then from the tool options you select the Shape Layer option and create your shape. You get a Fill layer with a vector mask showing the shape.

To change the color – double click the Fill layer thumbnail and choose another color. Again – so far so good.

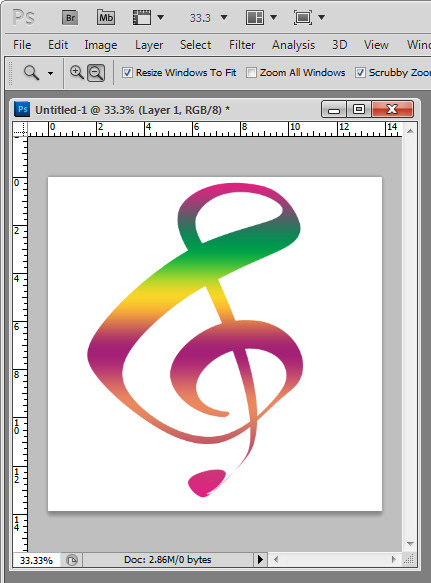
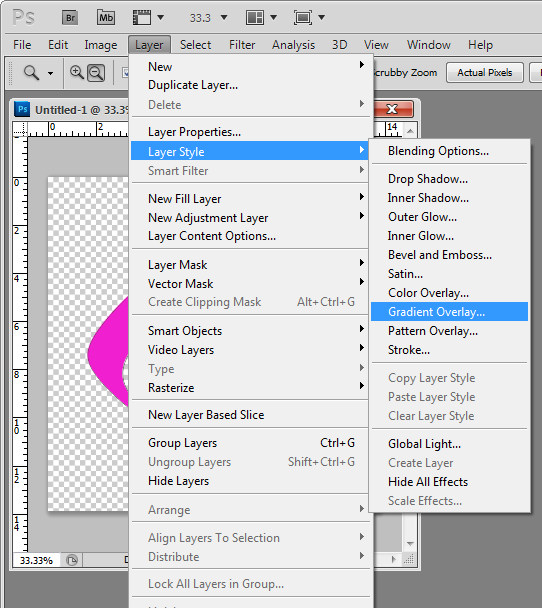
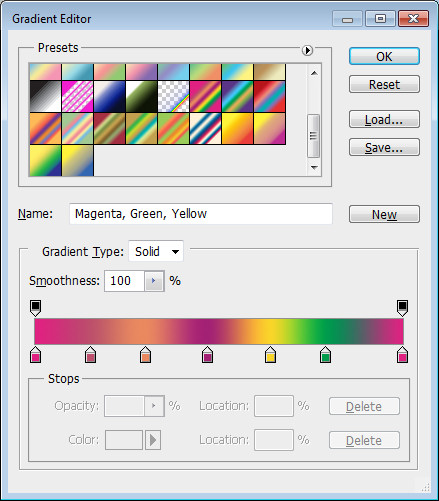
To fill the shape with a gradient – yikes.. there is no obvious option. Here’s a hint – Layer styles! Click the shape layer so you have it selected, choose Layer > Layer Style > Gradient Overlay. Select the gradient to use or make your own custom gradient and click Ok.

Now you know…

Helen Bradley

Friday, April 15th, 2011

Lightroom Vignettes aren’t all equal

I was recently looking around for some cool Lightroom Presets to replicate vintage and toy camera effects. I found a couple of Lomo ones which had some good features but one horrendous failure that really made them usable in all conditions and that’s sad ’cause it didn’t have to be that way.

You see the problem was that the designer didn’t know the difference between vignette tools in Lightroom and they picked the wrong one to use. They used the Vignette tool in the Lens Correction panel to add the vignette – Way Wrong Technique. This tool is for removing vignettes and while it might seem to work for adding vignettes when used on one or a few images it won’t work on all images – hence it is a very poor choice for a preset when there is a better alternative.

The Lens Correction vignette tool removes a vignette from (or adds one to) the edges of the image. So, if you later crop the image, the vignette gets cropped away. If you’re using the tool to remove a vignette then that’s not an issue at all. However, if you are using it to add a vignette – it is a big issue. The presets I found with the vignette added using Lens Correction made a mess of any image I’d cropped – the vignette either got cropped away or worse still it appeared on one side of the image and not the other – yikes!

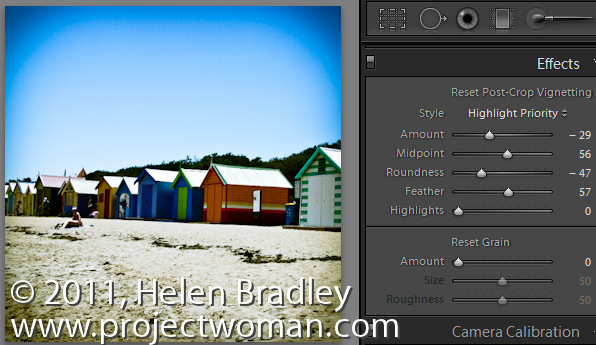
The correct tool to use to add a vignette is the Effect panel’s Post Crop Vignette. This, as its name suggests is a vignette added after the image is cropped so it always appears around the edge of the image regardless of whether it is full size or severely cropped or anything in between and regardless of when you choose to crop the image.

To add a vignette to darken the image edges drag the Amount to the left – dragging to the right will lighten the edges. The Midpoint setting moves the vignette inwards or pushes it outwards. The Roundness setting makes it rounder or squarer and Feather adds a softer or harder edge. For Style, I prefer Highlight Priority although Color Priority is ok – Paint Overlay is an overlay effect and not a blended one so I like it least of all.

So, next time you need a vignette effect for an image, choose the one that not only has plenty of customization options but also the one that will survive any cropping applied to the image.

Helen Bradley

Thursday, March 17th, 2011

Excel Convert dates from MDY to DMY

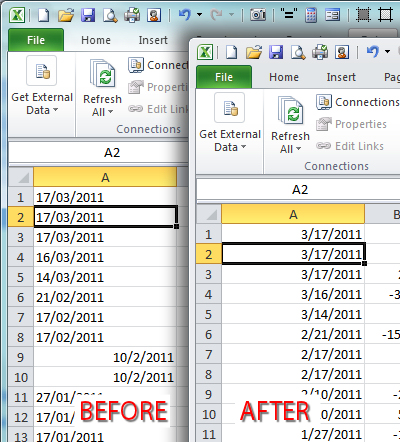
Today I encountered a problem when downloading some data from an Australian bank. Australia uses the DMY date format whereas the US uses MDY, my computer is set to use US as its region which means Excel expects dates to be entered using MDY format. Excel gets its country information which affects dates, in particular, from the setting you have for your Windows Region.

So, I had a .csv file in which all the dates were entered wrongly – they read 22/11/2010 instead of 11/22/2010, for example. When the dates are typed incorrectly for the country you are currently set to use, you can’t simply apply a format to them to fix the problem because there is no such date as 22/11/2010. And worse still a date like 2/1/2011 which is 2-Jan-2011 in Australia will be formatted as 1-Feb-2011 in my US Excel – throwing all my data spectacularly out.

So what to do?

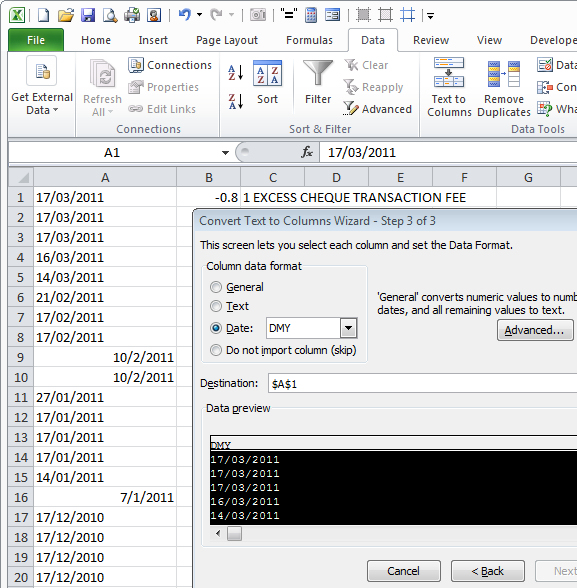
The simplest solution is to use the Excel data parse tool. Select the column of dates and choose Data > Text To Columns. This opens the Convert Text To Columns Wizard which is the old way of parsing data into Excel.

In Step 1 select either option as you only have one column of data selected anyway. Click Next twice. Now in step three of the wizard, select the Date option and select the formatting for the displayed data. So if the data has been typed in DMY format, select DMY. If it has been typed in MDY format, choose MDY. Click Finish.

The date data will be automatically converted to match the correct date syntax for your version of Excel. In short this converts all my Australian dates to US date format so they are correct in Excel. Select the column of dates and you can now format the dates using your preferred format.

It’s a simple but effective solution that avoids the necessity of retyping the date data.

Helen Bradley

Friday, March 4th, 2011

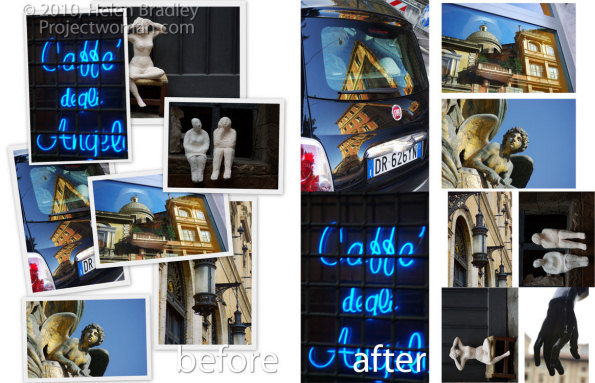
Multiple image printing in Photoshop CS4 & CS5

One real annoyance with Photoshop CS4 and CS5 is that Print Package and Contact Sheet printing is missing. These options appeared in earlier versions of Photoshop but they aren’t installed automatically in Photoshop CS4 & CS5.

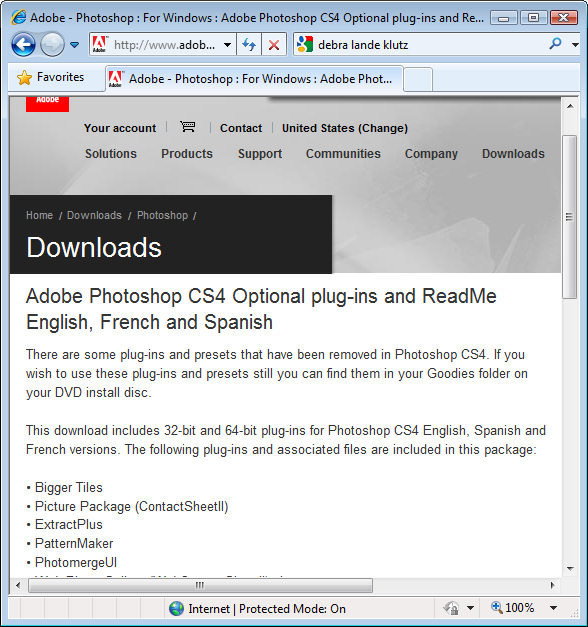
You might be excused for thinking this means you can’t print multiple photos per page in Photoshop CS4 & CS5. Nothing could be further from the truth. The secret is to find the missing features on your program disk or, quicker still, download them from the web.

Here are links to the files you need for the Mac and the PC:

Mac version for CS4:

http://www.adobe.com/support/downloads/detail.jsp?ftpID=4047

and for CS5:

http://www.adobe.com/support/downloads/detail.jsp?ftpID=4687

Windows version for CS4:

http://www.adobe.com/support/downloads/detail.jsp?ftpID=4048

and for CS5

http://www.adobe.com/support/downloads/detail.jsp?ftpID=4688

Download and run the files. If you’re on a PC the download zip file contains an executable file you simply run and it places the files you need in a folder on your desktop.

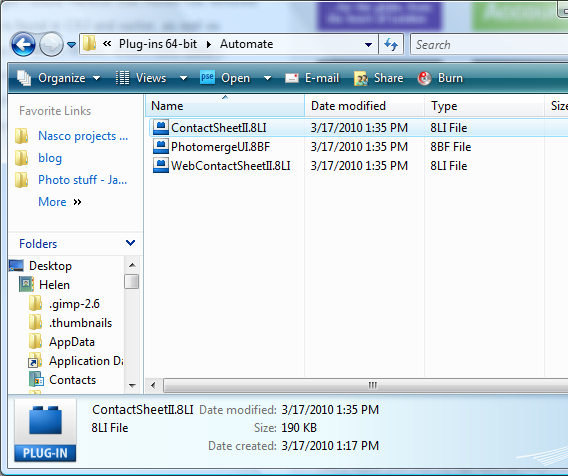
Open the desktop folder, open the appropriate English, French or Spanish folder, choose Goodies > Optional Plug-ins. Then choose the plug-ins appropriate to your version of Windows. In the folder are the Contact Sheet, Web Contact Sheet and PhotoMerge plug-ins. You need the Contact Sheet plug in as it provides both the Picture Package and Contact Sheet features.

Copy the ContactSheetII.8LI file to your C:\Program Files\Adobe\Adobe Photoshop CS5\Plug-ins\Automate folder.


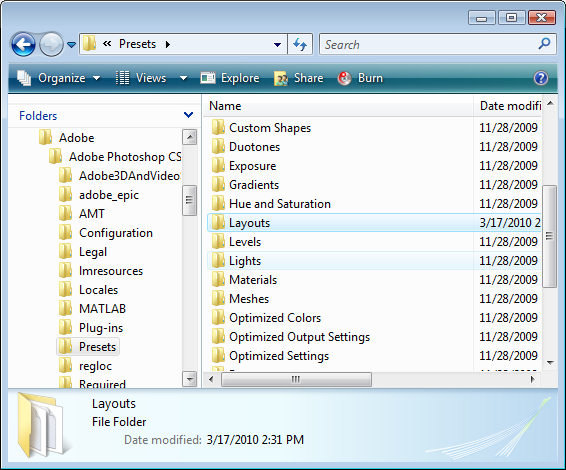
You will also need to copy the Goodies> Presets > Layouts folder and place it in your C:\Program Files\Adobe\Adobe Photoshop CS5\Presets folder – just drag and drop the entire Layouts folder into the Presets folder.


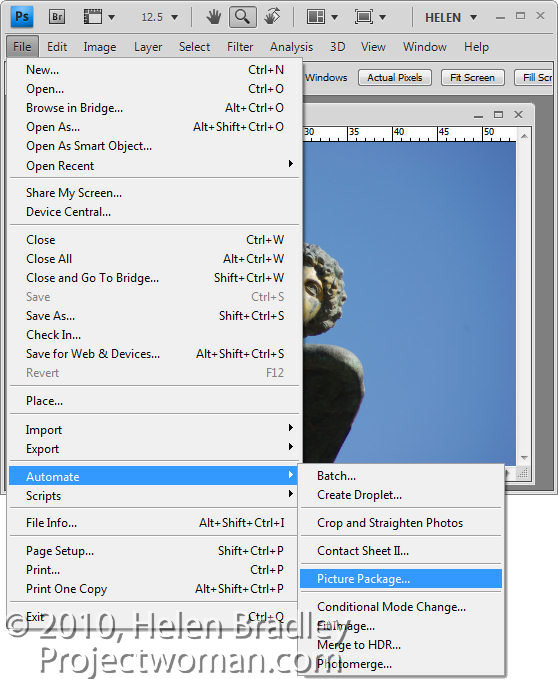
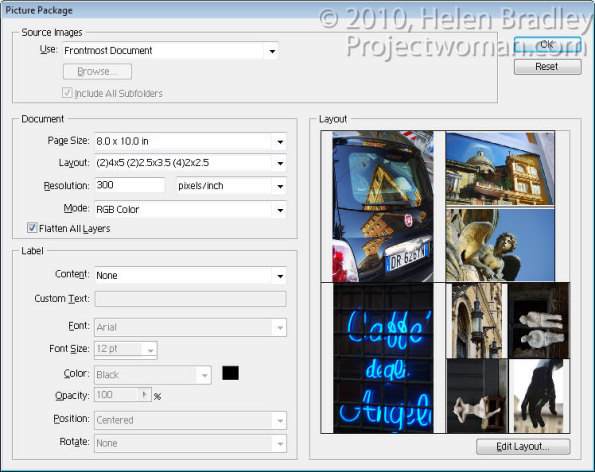
Restart Photoshop, open a file and choose File > Automate > Picture Package.

When you launch the Picture Package choose either the Foremost Document, Folder or File from the Use menu as the image(s) to start with.

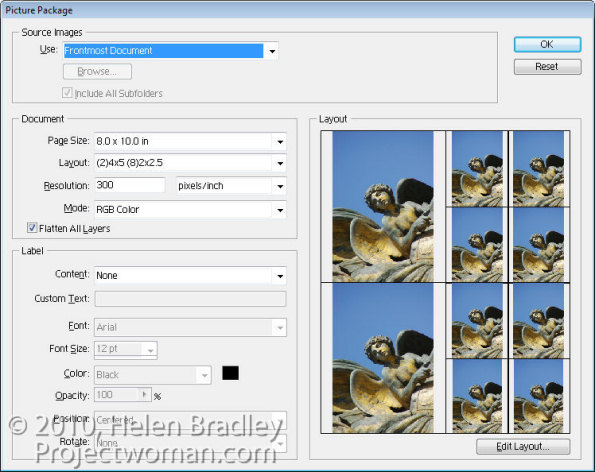
Select the page size to use and then the layout arrangement. You can, for example, print four 4 x 5 images or a combination of 4 x 5 and 2 x 2.5” – there are plenty of options to choose from.

If you enable the Flatten All Layers checkbox you will end up with all images on a single layer rather than each  image appearing on its own layer.

Set the printing Resolution and add Labels to your images if desired and click Ok.

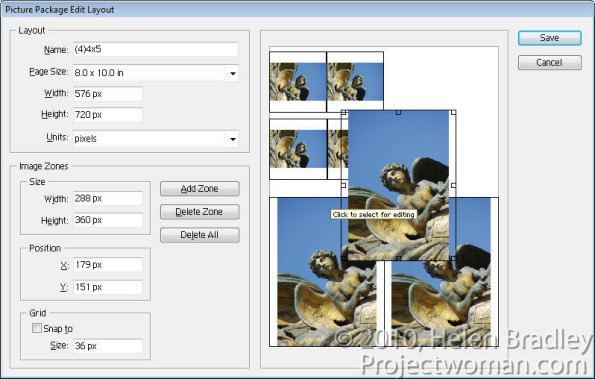
To customize a layout, click Edit Layout and you can click and drag to resize any of the images in the layout.

To add an additional image click Add Zone and then size it.

If the ratio of your selected image’s height and width are different to the ratio of the zone the image is placed in, the image will be scaled to fit one dimension – it will not be cropped – but it will print slightly smaller in the other dimension.

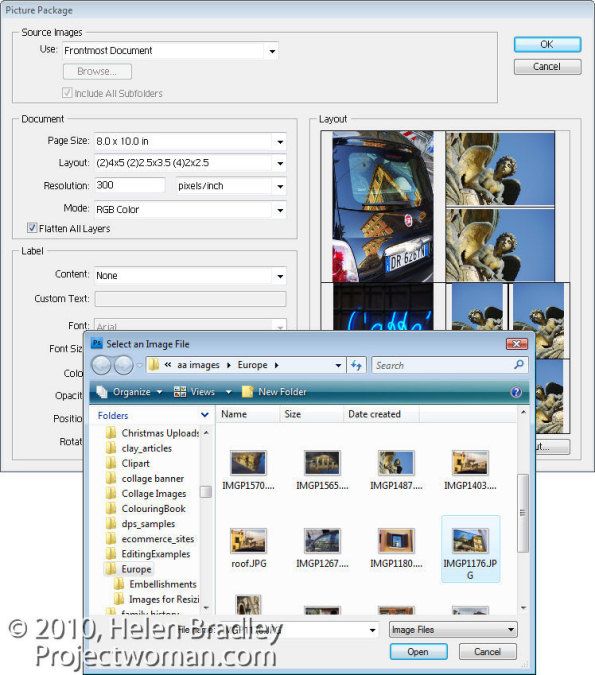
What isn’t at all obvious is how to print multiple images at various sizes in the Picture Package.

To do this, click on an image in the Picture Package and a File dialog will open. Select the image to print at this location in the Picture Package.

Continue and select different images for every one of the layout boxes if desired.

When you are done, click Ok.

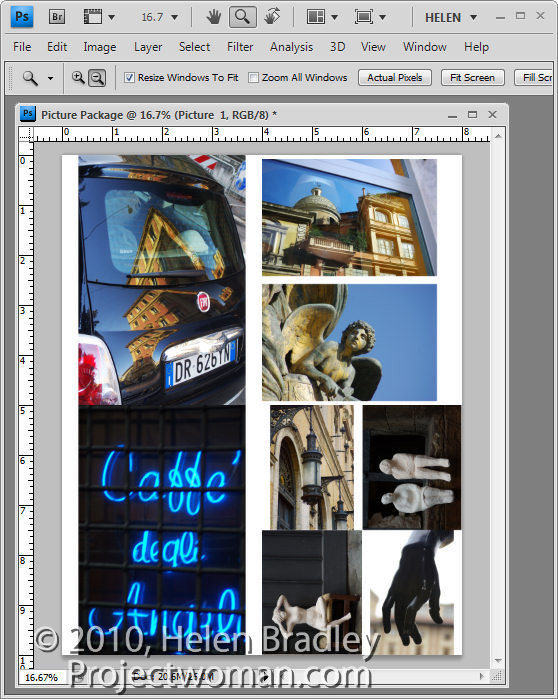
Photoshop creates an image the size that you specified with all the images that you selected sized and positioned in the layout. Depending on whether you had Flatten All Layers enabled or not, each image will be on a separate layer or your image will have one layer full of images.

You can now save or print this image.

Print Package is a feature of Photoshop that really should have been included in a regular install of Photoshop CS4 or CS5. It shouldn’t be as difficult as it is to find and install.

The good news, however, is that once you’ve gone to the trouble of installing it, it will be there every time you need it and also, by adding this feature you’ve also reinstated the Contact Sheet option.

Helen Bradley

Monday, February 28th, 2011

Scale a Gradient in Illustrator CS5

If you’re working with Illustrator CS4 or Illustrator CS5, you can scale, rotate or vary the opacity of a gradient using the gradient bar.

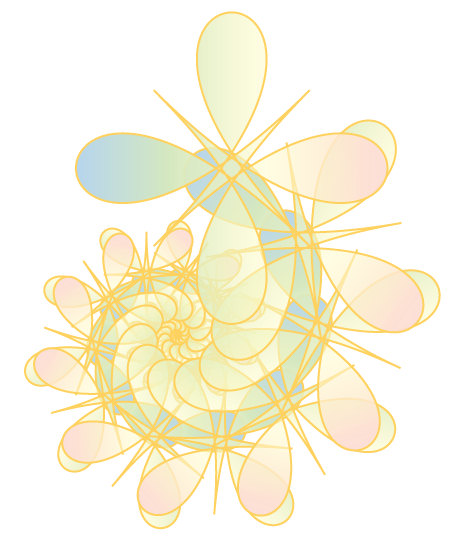
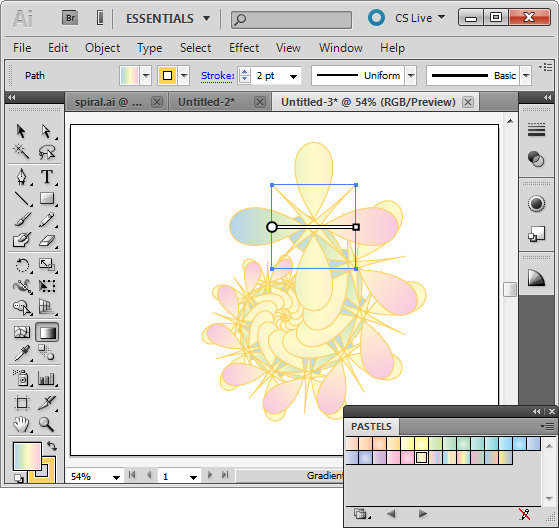
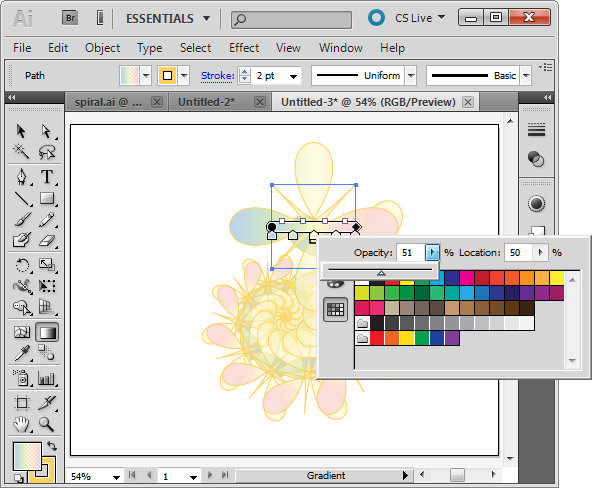
Here I am working with the spiral shape I created in an earlier post on Creating Cool Spirals in Illustrator. Here I have selected the original path using the Selection tool and then clicked the Gradient tool in the toolbar. This displays the gradient bar over the image.

To make a color from the gradient partially transparent double click the marker for that color on the gradient bar. This displays the Swatches dialog with a slider which lets you change the Gradient Opacity at this point.

You can repeat this for other color markers on the bar. Adjusting the opacity of colors for this spiral shape lets colors from shapes underneath appear through the original gradient.

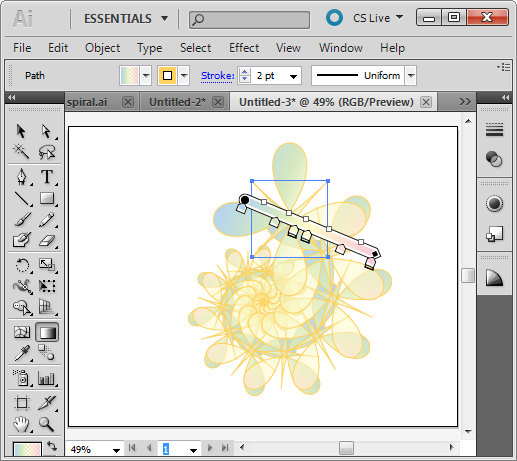
To rotate the gradient, hold Alt as you drag on the square marker to rotate it.

To scale the gradient drag on either end of it to stretch it. You can also move the bar to change how the gradient is applied to the shape.

Helen Bradley

Friday, February 25th, 2011

Scale a font’s height but not width in Word 2010

how to increase font height but not font widthI call this post – one step forward, two steps back. It’s a funky solution but it rocks and that’s why it’s worth today’s post.

Ok, you are in Word and you want to make a great title for a document. But it’s a little long so you can’t make the font really big cause that stretches it too wide. Hmm..

Ok, there’s a setting for scaling font width but not height – so what do you do? Well, with a little ingenuity you can solve the problem by scaling the width – in the reverse direction.
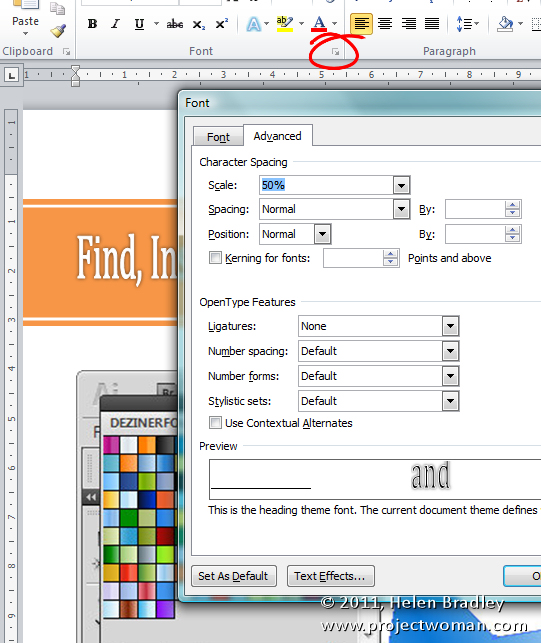
Select the text to alter then click the small icon in the bottom right of the Font group on the Home tab of the ribbon and click the Character tab. Set the Scale of the font to around 50% to shrink its width. Now, back in the Home tab, size the font up so it is nice and big. The ‘big’ font setting gives you the increased font height – which is what you want, and the small Scale value gives you the narrow width which solves the “too wide” problem.

Helen Bradley

Wednesday, February 23rd, 2011

Find and install Gradients in Illustrator

If you’ve come to Illustrator from Photoshop then Gradients will be a feature that will take some getting used to.

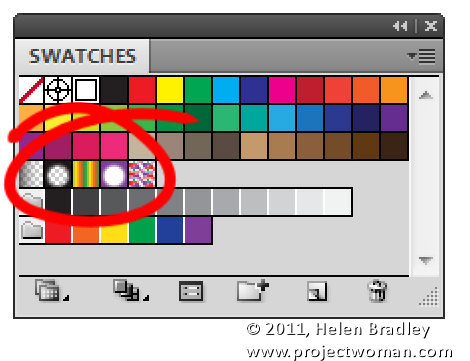
There is no fly out menu on the Gradient palette to use to load new gradients and instead gradients are available through the Swatches palette.

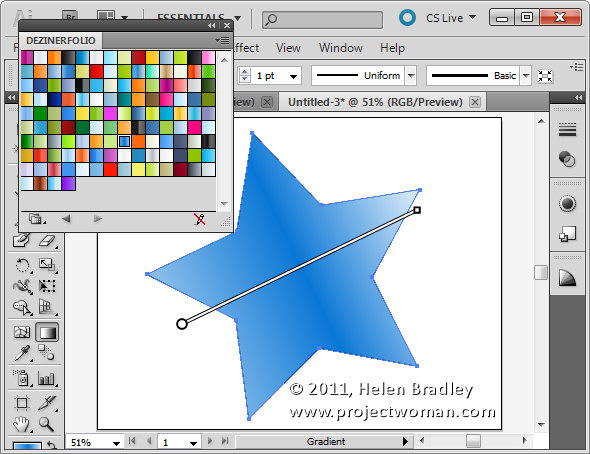
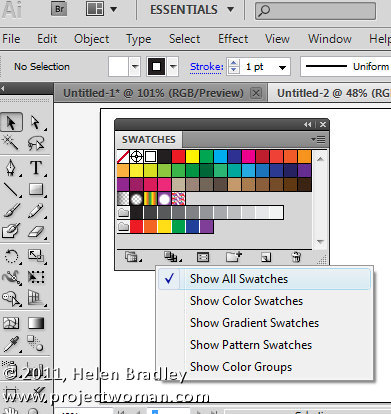
Choose Window > Swatches to view the Swatches palette and make sure that you click the Show Swatch Kinds menu at the foot of the palette and click Show All Swatches. This will display all the swatches you have available.

In the middle are your gradients. These include Fade to black, Super Soft Black Vignette, Green Yellow Orange, Purple Radial, and Laguna.

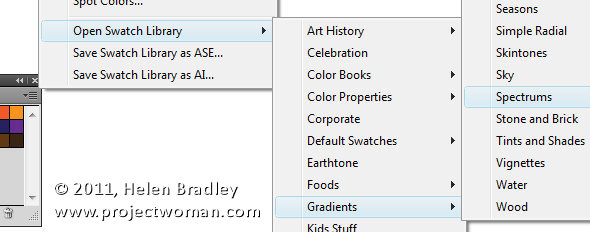
To find and load additional gradients, click the fly out menu on the Swatches palette and select Open Swatch Library > Gradients and then select a set of Gradients to open. These open in a palette all of their own.
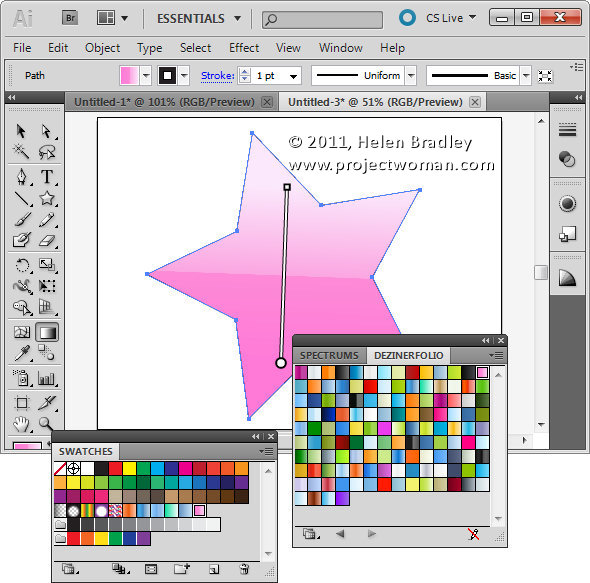
Select a gradient to use for an object from this palette and, when you do, it is automatically added to your Swatches palette.

Like Shapes, Brushes and other features of Illustrator you can also find, free gradients online and then download and install them into Illustrator.

How To Install downloaded Gradients

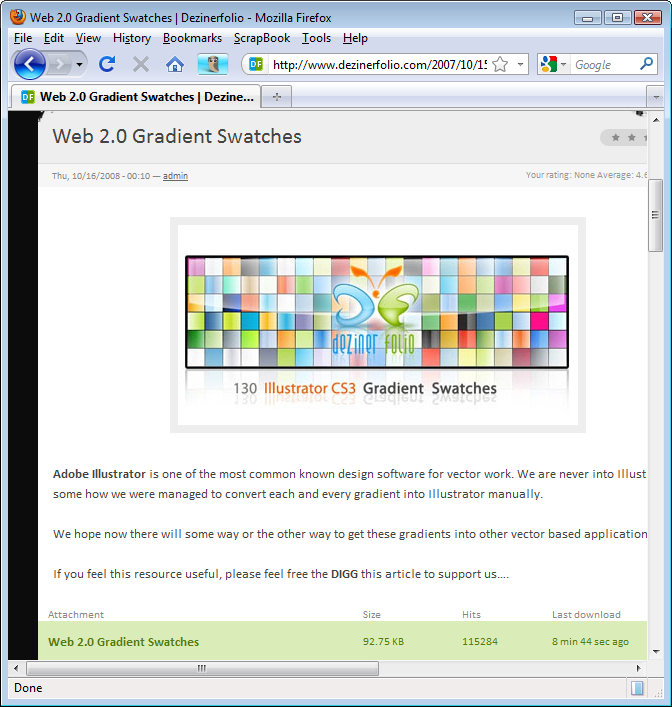
To install downloaded gradients first locate and download the file and, if necessary, unzip it. Once you unzip the gradient you should have an AI file which is your gradient file. I downloaded a set off Web 2.0 Gradients from http://www.dezinerfolio.com/2007/10/15/130-web-20-gradient-swatches-for-illustrator/

Place the .AI file you downloaded in your Illustrator Swatches folder. The location of this depends on your operating system. On Vista it is [user name]\AppData\Roaming\Adobe\Adobe Illustrator CS5 Settings\en_US\Swatches. For other versions and countries you may need to choose Adobe Illustrator CS4 Settings or en_GB etc..

On the Mac choose: [user name]:library: ApplicationSupport: Adobe: Adobe Illustrator CS5: en_US: Swatches.

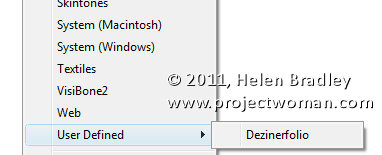
Close and reopen Illustrator and the gradients will be available in the Swatches palette in the User Defined group.

You can then select and use any of the downloaded Gradients for your objects.

Helen Bradley

Tuesday, February 22nd, 2011

Excel – copy a chart or worksheet as a picture

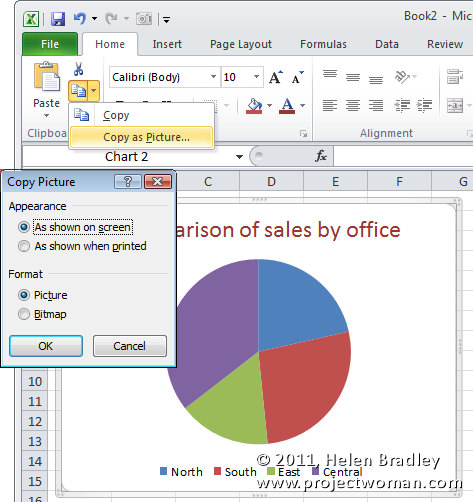
Image showing how to copy part of a worksheet or a chart as a picture

Sometimes you need to place a copy of a worksheet or a picture of an Excel chart onto your website or into a document. When you need only the image itself (not the link or an embedded version of the worksheet) you can make a copy of the area or graph as a picture.

So, with the worksheet open, select over the area that you want to convert to a picture. Or, if you need a picture of a chart select the chart. Now, from the Home tab, click the Copy dropdown list and choose Copy As Picture.

From the dialog which appears, choose Bitmap if you want an image the same size as you see it on the screen. To get an image you can make larger than this, choose Picture as this creates an image which scales well.

Then select either ‘As shown on screen’ or ‘As shown when printed’ as required. Click Ok and the picture will be copied to the Windows Clipboard. You can now paste the image into another application using that application’s Paste tool.

Helen Bradley

Tuesday, February 22nd, 2011

Photography – why you should use a polarizer

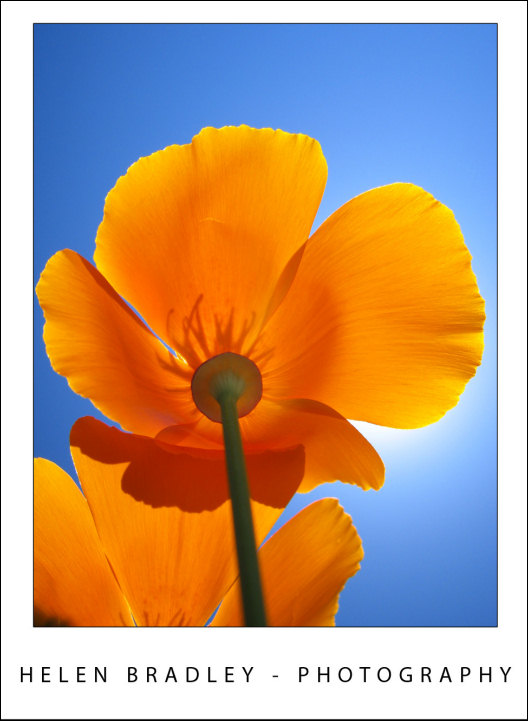
Polarizer.jpg

Using a polarizing filter on your camera’s lens ensures crisp blue skies and saturated colours even as here, when shooting into the sun.

You may have already noticed that you can encounter problems you’re capturing photos in very bright sunlight. On the beach, for example, you may find your camera exposes for the lighter areas leaving the remainder of your photograph underexposed and very dark.

In bright sunlight you can benefit from using a Polarizing Filter over the lens of your camera. These filters are obtainable for most DSLR cameras and simply screw onto the lens.

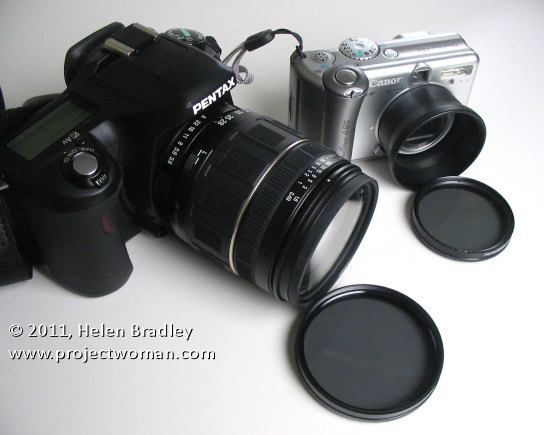
For a point and shoot camera you’ll need to determine if it can take a polarizing filter either on a bracket that screws into the camera’s tripod mount or, in some cases using a special adaptor called a tele converter that screws over the lens and that has a screw mount for the filter.

Image showing a polarizing filter for a dslr and one for a point and shoot which uses a tele converter to mount it

How to buy

When purchasing a polarizing filter for a digital camera you will generally want to purchase a circular polarizer. The other option is a linear polarizer – however circular polarizers are typically recommended for cameras that meter through the lens (TTL) which is what a digital SLR does.

When using your polarizing filter notice it has a marker on it that you can use as a reference point for adjusting it. Look through the viewfinder and turn the filter slowly. As you do this you will notice that the preview will change.

At some point of the rotation it may have no effect at all and at other points it will have an increasingly strong effect. Turn it until you get the effect you are looking for which is good rich color and no washed out skies. When you find the sweet spot go ahead and capture your photo.

A polarizing filter will give you better colour saturation and brighter, bluer skies. It’s also a good filter for photographing things under water from above the water surface such as a tropical reef or seaweed because it cuts out the sun’s reflection on the water surface allowing you to capture the underwater detail.

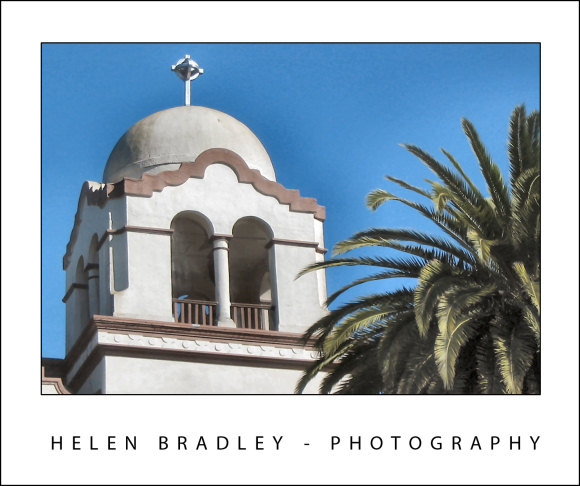
This blue sky would have been washed out if the photo had not been captured using a Polarizing filter:

An image shot using a polarizing filter to ensure rich blue skies

Helen Bradley