Wednesday, February 15th, 2012

Capture a great Panorama


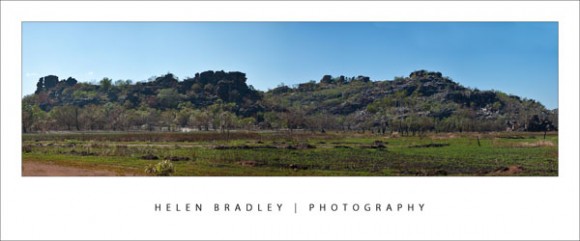
There’s something very compelling about panoramic images. They’re much wider than regular photos and, instead of showing the small portion of a scene that is in front of the camera lens, they show much more.

Some panoramas show a semi circle around a point and others wrap around a full 360 degrees showing everything there is to see. Panoramas have been popular with photographers since the early days of photography. Then, as now, they were created using a series of side by side images put together to form a single seamless image.

Today’s digital cameras and photo editing software let you create panoramas quite easily. Even simple cameras like prepaid phone cameras and point-and-shoot cameras are advanced enough to have a panorama setting. There are, however, some tips and tricks for taking the photos that will help ensure you get a great panorama and I’ve thrown in my best solution for when things go wrong!

Use a tripod

When you take photos for your panorama make sure you stand in one position to take all the shots. It is easiest if you fix the camera to a tripod and test to ensure it will swing around smoothly to capture the images that you want to take. If you don’t have a tripod, practice standing in one position and rotating your body to capture the images.

This painted sign on the building above was too large to capture in one shot but it works well as a panorama.

Overlap the images

When taking the individual shots for a panorama, make sure that the photos overlap each other by around 25 percent. This means that the objects that appear on the far right of one photograph should appear on the far left of the next photograph in the sequence.

If your camera has a panorama feature you can use this to help configure the overlap for the images. Your photo editing software uses the overlapping areas as a key for aligning and matching the images so it’s important that you have enough of an overlap for the software to do its work. On the flip side, avoid having too much overlap as that’s not desirable either.

Try to photograph scenes that don’t change rather than subjects that are moving as it’s much harder to match up your images if people are moving around in them such as in this image:

I had to put a lot of work into tidying up this image – with so much action it was far from an ideal topic for a panorama but the results were worth it.

Fix your settings

When capturing photos for a panorama make sure that you do not alter your camera settings, such as the zoom, between shots as this will mess up your images and they won’t be easy to match.

If you’re using a digital SLR camera, keep the exposure the same between shots too. Using Aperture priority mode is a good choice.

There are some classic occasions when a panorama is an obvious solution and I dream of one day spending an afternoon at Lord’s capturing that wonderful cricket ground as a panoramic image. Other shots that work well as panoramas include scenery and landscapes. However panoramas aren’t limited to major spectacles and you can capture a series of two or more images of anything from a sign to a streetscape and assemble it into a panorama.

I’ve shot panoramas of signs, cityscapes, the mounting yard at a racecourse and I’ve done one of my street so one day I will be able to look back and see then what I see now, as I stand on my front porch.

If you’d like to learn more about creating Panoramas, check out this post on Creating Panoramas with a twist. It’s a great way to save an imperfectly shot panorama.

http://www.projectwoman.com/2009/04/photoshop-panorama-with-twist.html

Helen Bradley

Friday, January 27th, 2012

Smarter Content Aware Fill

If you’re like me, you’ve tried out the new Content Aware Fill feature in Photoshop CS5 and you’ve been left just a little bit disappointed.

What Content Aware Fill does is to replace unwanted areas of an image in a smart way. It can reduce the amount of time you spend working with the Clone Stamp and other fixing tools when you have something you need to get rid of in an image. However, where the Content Aware Fill feature appears to fail is when you want to remove a large portion of an image – those very times you wish it would work perfectly.

Well, last week I learned a cool technique to use with Content Aware Fill that solves these problems, thanks to Adobe’s Bryan Hughes. So here’s a way to make Content Aware Fill behave a whole lot smarter.

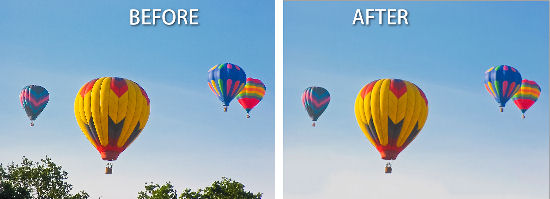
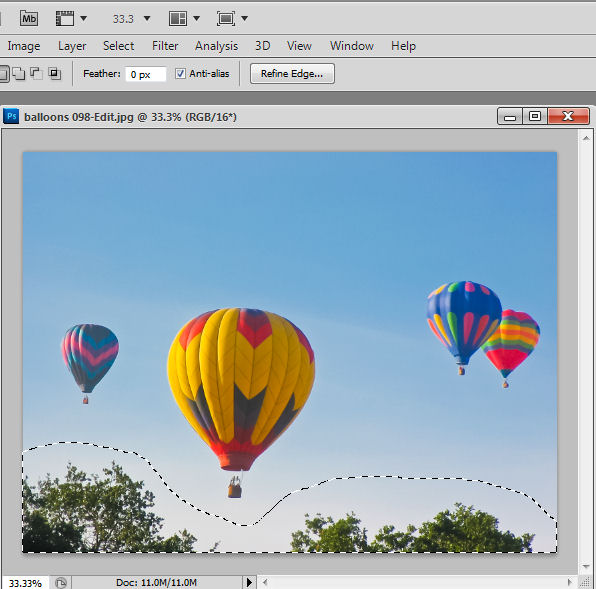
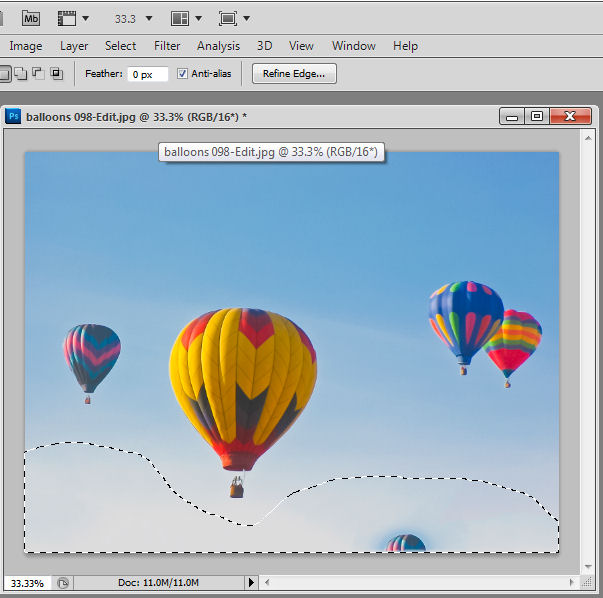
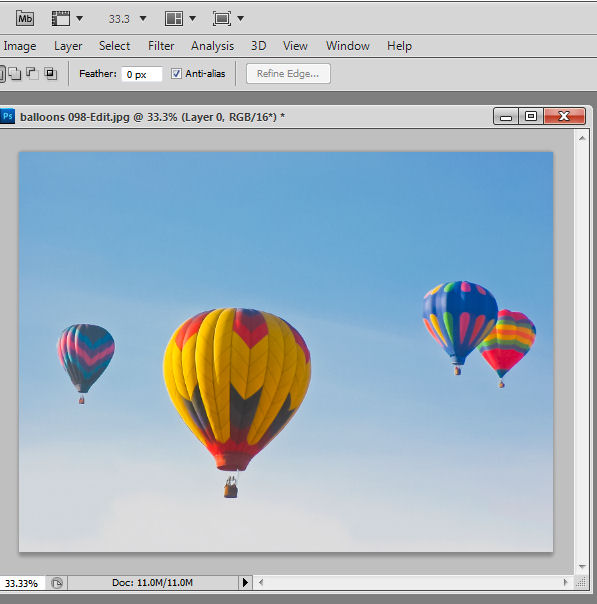
In this balloon image, if I want to remove the trees at the bottom of the image, I would make a selection around them with, for example, the Lasso tool.

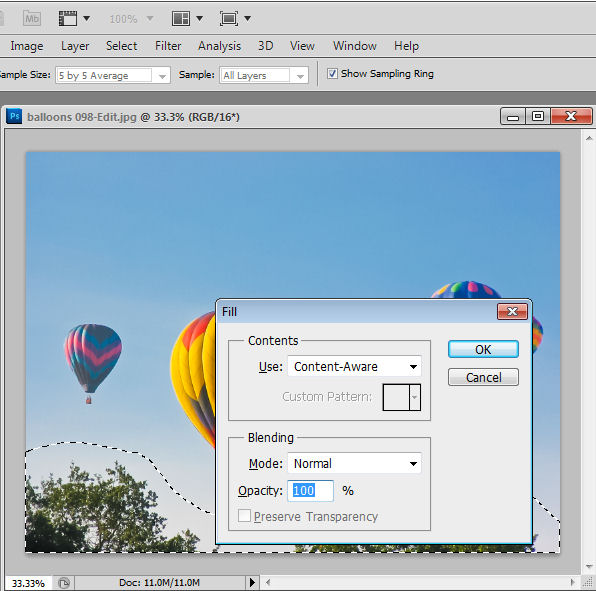
Then, in Photoshop CS5 – even though the bottom layer of the image is a Background layer I would press Delete to open the Fill dialog. Here I can choose Use: Content Aware Fill and press Enter to have Photoshop remove the trees for me.

The problem is, that as often as not, part of one or more balloons will appear in the filled area. What I want is blue sky and not balloons. I could repeat the “Select and Delete” process until the image looks as I want it to but there is an alternative way to use the Content Aware fill feature. This way of working is great when you are trying to remove a large object and where there is not a lot of clean image data for Photoshop to use to do the fill with.

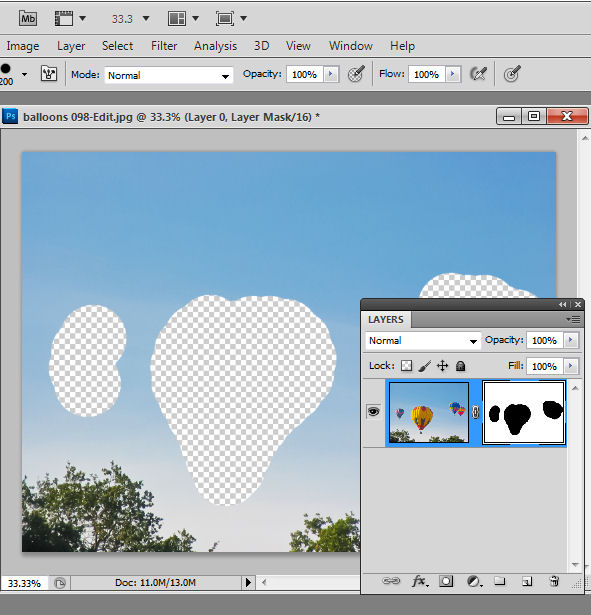
This solution involves removing any part of the image I don’t want the content aware fill feature to use – here that is the balloons – temporarily leaving only the content I want it to use – here that is blue sky. To do this I converted the background layer to a regular layer by double clicking it and pressing Enter.

Then I added a layer mask using Layer > Layer Mask > Reveal All and painted on the mask in black to remove the balloons – a hard edge brush is a good choice here.

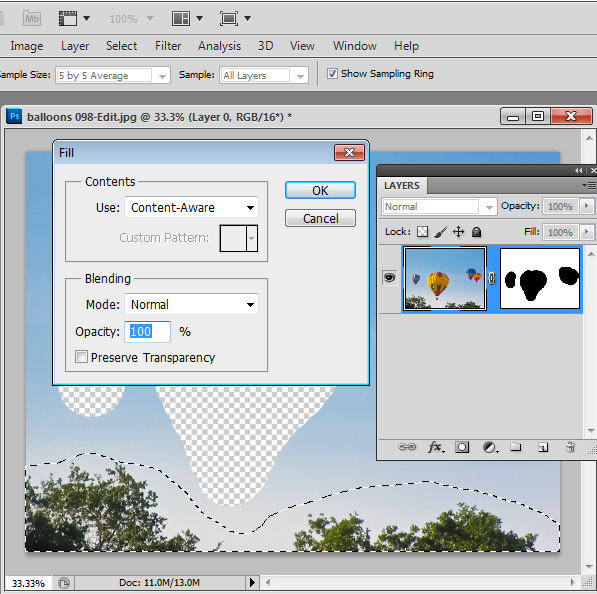
Now I’ve reselected the image – not the mask – and made a selection around the trees again using the Lasso tool. Pressing Delete this time won’t work – it just deletes the selection so, instead, I need to press Shift + F5 or choose Edit > Fill to open the Fill dialog. Make sure that Use: is set to Content Aware and click Ok.

This time Photoshop uses only the visible content to fill the area and because the balloons aren’t visible they aren’t used to fill the area when the trees are removed.

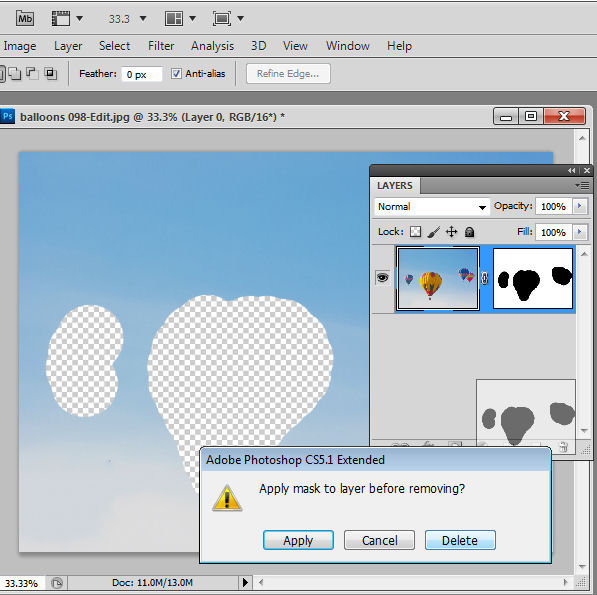
Once you are done, you can bring back the balloons by dragging and dropping the layer mask into the trashcan – select Delete when prompted so you remove the mask – don’t apply it.

Now the content aware fill tool works as you would expect it to – allowing you to remove large portions of an image and have the area filled in an intelligent way.

Helen Bradley

Tuesday, January 24th, 2012

Do you clean your own Sensor?

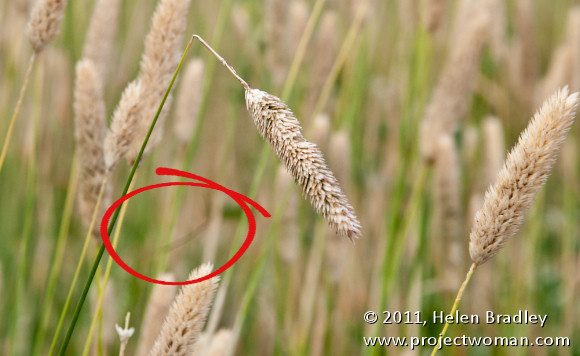
Every digital camera user will have confronted or will confront one day the issue of sensor dust. Every time you change the lens on your SLR there is a chance that dust will enter your camera. Some of this dust finds its way to the camera’s sensor with the result that you see unwanted and distracting spots on your images.

Built-in dust removal

Most cameras have some sort of dust removal feature built in. For example, my Pentax K7 has one that applies (according to its manual) “ultrasonic vibrations to the filter on the front surface of the CMOS sensor for approximately one second”. Sometimes this is all it takes to remove the dust. Just as often, however, the dust remains stuck fast.

This isn’t unusual because there are different ways dust can get to the sensor area and not all of it is ‘loose’ in the sense that it can be shaken off. Some particles can actually become stuck to the sensor.

Also, just to be clear, when I am talking about dust on the sensor, it isn’t really on the sensor itself but rather on a thin glass plate that is on top of the sensor. It’s just easier to call it sensor dust and to talk about cleaning the sensor than talk about cleaning the glass filter on top of the sensor.

When built-in methods fail

If your camera’s on board dust removal feature fails, the recommended solution is to send your camera to a service center that is authorized by your camera manufacturer and to have them clean it.

Because this is a service, you’ll be charged appropriately for it. You’ll also be without your camera for the length of time it takes to get it cleaned. Inspite of these issues, for most camera owners this is the safest and best solution.

Another option is to utilize the cleaning services provided by your local camera store. However, this is not without its risks – if the service technician isn’t authorized by the camera manufacturer to clean the camera then the cleaning could void your warranty -even if the cleaning doesn’t cause damage to the camera.

However, for a lot of photographers these options are just plain expensive and inconvenient.

For me, the issue is just that – cost and convenience. To get my camera cleaned at the local camera store costs $75 a time and it involves a one week turnaround – the service technician picks up and delivers to the store only on Tuesdays. In addition I have two one-hour round trips to drive to the camera store to drop it off and pick it up and I have to strip everything off the camera including the camera strap before it goes out and then put it all back together when it is done. All of this I was content to do until Mike from my local camera store suggested an alternative – cleaning the sensor myself.

Not for the faint of heart

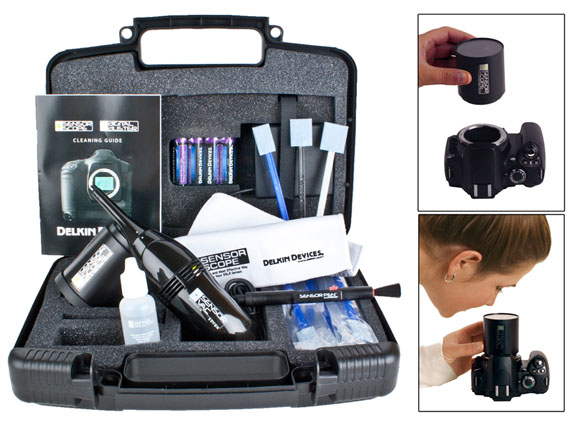
On Mike’s recommendation, I bought a sensor cleaning kit which included a vacuum, wipes and cleaning solution as well as a magnifying light all packaged in a padded toolkit. The cost of the kit was a little more than one cleaning so on my second cleaning I stood to be ahead on cost.
Kiss your warranty goodbye

I’m not recommending self-cleaning to anyone. It is a decision each camera owner needs to make themselves. You need to do as I did and ask yourself if you are prepared to shoulder the cost if you damage your camera and void your warranty? If not, then pay your money and leave it to the professionals.

I accepted I would be up for the cost of a new camera body if I damaged it because that’s about what it would cost to fix the damage I would do if the cleaning went wrong. I also acknowledged that I have probably voided my camera warranty by cleaning the camera myself even if it isn’t damaged by the cleaning. However, for me it made sense to see if I could save some time and effort by doing my own cleaning.

Scouts’ motto: Be prepared

Here is what I suggest you do if you plan to clean your own camera:

1 Read the Manual

However you behave and whatever you do in any other aspect of your life this is the one time you should read the manual for your camera and your cleaning kit before you get started. In fact, read it four or five times until you’re completely familiar with what you’re about to do and the risks.

I also found a good deal of useful information at the Cleaning Digital Cameras website (http://www.cleaningdigitalcameras.com).

In short the better informed you are the more likely you are not to fail. And if it all sounds too risky and beyond your skills, then don’t do it – after all that’s why they have service centers that do it for you!

2 Power it up

If your camera has an AC connector, connect it to the AC so that you won’t run out of power in the middle of the cleaning. This is an extremely dangerous situation as lack of power will cause the camera to shut down and if it shuts down on your cleaning tool then you are almost guaranteed to damage something.

If you don’t have a mains power connector for your camera, make sure to charge a fresh set of batteries and put these in the camera before you begin.

3 Make sure you have a problem

This probably should really be step 1 – you need to make sure you have a problem before you start. If your camera is not dirty then don’t clean it.

Many cameras will have some form of dust alert system that will show you dust on the sensor. For the Pentax K7 there’s a dust alert setting that requires you to set the camera in C or AF.S shooting mode and point at an evenly lit even color subject such as a white wall or an empty word processing document on a computer screen and take a shot. The resulting image shows you if there is dust and where it is.

You will need to read your camera’s manual to see if you have a similar system and how to capture an image of the dust.

Of course, some of us will be in no doubt that our camera needs cleaning because we can see the dust on our photos. My own cleaning efforts were driven by a particularly large gob of dust stuck in the middle of the sensor which showed up on nearly every image I shot and which just wouldn’t move inspite of numerous attempts to vibrate it free.

4 Check your tools

Check your tools before you begin making sure that you have everything that you need arranged on a clean work surface in a clean environment. Because you’ll be removing the lens from the camera you don’t want to risk getting dust into it while you are cleaning it.

5 Prepare the camera

Your camera will have a sensor cleaning feature in it. You use this to raise the mirror so you can access the sensor to clean it. Check your camera’s manual for instructions as to how to access this feature and how to return the camera to its usual setting when you are done. On my camera, simply powering it off resets it – so I have to be very careful not to touch the power button while cleaning it and that’s why freshly charged batteries are critical.

6 Clean the sensor

Clean your camera following the instructions in your camera’s manual and those in your sensor cleaning kit (all the time having regard to the terms of your camera’s warranty).

Take care – this is a delicate piece of equipment and needs to be cleaned with a light and steady hand. A half cleaned sensor in a camera that still works is better than a squeaky clean sensor in a broken camera.

7 Check the results

When you have finished cleaning, check the results to make sure the dust is gone.

Now for the good news

The good news is that many people do clean their sensors successfully.

If you do it yourself and if you do it right, you will find the cost of sensor cleaning is much less than sending the camera away to be cleaned. It’s also very convenient because you don’t have to be without your camera for a period of time and it feels good to know you can deal with a dust problem yourself.

For me, it will be a task I’ll always approach with some trepidation and mindful that it’s one that needs to be done carefully and not hurriedly or under stress. It does however give me a new sense of freedom particularly when traveling. With my cleaning kit I’ll never be caught on day one of a two-week trip with a nasty gob of dust on the sensor and no way to remove it until I get home.

Helen Bradley

Tuesday, September 27th, 2011

Timeline in Microsoft Word 2010

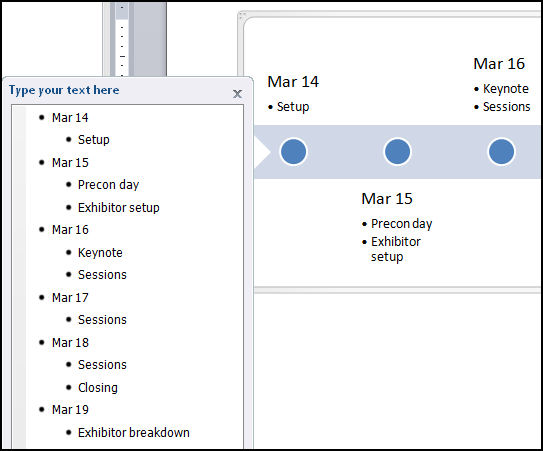
The new SmartArt feature in Word 2007 and 2010 helps you create timelines very easily:

Step 1
Choose Insert -> SmartArt -> Process and select one of the process options such as Basic Timeline and click Ok. Type the text into the textboxes in the SmartArt object. Alternately, click the arrows at the far left of the object and add text via the dialog.

Step 2
To format the timeline SmartArt, select the object and choose Format -> Design on the Ribbon and then select one of the SmartArt Styles. Click Change Colors to alter the colours used in your SmartArt object.

Step 3
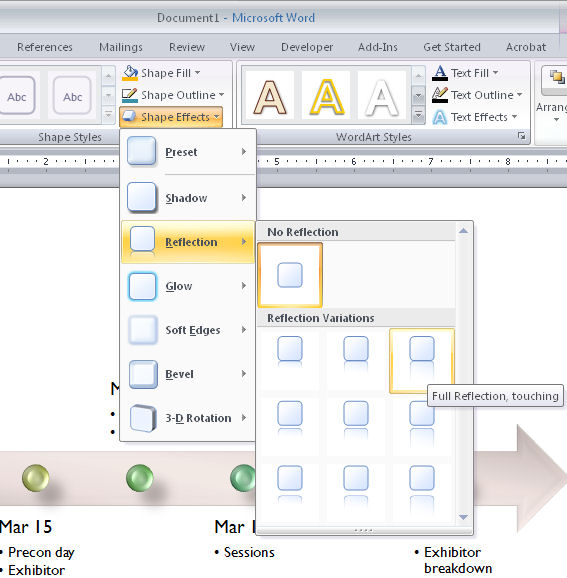
From the Shape Effects list you can customise an effect such as reflection or shadow for the art. In addition, as the look of a SmartArt object is controlled by the document theme you can choose Page Layout -> Themes and select an alternate theme for your document.

Helen Bradley

Tuesday, February 22nd, 2011

Photography – why you should use a polarizer

Polarizer.jpg

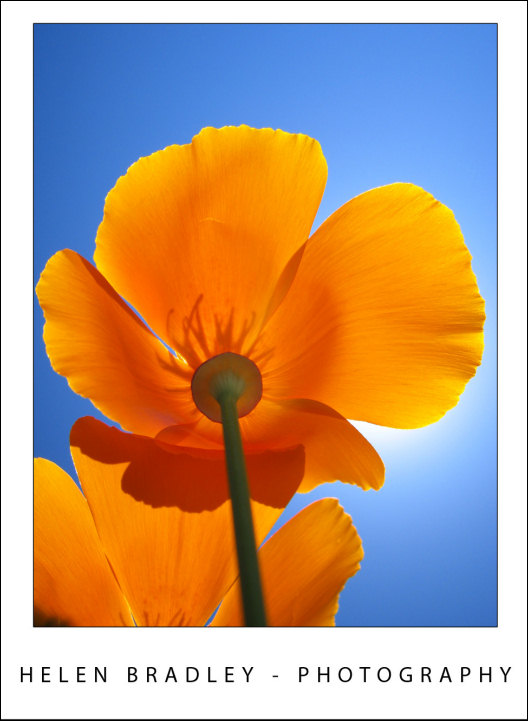
Using a polarizing filter on your camera’s lens ensures crisp blue skies and saturated colours even as here, when shooting into the sun.

You may have already noticed that you can encounter problems you’re capturing photos in very bright sunlight. On the beach, for example, you may find your camera exposes for the lighter areas leaving the remainder of your photograph underexposed and very dark.

In bright sunlight you can benefit from using a Polarizing Filter over the lens of your camera. These filters are obtainable for most DSLR cameras and simply screw onto the lens.

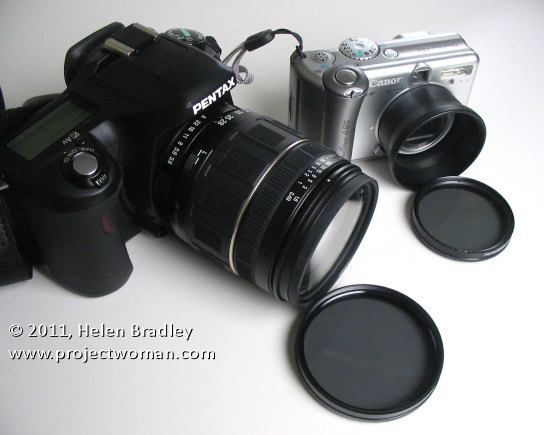
For a point and shoot camera you’ll need to determine if it can take a polarizing filter either on a bracket that screws into the camera’s tripod mount or, in some cases using a special adaptor called a tele converter that screws over the lens and that has a screw mount for the filter.

Image showing a polarizing filter for a dslr and one for a point and shoot which uses a tele converter to mount it

How to buy

When purchasing a polarizing filter for a digital camera you will generally want to purchase a circular polarizer. The other option is a linear polarizer – however circular polarizers are typically recommended for cameras that meter through the lens (TTL) which is what a digital SLR does.

When using your polarizing filter notice it has a marker on it that you can use as a reference point for adjusting it. Look through the viewfinder and turn the filter slowly. As you do this you will notice that the preview will change.

At some point of the rotation it may have no effect at all and at other points it will have an increasingly strong effect. Turn it until you get the effect you are looking for which is good rich color and no washed out skies. When you find the sweet spot go ahead and capture your photo.

A polarizing filter will give you better colour saturation and brighter, bluer skies. It’s also a good filter for photographing things under water from above the water surface such as a tropical reef or seaweed because it cuts out the sun’s reflection on the water surface allowing you to capture the underwater detail.

This blue sky would have been washed out if the photo had not been captured using a Polarizing filter:

An image shot using a polarizing filter to ensure rich blue skies

Helen Bradley

Friday, February 18th, 2011

Create Cool Spirals in Illustrator

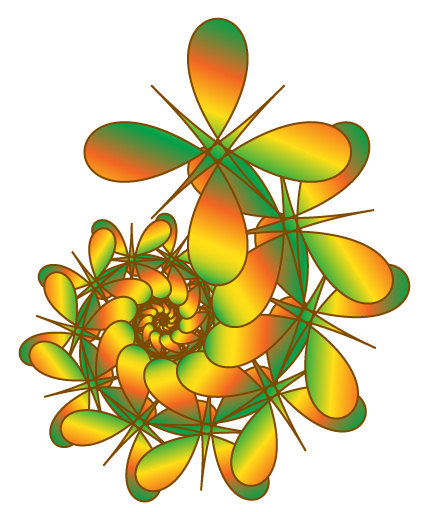
Spiral shapes are simple to create in Illustrator using some of its built in effects.

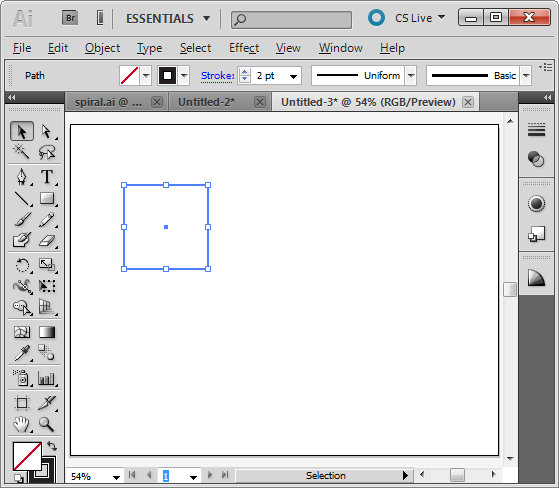
To get started, create a new image and select the rectangle tool. Hold Shift as you drag to create a small square on the artboard.  Set the stroke to around 2 pixels, set black as the stroke color and don’t apply any fill.

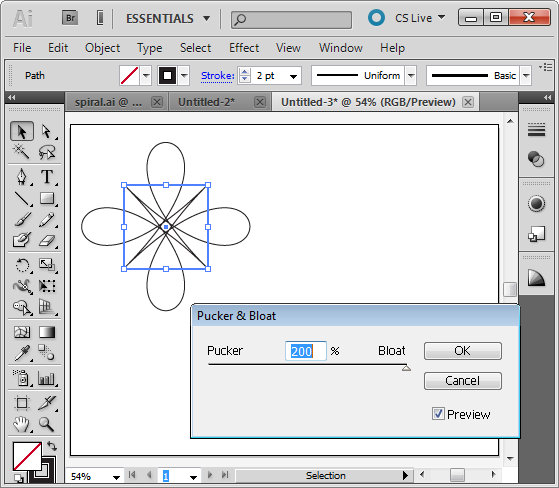
With the shape still selected, choose Effect > Distort & Transform > Pucker & Bloat. Enable the Preview checkbox and drag the slider to create an interesting shape. Here I dragged it to 200, which gives an interesting floral shape. Click Ok to confirm the transformation.

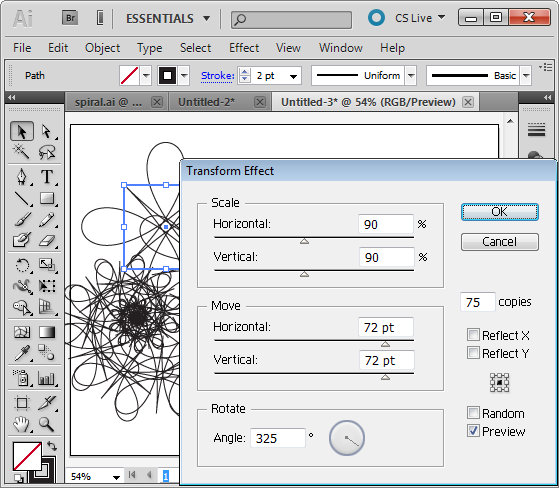
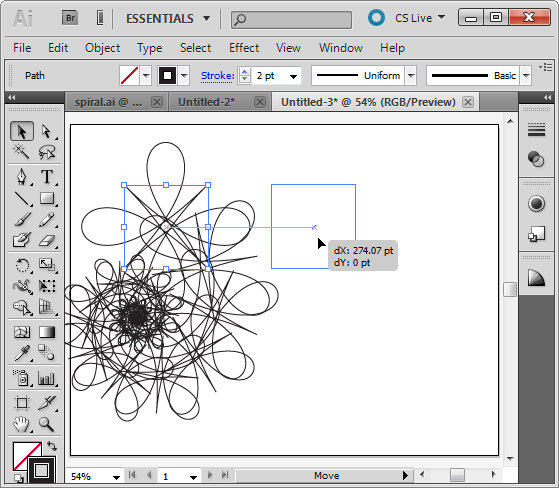
To create the spiral, with the shape still selected choose Effect > Distort & Transform > Transform to open the Transform Effect dialog. Enable the Preview checkbox. Set the number of copies to, for example, 75 and then experiment with various settings of the various sliders.

Changing any of the sliders will alter the shape significantly. Here I set Scale: Horizontal and Vertical to 90% so the shape gets incrementally smaller each transformation. I set the Move: Horizontal and Vertical to 72 pt so the shape moves both horizontally and vertically a small increment each transformation and the Rotate Angle to 325 degrees so each shape is rotated as it is transformed.

Once you have a shape that you like, click Ok.

If necessary, use the Selection tool to move the shape back so it sits within the artboard.

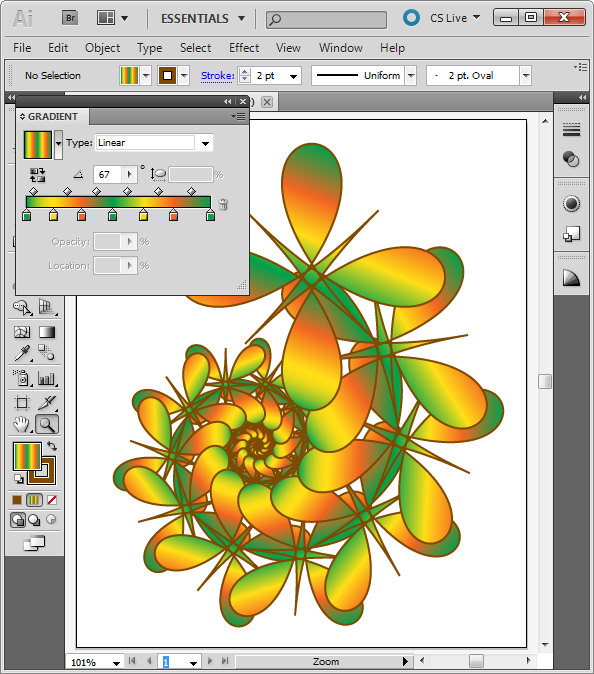
With the shape still selected, set the Stroke to a color of your choice. Select Fill and select a gradient such as the built in Green, Yellow, Orange gradient. By changing the angle of the gradient, for example, you can change the look of the filled shape.

In an up coming blog post I’ll show you more about working with Gradients in Illustrator.

Helen Bradley

Wednesday, February 16th, 2011

A cool resource for understanding Av and Tv

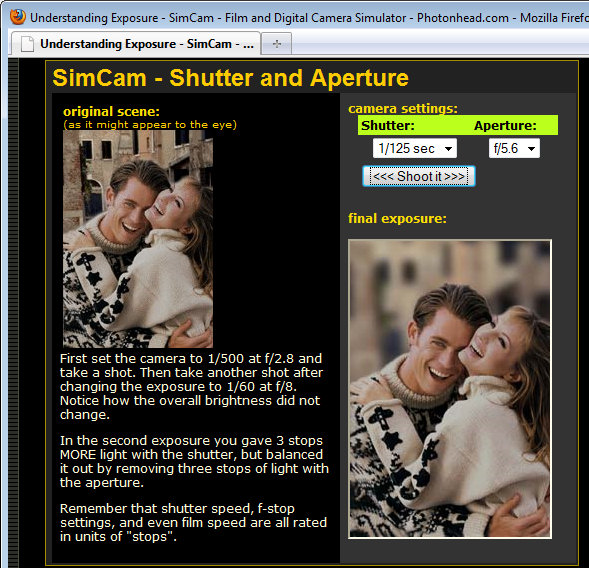
photon simulator showing how shutter speed and aperture relate when taking photos

I’ve been explaining recently why you might shoot in Av (Aperture Priority) or Tv (Shutter Priority)  mode.

Sometimes it can be hard to understand these things so I’ve found a cool tool you can use to see how these interact. Click here to visit the hands on simulator.

The simulator is an interactive camera that you can use online to experiment with aperture and shutter speed. You get to set the speed and the aperture and take your shot – the preview shows you what the image will look like with those settings.

Helen Bradley

Thursday, January 27th, 2011

Understand your cameras settings – Part 1 – Aperture

All digital SLRs and many point and shoots can operate in manual or semi-manual modes. If you capture most of your photos using Auto mode it’s time to look at some of the benefits you can get by switching to semi-manual operation.

With these modes you control the aperture or shutter speed and you get a chance to capture more creative photos. So how do you do this and what settings do you use? In this series, I’ll explain your camera’s Aperture Priority and Shutter Priority (Av and Tv) modes and also explain why your ISO setting  is important to understand too.

If your camera can operate in manual mode you’ll have settings such as M, Av, Tv and P on your camera’s dial. The two settings we’ll focus on are Av and Tv where you set the aperture or shutter speed yourself.

What is Aperture?

This begs the question, what is aperture and what is shutter speed? Aperture is, very simply, the size of the hole through which light enters your camera. The larger the hole, the more light gets in.

Aperture is described using an f number which is calculated using a complex formula. A rough rule of thumb is to think of aperture being a fraction so an f number (often called a f-stop) of f/2.8 is bigger than f/22 for example.

Understanding aperture

Aperture not only has a direct relationship to the amount of light let in to the camera, it also affects depth of field. When you use a large aperture such as f/2.8 you will get a small depth of field so only a small distance in front and behind the point of focus in the photograph will be in sharp focus and the remainder of the image will be out of focus.

Depth of field is a creative tool that many photographers use to their advantage. For example, when photographing a beautiful flower, you’ll want the focus to be on the flower and not the things behind it. Using a large aperture such as f/2.8 throws the background out of focus. The photograph at the top of this post is an example of a large aperture and a small depth of field.

On the other hand, using a small aperture such as f/8 or f/11 gives you a large depth of field so everything in the photograph will be in focus – useful when photographing landscapes for example.

The relationship between Aperture and Shutter speed

When you set the aperture using the Av setting on the camera, the camera sets the shutter speed to an appropriate value. This is because there is a direct correlation between aperture and shutter speed.

When you use a small aperture, only a small amount of light comes into the camera so you need to compensate for this by using a slow shutter speed to ensure you capture enough light.

On the flip side, when you use a large aperture such as f/2.8, you get lots of light so the camera will set a fast shutter speed.

When you use Av mode, you’re effectively saying, I’ll set the aperture I want and you – the camera – are to adjust the other settings to give me a good picture. When you are in Av mode, there will be a dial or other option you’ll use to set the desired aperture value.

Helen Bradley
Thursday, December 30th, 2010

New Year Project – Photo flip books

I recently got asked how you make a photo flip book – you know one of those little books you flip the pages from and something happens?

Well as luck would have it those cool folks over at O’Reilly used to have a magazine called Craft! and they asked me to write an article for them on just this very topic. So, click this link and you will see how to create your very own photo flip book.

I used clips from a movie file for this flip book so there’s lots of fun for everyone involved from writing the signs to making the film and then the tech side of extracting the frames and making the book.

It’s a great snow day/rainy day project.

Helen Bradley
Tuesday, April 20th, 2010

Lightening backgrounds in Lightroom

I was recently asked by photographer Rhonda Pierce to look at an image that she’d taken and to suggest how the background could be lightened to white in Lightroom.

This image raises an interesting question for anyone involved in postproduction and trying to understand when to use Lightroom and when to use Photoshop for editing.

Ultimately, if this image is to be printed at a large size then Lightroom really isn’t the tool for the job. There is too much wispy hair, particularly on the left side of the model’s face just opposite her mouth, which is cumbersome to work with in Lightroom. Selecting around the hair and doing a detailed job really isn’t possible or feasible in Lightroom. Ideally, Photoshop and a good extraction tool such as Vertus Fluid Mask would be the best combination to use.

However, if the image is not going to be printed at a large size and, for example, it’s destined for the web or if it is a preview image for a client where they’ll choose their favorite image from a series, then Lightroom is a good tool for the job. While Lightroom won’t do such a good job, it will do it very fast and, at the resolution we’ll be using the image we probably won’t see any real difference anyway. For this use, we can compromise on quality and harness the superior speed of Lightroom.

Later on, if this is the image the client chooses and if it will be printed at a large size, then we can wind back the Lightroom changes, export the image to Photoshop and do a proper job. We’ll only be spending time fixing those images that the client is actually paying for and that need a quality fix applied.

Lightening the background in Lightroom
So, assuming this image is destined for the web or for client preview purposes, let’s go back to the original question as to how the background can be lightened in Lightroom.

Any solution will require us to isolate the background. It’s not possible to lighten the background in Lightroom without affecting everything else in the image and that will destroy the rest of the image. The Adjustment Brush is the obvious solution.

Step 1
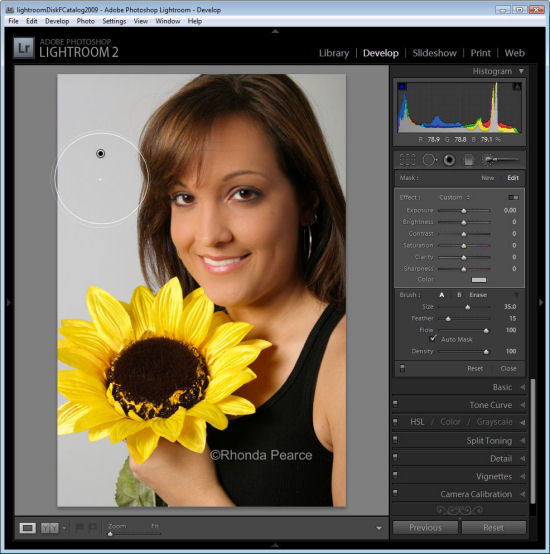
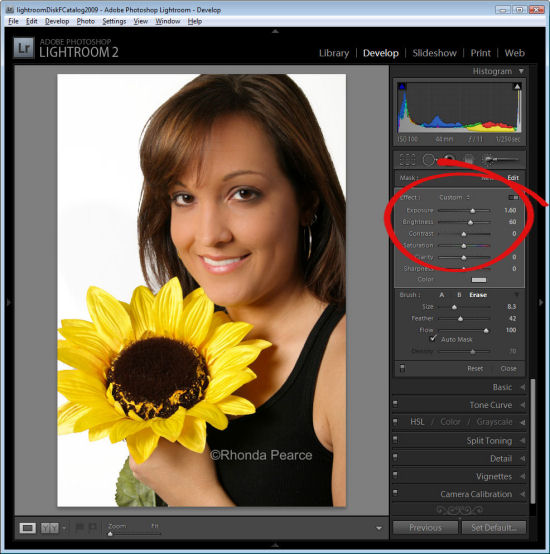
Click the Adjustment Brush in the Develop module and size Brush A so it is big enough to paint over the background. Add a small feather, and for this job, enable Auto mask so Lightroom will do most of the selection work for us. Set Density to 100.

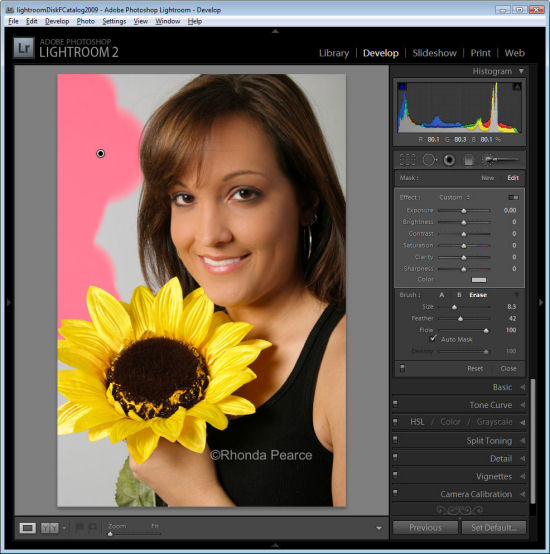
Click and paint over the background with the brush. When you lift the brush you’ll see the Adjustment Pin. Make sure the cross hair in the middle of the brush stays on the background and then the Auto Mask feature will ensure that the brush doesn’t paint over anything but the background.


Step 2
To see the painted area, press the O key and a red overlay will appear. This makes it easier to see where you are working.

Step 3
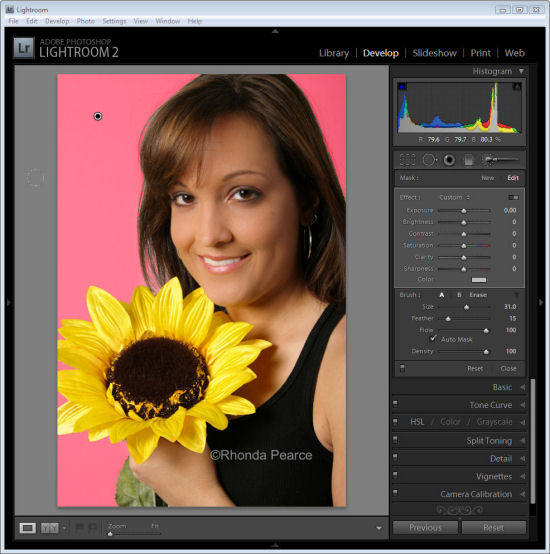
To get the background behind the very fine hairs you might be tempted to select a very small brush and try to isolate the areas manually. However, to do the job fast, it’s more efficient to size the brush very large so the center can be positioned over an area of the background and the rest of it extends over the wispy hair area. It might help to significantly decrease the density at this point to around 30 so that you only partially select the background in the wispy hair area.

Position the brush over an area of the background so the rest of it extends over the wispy hair area and click once.


Step 4
Return to 100% density and continue to work in the other background areas making sure to avoid the wispy hair.

When the area that you want to effect are selected, press O to hide the mask.

Step 5

Now adjust the settings for the Adjustment Brush. Increase the exposure and brightness until the background is white.

Click Close to close the panel and deselect the Adjustment Brush.

Step 6
Check the wispy hair area and you’ll see that not all the grey has gone but, when viewed in context of the remainder of the image the results are acceptable.

Press the backslash key (\) to see the image before and after the fix.

Helen Bradley
Page 11 of 12« First89101112