Wednesday, September 26th, 2012

Wide angle lenses come in two types, some are wide angle and some are fisheye. I have a fisheye and from my experiences recently with it, I am tempted to buy the other type – not because I don’t like the fisheye, but because I see the possibilities with a wide angle lens.

Where I use a wide angle is when I have a lot of stuff in front of me – generally high things and where it just doesn’t fit in the screen.
These next images are from the Avon Aqueduct in Scotland. It is high and wide – impossible to capture without a wide angle, but with a wide angle lens everything fits nicely and you get an idea of the scope of the structure.


Now on the top of the aqueduct, which by the way is a canal for boats, the view is expansive. Huge, wide, diverse and you really want everything in the one shot if you can. Here, again, the wide angle saves the day and lets you get plenty of the scene in your shot.

In fact, this trip to Scotland, I pulled the wide angle out a few times. Tall buildings, streetscapes and bridges all got captured with it. I love the curve you get with the fisheye but I’d like the option to just get a wide shot without the bulge sometimes.
Helen Bradley
Labels: Fish-eye, Fisheye, Photography, travel photography, wide angle lens
posted by Helen Bradley @ 11:23 am0 Comments - links to this post
Wednesday, September 19th, 2012

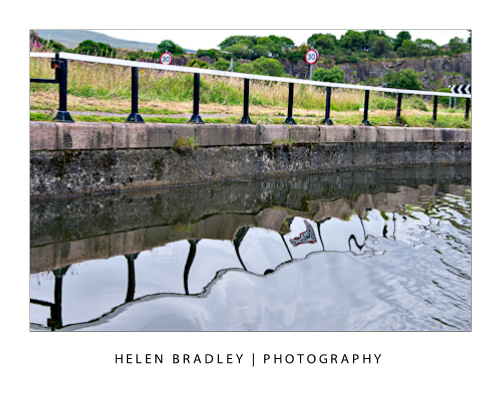
I really cannot emphasise too much how reflections can help you capture wonderful images. They can make even the most ugly objects like discarded road signs and rusty fences look great. It seems that anything reflected seems to grow an immediate charm factor and you can take advantage of this.
In this image, the traffic cone caught my eye so that made the subject something to look at. Perched on the old fence and standing in the canal it had a certain charm. Then the reflection made the shot. If I could pull it all together I had a worthwhile image. I like the result.

When you are out, look for reflections – you will find them in water and in shop windows, in car windows and all sorts of places you might not think of but they are there.

Helen Bradley
Labels: Photography, photography how to, reflections, water ref
posted by Helen Bradley @ 11:10 am0 Comments - links to this post
Thursday, September 13th, 2012

I’ve been photographing recently on the canals of Scotland. There has been so much potential for creative stuff I have really been glad that I photograph so regularly and I’m so familiar with my lenses and camera that I don’t worry too much about setup and can spend more time on the creative side.
Here I had photographed these industrial buildings already and I knew there were steers in the field but nothing had quite come into position. The secret is to wait, somehow if you wait, chances are that things just move to where you want them. This field had wonderful colourful scrub, green grass, black and white (friesian) steers and buildings belching smoke in the background. I just had to wait till everything lined up and, in time, it did.


So far as apertures are concerned this is a hard shot to get everything all in focus. It is just too much depth and it was early evening so the light was low. I settled for what I generally use when I want a big depth of field which is around 7.1 or 8 and then I focused on the steer. This brought the industry on the horizon into some focus but threw the flowers close to me out of focus. There was no where to move to as I was standing in the only place I could get everything in the picture and that put some flowers directly in front of my camera.
Turns out I love the effect and the colours in the foreground just work for me. The layers in the image from the out of focus flowers through the field and the steer and back to the industry on the horizon just makes this image for me.
Next time you are out, look for layers to capture. Look for something interesting to shoot and then ask yourself how can you position yourself to capture the shot and get some foreground interest too. You might be surprised at what you can find and what creative opportunities you encounter.
Helen Bradley
Labels: focus, Layers, photograph, small aperture
posted by Helen Bradley @ 12:44 pm0 Comments - links to this post
Monday, September 10th, 2012

I got caught recently photographing in Scotland. While I had packed 2 more lenses than I ususally travel with – usually it is only one – I forewent the tripod – I do have my limits and I was spending 6 nights on a 6 foot wide narrowboat on the canals so to say that space was at a premium is an understatement. So, night one of the trip we are moored at the Falkirk Wheel. This huge monolith lifts boats using a rotating wheel up 80 feet or so from one canal to another. It’s big and beautiful and very kindly the guys at the wheel turned the lights on for me so I could photograph it. So, there I was late at night, the weater was cold but luckily pretty still but I really needed a tripod. There was nothing around to sit the camera on so I braced myself and got off a few shots, not too shabby in the circumstance – the lights were great but I love to get something just a bit different.

So here’s what happened – I had spent the afternoon photographing some kelpie statues – these are creatures with horse like heads and dragon like tails. In this case there were only the heads and they were sitting on a boat in the mooring pond at the foot of the wheel – funky stuff. At night it made a perfect focal point for my shots – but still the problem of no tripod. Now there is a flash curtain setting on most cameras – you typically have a front and a read curtain sync flash. Essentially what it gives you is a combination of both a flash and a long exposure – the front and rear bit is when the flash fires – the beginning or the end of the exposure.
So, I could use the flash to capture the statues and the long exposure to capture the lights. Because the sculptures were so dark they didn’t get caught in the long exposure but they were frozen in the flash. Having shot a few test shots, I thought it needed just a bit more so I combined the flash and long exposure and at the same time I moved the camera.

So, the kelpie (horse) statues are lit and they are sharp, the lights are caught but moving and out of focus – and because the statues are little bits of metal welded together with holes in them, the light show through and over them. All in all I called that a technical challenge well met and an ace final result.

A word of caution. The solution to this problem required me to have played with the flash in the past so I understood the curtain sync process, it also helped that I’d played a bit with moving the camera so I could forsee what that might give me. So, as always it will pay to learn to use your camera features before you really need to put them to use.
Then pure luck put the statues there (they get moved around a bit) and it got my host Nick to call the wheel guys and get the lights turned on and Irene to wake me and tell me the lights were on – an all round community effort which paid off with some shots I love.
Helen Bradley
Labels: creative photography, curtain flash, front curtain, Photography, rear curtain
posted by Helen Bradley @ 12:43 pm1 Comment - links to this post
Tuesday, July 3rd, 2012

You can learn a lot about black and white photography using your favourite photo editing program as most have tools for converting from colour to black and white.
Avoid the adjustments that do the work for you such as by choosing Image > Mode > Grayscale as you won’t be able to make any creative changes to the image.
Instead, in Photoshop Elements, choose Enhance > Convert to Black and White and experiment with the sliders and options. There are different options down the left of the screen to select from and you can then adjust the red, green and blue sliders to fine tune the result.
In Photoshop, choose Layers > New Adjustment Layer > Black & White and adjust the sliders for the colors – this lets you control how the colours are converted to either black or white. In this way you can separate colors like Green and Red for example making them significantly different to what they would look if you do a regular conversion.
For more information on making a detailed colour to black and white conversion in Photoshop Elements visit this blog post: An Adjustable Black and White conversion http://projectwoman.com/2009/08/an-adjustable-black-and-white-conversion.html
In Lightroom and in Adobe Camera Raw you can convert to black and white and then adjust the color sliders to create a good looking black and white image.
Helen Bradley
Labels: b & w, b and w, B&W, black and white, Camera Raw, camera settings, color, colour, convert, desaturate, digital SLR, dslr, film, grayscale, greyscale, Helen Bradley, monochrome
posted by Helen Bradley @ 8:11 am0 Comments - links to this post
Friday, June 29th, 2012

Traditionally, when shooting with black and white film, photographers use filters to enhance the colours in the image.
Using red, yellow or orange filters when shooting landscapes or shots where the sky has interesting detail can help darken the blues in the sky giving them more punch than they would otherwise have.
You can purchase coloured filters that screw onto the lens of a digital SLR or which can be placed over the lens of a point-and-shoot camera using an adaptor ring.
The images captured with these filters will show different conversion of colours to black and white than you would see if you were to shoot in regular black and white without the filter.
The image at the top shows two different renderings of a single image the first with a red filter and the second with a blue filter.
Helen Bradley
Labels: b & w, b and w, B&W, black and white, Camera Raw, camera settings, color, colour, digital SLR, dslr, film, filters, Helen Bradley, monochrome
posted by Helen Bradley @ 8:09 am0 Comments - links to this post
Thursday, June 28th, 2012

I’ve been taking a lot of screenshots lately and I have over 1,200 photos on my iPad – a lot more than I really want to store there.
When I went to delete the photos in bulk, I banged my head pretty quickly up against a problem with the iPad. It’s not immediately apparent how you delete a lot of images at one time and deleting them one at a time will get very cumbersome very quickly.
Here’s how to do it:
To begin, launch the Photos app, tap the Albums link and then make sure you’re viewing the Camera Roll or the place where your image are stored. I wanted to remove them from the Camera Roll so I tapped that.

Now press the bent arrow icon in the top right corner of the screen and you’ll see options on the left for Share, Copy and Delete.

Tap an image to select it and then go ahead and select each of the images to delete – they’ll get checkmarks on them to show they are to be deleted. To undo the setting, tap the image again.

Then when I you have those you want to delete selected, tap the Delete button and choose Delete Selected Photos to remove them.

It is, as you might have expected this is ridiculously simple once you know how to do it but difficult until you do.
The good news is that the images aren’t removed from your iCloud download folder on your PC. So, for example, if you’ve previously had the images synched so they appear on your PC in a folder of iPad downloads, the images will still be on your PC at the end of the process – they’re just removed from your iPad.
Helen Bradley
Labels: delete, Helen Bradley, how to, images, ipad, photos, pictures, remove, share, tip
posted by Helen Bradley @ 8:00 am2 Comments - links to this post
Tuesday, June 26th, 2012

The same rules for composing an image in colour apply when you are shooting in black and white. Make sure the subject of the photo is placed in an interesting position in the shot, make sure the camera is square to the horizon and that the subject is in focus.
When you are photographing in black and white pay attention to how the colours are converted.
Some colour pairs like green and red which contrast so strongly in colour photos convert to the same shade of grey in a black and white image. Depending on what you are shooting this can be an advantage or a disadvantage.
In the image above the solid black of the nuns’ habits ensures that the image will be a strong one and placing the subjects off center makes the image more dynamic.
If you are unsure how the image will convert, check the camera’s viewfinder or on a digital SLR take a reference shot and look at the result in the LCD screen to evaluate the composition and to check that what you are seeing in the scene will render well in black and white.
Helen Bradley
Labels: b & w, b and w, B&W, black and white, Camera Raw, camera settings, color, colour, composition, digital SLR, dslr, film, Helen Bradley, monochrome
posted by Helen Bradley @ 8:06 am0 Comments - links to this post
Friday, June 22nd, 2012

When the light is lacklustre because the weather is overcast it is often a bad time to shoot in colour because the colours are bleak and uninteresting.
These are times when black and white works particularly well because, by removing the colour problems, you can focus on the interesting things in the scene.
If the scene is monochromatic anyway and even flat but shooting it in black and white you can reinforce the desolation and age of the scene.
However, that’s not to say that a sunny day or sunrise and sunset is not also a good time to capture photos in black and white – when the sunlight is strong, the contrast between areas of light and shadow become very obvious and black and white is a wonderful way to capture this.

Helen Bradley
Labels: b & w, b and w, B&W, black and white, Camera Raw, camera settings, color, colour, digital SLR, dslr, film, full sun, Helen Bradley, light, monochrome, sunrise, sunset
posted by Helen Bradley @ 8:03 am0 Comments - links to this post
Tuesday, June 19th, 2012

Black and white is particularly attractive for use in portraits photography. You can use it when your subject is dressed in or surrounded by colours that are not complimentary to them or which are distracting to the eye.
By shooting in black and white, you remove the impact of the clashing colours allowing the subject to become the focus of the image and not their clothes or, worse still, the background.
Bathed in soft light, babies captured in black and white look wonderful and the impact of jaundiced skin or blemishes is reduced.
For subjects that have facial details that can handle harsh light, try capturing your portraits with strong side lighting such as sunlight pouring in through a window. The dramatic contrast between light on one side of the face and shadow on the other can bring a portrait to life.
This type of setup is best used for a subject who has very strong facial features such as older subjects with lots of wrinkles or for subjects who live life hard as it reinforces their personalities and lifestyle.

Children’s and baby’s portraits captured in black and white do away with distracting colours and blemishes and allow you to focus on the child.
Helen Bradley
Labels: b & w, b and w, B&W, baby, black and white, Camera Raw, camera settings, child, children, color, colour, digital SLR, dslr, film, Helen Bradley, kid, monochrome, skin tone
posted by Helen Bradley @ 8:00 am0 Comments - links to this post
Friday, June 15th, 2012

What to capture?
When you remove the colour from an image, you are left without one of the key elements that attracts the eye to an image – the differing colours in it.
However, colour is also distracting so removing colour removes a distractive element allowing the eye to focus on other elements in the image.
This image isn’t a good one to shoot in black and white as most of the interest in it is colour:

As photographer it’s your job to find other elements of interest to capture.
Look for different shapes, textures, tones and contrast in the scene that will be visually interesting and make these your subject matter.
For example, one element that works particularly well in black and white is repetition.
When you capture a series of repetitious elements such as trees, fence posts, light poles; then by removing the colour, you’ll be able to focus the viewer’s eyes on the repeated elements.
Helen Bradley
Labels: b & w, b and w, B&W, black and white, Camera Raw, camera settings, capture, color, colour, digital SLR, dslr, film, Helen Bradley, monochrome
posted by Helen Bradley @ 7:50 am0 Comments - links to this post
Thursday, June 14th, 2012

If you’re travelling for work or pleasure, ask for a room on a high floor in the hotel and shoot the night skies from your hotel window. There’s always something of interest happening in the streets below even if you have a totally awful view in daytime, the nightlights can offer photographic opportunities you don’t get in the daytime.
When you’re shooting from a hotel or office window at night, turn out the room lights so you minimise the reflections in the glass. Look for interesting buildings and light effects, jam your lens up against the window and start shooting. A table or windowsill can be used to steady the camera for long exposures too.
Helen Bradley
Labels: Helen Bradley, hotel window, how to, Photography, photography how to, shoot right at night, tip
posted by Helen Bradley @ 8:00 am1 Comment - links to this post
Tuesday, June 12th, 2012

Artistically black and white photos take a lot of beating. There is something about a good black and white image that invokes a level of appreciation that many colour images can never achieve.
In days of film, shooting in black and white meant that you had to commit to an entire roll of film for your black and white photos. Today you have a lot more choices and black and white is only a setting away in your camera.
However, shooting in black and white is a little different to shooting in colour so here is what you need to know:
Camera settings for black and white shooting
The first thing to do is to work out how your digital camera captures in black and white.
Most cameras have a setting that allows you to switch to monochrome or black and white capture.
You’ll need to be familiar with how to switch the camera into this mode, how to identify from its display that you are in this mode and how to return to full colour mode when you’re done.
When you capture in JPEG using a point and shoot camera or a digital SLR, your camera will discard all the colour information before saving the image. You can’t go from monochrome to colour later on.
However, if you shoot with a digital SLR and capture the image using Camera RAW you can generally configure your camera to capture monochrome images but, behind the scenes, the camera will still capture all the RAW data it would capture if you were shooting in colour and this will be available later when you process the RAW image.
Helen Bradley
Labels: b & w, b and w, B&W, black and white, Camera Raw, camera settings, color, colour, digital SLR, dslr, film, Helen Bradley, monochrome
posted by Helen Bradley @ 7:39 am0 Comments - links to this post
Monday, April 30th, 2012
I recently got the chance to spend time at a photo safari at Safari West with local photographer John Burgess. It was a great opportunity not only to hear John speak but also to be reminded of the basics – I always learn something and I took away a few big ticket items which I was really pleased with. With John, because of his close association with Safari West you also get to do things not everyone else can do like jam your lens up against a fence to capture a monkey or a cheetah which is totally cool and really makes one heck of a difference to the final images.
Here is a sampling of the wonderful animals you get to enjoy at Safari West – click the image to view the slideshow.

Helen Bradley
Labels: cape buffalo, cheetah, colobus monkey, de brazza monkey, flamingo, giraffe, photographs, safari west, springbok, waterbuck, wilderbeest
posted by Helen Bradley @ 2:06 pm0 Comments - links to this post
Wednesday, March 21st, 2012

After dark you will find many shops completely blacked out but those which are lit or partially lit offer unique opportunities to photograph empty places.
Without people around to question what you are doing you can spend the time you need to do to find great subjects to capture. Look for different colours of light and repeated objects – here the local laundromat provides a moody subject which is only enhanced by the grain from the high ISO setting used.
Helen Bradley
Labels: closed shops, Helen Bradley, night, Photography, photography how to, tips
posted by Helen Bradley @ 9:00 am0 Comments - links to this post

