Friday, May 22nd, 2009

Keywords and Lightroom – the basics


As with any photo management tool Lightroom 2 offers you the ability to add keywords to your images. In this way you can make it easier to find images later on by searching for them by keyword. One simple way of adding keywords to your images is to do this as you import your images into Lightroom. Of course this requires that you’re importing a series of images which all share the same keywords. As this is not always the case, you may need to add keywords from inside Lightroom and I’ll show you how to do this.

Start in the Library module in Lightroom. While it appears possible to select multiple images in the Filmstrip whilst in Loupe view and add keywords to them this is not the case. The keywords will be added to only the first of the selected images and not all of them. Not only is this frustrating but it also is a little misleading.

Step 1
Instead, to add keywords to multiple images at the one time you need to select Grid view (G). Select the images to add the keyword to and type a keyword in the Keyword Tags panel on the left of the screen (open Keywording) to access this. You can also drag and drop a keyword from the Keyword Suggestions onto the selected images.


Step 2
You can add keywords to any image from the Keyword List by selecting the images, then right click the keyword in the Keyword List and choose Assign this keyword to Selected Photos.

Step 3
Once you have added keywords to your images you can find the images by keywords by accessing the Filter panel. Press \ to toggle the display of this panel which appears above the Grid panel of images. Select Text, in the first box, select Keywords in the second box select Contains All (or Contain) and type the keywords in the last box. Contains All is an AND search and requires that an image contain both keywords such as Florence and Church. Contain is used for an OR search which would return all images with either or both the keywords, Florence or Church. To cancel the search, click the X button in the search field.

While keywords aren’t the easiest thing to get a grip on, in Lightroom they are key to being able to index and find your images quickly.

I contribute to the Digital Photography School blog and this post first appeared on that site.

Helen Bradley

Wednesday, May 20th, 2009

Lightroom – Understanding Clarity, Vibrance and Saturation.


In Lightroom 2 the collection of Basic fixes available for your image includes three Presence sliders that sit together in the Develop module: Clarity, Vibrance and Saturation. This week I’ll explain the differences between these three adjustments and how they affect your photos. In each of the screenshots below I have set the slider value to 100 – way more than you would use to fix your image but a setting that will show clearly how the fixes work.


Step 1
Let’s tackle Saturation first. The Saturation slider works similarly to the Saturation slider in Photoshop or any other graphics software. It lets you adjust the saturation of the colors in the image – drag it to the right to brighten and deepen the colors in the photo. If you drag to the left, you remove some of the depth and brightness in the colors and, if you go all the way to -100 you end up with a desaturated or monochrome image.

One of the problems with using the Saturation slider is that it adjusts all the pixels in the image – those where the color is lacking in saturation and those that are already highly saturated. In trying to fix the pixels that need a color boost you can end up shooting some other pixels into right over the edge so the colors tend towards the ridiculous.


Step 2
The Vibrance slider solves some of the problems that you’ll encounter when trying to boost color saturation because it is more particular about what it adjusts. With vibrance only the least saturated colors in the image are adjusted and those pixels which are already relatively saturated are adjusted less. The result is that you’ll get a general improvement in the saturation in colors in the image but not to the extent where colors become unrealistically bright. Vibrance also offers some protection for skin tones which makes it a good choice for adding saturation to portraits as it is less likely to over saturate and destroy the subject’s skin tones. In many instances you can safely bypass the Saturation slider and adjust Vibrance instead.

Step 3
The Clarity slider affects the contrast in the midtones in the image. It works by increasing some of the edge detail in the midtones giving a general sharpening which adds punch to your photo. Typically you will want to adjust the Clarity of your image in a positive direction using a setting of around 10 to 15. If possible, view your image at 100 percent so that you can see the changes that you’re making to it as you adjust it.

Helen Bradley

Thursday, May 14th, 2009

Photoshop: Creating Cool Duotones


A duotone is an image made up of just two colors. It’s often used in the printing world where a photograph is included in a publication and where the publisher wants to use some color on the page but not pay for full color printing. As a duotone, the image is created as a mix of two colors – hence its name duotone. Typically the colors are black and a spot color but they can be any two colors.

You can convert a photo to a duotone in Photoshop using its Duotone feature and you can customize the duotone and determine just how much of each color is applied to the image.

Here’s how to convert your photo into a duotone in Photoshop.


Step 1
Open your photo in Photoshop and apply any desired adjustments to it – concentrate more on developing pleasing contrast in the image than on the colors because in the next step you will be removing the color.


Step 2
Create a black and white version of the image. Typically this is done by selecting Image > Mode > Grayscale. The problem with this conversion method is that you don’t get the chance to determine how the image is converted and it is often a lackluster result. You can do better by converting the image yourself.

I recommend using a specialist black and white conversion tool – in Photoshop CS2 you can use the Channel Mixer and in Photoshop CS3, choose the Black & White tool. To do this, choose Image > Adjustments > Black & White and drag the sliders to create your custom black and white image. Then choose Image > Mode > Grayscale and click Discard to discard the color.


Step 3
Choose Image > Mode > Duotone to display the Duotone Options dialog. From the Type list select Duotone. The first Ink color defaults to Black and you can now add a second ink color by clicking in the swatch box.

Because duotones are typically used in commercial printing, you are offered a choice of colors from a Pantone color swatch. If you aren’t printing commercially and if you prefer to use the color picker, click the Picker button and select a color this way – type a name for it in the text area.


Step 4
Click the curve icon to the left of each of the color in turn to adjust how the color is applied to the image. The highlights are on the right of the chart and the shadows on the left. Drag upwards on the curve to apply more color in that area of the image, or drag down to apply less color. This feature lets you add more of your second ink color, for example, to the highlights.


Step 5
You can save the Duotone settings by clicking the Save button and type a name for it. Later you can load those colors and the curve into the dialog to use for another image. When you are done, choose Image > Mode > RGB Color to convert back to color mode so you can continue to work on the image or to save it.


The Duotone on the right was created from an image converted to a monochrome image using Image > Mode > Grayscale. The one on the left uses a custom Black and White conversion first – notice the differences in how the duotone colors are applied.

Helen Bradley

Tuesday, May 12th, 2009

Lightroom: Spot fixing with the Adjustment Brush

One of the exciting new features in Lightroom 2 is the adjustment brush which lets you to make spot fixes to your image in Lightroom. These fixes apply to only the area you select rather than the entire image. This means you can make local adjustments for contrast, saturation, exposure, brightness, clarity and sharpness without having to take the image to Photoshop to do this.

In this post I’ll show you how to get started using the adjustment brush in Lightroom. 2


Step 1
Open Lightroom and click the Develop module. Locate the Adjustment Brush and click it to select it. Hold the brush over the image to check its size. The inner circle is the hard part of the brush and the outer circle shows the edge of the feathering. To adjust the brush size use the [ and ] keys or adjust the Size and Feather using the sliders.


Step 2
Select the adjustment to make, such as Brightness or Saturation by clicking its + symbol to increase its value or the – symbol to decrease it. Then start painting on the image to adjust that part of the image. When you start painting the effect onto the image, Lightroom places an identifying marker on the screen. Here I have Brightness selected and the marker is visible.


Step 3
If you don’t know where you have painted – and it’s often very hard to know exactly – press the O key to view or hide a mask which shows the area you have painted on. If you prefer to, you can display the mask as you work. The mask also appears if you hold your mouse over the marker.

To erase the brush strokes, click the Erase option in the brush area and erase over the area to remove the strokes. To return to painting click brush A which is the default brush and continue to paint over the area. You can also use the brush with the Alt (Option on the Mac) to remove the painted areas rather than switching between the brush and eraser.


Step 4
If the effect is too much or too little you can adjust the intensity of the effect using the slider.


Step 5
If another area of the image requires fixing, click the New option and then repeat the steps to select a fix and then paint it onto that part of the image. Later on you can adjust either of the fixes by first clicking the Adjustment Brush tool to select it and then click on the marker for the area to change – you will see that the word Edit is now highlighted – and you can now adjust the painted area or adjust the amount of the fix.

In a future post I will look at some more advanced functions of the Adjustment Brush.

Helen Bradley

Tuesday, May 5th, 2009

Photoshop: Partially removing color

While there are lots of ways that you can convert an image into black and white in Photoshop sometimes you want to remove some of the color but not all of it.

One method to do this, is to use a tool such as an adjustment layer to remove the saturation from the image or to apply a black to white gradient map adjustment. This removes all the color and you can then recover some of it by reducing the opacity of the adjustment layer to show some of color from the image layer underneath. However, when you adjust opacity, the setting is applied to every pixel in the image so light and dark pixels are treated equally.

You can achieve a richer effect by using the image as its own mask so that the desaturation effect is applied with different strengths to pixels in the image depending on their relative lightness or darkness.

To see how this effect can be achieved:


Step 1
Open a new image and add an adjustment layer to convert it to black and white. I used Layer > New Adjustment Layer > Gradient Map and used the Black, White gradient from the basic set of gradients.


Step 2
Click the Adjustment Layer’s layer mask to select it – this is the white box in the Layer palette to the right of the Adjustment layer thumbnail. Choose Image > Apply Image. This tool lets you apply the image to itself as a layer mask. The current image name should appear in the Source Image area and you need to apply it to the Merged layer. Experiment with selecting and deselecting the Invert checkbox, if you have Preview selected you’ll see how each setting affects the image. Choosing Invert typically gives the best looking results and it’s the option I chose. Click Ok to add the image as its own layer mask.


Step 3
Inspect the image and let’s talk about what’s happening. The screenshot here shows the mask (not the resulting image). You can toggle the mask’s visibility on and off by Alt + Click (Option + Click on the Mac) on the Layer Mask thumbnail in the Layers palette.

Masks are grayscale so they’re always black, white or shades of gray. They work like this: where they are white, the current layer is shown – that’s the black and white conversion in this example. Where the mask is black, we are seeing through the current layer to the colored layer below. Where the mask is grey we’re seeing some partial transparency in the black and white layer so some color is showing.

Here the mask is dark in the sky area and around two of the buildings on the left so you’re seeing some blue in the sky and color in the buildings in this area. Where the mask is white, the image is almost all desaturated.


So you can see how subtly different the results are using this method, here’s the original image, the version we just created using the Apply Image command and another version showing the result with the same Gradient Map adjustment layer but this time with a reduced opacity and no layer mask. The significant differences are in the sky which is bluer and the grass which is more desaturated in our example – a result you cannot achieve by simply adjusting the opacity.

Tip
Masks can be adjusted just like regular layers. So, you can create more variety in the mask by clicking on it, and choose Image > Adjustments > Levels. Adjust the levels to suit – if you lighten the mask you’ll make it whiter overall which means the image will become more black and white and less colorful. If you darken the mask then you will see more of the colored image below.

I contribute to the post production blog at Digital Photography School and this post first appeared there.

Helen Bradley

Friday, May 1st, 2009

Make Your Own Photoshop Brushes


One of the most popular searches involving Photoshop on the web is, perhaps not unsurprisingly, for free Photoshop brushes. Photoshop brushes can be used for a range of editing and creative tasks and while it’s fun to find and download great looking brushes it’s also possible to create them yourself and to do this very easily.

Here’s how to create your own Photoshop brushes from your photos:


Step 1
Open an image that contains something that you want to create as a brush. It can be something as simple as a coffee stain on a piece of paper or a photograph that you’ve taken of a texture, statue, graffiti or other shape. The best brushes are made using high quality images so plan your brush to be around 1,000 to 1,500 pixels in width and height. The maximum allowable size is 2500 x 2500 pixels.


Step 2
To make your brush you’ll need to isolate the area that you want to turn into the brush. So start by double clicking the background layer and click Ok to turn it into a regular layer. Make a selection around the area to make a brush from, choose Select > Inverse and press Delete.


Step 3
Brushes are grayscale images so you can control the contrast and the look of the brush by converting the image into black and white using your preferred method of doing so.

Here I have selected Image > Adjustments > Black & White. This adjustment lets you tweak the black and white result to get the desired amount of contrast in the brush and to determine which colors are taken towards black and which are taken to towards white.


Step 4
Select any light areas around the image that aren’t to be included in the brush and remove them. If you don’t do this, anything that isn’t white will actually pick up paint when you use the brush later on. I selected these areas using the Magic Wand tool with a Tolerance of 5 to get everything which was white or nearly white.


Step 5
Select the area to include in the brush. If you have removed from the image everything except what you want to include in the brush Control + click (Command + Click on the Mac) on the layer to select the image.

Choose Edit > Define Brush Preset, type a name for the brush and click Ok. If the option doesn’t appear in the menu, your proposed brush is too big so size the image a little smaller and try again.


Step 6
Create a new image and test your brush. It is the last entry at the foot of the brushes palette. It’s a good idea to test it at 100% Opacity using black or dark “paint” on a white background and “white” paint on a black or dark background. If it needs fixing, return to the brush image, make your changes and select and create the brush again. You will need to reselect the new brush in the Brushes palette – it is always the last one in the list. Even if you name the two versions the same name the second one doesn’t overwrite the first.

For brushes like this which has a photographic quality, select the image layer, press Control + I (Command + I on the Mac) to invert the image, select it and make a second brush that you can use to paint with white.


Step 7
When your brushes are complete, save them to a file so you have them on disk. If you don’t do this, you will lose them if you replace your brushes. Choose Edit > Preset Manager and select Brushes in the Preset Type list. Select the brushes to save, choose Save Set and type a name for the set.

Helen Bradley

Wednesday, April 29th, 2009

Replace a sky in Photoshop


One of the most disappointing things that can happen to you as a photographer is to have a once in lifetime chance to take a photograph of something and to have the weather let you down. So, instead of luscious blue skies you’ll get grey or dull skies in your image.

You can replace a dull sky in an image in a number of ways. One method I like to use involves the Blend If tool because it avoids the need to make a detailed selection around the area of sky to replace. This is particularly handy if the skyline has trees or other wispy elements along it. The principle of this tool is you blend two layers together conditional on the overall lightness or darkness of the top or bottom layer or you can do it conditional on the lightness or darkness of a color on the top or bottom layer.

For this purpose I keep a file of blue skies. Anytime I’m photographing, I’ll swing the camera upwards and shoot a few new sky images for my collection. Then, when I need a sky, I have plenty to choose from.

Here’s how to seamlessly change the sky color in Photoshop:


Step 1
Open both the image which needs a new sky and an image of some sky.


Step 2
Drag the background layer from the sky image into the main image. It will appear at the top of the layer stack.


Step 3
Move and size the sky layer so it overlaps the problem area.

If the sky is too dark or light for the image, use a tool like the Curves tool to lighten it so it blends in better with the target image.


Step 4
Click the sky layer so it is selected in the layers palette and click the Add a Layer Style icon at the foot of the Layers palette. Click Blending Options to open the Layer Style dialog.

Locate the Blend If area at the foot of the dialog. You will use Blend If to blend this layer with the layer below. To do this, drag the slider at the far left of the Underlying Layer panel in to the right – almost all the way to the right edge of the slider.

As you do this, you reveal the underlying layer in all areas except the lightest – the areas which contain the blown out sky.


Step 5
To smooth the transition between the sky and the remainder of the image, hold the Alt key and drag away one half of the small slider to split it in two. Drag the two pieces apart. The area to the left of the markers delineates where the effect is applied 100% and between the two pieces is where the effect transitions from 100% through to 0%. Click Ok when you’re done.


Step 6
To fix any problems where the sky has blended into the original image in an inappropriate place, either move the sky further up the image so it doesn’t overlap that area of the image or, if this can’t be done, use a layer mask. With the sky layer selected, click the Add a Layer Mask icon at the foot of the Layer palette. Paint on the mask in black to reveal the original image underneath.


Step 7
Now is the time to look at the image and determine what it needs to finish it. You might need to tweak the sky color and lightness using a Curves adjustment on the sky layer now that the sky is actually in place in the image.

In some cases you may see a halo effect around the tree branches and leaves or along the edges of buildings where the two images are blended. You can remove these using the Burn tool by painting over these areas with a low Exposure brush and with the Range set to Midtones or Shadows as necessary.

Note:
The Blend If tool can also be made to work on a single channel which can give better results in some situations. Select Blue, for example, from the Channel list in the Blend If area (rather than the default Grey) and adjust using that.

Helen Bradley

Sunday, April 26th, 2009

Photoshop: Color with Gradient Maps

When you’re looking for a fun effect to add to an image, the Gradient Map tool might be just the ticket. This tool has a serious side in creating custom black and white conversions and a more frivolous one in adding color to an image. I’ll show you how to use it for both purposes.

Before we start a word about how the Gradient Map works. It is an adjustment so you can find it on the Adjustment menu and you can also apply it using an Adjustment Layer. It applies a gradient of color to your image depending on the tones in the image. So, where the image is darker the tones at the left of the gradient are applied and where the image is lighter the tones at the right of the gradient are applied. The midtones are colored with the color in the middle of the gradient. If you want the effect reversed, you can reverse the gradient and the colors are applied in reverse.

The serious side of the Gradient Map tool is its black and white gradient. You can use this to convert an image to black and white. By changing the gradient, you can affect what parts of the image go to black and which parts go to white.

Step 1
To see this at work, open an image and add a Gradient Map adjustment layer by choosing Layer > New Adjustment Layer > Gradient Map. From the Gradient list choose the Black, White gradient and click Ok. The image now shows as black and white.

Step 2
To adjust the way the gradient is applied, double click the adjustment layer and double click the gradient to open the Gradient editing dialog. You can now add stops below the gradient bar to adjust how the colors are applied. For example, if you add a second black stop to the right of the first one, you can set all the tones that are mapped to this area of the gradient to black rather than them ranging from black to a dark grey.

Step 3
By adjusting the midpoint marker between two stops you can control how the gradient transitions from one color to the next. If you drag it to the left you steepen the transition from the left most color to a color that is half way between the colors in the stops either side of the midpoint marker. Of course, here we’re talking about black, grey and white as colors, but in a minute the stops will be applying colors to the image and they work the same way.

Step 4
To apply a color gradient to an image to give it a more creative look, repeat step 1 to open an image and to add a Gradient Map adjustment layer to it. This time choose one of the colored gradients. If the gradients aren’t to your liking, click the flyout menu on the Gradient tab and load a second gradient set and use one of those.


Step 5
These gradients, like the Black, White gradient can be edited so you can tweak the colors or add new ones until you get exactly the effect you want.

Step 6
Like any adjustment layer, you can achieve further creative possibilities by setting the blend mode of the adjustment layer to something other than Normal. You can also reveal some of the underlying color from the image if you reduce the layer opacity.

I blog for the Digital Photography School and this post first appeared on that site.

Helen Bradley

Wednesday, April 15th, 2009

How to merge or combine paths in Photoshop

One of the most difficult things to work out how to do in Photoshop if you work with paths is to know how to merge or combine two paths into one.

Say, for example, you have a working path and a second path and you want the two to appear as one path so you can save it or work with it as a single entity. It sounds easy but merging or combining paths is anything but.

The solution is this:


First, convert the working path to a regular path by double-clicking on its name and click Ok. In this example, I have Path1 and Path2.

Click to select Path2 in the Paths palette. Select the Path Selection Tool and click on the path so it is selected (you will see its nodes appear). Press Ctrl + C (Command + C on the Mac), to copy it to the clipboard.

Click on Path1 in the paths palette so that it is now selected and press Ctrl + V (Command + V on the Mac) to paste the copied path into this path. You now have a single path that contains both your paths and you’re almost done.

Check the Tool Options bar as it contains the tools you need to work with the two paths. You can add the shape, subtract the shape, take the intersection of the two shapes or exclude overlapping shape areas – click each and check the diagram in the path thumbnail to see the result to determine which one you want. Select the desired option and click the Combine button and the paths will be permanently joined.

Here is an example where one path is contained inside a second path. You can choose from a number of options for combining the paths depending on whether you want the doughnut, the hole or something different!

Helen Bradley

Sunday, April 12th, 2009

Update Lightroom Previews


I travel with a laptop and I take most of my photos when travelling. All this adds up to me wanting to get my images into Lightroom quickly so I can see what I have but so I can do it on the run in the airport lounge, for example.

Because of this most of my images are imported using the Minimal previews which are, let’s face it, pretty awful but they are fast. When I get home and I have the time, I want to update the previews to Standard which is a good working size for me.

To change and update the preview size for a folder of images, choose Library > Previews and choose to render 1:1 previews or standard size ones. You’ll be asked if you want to apply this to one image or all of them – choose All and go do something else while Lightroom grinds away at the task.

In the top left corner of the screen you’ll see how many previews it has to make and how far through the process it has got. If you have multiple folders needing updating repeat the process and Lightroom will continue to work on multiple tasks at once.

To change the actual preview defaults, choose Edit > Catalog Settings > File Handling tab and set the Preview size – it won’t need to be any larger than your screen and Medium quality is a good compromise between speed and quality.

Helen Bradley

Saturday, April 11th, 2009

Photoshop: Panorama with a twist

Panoramas don’t have to perfectly or neatly aligned. If you’re looking for a fun way to create a panorama in Photoshop the best way to achieve the effect is to throw away the rule book on how to capture and assemble a panorama and try something a little different. In this article, I’ll show you how to capture the images and create a stylish panorama which is anything but perfect.

Traditionally, you capture images for a panorama using a tripod and taking care to ensure that all the shots overlap and that the camera settings do not change from one image to the next. For my panorama I ignored the rules and captured my images with a hand held camera, ignoring changes in the camera settings and continually varying the camera angle from one image to the next. However, you will still need to have plenty of overlap from one image to the next as the panorama tool needs this to assemble the final image for you.


Download the panorama sequence onto your computer and open all the images in Photoshop. Choose File > Automate > Photomerge to open the Photomerge or panorama tool. Select the Cylindrical, Auto or Perspective options – each renders a different result and disable the ‘Blend images together’ checkbox – this is important as you don’t want the images blended at all. Click Add Open Files to select the open files as those to create the panorama from. Click Ok and wait as Photoshop assembles a panorama from the images that you have selected – this may take some time.


When the process is complete you will have a panorama that is bent in interesting directions with the images making up the scene overlaid over each other in a haphazard arrangement.


To add the final touches to the project, start by adding a new layer behind the panorama images by choosing File > New > Layer and click Ok. Drag it to the bottom of the layer stack and fill it with your chosen background colour. To get a colour that works with your image, sample one from the image itself using the eyedropper.

To adjust the panorama’s contrast and brightness add a new adjustment layer by clicking on the topmost layer and choose Layer > New Adjustment Layer > Curves. Drag on the curve until you have a result you like. This adjustment layer will affect all the layers in the image. If you need to adjust only one layer, select it and choose Image > Adjustments and select the adjustment to make – doing it this way ensures the adjustment affects only the selected layer.


Select one of the layers in the image and click the Add Layer Style icon at the foot of the layer palette. Select Stroke and set the stroke Color to White and add a large enough sized stroke that you can see it clearly. Set the Position to Inside and click Ok.


In the Layers palette, right-click on the Layer Style that you just created and choose Copy Layer Style. Select all the panorama layers in the image right-click and choose Paste Layer Style to apply the stroke outline to all the layers.


For additional interest, click some of the layers in the image and either drag them a little out of position or drag their layer to a different position so they are more or less visible. You can also add a drop shadow to the layers the same way you applied the stroke outline.

Helen Bradley

Thursday, April 9th, 2009

Stupid Photoshop Tricks #3: Faux Reflections – Pt 2


Reflections in Puddles
Creating a reflection that looks like a puddle on the ground is a fun technique. Start with an image of a pavement or brick and convert the background layer to a regular layer. Add a new layer on the image and, using black paint and a semi hard brush with 100% opacity, paint a puddle shape over the image.

Open the image to use as a reflection in the puddle and flip it vertically by choosing Image > Transform > Flip Vertical. Drag this layer onto the image with the black puddle in it and move it to the bottom of the stack. Control + Click on the layer thumbnail for the puddle to select it, add a feather to the selection and choose Select > Inverse to invert it. Hide the puddle shape layer.

Now click the original image layer and click the Add Layer Mask icon at the foot of the Layer Palette and a layer mask will be added to the image opening a hole in the pavement so you see the image through it.

Move the image into position and then darken the pavement if desired using the Burn tool or duplicate the pavement layer and apply the Multiply blend mode to the duplicate and then reduce the opacity to suit.

To edit the reflection paint with black or white on the mask layer. Painting with black will add the reflection in that area and painting with white will remove it. With some fine tuning you should have an interesting result, fig 1.


Fig 1 Create a reflection in a pavement image to show off your favorite sky or streetscape.

Mirror Reflections
Having said in part 1 that you should avoid using mirrors to create reflections, here is one way you can do it with a single image and without sacrificing reality – unless of course that’s what you want to do.

Open an image of a reflective object – a car rear vision mirror is a good choice and it’s easy enough to go out and shoot one if you don’t have anything else to work with. Convert the background layer of the image into a regular layer by double clicking on it and click Ok.

Open an image with a scene that you want to show reflected in the mirror and drag the image layer from this image onto the image with the mirror in it. You can now close the second image.

When you look at objects through a mirror they are in revere so you should mirror any image that has type or signs etc, that will look wrong if not flipped. To do this, click the layer to flip and choose Edit > Transform > Flip Horizontal. Hide this new layer for now by clicking its Layer Visibility icon.

Click the bottom layer to make it active and make a selection around the area where the second image should appear inside the mirror. Feather the selection a little by choosing Select > Feather and apply a small feather value to soften the edge – in Photoshop CS3 and CS4 you can use Refine Edge to refine the selection edges.

With this selection in place, click the Layer Visibility icon for the topmost layer so it is visible again. Click the Add Layer Mask icon at the foot of the layer palette and, immediately you do this, a layer mask will be created that automatically places the image inside the mirror.

Notice that the layer mask is a black and white image and, where it is black, that part of the image is hidden and where it is white that part of the image shows. A final touch is to darken the inside edge of the mirror as it was in the original image, see fig 2.


Fig 2. This simple reflection is created by placing a scene inside a reflective object such as a car mirror.

To adjust what portion of the image appears in the mirror, undo the link between the layer mask and the image (it is a small chain icon between them in the layer palette), move the layer into a new position and apply the link again.

If you’re interested in seeing some great real life pavement reflections so you can analyze their characteristics to apply them to your images, visit Photochiel’s wonderful Reflectins collection at Flickr: http://www.flickr.com/photos/photochiel/sets/140720/show.

Helen Bradley

Sunday, April 5th, 2009

Stupid Photoshop Tricks #3: Faux Reflections – Pt 1


There’s something very compelling about photos that capture reflections. These reflections can come from puddles on the ground but they’re not limited to wet environments. In fact any shiny surface can reflect its surroundings.

If you’re not lucky enough to encounter a reflection worthy of capturing, you can create a faux version with Photoshop. The process is relatively simple and you can create results that vary from looking realistic to those that are playfully faux. In this article I’ll show you three variations on the reflection theme including how to make a reflection in a mirror and how to create a puddle of water where there wasn’t one before.

Before you start working with reflections, there are some things to be aware of. One of these is to avoid attempting the impossible, such as placing a person in front of a surface and creating mirror reflection of them in it. The problem here is that you typically need two images, one shot from each side of the person to create the mirror image because what is reflected in the mirror won’t be what you’re seeing in front of it, as shown in Fig 1.

The easiest reflections to create are where the reflective surface is below the object being reflected in it. Examples of this are reflecting a building or scene in a lake or pond. This type of reflection requires only one image to achieve a semblance of reality. Another type of reflection that it simple to achieve is where you show the reflection but not the original object – in this case, almost anything can be reflected.


Fig 1 This is a photo of a person reflected in a mirror, to recreate this digitally you’d need two images, one shot from either side of the person.

Water reflection
When you think of reflections, you’ll probably think first of a scene or building reflected in a lake or large body of water. These reflections are fairly simple to create. Start with your image open in Photoshop and double click the background layer to make it into a regular layer.

Enlarge the canvas so you have room for the reflection by choosing Image > Canvas Size and read the current size from the top of the dialog. You’ll need to double the height so, to do this, click the Relative checkbox and the box in the top center of the 9 boxes in the Anchor preview. Type the value of the current height of the image into the dialog and click Ok, (see Fig 2). You should have lots of extra room below the image.


Fig. 2. Add more canvas to the foot of the image so you have room for the reflection.

Duplicate the image layer by right clicking it in the Layer palette, choose Duplicate Layer and type a name for this layer – Reflection – and click Ok. Select and delete any portion of the bottom of the image you don’t want to use. Click the layer name to select the layer and flip it by choosing Edit>Transform>Flip Vertical. Use the Move tool to drag the flipped version of the image down below the original image and align them carefully.

The reflection is in place but it’s probably won’t be particularly realistic. To add realism, add a ripple to the reflection layer by choosing Filter>Distort>Ripple and select a ripple amount of either Small or Medium. This adds a subtle distortion to the reflection and makes it look more like water, see Fig 3.


Fig 3 Add a ripple filter effect to make the reflected area look like water.

Because not all reflections will be perfect you can make the reflection disappear as it moves father away from the reflection line. To do this, add a new layer using Layer>New>Layer and fill the layer with black, muddy brown or blue/grey and drag it under all the layers. Return to the reflection layer and add a layer mask by clicking the Add Layer Mask icon at the foot of the Layer palette.

Click in the layer mask and click the Gradient tool on the toolbar. Select a White to Black gradient and set the style to Linear. Drag vertically on the image with your mouse to fill the mask with the gradient. It should be filled with white at the top and black at the bottom. If not, click the Reverse checkbox on the toolbar and repeat the gradient fill until you get a transition from fully opaque to partially transparent for the reflection layer. As you do this, the underlying black or brown layer will show through, see Fig 4.


Fig 4 The reflection has been made partially transparent so it’s not as perfect and it’s more realistic.

Other fine tuning options include duplicating the reflection layer and blur this duplicate by choosing Filter>Blur>Gaussian Blur. Blend this layer into the one below by decreasing its opacity.

If having a reflection appear as a straight line along the image doesn’t look good, you can clone elements from around the reflection to make it less obvious. To do this, add a new layer to the image and drag it on the top of all the layers. Select the Clone Stamp tool and ensure the Sample all Layers checkbox is selected. Now Alt + Click on an area to sample it and paint over the horizontal line to soften it. Cloning onto a new layer allows you to edit the cloned area separately from the original image. In fact, you may notice that nothing we’ve done in these steps has affected the original image.

Crop the image to create a more interesting result. For example, crop so the line between the original and the reflection is along the top third of the image so you’re showing more of the reflection and less of the original or crop so it’s along the bottom third so you see just a little of the reflection, see Fig 5.


Fig 5 This image has the reflection line softened by cloning and it’s cropped so only a little bit of the reflection shows.

Helen Bradley

Wednesday, April 1st, 2009

Stupid Photoshop tricks #2 – Fold a Photo


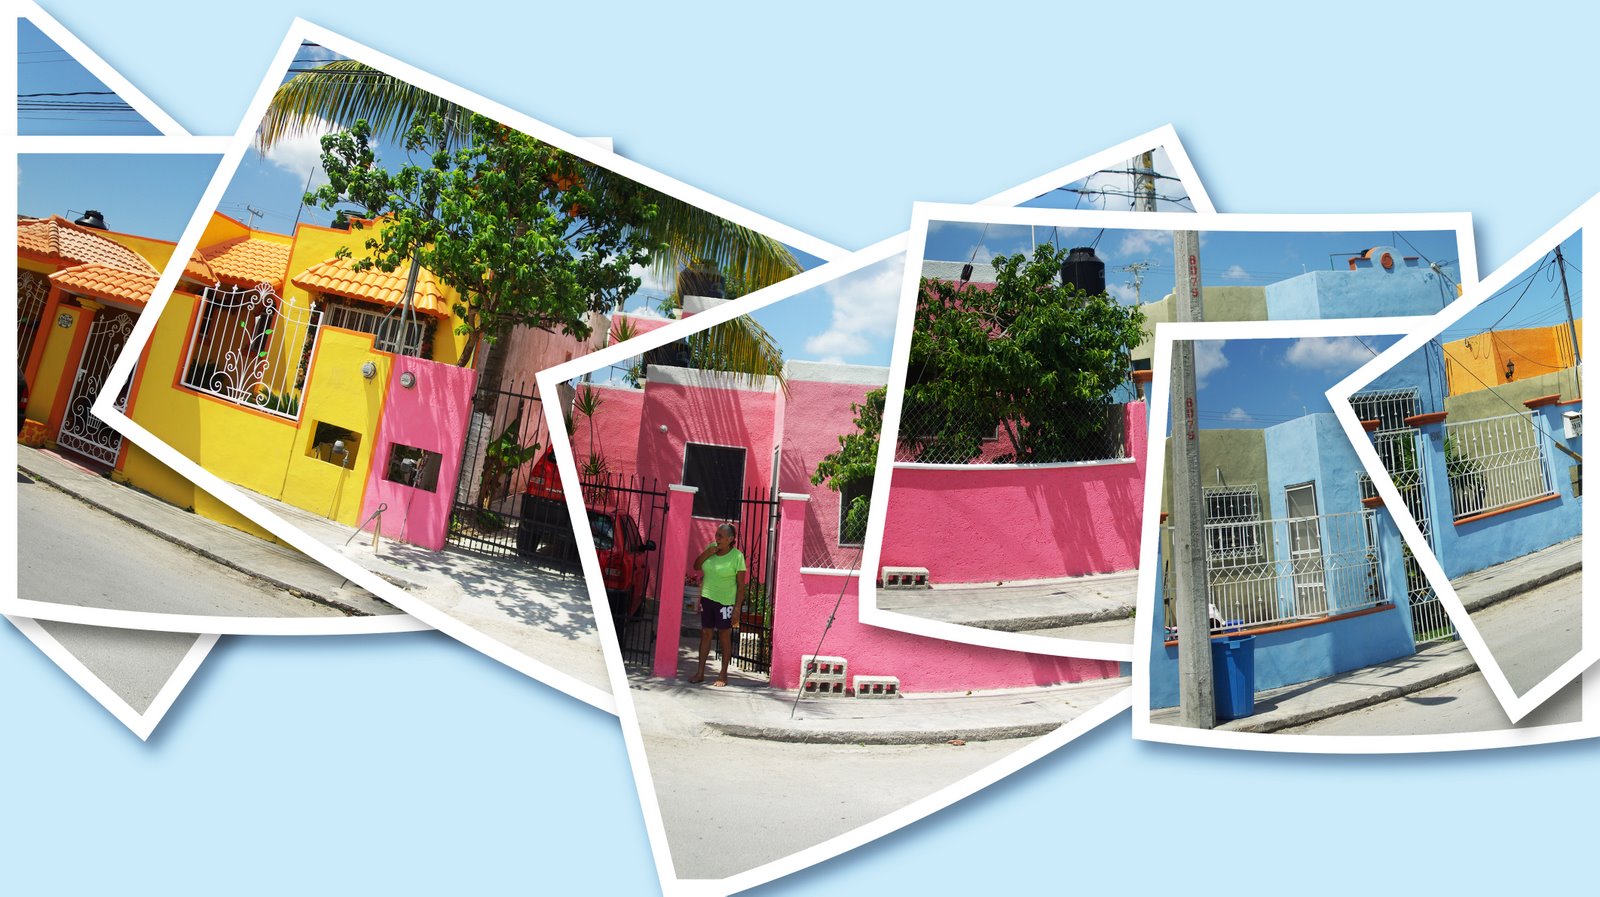
I love the texture of old heritage photos, particularly those that have been kicking around for some years and which have managed to accumulate folds and crinkles. While it can take many years for a printed photo to develop this sort of quality, luckily Photoshop allows us to create a similar effect for our digital photos in far less time. With the help of the Liquify filter to distort the edge of the photo and some gradient fills to add the highlights and shadows you can create the effect of a folded photo in minutes.

The Liquify filter is a tool which is often used to create funny effects like making a person’s eyes bulge or pushing their nose out of shape. It also has more serious applications, not only in photo retouching but also, as you are about to see, in creating interesting effects with your photos. We will use the Liquify filter to bend the edges of the photo to give the impression that it’s been folded and then unfolded.

Here’s how to get started on the effect:

Step 1
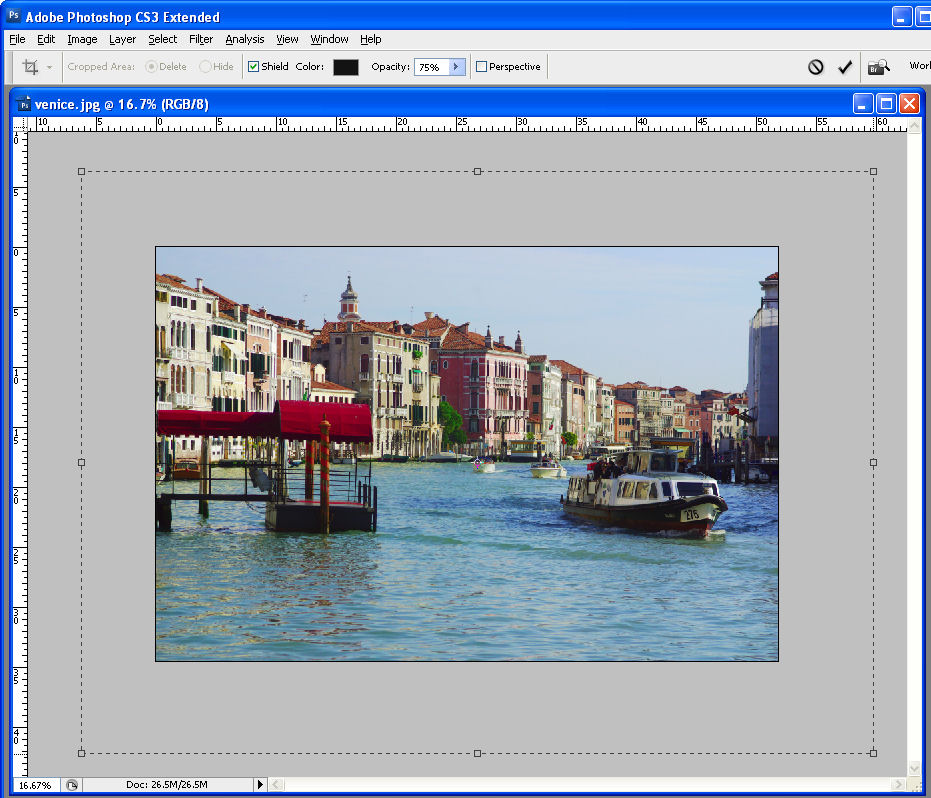
Open the photo that you want to use with this effect. I have used a landscape orientation photograph which will be folded into six panels. Duplicate the background layer by choosing Layer, Duplicate Layer and click Ok. Turn off the layer visibility icon for the Background layer.

Step 2
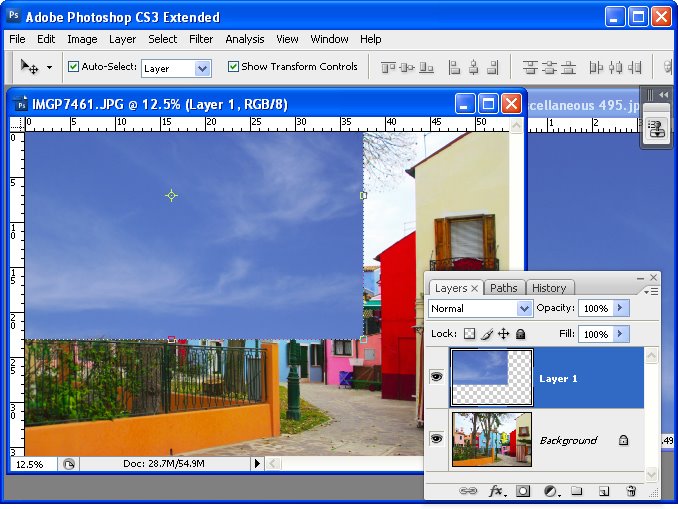
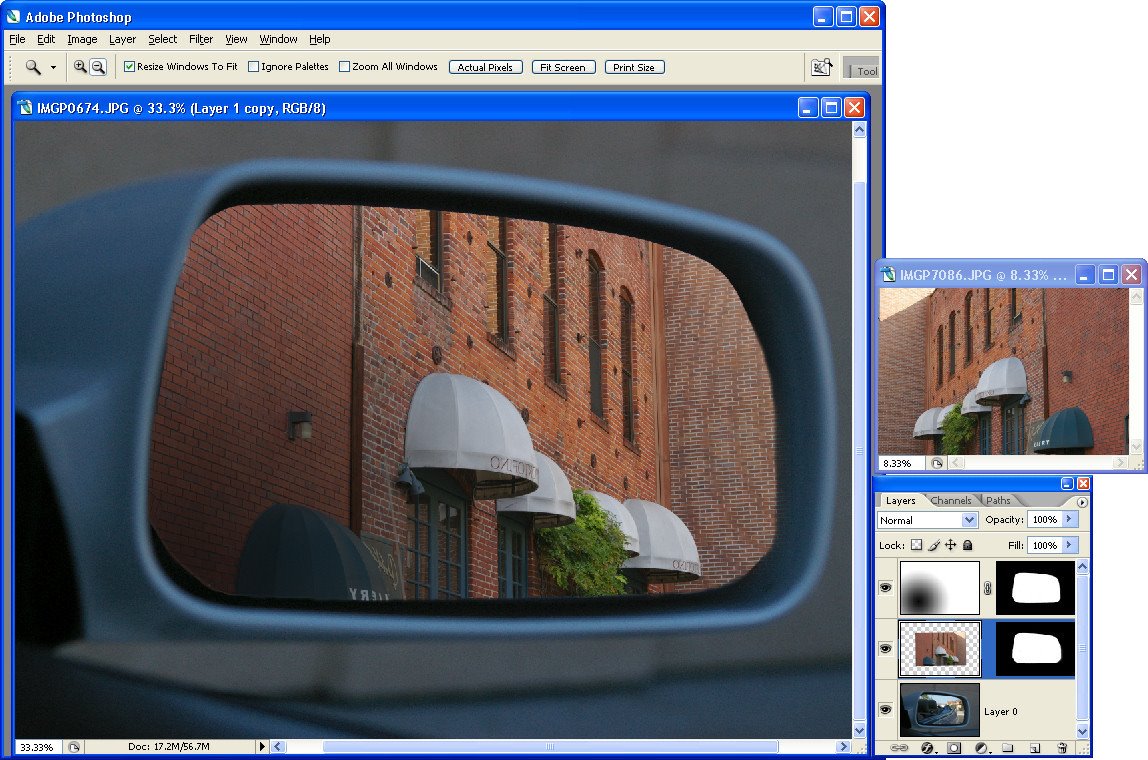
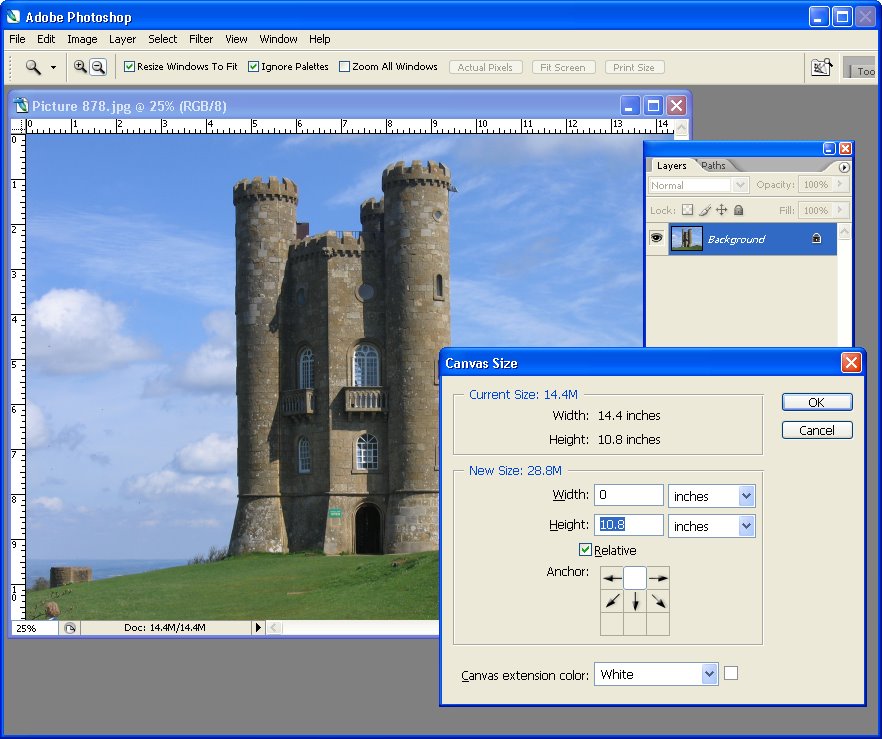
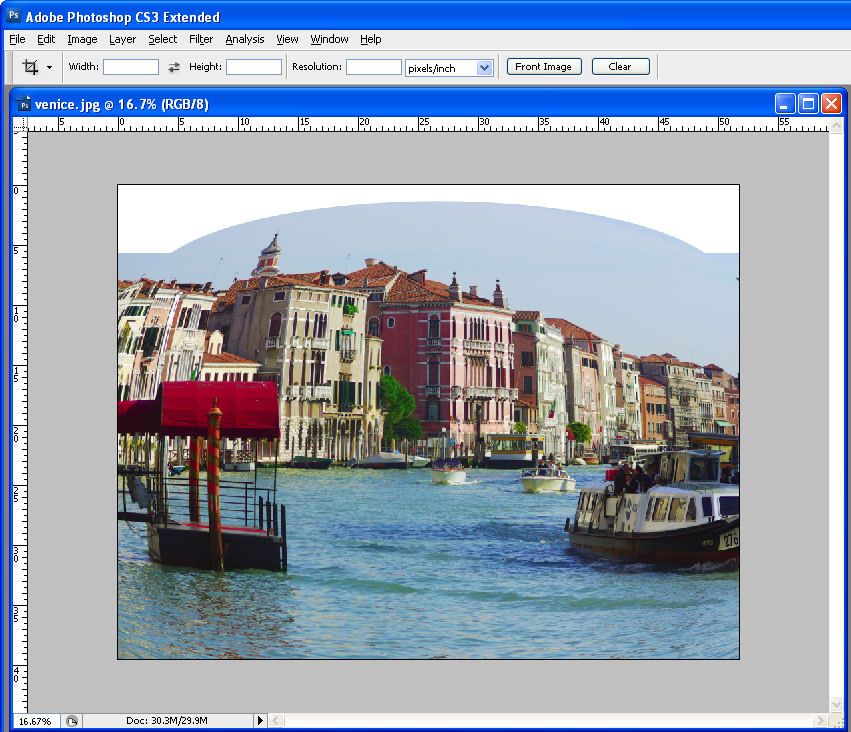
Add some extra canvas around the image by choosing Image > Canvas Size and click the middle of the nine Anchor points. Select the Relative checkbox and add a small amount of space around the image. For example, for an 7 x 5 inch image add 2 inches to the Width and Height. Click Ok to add the extra canvas, (see Fig 1).


Fig. 1. To make room around the photo so you can warp its edges, add some extra canvas.

Step 3
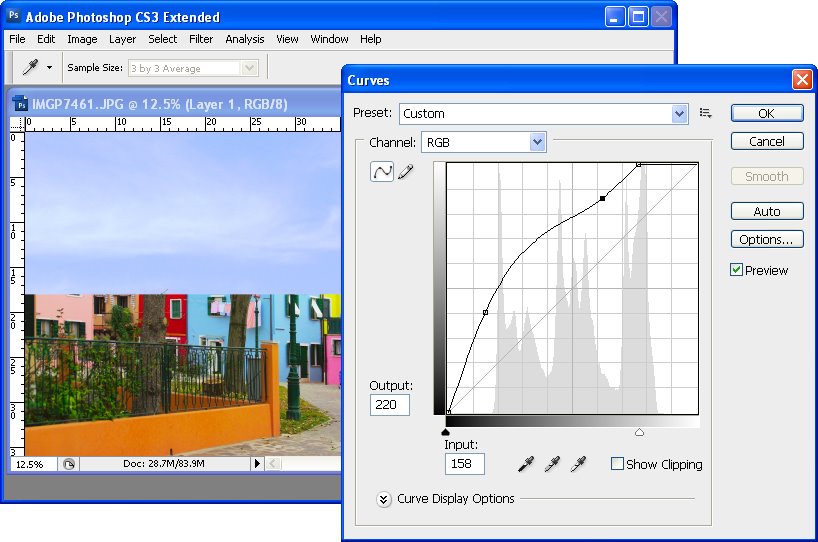
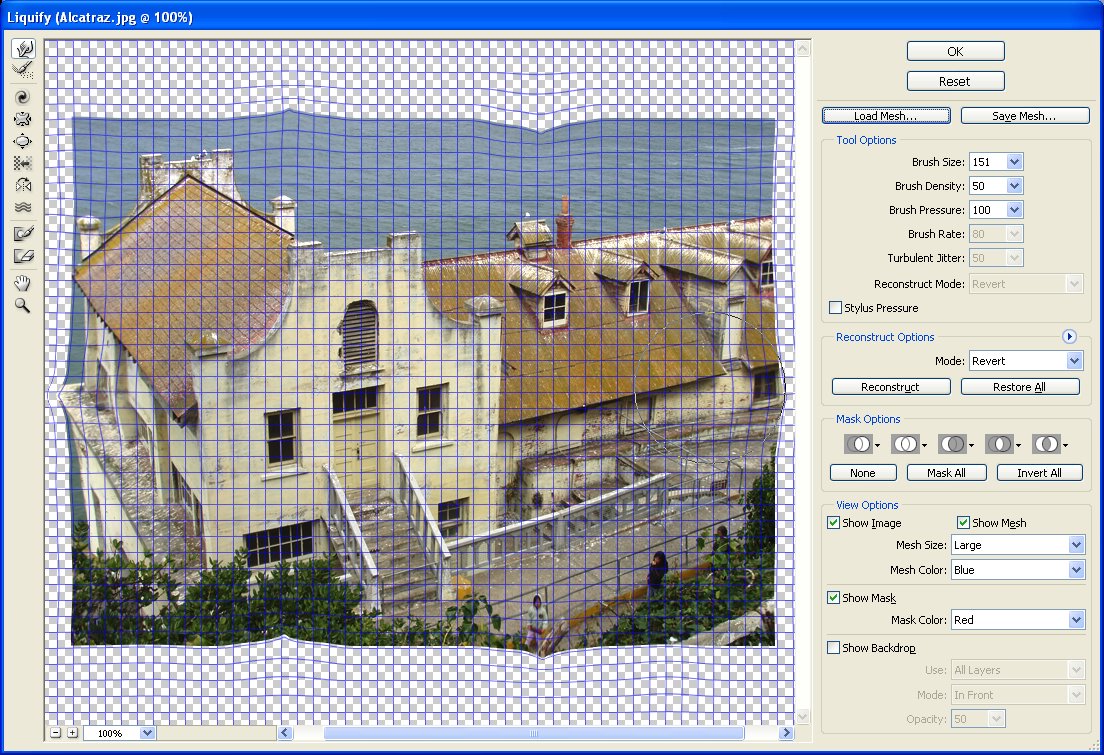
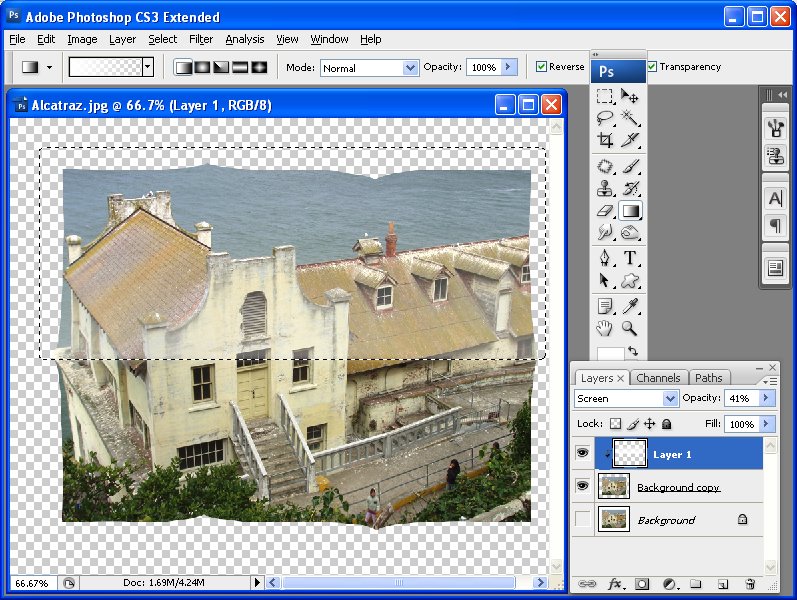
To alter the edges of the photo so they’re not square, you will use the Liquify filter. Choose Filter > Liquify and select the Forward Warp Tool in the top left of the screen. Select a large brush size and, working across the top edge of the image, start at a position one third of the way across and pull the edge gently up using the Forward Warp Tool. At the two-thirds mark pull down slightly.

Along the right edge, pull the image out at the half way position and do this again half way down the left edge, pulling outwards here too.

Across the bottom, push the edge up at a position one-third in from the left hand edge and push it down at a position two thirds in from the left edge.

Step 4
Reduce the brush size and push again on all these points to create a sharper distortion in the edge. Reduce the brush size again and continue to refine these points until they are smooth but obvious.
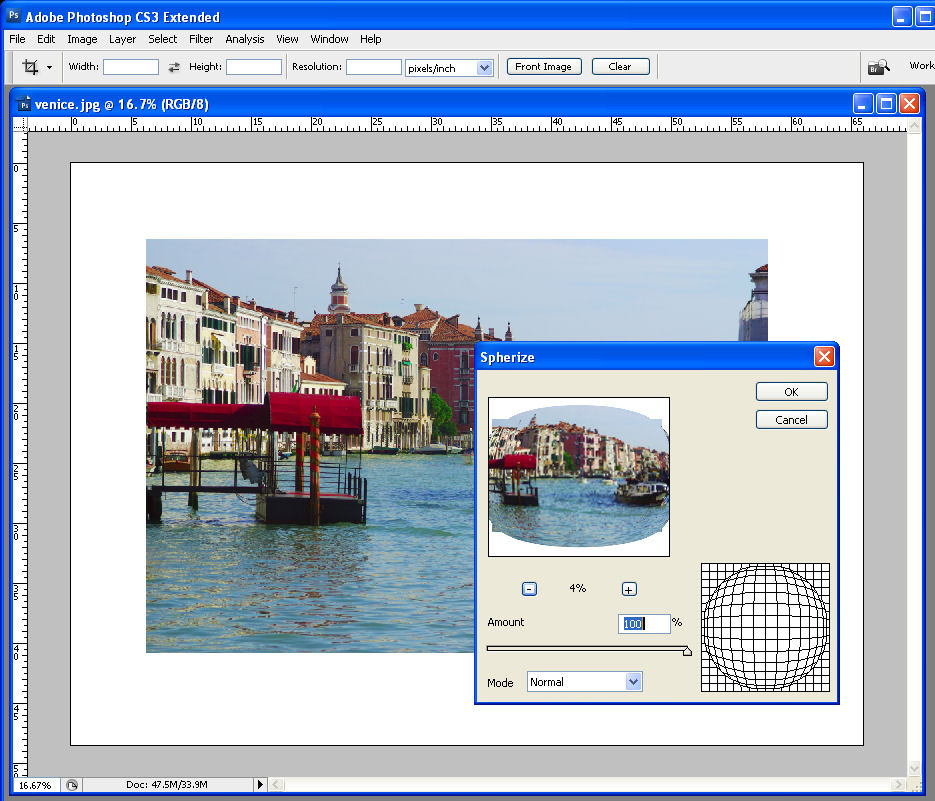
Step 5
Switch to a large brush size and push or pull on the corners of the image to get a very subtle change so the corners aren’t perfectly square, (see Fig 2). When you are done you can save the mesh so you can use it later on by clicking the Save Mesh button. Click Ok to return to editing in Photoshop.


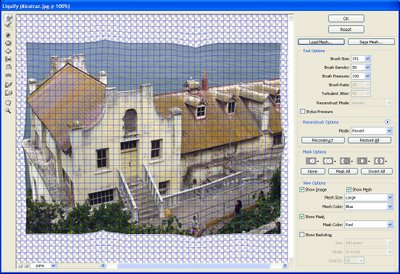
Fig. 2. The Liquify Filter lets you warp the edges of your image so it will look like it has been folded.

Add the shadows
Shading will help you achieve the effect of a photo that has been folded and then opened flat:

Step 6
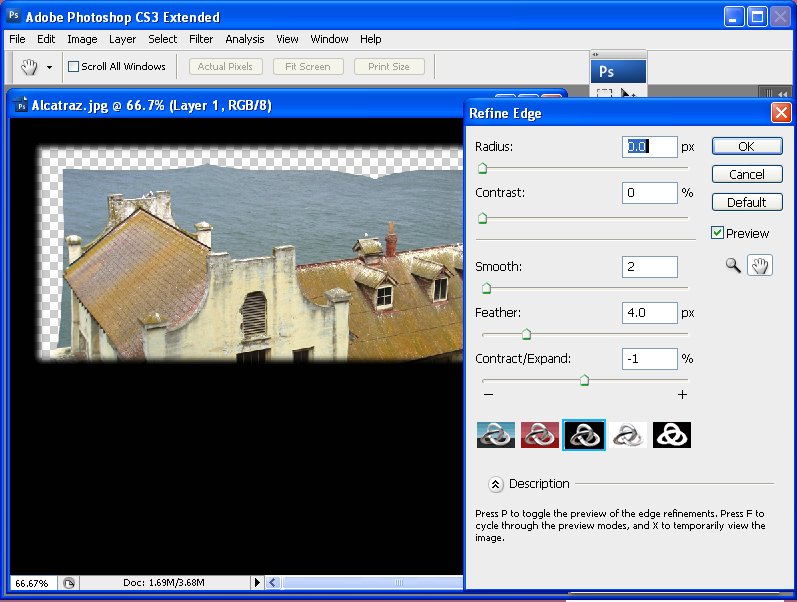
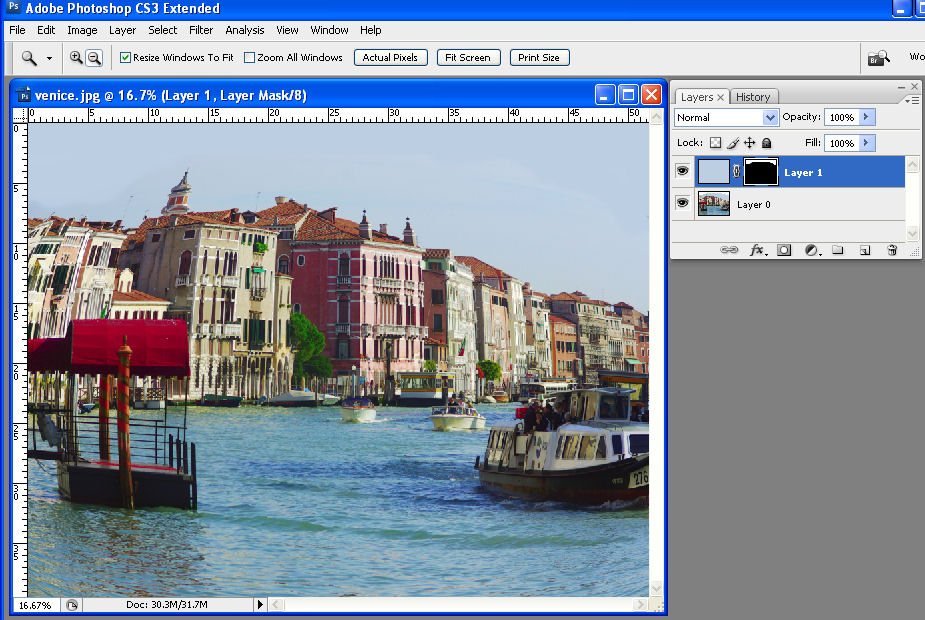
Use the Rectangular Marquee tool to select the top half of the image. Apply a feather to this selection by choosing Select > Refine Edge and adjust the Feather value to achieve a soft edge, (see Fig 3). Add a new layer by choosing Layer > New > Layer and click Ok.


Fig. 3. Use the Refine Edge tool in Photoshop CS3 to add a feather to the selection to soften it.

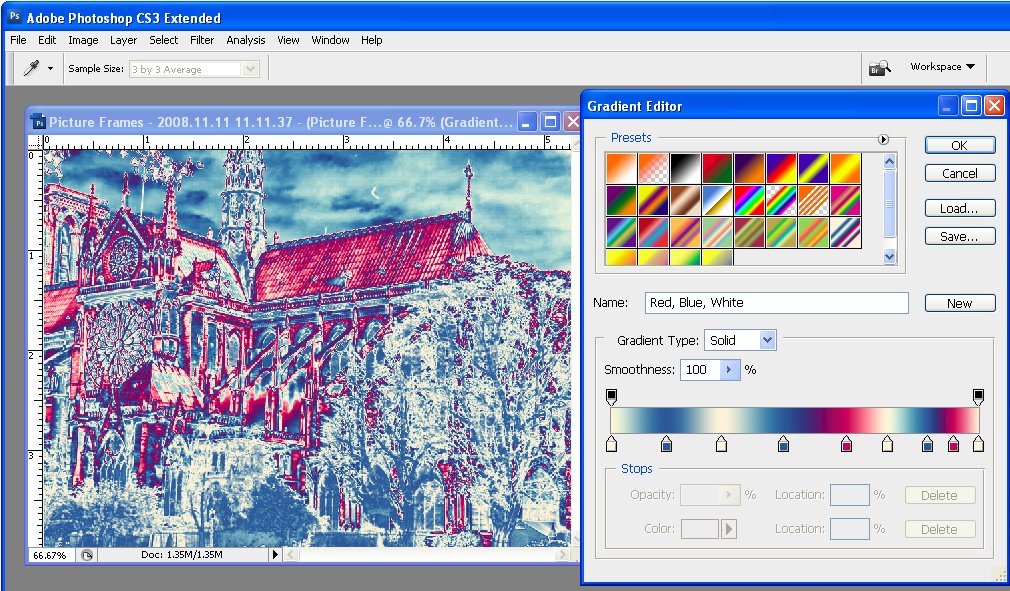
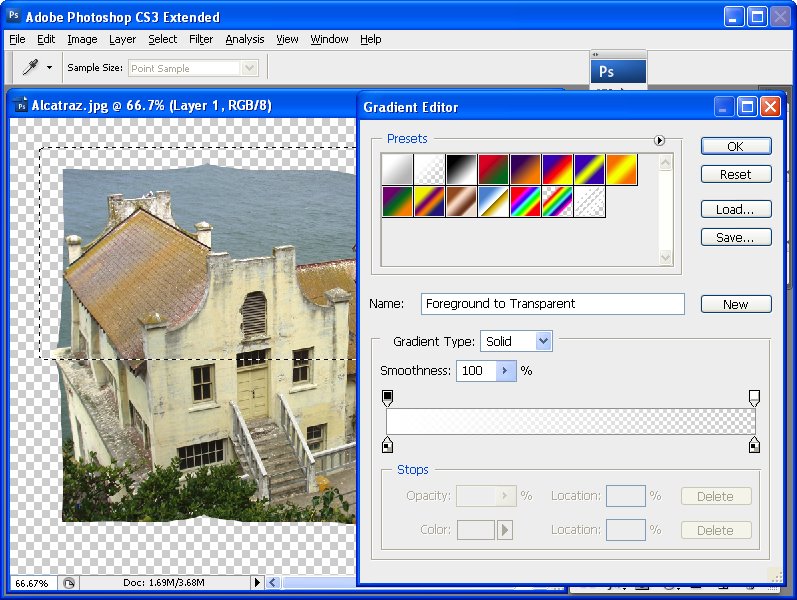
Set the foreground color to white and the background color to a mid-grey. Click the Gradient tool – it shares a toolbar position with the Paint Bucket Tool – and click in the gradient display on the tool options bar to open the Gradient Editor. Select the Foreground to Transparent gradient and click Ok, (see Fig 4).


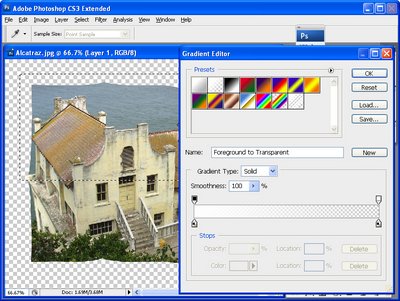
Fig. 4. The shadows and highlights are created using a Foreground to Transparent gradient.

Drag your mouse from the top of the image downwards and just over the edge of the selection you made. You will get a gradient which ranges from transparent to white and the white part will be across the middle of the image. The gradient fill is contained inside the selection.

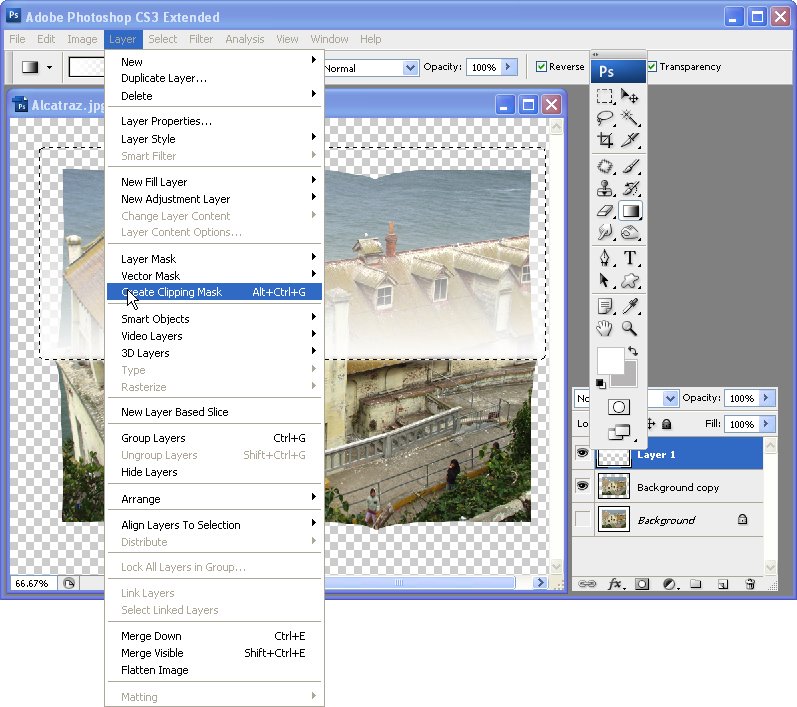
With this layer still selected, choose Layer > Create Clipping Mask so that the gradient fill constrained so it appears over the image and no longer outside it, (see Fig 5).


Fig. 5. To confine the gradient so it covers the image and not the area round it, use Layer > Create Clipping Mask.

Set the Blend Mode for the layer to Screen to lighten the image and adjust the Opacity so the effect is subtle – around 30-40% Opacity is a good value, (see Fig 6).


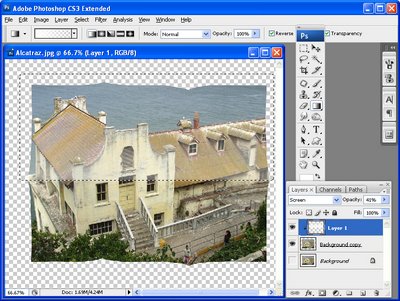
Fig. 6. Blend the highlights into the image using the Screen layer blend mode and a reduced layer opacity.

Step 7
Invert the selection by choosing Select > Invert. Add a new layer, switch the foreground and background colors by clicking the Switch Foreground and Background Colors icon and apply a light grey gradient fill to the bottom half of the image, this time drag the gradient from the bottom of the image upwards to finish slightly over the top of the selection marquee.

Again, create a clipping mask from this layer by choosing Layer > Create Clipping Mask. Set the blend mode for this layer to Multiply and reduce the opacity to get a slight darkening of the photo along the middle ‘fold’ line, (see Fig 7).


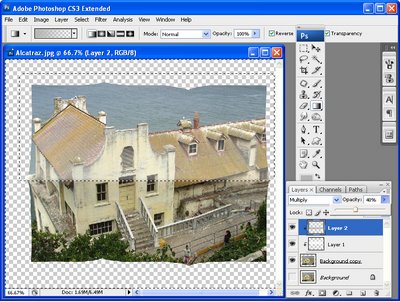
Fig. 7. Add the shadow to the bottom of the image using a grey gradient, this time using the Multiply blend mode.
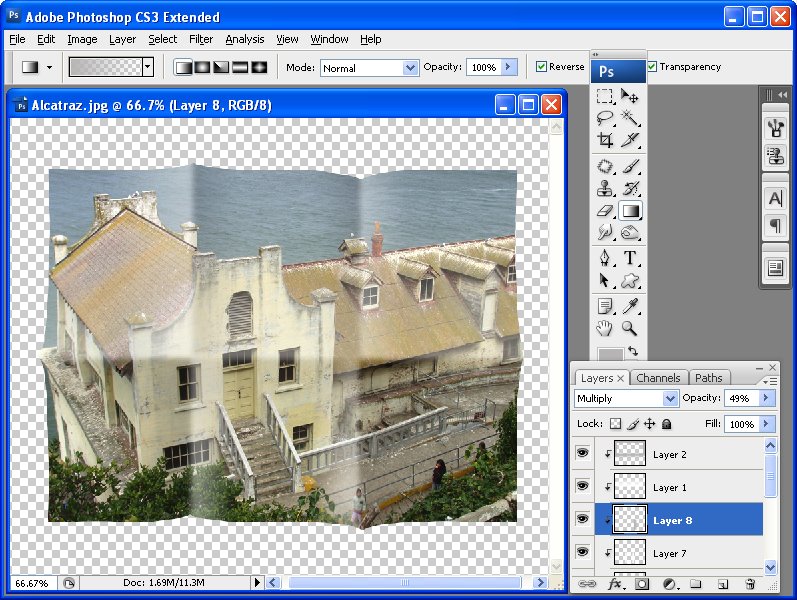
Step 8
To add the additional highlights you will need six layers, one for each of the six panels that would be created by folding a photo three times. Each panel will have either a white or grey gradient applied to it. When you apply a grey gradient, use the Multiply blend mode and when you apply a white gradient, use the Screen blend mode for the layer.

When creating each panel, create a new layer, make your selection using the Rectangular Marquee tool, feather the selection, apply the gradient, set the layer blend mode, adjust the layer opacity and create the layer as a Clipping mask.

The gradients should be applied as follows:
top left – apply a white gradient to the right hand side of the panel
top middle – apply a grey gradient to left and right sides of the panel
top right – apply a white gradient to the left side of the panel
bottom left – apply a grey gradient to the right hand side of the panel
bottom middle – apply white gradient to the left and right sides of the panel
bottom right – apply a grey gradient to the left side of the panel

You might recognize there is a pattern to how these gradient fills are applied.


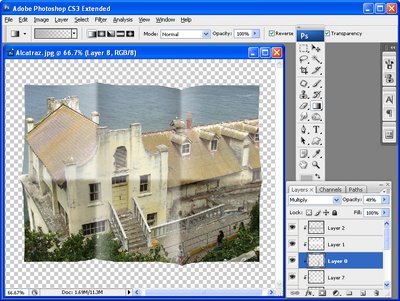
Fig. 8. Add shadows to all six of the panels that the folded photo shows.
Step 9
Click the Background layer and choose Layer, New, Layer. Fill this layer with white.

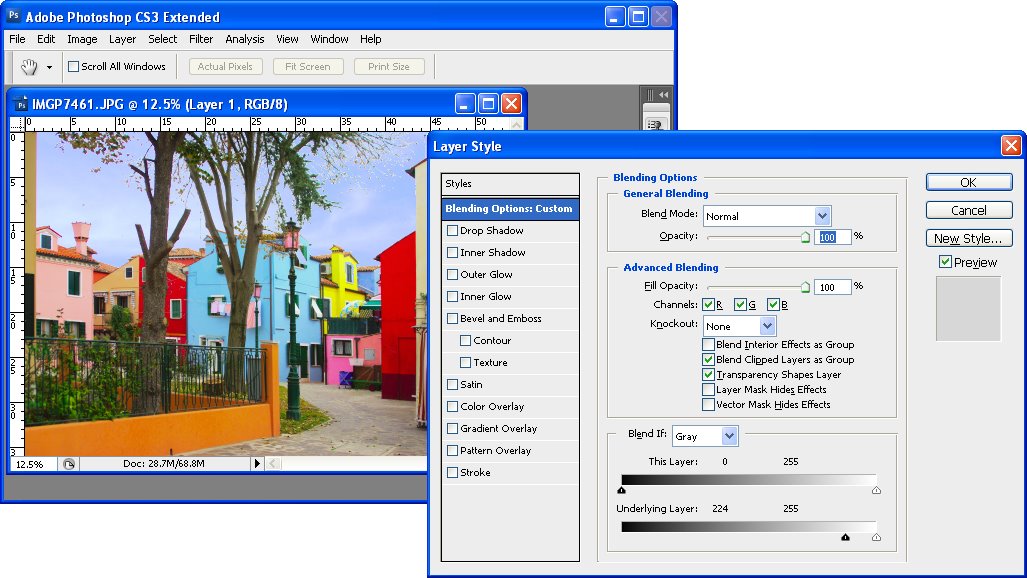
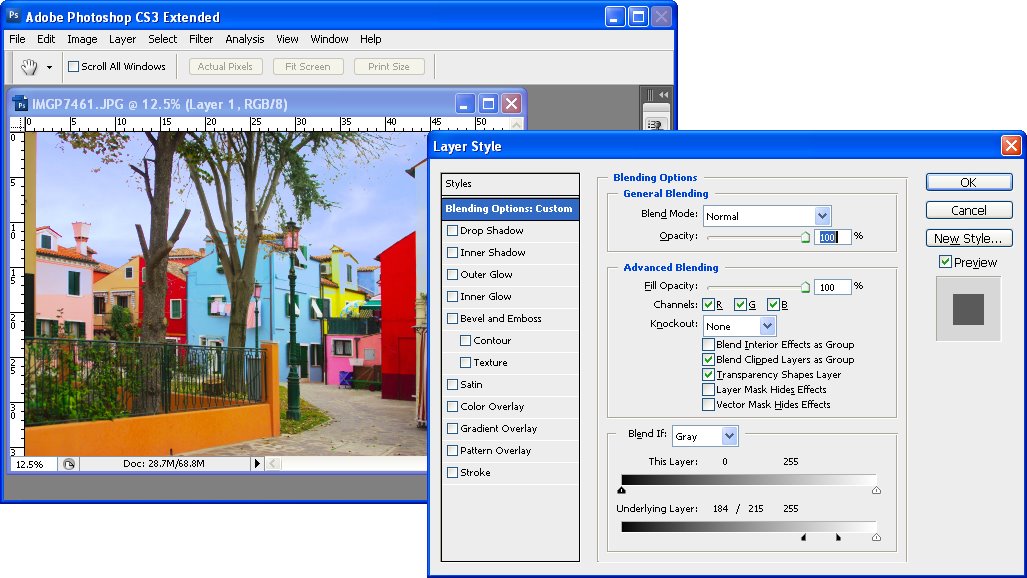
Click the Background Copy layer to select it and click the Layer Style icon at the foot of the Layer palette. Select Drop Shadow and add a drop shadow with the angle of the light at around 130 degrees. Click Ok when you’re done. Right click the Effects layer that contains the Drop Shadow and choose Create layer. This moves the Drop Shadow to its own layer.

Apply a second drop shadow to the Background Copy layer, this time make the shadow smaller, lighter and configure it so the light comes from the opposite direction.


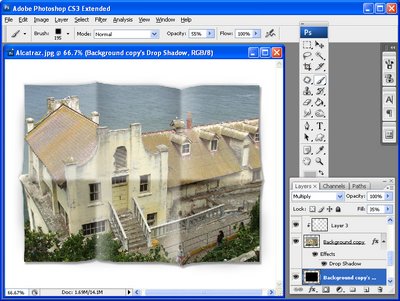
Fig. 9. Add two drop shadows using the Layer Style tool to make the paper look dimensional on the page.

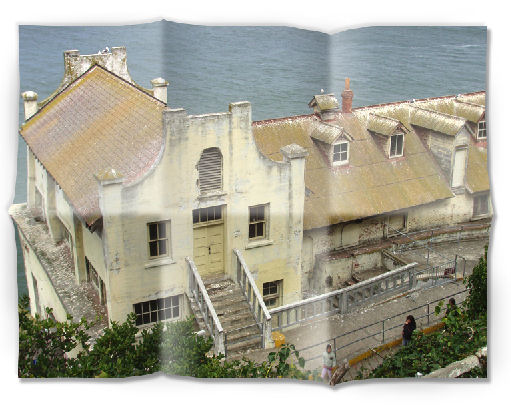
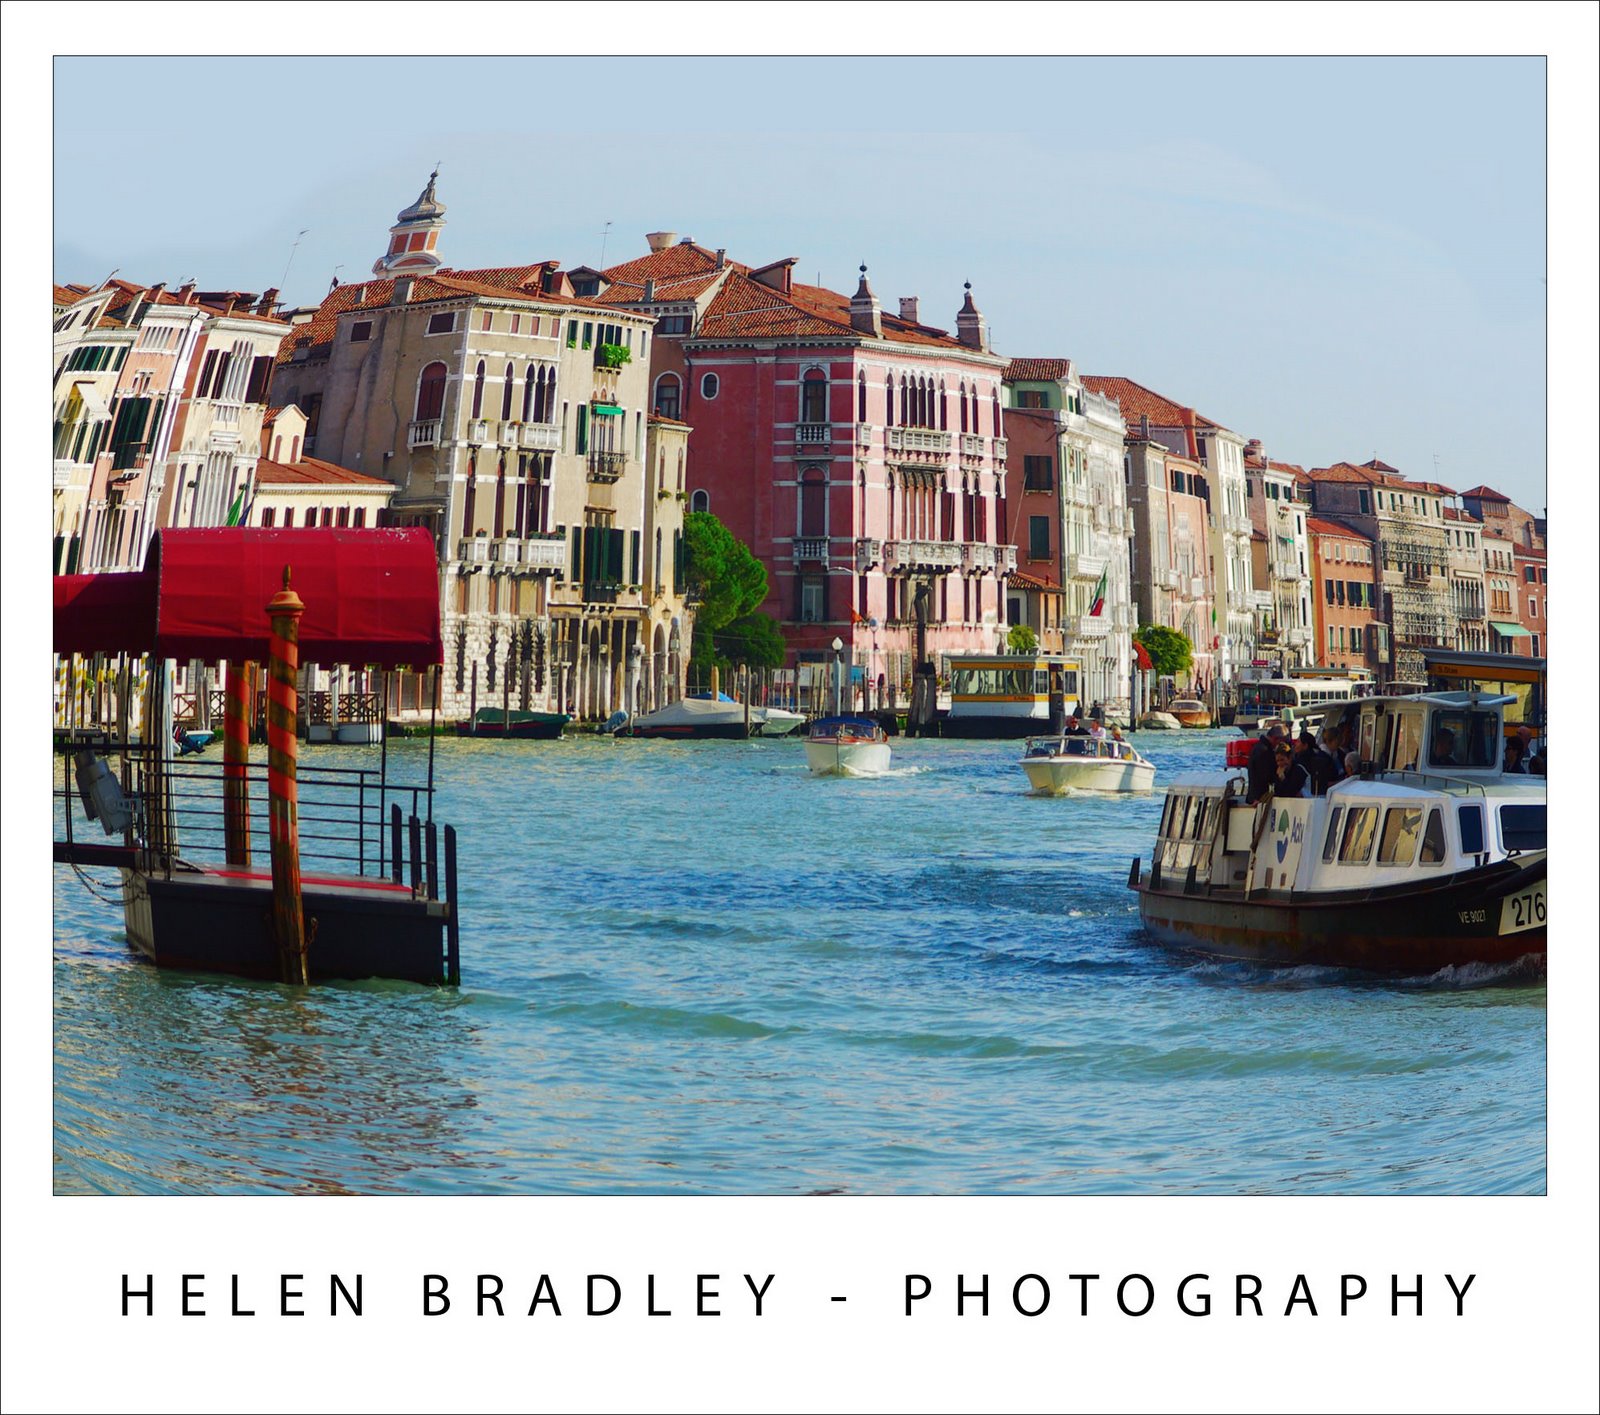
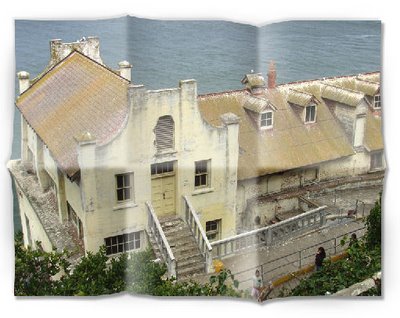
The final image looks like our photo has been folded in three and then opened out. This process can be applied to other creative folds. You can use it to create a photo that has been ‘folded’ more or less times than the three shown here, or one which has a bent corner or which is folded accordion style. A simple combination of lights and darks created using gradient fills will give you a realistic folded look.

Photo credit: Brenda Smith

Helen Bradley

Monday, March 30th, 2009

Create a Faux Fisheye image effect in Photoshop


A fisheye lens is a wide angle lens which captures a lot of detail both in front of you and to the side – often as much as a 180 degree radius. While other wide angle lenses capture rectangular photos, a fisheye captures images which are distorted and which bulge in the middle and curve in at the edges.

While there is no real replacement for capturing an image using a fish eye lens on your camera because the field of vision is hard to duplicate you can still create a realistic faux fisheye effect in Photoshop.


Open the image in Photoshop and enlarge the canvas. To do this, drag the edges of the window containing the image so you can see plenty of the grey space around the image and click the Crop tool. Drag over the entire image to select it and let go the mouse button. Now drag outwards on the crop rectangle handles to select an enlarged area all the way around the image. You want a good amount of extra canvas. When you have done this double click to add the extra area to the image. It doesn’t matter what colour this is as you’re going to discard it later.


Choose Filter > Distort > Spherize to display the Spherize dialog. Set the Mode to Normal and set the Size to 100 percent and click Ok. This distorts the image by blowing up the middle of it to give a typical fisheye type effect.


Click the Crop tool, drag over an area of the image to retain and double click to crop to this size.


If necessary, clone areas of sky or other elements to fill the photo frame. Here I cropped the image so it would be nice and tall and knowing there was a little bit of work required to fill the missing areas of the sky.

Alternately, for a circular result, drag a circular selection across the image, choose Select > Inverse and choose Edit > Crop to Selection. You will now have a photograph which looks like it was captured using a fisheye lens.

Before you shoot (if you can!)
If you know you want to create a faux fisheye effect with the images you are capturing, then plan ahead and capture a 2 row by 3 column grid of images from a stationary point using a tripod and the widest angle that your lens can shoot at – in other words, don’t zoom in at all. Overlap the images around 25% on the edges so you can assemble them into a panorama later on.

Back in Photoshop or your software, assemble the images into a panorama. You may need to do this in three steps first assembling each row into a panorama and then assembling the two rows into a single image. This will give you more image data than you would typically have and will make the final result more believable.

Helen Bradley