Find Lost Details Hidden in Shadows and Darker Parts of an Image
When you have an image that has details lost in the shadows or darker areas of the image, the Fill Light slider in Lightroom 3 or the Shadows slider in Lightroom 4 can be used to recover this detail.
Don’t use either of these as a tool for lightening an image or to lighten shadows if there is nothing interesting in the shadows. Use them instead when you want to get some interesting detail out of the shadows.
The result of using the Fill Light and sometimes using the Shadow tool is that some contrast in the image will be lost – so you nay need to increase Contrast as a result of using the Fill Light slider in Lightroom 3 or apply a tone curve adjustment in Lightroom 4.
Learn how to create and use the Lightroom Target Collection feature
Lighroom’s target collection feature makes it easy for you to add images to a collection. If you make a collection the target collection you can add an image to that collection by simply pressing the letter B on the keyboard. But, be warned, once it is added if you press B again you will remove the image from the target collection.
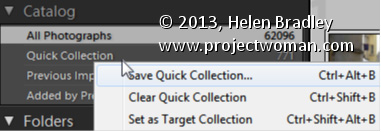
To make a Collection the Target Collection: right click it and choose Set as Target Collection.
Any Collection (except a Smart Collection) can be designated as the Target Collection but there can only be one Target Collection at the one time.
If you deselect the current Target Collection: by right clicking its name and disabling Set as Target Collection, then the Quick Collection becomes the Target Collection, by default.
Understand what the Quick Collection is and how to use it
The Quick Collection is a temporary collection in the Catalog area of the Library in Lightroom. You can use it to manage your images.
You can drag and drop images into the Quick collection and use it to store images temporarily.
The Quick Collection doesn’t lose its contents when you close and reopen Lightroom.
When you right click the Quick Collection you can choose Set as Target Collection, Clear Quick Collection or Save Quick Collection to save its contents as a regular Collection.
Undertand the Collections in the Catalog panel in Lightroom
Some collections are created and maintained by Lightroom. You will find these in the Catalog panel in the Library module.
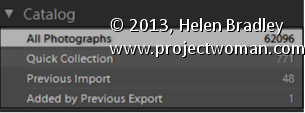
One of these, All Photographs, is a collection of all the photos in your Lightroom catalog. If you need to search all your images, click this before creating a search or filter.
The Previous Import Collection contains the images added to the catalog during the most recent import. As soon as new images are imported, the older images disappear from the Previous Import Collection.
Added by Previous Export is a collection of images you recently exported from Lightroom. When you did so, you selected the option to import the exported images back into Lightroom.
Quick Collection is a temporary collection that you can use to store images temporarily.
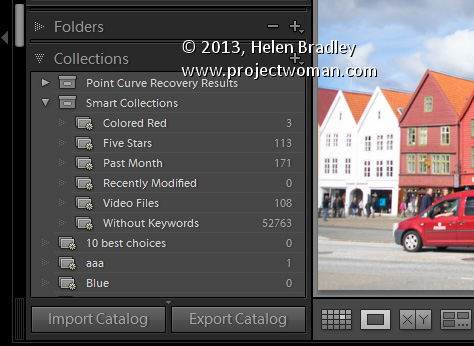
Understanding why you should use Collections in Lightroom
A Lightroom collection is different to a folder. A folder contains images but a Collection contains only pointers to those images, which exist somewhere on your disk. In Lightroom each image exists in just one folder but it might be in many different collections.
For this reason collections are a great way to organize your photos. For example, you can use collections to assemble images for printing or for creating a slideshow.
You can add images to a collection from one or many folders. So, collections are a great way to create a central location where you can view and work with a set of images that may be located in multiple folders on your disk. Because collections are merely pointers to your images they take up very little disk space.
If you have thousands of images to add a copyright watermark to, you can use Lightroom to do this very quickly. This video shows the workflow to use to import thousands of images into Lightroom and how to export them and create your own watermark to add to them. This is a minimalist workflow designed to process a lot of images very quickly.
Transcript:
Hello, I’m Helen Bradley. Welcome to this video tutorial. In this tutorial I’m going to show you how you can copyright in bulk the images as you export them from Lightroom. One of my blog readers recently contacted me and asked me how easy it would be to add watermarks to a series of images that they had. And so this video is for them and for anybody else who’s considering applying a watermark to a lot of images all at once. And my suggestion is, and she had something like two and a half to three and a half thousand images, is that Lightroom is the tool to use.
So I’m going to get started and I actually have a folder of images that I am going to import into Lightroom to show you exactly how it will work. So I’m going to click on Import and then I’m going to select the folder that contains the images that I want to import in. So this would be the folders that contain the two and a half thousand or so images that this particular reader has. So I’m just looking for my particular set of images. And I know they’re here. So all I’m going to do to start off with is just to select the folder of images. And it’s these Cornwall images that I’m going to import. Now I’m going to add them to Lightroom. And in this case because I want to do this very quickly because all I want to do is to add watermarks to them, I’m going to select Minimal as my previews because that’s going to render everything very, very quickly. And because I want lots of images I’m going to deselect Don’t import selected duplicates. So all I’m going to do at this stage is now to click Import and bring those all into Lightroom.
Now the images are coming into Lightroom and I can start getting ready as soon as they’re in to export them with their watermarks. Now some of these are portrait orientation and some of them a landscape. That may or may not be an issue. I’m going to select the first image and Shift click on the last so that we can export them. I’m going to Right click and choose Export and then Export again. And this takes me to the Export dialogue. So the first thing I need to do is to determine where I want to export them to. So I’m just going to put them into a folder in my My Documents folder. And I’m just going to create a brand new folder for them. But I’m going to select My Documents as the location, and I’m going to put in a subfolder called watermark. And then I will check if I want to rename my files. I don’t want to rename them. The idea of this is to get in and out as quickly as possible.
I can convert them if they were not JPGs and I could select the quality for them. Again 85 percent quality might be sufficient. If you’re that particular reader 100 percent quality might be your preferred quality. I can resize them or not. So if I want to leave them at the exact same size I just deselect everything.
What we’re most concerned about here is this Watermark option. So I’ve got it selected, and I’m going to click it, and I can choose Edit Watermarks. So this means that I can now create my own watermark. So I’m just going to delete what’s here. I’m going to press and hold the Alt key as I type out 0169 on the keyboard because that gives me the copyright symbol, and I’m going to type my copyright text. And I’m going to do two lines. And it’s Helen Bradley, projectwoman.com. And you can see it up here and it’s up there because that’s where I’ve got it positioned right
now. Here’s the anchor. If I wanted it down the bottom corner I could place it there. And then there’s an inset which is inset off that option.
So I could push it further down into the corner if I wanted to or not. It looks like it’s also centered right now. And no it isn’t. It’s right justified. So we could left justify it or center it if we wanted to. And we can also resize it either by dragging on its sides or we can drag it just to make it bigger if we wanted to. So I’m going to inset this a little bit horizontally and a little bit vertically. But you could see that we have a lot of power in where we place it.
Its opacity is 100 percent. And I always suggest that you do apply a shadow to your text because the shadow will help its readability if it’s over a lighter background. So I would normally put a very, very small shadow. And you can change the angle so that you can make the shadow come from whatever angle that you want it to come from. I prefer mine to come from about 30 to 45, something like that, so it’s coming in from this angle here. And if you’re happy with that that’s all you need to do. So you click Save. And we’re going to save this. And we’ll call it test watermark, you can call it whatever you want your watermark to be called, and I’ll click Create. And it’s now being selected as the watermark for my images.
I’m going to select to after export to show in Explorer. But literally at this point we could have two and a half or three and a half thousand images selected and they would all be ready for export. And all I do is click Export and now they’re going out. They’re exported out of Lightroom. And when they appear in that folder in My Documents, which we’re going to see in a minute, here it is now, they’re all going to have the watermark on them. So if I double click on this image we’re going to see that the watermark is in place.
So that’s how easy it would be to apply a watermark. If that were all you wanted to do and you had thousands of images to do it with, that’s all you need do to watermark your images. Bring them into Lightroom, don’t even bother rendering big previews, just use the minimal, select to export them, click and create your watermark and then just click Go and Lightroom will just go and do it all for you.
I’m Helen Bradley. Thank you for joining me for this video tutorial. Please if you have any questions feel free to pose them to me. I’m quite happy to make videos to answer questions. Look out for more of my videos on this YouTube channel. And follow me at projectwoman.com where you’ll find more tips, tricks and tutorials for Lightroom, Photoshop, Illustrator and a whole lot more.
Save Time when importing photos by Creating an Import Preset
If you use the same options every time you import your images into Lightroom, you can create an Import Preset to speed up this task.
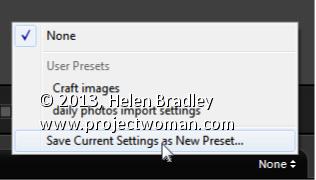
Start by selecting Import to open the Import dialog and go ahead and select those options you generally want to use and then locate the Import Preset option at the foot of the Import dialog. Click the drop-down list and choose Save Current Settings as New Preset. Type a name for the preset and save it.
In future you can select this preset when you are importing images. This gives you, at the very least, a starting point for your import as it sets up the import dialog to match the settings you saved. If you wish, you can make changes to the settings without altering the preset, allowing you to use it anytime.
You can create multiple import presets for different situations so you can select the most appropriate one to use each time you import photos.
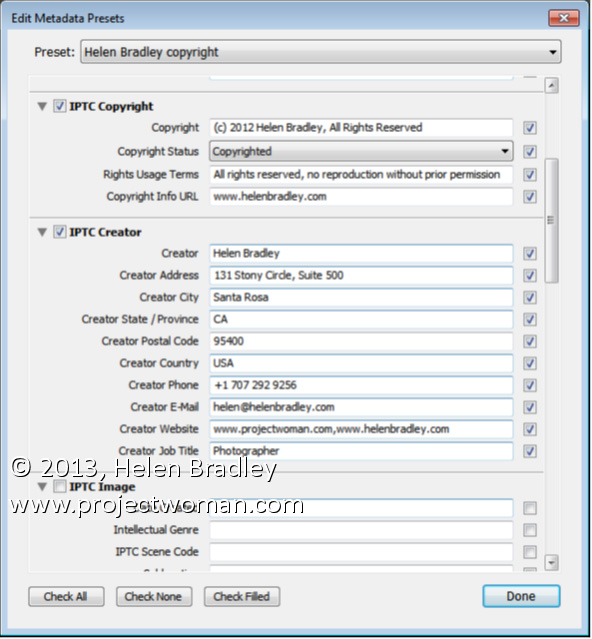
Protect your images by adding Copyright metadata to them as you import them
Using the Metadata tool in the Apply During Import panel you can add copyright data to your images as you import them. If you write this data automatically into every image you will ensure that your images always include your contact details and copyright information.
To create a preset to use, from the Metadata drop-down list choose New and create a copyright preset that has, at the minimum IPTC Copyright and IPTC Creator data entered. Type a name for it and save it and select it in the Metadata list.
As this data will be added to all images only provide data that is applicable to every image such as your copyright information, copyright status, rights, usage terms and details about you and how you can be contacted. Leave out image specific data such as what the image contains and its location for example as this will be different for most images.
Avoid duplicate images in Lightroom by importing Only New Images
There is little that is more annoying than having duplicate images in your Lightroom catalog. Duplicate images not only take up room on your disk but they also bloat your catalog and can cause confusion when you are working with your images.
To ensure that you don’t import images that are already in your catalog, enable the Don’t Import Suspected Duplicates checkbox in the Import dialog. With that setting enabled you will no longer be able to select to import images that are already in the catalog. So any images that you can select to import aren’t duplicates so it is safe to import them.
This feature is particularly useful when you only want to import images from a camera card that you haven’t previously imported into the catalog.
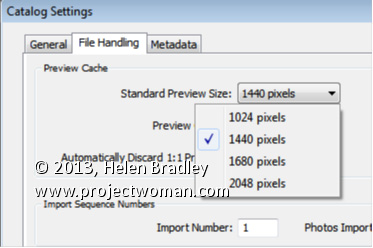
Set the size of your Standard previews to match your screen size.
When you choose to render Standard previews you can choose how large the previews will be. You should do this because setting the size to match your screen size maintains a good balance between disk space the previews take up, the time they take to render, and general usability.
To configure the image preview size for Standard size previews, choose Edit > Catalog Settings (or Lightroom > Catalog Settings on the Mac) and select File Handling.
From the Standard Preview Size drop-down list, you can choose from one of four sizes; 1024, 1440, 1680 and 2048. Choose the size that matches the size of your monitor or which is a little smaller.
This setting will be applied to previews that you create on Import or which you create from inside the Library module itself.